Personnel Actions
Welcome to New World ERP Personnel Actions. Personnel Actions automates the activities required to initiate, approve and finalize changes to an employee's personal or work information. This topic covers the setup and processing aspects of Human Resources Personnel Actions.
It is divided into two sections:
The System Administrator will focus on the setup components necessary to create new employees and make changes to existing through the use of Personnel Actions. This will include detailed information on master files that must be set up such as roles, approval manager, and personnel action codes and forms. Also included are the security settings which will be utilized to enable workflow and tailor user options as needed.
The End User will describe the steps and workflow of how to maintain and update employee records through the use of Personnel Actions. It will demonstrate the proper sequence of creating a personnel action through to posting the record to an employee record in Workforce.
System Administrator
Roles
The Role(s) to which a user is assigned controls what a user can process and what the user can view during Personnel Action Processing. To create a new role, navigate to Maintenance>Logos Suite>Security>Roles and click the New button on the bottom of the screen:
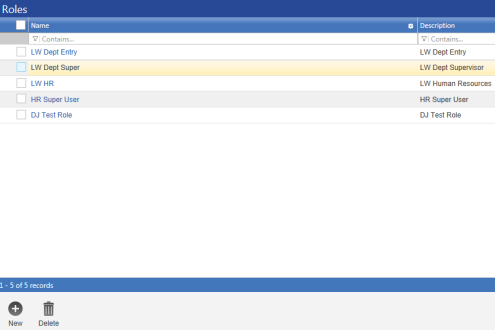
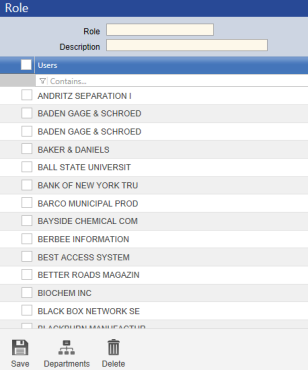
Two fields, Role and Description, appear along with a list of all active Users. Complete the Role field with a code and the Description field with the description of the role. Assign at least one User to the Role by checking the box in front of the user(s). Click Save at the bottom of the page.
Note: Users can be assigned to multiple roles.
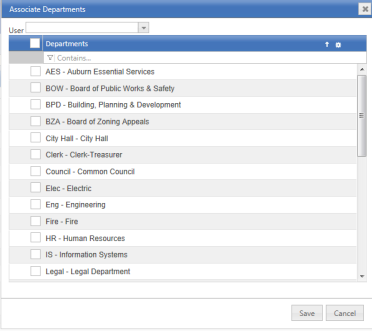
Departments must then be associated with the users assigned to the newly created Role. Click the Departments button on the bottom of the page. A dropdown field appears with a list of all of the users assigned to the newly created role. Select a user and check the box in front of each department for which the user will have access to within this role. To select all departments, click in the box on the blue header line next to the word Departments. Repeat these steps for each user within the role. Departments must be added to users individually.
Approval Manager
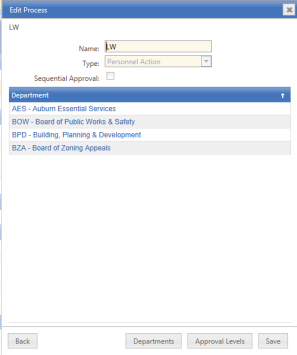
Approval Manager is the location for creating the processes that will allow users to add their approval during Personnel Actions. To create a new process in Approval Manager, navigate to Maintenance>Logos Suite>Approval Manager and click New at the bottom of the page. The following screen will appear.
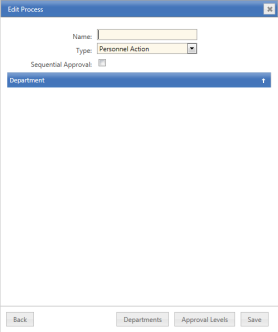
NameA required field. Enter a name that will clearly identify the process being created
TypeA required field. Select Personnel Action from the dropdown menu if it is not already defaulted.
Sequential Allows the approval process to take place in
Approval Sequential order from lowest to highest. If used, a user with the highest level of approval would not be able to approve a Personnel Action until all lower levels of the defined process had been approved. Check the box to use Sequential Approvals.
Click Save. Then click on the Departments button. This will open a list of the Departments available to be added to the newly created process.
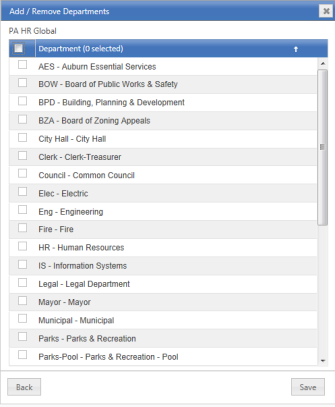
To select the departments associated with the process, check the box in front of the department name. To select all departments, click the checkbox located in blue next to the word Department. Click Save. Then click Back.
The page will refresh to the Edit Process screen, but now the departments selected will be shown in list form as well. Click Approval Levels to begin adding the levels of approval that will be needed to complete a personnel action. A new pop up will appear titled Manage Approval Levels. Click Add.
For each level of approval created, supply a Name and the number of Required Approvals. Click Save. The page will refresh and return to the Manage Approval Levels. Repeat the process for each level of approval needed in this process.
Once all levels have been created, return to the Manage Approval Levels and the ability to rearrange the order of the approvals by clicking and dragging the name of the approval is available. Click Save after making any changes to the order of levels.
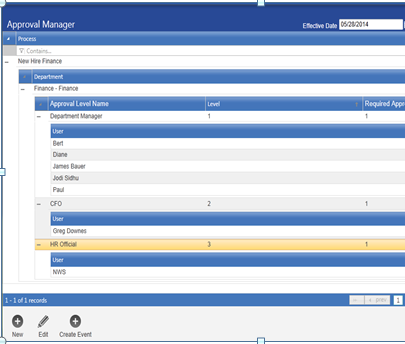
The next step in Approval Manager is to associate users with the levels that were just created. After completing the creation of Levels, click the Back button on the bottom of the page to return to the Edit Process page.
To associate the appropriate users, click on the name of the Department. The Manage Approvals Levels screen will appear as associated with the department selected. Click on a level name. The level will open with a list of users available to be associated. To select the users associated with the level, check the box in front of the user name. Click Save. The screen will refresh to the Manage Approvals Levels screen. Click on the next level for which users need to be associated and repeat until all levels have users associated with them.
Once Approval Manager has been completed, the list screen can be expanded by clicking on the plus sign in front of each Process, Department and Approval to show the detail of each section.
A process in Approval Manager can be edited by highlighting the Process, a Department within the process or a Level under the process and clicking the Edit button on the bottom of the page. However, once the process has been used to complete a Personnel Action, changes must be made using Create Event.
To create an event, highlight the Process for which a change needs to be made and click on Create Event at the bottom of the page. Enter the effective date of the change. The page will refresh and will return to the list of processes. At the top of the page, select the effective date of the event just created. Highlight the process to be changed and click Edit. The ability to make changes to the process will be the same steps as when creating a new one.
Personnel Action Forms
Personnel Action Form Configuration allows users to predefine the forms that will be generated during a personnel action. To configure a new form, navigate to Maintenance>Human Resources>Personnel Actions>Forms.
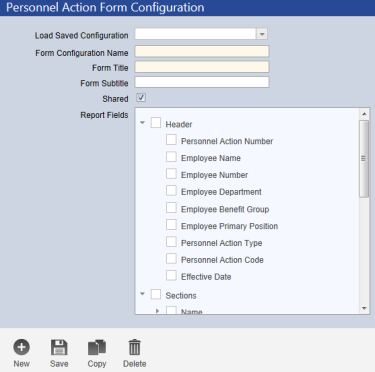
A blank configuration screen will appear for the creation of a new form:
Load Saved Configuration drop-down will show a list of any previously configured forms.
Form Configuration Name is a mandatory field. Enter a name that will clearly identify the form being created.
Form Title is a mandatory field. Title the form as it is to be printed.
Form Subtitle is not mandatory. Subtitle will print on the form if this field is completed.
Shared checkbox defaults checked to allow other users access to the configuration of the form. Uncheck the box if this form configuration should not be shared.
Report Fields define what information will appear on the form that is generated by a personnel action. Select each of the items to be printed on the form. All items within a section can be selected at one time by checking the box in front of the section. Click Save.
Note: The Form Configuration lists all the available sections/fields in Personnel Actions; however, only those sections as defined in the Personnel Action Code under the Available/Edit Sections will be displayed on the form.
Personnel Action Codes
Codes identify which Roles, Approval Process, Forms and Sections will be used during Personnel Actions. To create a new code, navigate to Maintenance>Human Resources>Personnel Actions>Codes. Click New at the bottom of the screen.
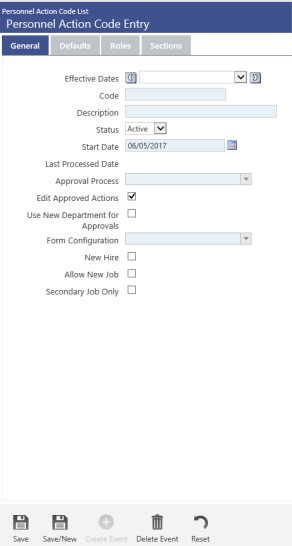
General
Effective Dates will automatically populate once the record is saved.
Code is a required field. Enter an identifying code.
Description is a required field. Enter the description of the code.
Status allows the user to inactivate a code that has previously been used. For a new code, the status should remain Active.
Start Date is the first date the code can be used in Personnel Actions.
Approval Process is a required entry selected from the drop-down.
Select Edit Approved Actions to let users edit personnel action records until the posting process. Deselect this check box to disallow edits once an approval has occurred.
Form Configuration is a required entry selected from the drop-down.
The New Hire checkbox is selected if the Code will be specific to the New Hire Process.
The Allow New Job checkbox is selected so that the New button will be available on the Entry page for adding a secondary Job. This is primarily an additional job if a change to an existing job was also occurring for the same Personnel Action.
The Secondary Job Only checkbox, if selected, will only allow a user to create a Secondary Job. This selection does not bring in any of the employee’s existing positions (primary or other).
Defaults
The Status, Status Event and Event Reason fields are not required. Selections from these drop-downs are used as defaults for the Personnel Action.
Roles
Roles determine what departments/users are associated with the Personnel Action. Select Roles by moving them from the left to the right. Multiple Roles can be selected, but at least one is required.
Sections
Selections made in the Personnel Action Sections determine what sections can be viewed or edited during the Personnel Action. To select a section for view only, move the section from the left to the middle. Placing sections in View is optional. To select a section for editing during the personnel action, first move the section to the middle and then all the way to the right. At least one section must be moved to Edit.
For New Hire Personnel Actions, all sections are required.
For Job Change Personnel Actions, all job sections are required.
Note: Unless a section is selected in either View or Edit, the section will not appear on the Personnel Action Form even if the form is configured to show the section.
Security
User Security is setup in the Permissions screens accessed Maintenance > Security> User Security / Security Template. The template(s) can then be added to each appropriate user. In the Permissions interface, there are four Permission Types:
- Company Applications
- Non-Company Applications
- Company Documents and Notes
- Non-Company Documents and Notes
Feature Groups are defined permission groups pre-designed for new world ERP Modules. Personnel Actions is one of the Feature Groups. After selecting the Permission Type and the Feature Group the granter can then assign the follow security:
AddAllows a user to add an item
Change Allows a user to change an existing item
DeleteAllows a user to delete an existing item. The delete
function is limited to certain system restrictions.
View/UseAllows the user to view and use existing items.
PrintAllows the user to print the items
The Check All Button at the bottom of the screen selects all filtered permissions.
Permission Type – Company Applications
Feature Group – Personnel Actions
|
App |
Component |
Description |
All |
Add |
Change |
Delete |
View/Use |
|
|
|---|---|---|---|---|---|---|---|---|---|
|
HR |
HR Personnel Action |
Ability to create, change and/or view Personnel Actions. |
X |
X |
X |
X |
X |
X |
|
|
HR |
HR Personnel Action Post |
Ability to post a Personnel Action. |
X |
|
X |
|
|
|
|
|
HR |
HR Personnel Action Validate |
Ability to validate a Personnel Action. |
X |
|
X |
|
|
|
|
|
HR |
Personnel Action Code Maintenance |
Ability to create and maintain Personnel Action Codes. |
X |
X |
X |
X |
X |
X |
|
Permission Type – Company Documents and Notes
Feature Group – Personnel Actions
|
App |
Component |
Description |
All |
Add |
Change |
Delete |
View/Use |
|
|
|---|---|---|---|---|---|---|---|---|---|
|
HR |
Personnel Actions Documents |
Ability to create, change and/or view Personnel Actions Documents. |
X |
X |
X |
X |
X |
X |
|
|
HR |
Personnel Actions Employee Notes |
Ability to create, change and/or view Personnel Actions Employee Notes. |
X |
X |
X |
X |
X |
X |
|
|
HR |
Personnel Actions HR Internal Notes |
Ability to create, change and/or view Personnel Actions HR Internal Notes. |
X |
X |
X |
X |
X |
X |
|
Personal Actions Documents also has columns to give the user the ability to Check Out, Finalize or set Reminders.
For those end-users that will be maintaining Roles and Approval Manager, two additional permissions will need to be granted. To find them, click on the Search button in the top right-hand corner of the permissions page. Leave Permission Type set to Company Applications and in Component Name type the word Roles. Select the appropriate columns to allow the user to Add, Change, Delete and/or View/Use.
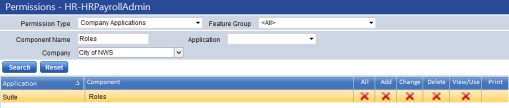
Then change the Component Name to Approval Manager and make the appropriate selections. Save.

During the approval process of Personnel Actions, the following email notifications will be generated if user security is properly completed:
Approval Request Email --
You have been asked to respond to an approval request. Please click the link to respond. http://logos90hf/Logos/HumanResources/PersonnelActions/PersonnelActionsApproval.aspx?ID={0}
Return Request Email --
Your approval request has been returned for more information.
Approver comment: I need you to fill in the employee information.
Click the link for more information http://logos90hf/Logos/HumanResources/PersonnelActions/PersonnelActionsApproval.aspx?ID=107
Resubmitted after Return Email --
An approval request has been resubmitted with additional information. Please click the link to respond. http://logos90hf/Logos/HumanResources/PersonnelActions/PersonnelActionsApproval.aspx?ID={0}
Rejected
Your approval request has been rejected.
Approver comment: I rejected this as this user failed the drug screening.
Click the link for more information http://logos90hf/Logos/HumanResources/PersonnelActions/PersonnelActionsApproval.aspx?ID=106
To complete user security, navigate to Maintenance > Logos Suite > Security> Users and complete the email address field for each user (click the Login ID). If all users in the email chain are not set up, the process will stop when it gets to the first user with an unspecified email.
End User
To create a new Personnel Action record, navigate to Human Resources>Personnel Actions and click New at the bottom of the page.
New Hires
After clicking New on the Personnel Actions page, a pop-up screen will appear with three fields: Effective Date, Personnel Action Code and Employee. Enter the effective date of the personnel action and select a Personal Action Code for a new hire from the drop-down. The field for employee will be replaced with a field for Department, and a Create Employee From Hired Applicant check box will be added to the pop-up:
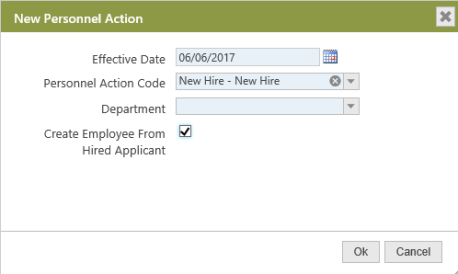
Select the department where the new hire will reside. If you are importing a hired applicant from the new world ERP Applicant Tracking System or a third-party applicant interface, select Create Employee From Hire Applicant. (For more information on the import process, see “New Personnel Action” in the new world ERP online help.)
Click OK.
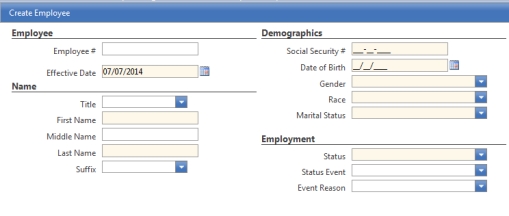
Employee # is not required if the Auto Assigned Number for Employee is setup in Human Resources Company Settings. Complete the field if the number is to be manually assigned.
Note: If a duplicate employee number was entered manually, the Personnel Action Error Listing will display an error. There is no way to change the employee number at this point and the record will need to be cancelled.
Effective Date defaults with the date entered on the first page of the Personnel Action.
Required fields on this page are: First Name, Last Name, Social Security #, Date of Birth, Gender, Race, Marital Status and Employment Status. Complete appropriately. Click OK.
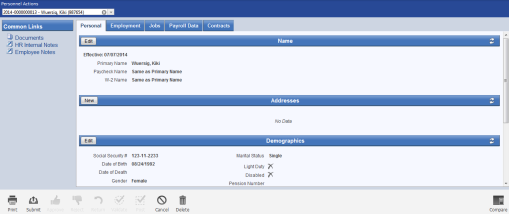
Each tab of the Personnel Action has sections that can be accessed with either the New or Edit Functions. When processing a New Hire Personnel Action, two pieces of information, Address and Job, must be completed in order to validate the record.
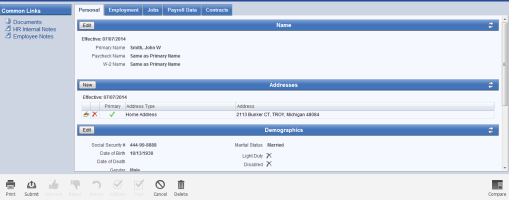
Address is located on the Personal tab. Click New on the Addresses line. The first address added must have the Primary Address box checked before clicking on Save or Save/New. Multiple addresses can be added as long as the validation set has been completed for multiple Address Types.
The Jobs tab contains the information needed to pay an employee. After navigating to this tab, click on the edit icon. Complete all necessary fields and click Save. (For detailed information on these fields, see the Workforce Administration manual or search the online help using the word Jobs.) To complete this Personnel Action, continue to Common Links.
Changes
After clicking New on the Personnel Actions page, a pop-up screen will appear with three fields: Effective Date, Personnel Action Code and Employee. Enter the effective date of the personnel action, select a Personnel Action Code and select the employee for which the change is needed. If the Personal Action Code selected includes the option of changing the Job, an additional field, Position will appear. From the dropdown select only the position(s) that will be affected during this Personnel Action. If multiple positions are selected, and only one position has an actual change, when the record is posted to Workforce, all positions selected will show a new event created.
Depending on what sections were defined during the creation of the Personnel Action Code, not all tabs may appear. Those sections that were defined can be changed or added to with the use of the Edit or New buttons. Edit will change existing information. New will create additional information such as a second address or a secondary job.
Note: If the Employment tab is available for the Personnel Action, the Employment Status must be completed even if there is no change from the current status.
Common Links
With the correct Security, users will have the ability to add Documents, HR Internal Notes and/or Employee Notes to a Personnel Record. These items remain with the Personal Action Record and are not posted to the Workforce Record. Employee Notes are the only items that can be printed on Personnel Action Forms. To open a link, click on the desired item. A pop-up will appear from which you can add, edit or view a link.
Workflow
After creating a Personnel Action record, the workflow steps needed to complete the Personnel Action are as follows: Submit, Approve, Validate and Post.
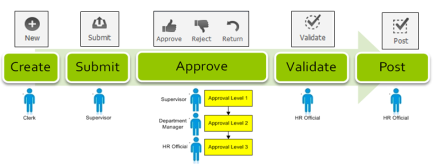
Once changes are completed for the Personal Action, the action needs to be submitted, either by the user completing the changes or by a supervisor. This will move the process to the next step, Approvals. Approvals are either non-sequential or sequential as defined in Approval Manager.
Non-Sequential Approval Process
|
Field Name |
Field Description |
|---|---|
|
Approve |
|
|
Return |
|
|
Reject |
|
Sequential Approval Process
|
Field Name |
Field Description |
|---|---|
|
Approve |
|
|
Return |
|
|
Reject |
|
If the final Approver wishes to Validate immediately after adding approval, the page will need to be refreshed in order for the Validate button to become available. After clicking Validate, a pop-up will appear stating the status of the validation, whether valid or invalid. If invalid, a report will also pop-up behind the Logos screen listing the reason(s) for the error(s). To correct the error(s), return to the Personnel Action record and edit the appropriate section.
Note: The corrections can be made by any one of the approvers.
The final step to move the Personnel Action record to Workforce is to post. In the open Personnel Action, click Post at the bottom of the screen. A pop-up will tell you the action is posted, the record will be removed from the active Personnel Action list and change(s) are now recorded in Workforce.
Additonal Icons
Three icons, Print, Cancel and Delete appear both on the Active Personnel Actions list page and on the opened Personnel Action.
- Print will print the Personnel Action Form that is associated with the type of Personnel Action.
- Cancel will remove the Personnel Action from the active list. Once a canceled the record can no longer be edited or re-opened, but can be viewed on the list page using the Canceled or All view.
- Delete will permanently remove the record from the database and can no longer be accessed.
To perform any of these actions on multiple records, from the list of Personnel Actions select records by using the checkbox in front of the Employee Number and then click on the appropriate icon.
Additionally, an icon is available to compare the information that currently exists on an employee record against the changes that have been made on the Personnel Action. Access a Personnel Action by clicking on the number. Click on Compare in the bottom right corner:
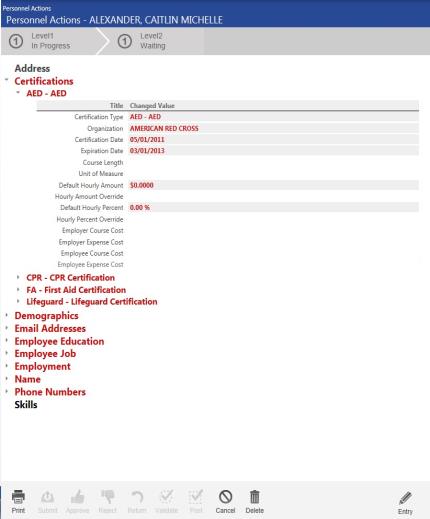
All sections designated in red text signify the changed sections. Fields with changed values are viewable by expanding the section name and changed fields designated in red text.
Users can toggle back to the entry page to make changes to the record by clicking on the Entry link in the lower right hand corner of the screen from the Comparator page.
Quick Views
There are several ways to view the Personnel Actions page. The default is Active. To change the view, in the top-right corner, select a different view from the dropdown. Records are limited by the user’s security.
|
Field Name |
Field Description |
|---|---|
|
Active |
Filters by the active Personnel Actions for which a user is authorized and by department. |
|
To Approve |
Filters by those records that are waiting for approval. The Approval icon is available for adding a user’s approval in this view. Multiple records can be selected for approval. |
|
To Validate |
Filters by those records that are waiting for validation. The Validate icon is available in this view in order to validate the record. Multiple records can be selected for validation. |
|
To Post |
Filters by those records that are waiting to be posted. The Post icon is available for posting. Multiple records can be selected to post. |
|
Posted |
Filters by records that have successfully posted. Posted records can no longer be edited. |
|
Canceled |
Filters by records that have been canceled. Canceled records cannot be edited or re-opened. The information is retained in the database for informational purposes only. |
|
All |
No Filters. All Personnel Action Records are listed. |