Integrating new world ERP with Tyler Cashiering and EnerGov
In release 2017.1, enhancements were made to support new world ERP's integration with Tyler Cashiering and EnerGov software. New functionality has been added in new world ERP Maintenance to allow users to view, create, maintain, and print a listing of G/L distribution codes.
G/L distribution codes consist of a code name, a description, default payment code, and an indication of whether or not the code is active. Each code must also include at least one defined set of account distributions. This entails specifying a debit G/L account, credit G/L account, and a percentage to be allocated to the debit/credit pairing. For debit and credit accounts that support projects, users can also enter project information.
Note: Enhancements in the 2017.1 release will only be utilized by the EnerGov Interface, as G/L Distribution Codes are integrated into the core product provided by the update.
For details on all of these new features, please see below.
Setup
Assigning the Required User Permissions
Maintenance > new world ERP Suite > Security > Users > Select a user > Permissions
Access to the software pages that allow users to view, create, and modify G/L distribution codes (i.e., the G/L Distribution List page and G/L Distribution Code page) is controlled by the new G/L Distribution Code Maintenance user security component. Administrators can give users the following permissions: Add, Change, Delete, View, and/or Print.
To assign permissions, do the following:
- Open the User List page: Maintenance > new world ERP Suite > Security > Users.
- Search for and select the User Login ID to which you would like to assign permissions.
- Click Permissions.
- In the Security Components search field, type g/l distribution code maintenance.
- When the G/L Distribution Code Maintenance component appears in the Permissions section, assign the appropriate permissions for the selected user login ID.
- If the Full check box is selected, all permissions will be automatically selected, giving the user permission to all related functionality.
- Selecting Add allows the user to add new G/L distribution codes.
- Selecting Change allows the user to open and modify existing codes.
- Selecting Delete allows the user to delete existing codes.
- Selecting View allows the user to open and view existing codes.
- Selecting Print allows the user to print the G/L Distribution Code Listing.
- Click Save.

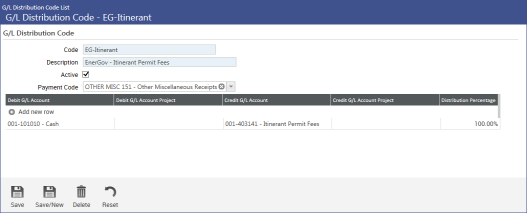
G/L Distribution Code List Page
Maintenance > new world ERP Suite > Chart of Accounts > G/L Distribution Codes
The G/L Distribution Code List page lists all the G/L distribution codes that have already been created in the system. These codes are listed in grid rows. The following information is provided at-a-glance for each code in the list: 1) an indication of whether or not the code is active, 2) the code name, and 3) the code description.
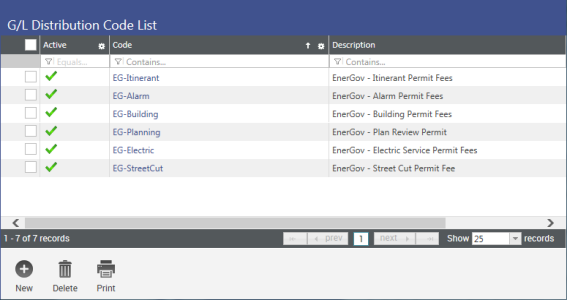
Values in the Code column are hyperlinks that, when clicked, opens the G/L Distribution Code page for the selected code (see G/L Distribution Code Page below). This allows you to view and/or modify the code's characteristics.
At the bottom of the page are three command buttons:
- Clicking the New button at the bottom of the page opens the G/L Distribution Code page in Add mode, allowing you to create a new G/L Distribution Code.
- Clicking the Delete button allows you to delete a selected code(s). To delete a code, select its associated check box and then select Delete.
- Clicking the Print button allows you to print the G/L Distribution Code Listing. For more information, see G/L Distribution Code Listing below.
Note: The New, Delete, and Print buttons are enabled only if the user has permission to those functions. For information about permissions, see Setup - User Permissions above.
Adding a G/L Distribution Code
Maintenance > new world ERP Suite > Chart of Accounts > G/L Distribution Code List > New
-
Open the G/L Distribution Code List page (Maintenance > new world ERP Suite > Chart of Accounts > G/L Distribution Codes).
Click the New
 button at the bottom of the page.
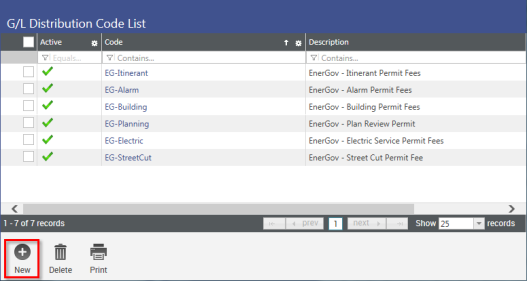
-
The G/L Distribution Code page will open in Add mode.
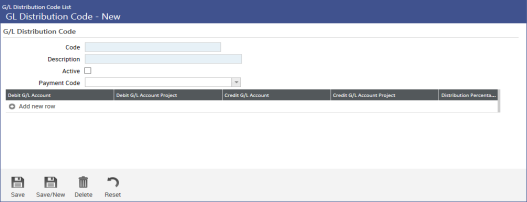
Do the following:
- In the Code field, enter the G/L distribution code. This field is required and must be unique. Maximum code length is 16 characters.
- In the Description field, enter a brief description of the G/L distribution code. This field is also required and must be unique. Maximum description length is 64 characters.
-
The Active check box indicates whether or not the code is active. Select the check box if the code is active or clear the check box if it is not active.
In the Payment Code field, enter the appropriate payment code. This field is optional. Clicking the drop-down control lists all available payment codes, whether the code is active or inactive, validated or not validated, or standard or not standard. If the selected code is inactive, not validated, and/or not standard, related error messages will display on Save.
-
Now you can define the code's G/L distribution. Each G/L distribution code must have at least one debit/credit distribution account pairing (i.e., a pairing of one debit G/L account and one credit G/L account). Any number of such parings can be associated with the G/L distribution code, but each pairing must be unique.
All distribution account pairings associated with the code are listed in the grid below the Active check box. One row per pairing. When adding a new G/L distribution code, as we are now, this grid is empty.
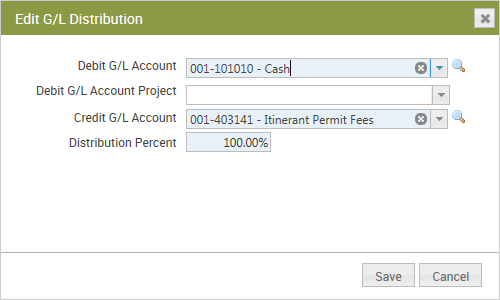
To begin defining G/L distribution account pairings, click the
 Add new row button. This will open the Add G/L Distribution window.
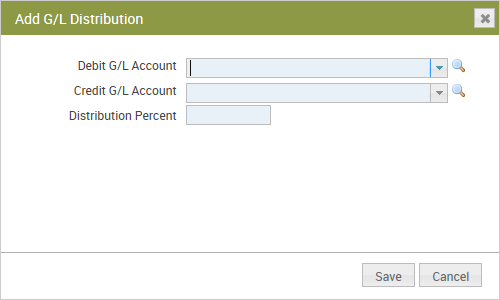
Do the following for each distribution account pairing you create:
- Click the Debit G/L Account drop-down control and select the debit G/L account you would like associated with the distribution pairing.
- If the account you selected in the previous step supports projects, the Debit G/L Account Project field will appear below the Debit G/L Account field. This allows you to associate a project with the debit G/L account. If you would like to associate a project with this distribution, click the Debit G/L Account Project drop-down and select the appropriate project.
-
Click the Credit G/L Account drop-down control and select the credit G/L account you would like associated with the distribution pairing.
-
If the account you selected in the previous step supports projects, the Credit G/L Account Project field will appear below the Credit G/L Account field. This allows you to associate a project with the credit G/L account. If you would like to associate a project with this distribution, click the Credit G/L Account Project drop-down and select a project.
Note: All accounts specified must be active G/L accounts. Also, the combination of specified accounts and projects must be unique within the distribution code.
-
In the Distribution Percent field, enter the distribution percentage to be allocated to the debit/credit pairing. The percentage must be greater than zero.
Note: The overall sum of the distribution percentages associated with all the G/L distribution code’s debit/credit pairings does not have to equal 100%.
Changing a G/L Distribution Code
Maintenance > new world ERP Suite > Chart of Accounts
-
Open the G/L Distribution Code List page: Maintenance > new world ERP Suite > Chart of Accounts.
- Locate the G/L distribution code you would like to modify and click on its Code value. Code values are hyperlinks that when clicked opens the selected code for editing .
- The G/L Distribution Code page will open in Edit mode. Make the necessary changes.

- After all modifications have been made, click the Save
 button on the G/L Distribution Code page to save all your work.
The Code, Description, and Payment Code field values, as well as the Active status, can all be modified. See Adding a G/L Distribution Code above for field information and entry rules.
To modify a distribution account pairing, click on the appropriate grid row to open the Edit G/L Distribution pop-up window and then make the necessary changes. When done making distribution changes, click the Save button on the Edit G/L Distribution pop-up.
Printing the G/L Distribution Code Listing
Maintenance > new world ERP Suite > Chart of Accounts > G/L Distribution Codes > Print button
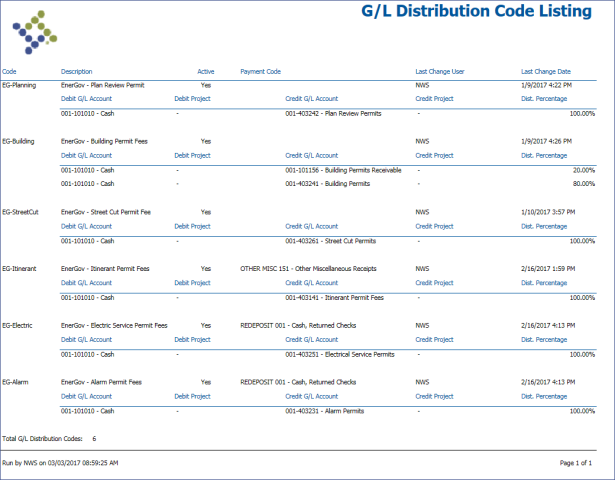
Clicking the Print  button on the G/L Distribution Code List page generates a listing of all G/L distribution codes. For each G/L distribution code in the listing, labeled columns in the main header row provide the following information:
- Code (G/L distribution code)
- Description (G/L distribution code description)
- Active (Yes or No)
- Payment Code (default payment code)
- Last Change User
- Last Change Date
Also, a detail header row is provided for each debit/credit pairing defined for a code. Columns in this row provide the following additional information:
- Debit G/L Account
- Debit Project
- Credit G/L Account
- Credit Project
- Distribution Percentage
The total number of G/L distribution codes in the listing is provided at the end of the report.
Following is a sample of the listing.
Tyler Cashiering Payment Code Maintenance
Maintenance > new world ERP Suite > Revenue Collection > Tyler Cashiering Payment Codes
Enhancements have been made to the Tyler Cashiering Payment Codes window to allow users to set up a default EnerGov cashier and payment code.
The following fields have been added at the bottom of the Tyler Cashiering Payment Codes page under the heading EnerGov CD Payments - Defaults:
- EnerGov Cashier field. This field allows you to specify a default EnerGov cashier, i.e., a cashier that will be automatically associated with EnerGov-related payment transactions. Cashiers listed in the drop-down list are defined in the Tyler Cashier maintenance area. The selected cashier must be an active cashier and must not be set up to auto-post batches. This field is optional.
- EnerGov Payment Code field. This field allows you to specify a default EnerGov payment code, i.e., a payment code that will be automatically associated with EnerGov-related payment transactions when a payment code is not defined for the G/L Distribution code referenced by the transaction originating from the EnerGov application. The EnerGov Payment code drop-down list includes all payment codes, whether or not they are active or validated, and regardless of the user's payment code authorization.
Note: The Tyler Cashiering Payment Codes and Tyler Cashier menu options are only available to customers who are licensed for Tyler Cashiering. To access the page, you must have either View/Use or Change permission to the Tyler Cashiering Payment Code Page security component. For more information, see "Setup" in Integration with Tyler Cashiering.
See also:
Integration with Tyler Cashiering