eUtilities Enhancements in 2018.1
In 2018.1, multiple enhancements have been made within New World ERP eUtilities. Many of these enhancements revolve around eSuite user authentication. These improvements give the user a more typical login experience, making it easier for them to log into eUtilities, create and save their sign-in credentials, and, should they ever forget them, recover their sign-in credentials.
Important: As a result of these enhancements, after your system has been updated to 2018.1, every eUtilities user will have to create a “user profile” before they can sign back into eUtilities. As this will no doubt cause some confusion among your citizen customers, all related changes are described in detail below.
Also, in Utilities Management Customer Service, new functionality has been added to allow Customer Service Representatives (CSR) and other authorized personnel to easily log into and view customer eUtilities accounts. In this way, CSRs can see exactly what the customer sees in eUtilities, making it easier to assist customers when they encounter problems with their eUtilities accounts.
This
- eSuite (i.e., the Citizen experience)
Creating an eUtilities User Profile
- eSuite Administration (i.e., the Administrator experience)
- New World ERP Administration
- Utility Management (i.e., the Customer Service Representative experience)
eSuite Enhancements - The Citizen Experience
User Authentication
The process of authenticating eUtilities users has been enhanced to make it easier for users to log into the system.
In earlier releases of the software, to log into eUtilities, users must enter their account number and up to six other authenticating criteria (e.g., Last Name, Full Name, Driver’s License Number, etc.), depending on how the eUtilities system administrator configures the login process.
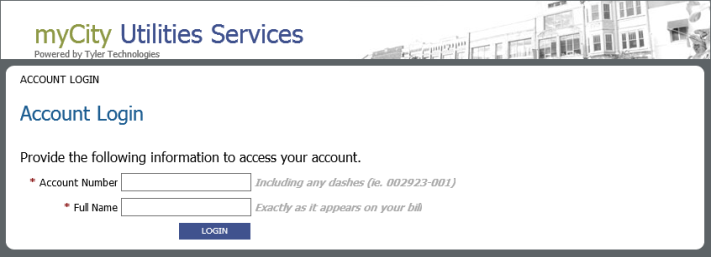
The eUtilities Account Login page before the 2018.1 update.
Starting in release 2018.1, users of eUtilities will be greeted with a more standard login screen, needing just a Username and Password to access their account online.
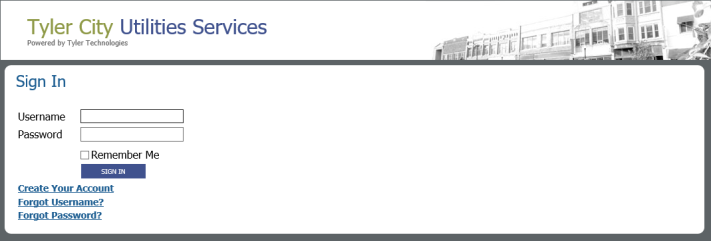
The user Sign In page after the 2018.1 update.
After your system is updated to New World ERP 2018.1, every eUtilities user must create a user profile before they can sign into eUtilities again. Creating a user profile is quick, easy, and described in detail below.
Note: Users will not be able to access eUtilities until they complete the process of creating a user profile.
Note: Because eUtilities administrators can customize the look and content of eSuite pages, the sample screen shots provided in this document may or may not match the screens you see in the software. However, the processes and fields described herein are common to all 2018.1 screens.
Creating an eUtilities User Profile
Immediately after your New World ERP system has been updated to 2018.1, customers will be unable to log into eSuite with their old sign-in credentials (i.e., credentials created in previous releases of the software). To regain access to eUtilities, users must verify their existing accounts and create new sign-in credentials. This is done by clicking the Create Your Account option on the eUtilities Sign In page and following the instructions.
To establish a user profile, do the following:
-
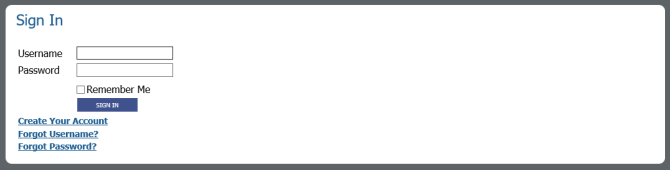
Open eUtilities. This will bring up the new Sign In page. When a user accesses this page for the first time after the 2018.1 update, they will not yet have the Username and Password required to access eUtilities. These will be created in the following steps.
Click Create Your Account.

-
The Confirm Account page will open. This page will resemble the user’s pre-2018.1 sign-in screen. It will consist of the Account Number field and up to six additional identifying credentials, depending on how the eSuite administrator configured the page.
The user must identify their account by entering the appropriate values and clicking the CONFIRM ACCOUNT button.

-
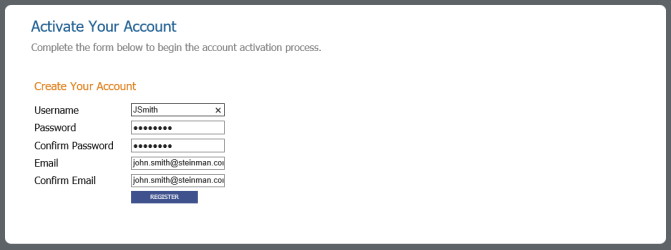
The Activate Your Account page will open. This page allows users to create their new sign-in credentials, i.e., the user name and password they will use to sign into eUtilities going forward.
All fields in this window are required. Make the necessary entries and click REGISTER.
For field descriptions, click here.
here.
- Username - The user name that will be used to access the account. This field must be unique.
- Password - The password that will be used to access the account.
- Confirm Password - The Password re-entered to ensure correct spelling.
- Email - The user’s email address. This is required to process password resets. Should a user forget their password, it can be reset via an automated email exchange. The email address must be unique. No two user profiles can share the same email address.
- Confirm Email - The Email re-entered to ensure correct spelling.
-
The following window will display:

At this point, the user should check their email. They will receive an email message with a subject line similar to the following: “eSuite UM Account Creation Requested.”
It could take several minutes for the email message to arrive, but when it does, the user must open it and click the link located in the body of the message (shown below).

Only by clicking this link will the activation process be completed. If the user does not click this link, the user’s account will remain inactive and they will not be able to access their eUtilities account.
Note: It is important to complete the activation process in a timely manner, as the registration process will eventually time-out. If that happens, the user will receive a message when they try to log in that will inform them how to have the account activation email resent.
-
At the new Sign In page, the user can now do the following:
- Enter their new Username and Password, i.e., the credentials created in step 3 above.
-
If they would like this page to remember their Username, i.e., to retain that value for future sign-in sessions, they can select the Remember Me check box. Otherwise, they can leave this check box unchecked.
Note: For security reasons, the password will not be retained.
- Click SIGN IN.
-
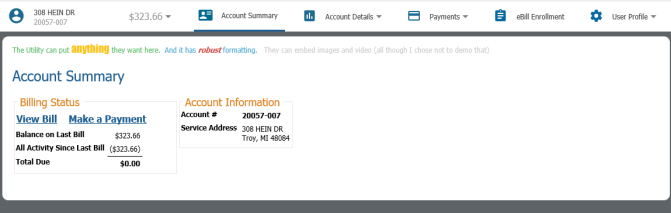
The Account Summary page will open (i.e., the default page for the customer’s account), thus completing the customer account activation process.
Resolving Forgotten Sign-In Credentials
eUtilities > Sign-in page
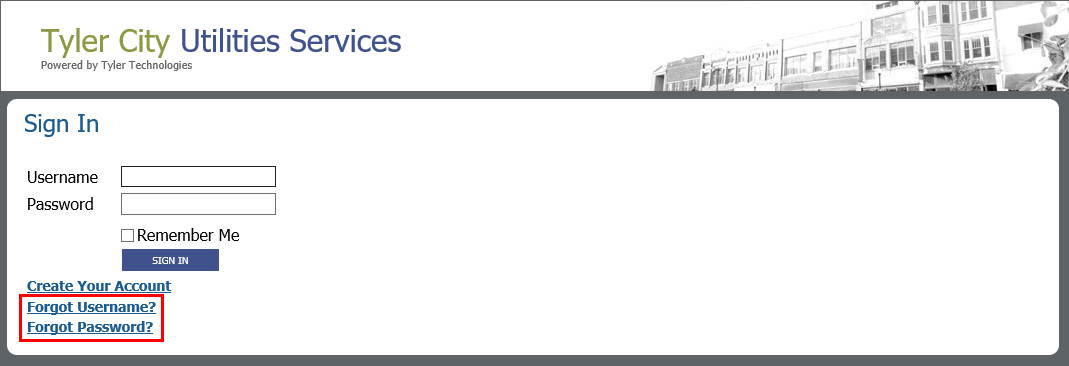
Options on the Sign In page provide quick and easy solutions for users who forget their user name or password. The “Forgot Username?” option allows users to recover a forgotten user name. The “Forgot Password?” option will walk a user through resetting a forgotten password.
Forgotten Username
Forgotten Password
eUtilities Menu Bar Enhancements
Open eUtilities > Sign In
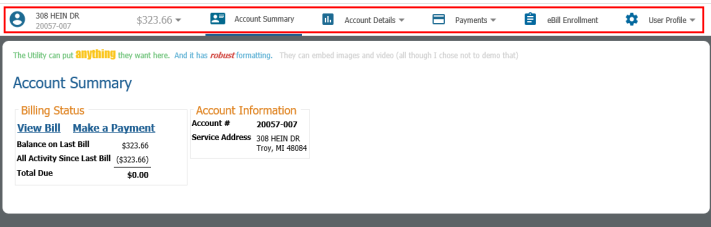
The eUtilities menu bar has been reorganized to make navigation within the software easier and more intuitive. All of the options that were previously available are still available, but related options have been grouped together in appropriately labeled drop-down lists.
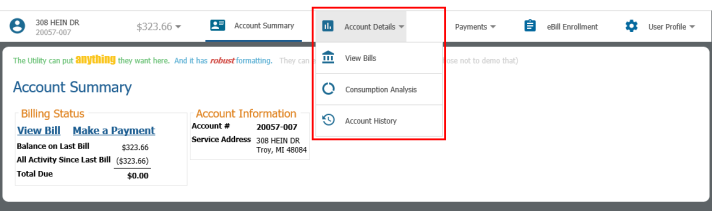
For example, the following options are now included in the Account Details drop-down list: View Bills, Consumption Analysis, and Account History. None of these options are new, they’ve just been reorganized under a common heading. ![]() Show me.
Show me.
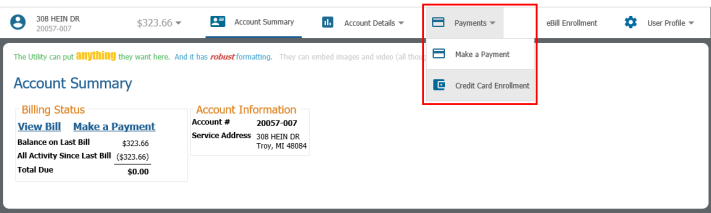
The Payments drop-down list includes the following options: Make a Payment and Credit Card Enrollment. Again, these options are not new, they’ve just be relocated under a common heading. ![]() Show me.
Show me.
Note: If Credit Card Enrollment is turned off in Maintenance, associated options will not be available via the menu.
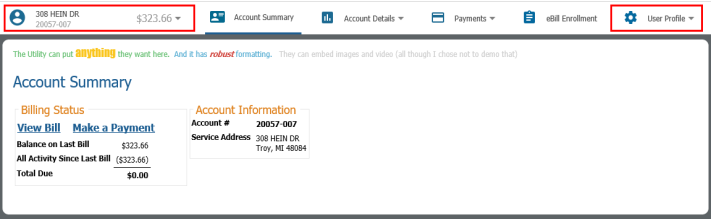
The user profile-related features at either end of the menu bar make it easier for customers to view and maintain their user profile and associated accounts. ![]() Show me.
Show me.

For more information about these features, see Viewing and Maintaining User Profiles and Associated Accounts below.
Viewing and Maintaining a User Profile and its Associated Accounts
In eUtilities, enhancements have been made to make it easier for users to view and manage their user profile and associated accounts.
The user identifies their primary account during the initial eUtilities account activation process (see Creating an eUtilities User Profile above). Once the primary account is successfully activated, the user can associate any number of additional accounts to their profile. This allows them to view information about all of their associated accounts from the same place and within the same login session.
The unlabeled Account drop-down control at the left end of the menu bar and the User Profile drop-down at the opposite end of the menu bar provide access to the new features described in this section.
Sign into eUtilities > User Profile > Profile Maintenance
The User Profile page (shown below) allows users to maintain their eUtilities password and email address. Their email address is necessary for the password reset process, which allows users to reset a forgotten password.
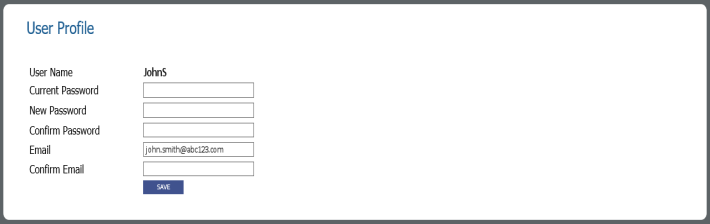
The User Profile page.
To change their password, the user must do the following:
- Enter their Current Password,
- Enter their New Password,
- Re-enter their new password in the Confirm Password field, and
- Click Save.
Sign into eUtilities > User Profile > Linked Accounts
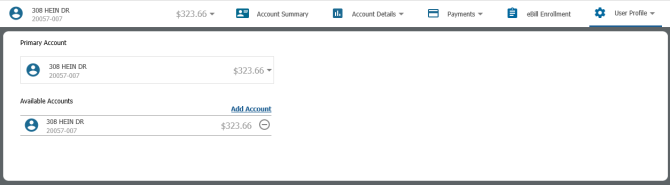
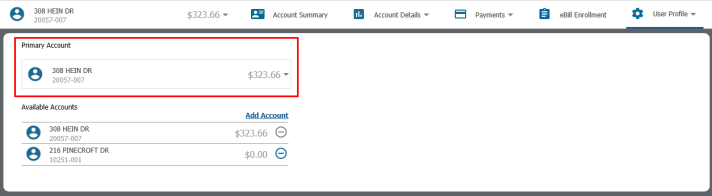
The Linked Accounts page (shown below) allows users to view a list of the accounts that are associated with their profile. All accounts and their respective balances are listed in the Available Accounts section.
From this page, users can also add accounts to their user profile (see Adding an Account), change their primary account (see Changing the Primary Account below), and remove accounts from their profile (see Removing an Account).
![]()
The Linked Accounts page.
Sign into eUtilities > User Profile > Linked Accounts > Click the Add Account button
Users can add an associated account to their user profile by clicking one of the Add Account buttons on the Linked Accounts page. There are two Add Account buttons, one at the bottom of the Account drop-down list and another at the top of the Available Accounts section. Both buttons work the same way (see Step-by-Step: Adding an Account to a User Profile below).
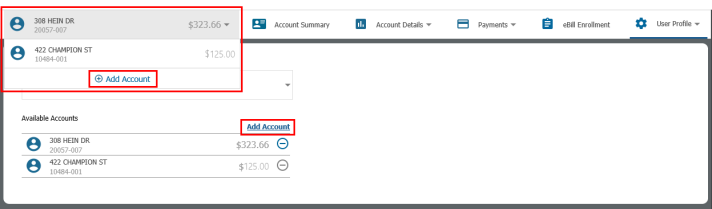
The user can add as many accounts as is necessary. Once an account is added it will display in the Account drop-down list (shown in the screen shot above). From there the account can be selected for viewing. Once an account is selected, all features in eUtilities will pertain to that account. For example, the Account Summary page will display summary information pertaining to the selected account; making a payment via the Make a Payment page will transact against the selected account, etc.
In this way, the user can toggle between all of their accounts.
Step-by-Step: Adding an Account to a User Profile
-
On the Linked Accounts page, click the Add Account button in the Available Accounts section.
Note: You can also add an account by clicking the Add Account button at the bottom of the Account drop-down list. Both Add Account buttons work the same way.
- The Confirm account window will open.
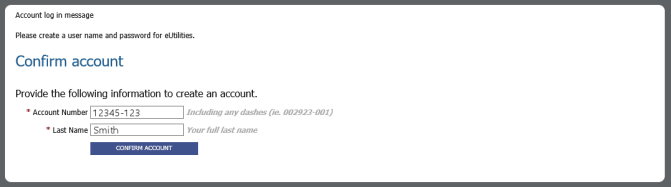
Do the following:
- Enter the Account Number associated with the account you are adding.
Enter all other identifying criteria for the account.
Note: The required criteria that displays on this page will vary based on how the system administrator set up the login requirements.
Click CONFIRM ACCOUNT.
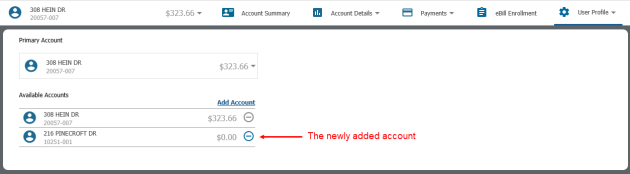
The account will then be added to the user profile. Now, when a user clicks the (unlabeled) Account drop-down control, both the primary account and the newly added account will appear in the drop-down list. Any number of accounts can be added in this way. Clicking an account in the list will open that account for viewing.
The Primary Account section displays the user’s current primary account and its balance. The primary account is initially determined during account activation when the user identifies and activates their account. After that, the user can add as many accounts as he likes.
Clicking the Primary Account drop-down control displays a list of all associated accounts. Selecting an account from this drop-down list makes it the user’s primary account. The primary account is the default account, the account that displays when a user first signs into eUtilities.
Each account listed on the Linked Accounts page has an associated Remove  button. Clicking an account’s Remove button removes the account from the user profile.
-
In eUtilities, select User Profile > Linked Accounts. The Linked Accounts page will open listing all of the accounts associated with the user profile.
- In the Available Accounts section, locate the account you would like to remove from the user profile and click its associated Remove Account button.
The account will then be removed. It will no longer appear in the Linked Accounts page or the Account drop-down list.
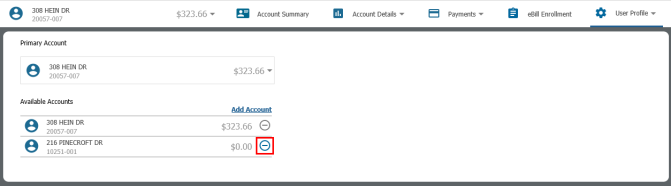
Note: The primary account cannot be removed from a user profile. Notice in the above screen shot the primary account is listed in both the Primary Account and Available Accounts sections. In the latter, the Remove Account button is disabled (i.e., grayed out); clicking it does nothing. To remove a primary account, a different account must first be made primary (see Changing the Primary Account). Only then can the previously “primary” account be removed.
eSuite Administration Enhancements
This section pivots away from eSuite and the citizen experience to eSuite Administration. The eSuite administrator must perform a one-time setup of password related settings that will govern the citizen sign-in experience.
Password Settings
eSuite Admin > System-wide Settings > Password Settings
In eSuite Administration, all of the settings in the Password Complexity Configuration section of the Password Settings page are now required (see image below). If any of these fields are left blank, then whenever an eUtilities customer tries to create a password that does not meet all of these requirements, the attempted password creation will fail and an error message will display for the customer.
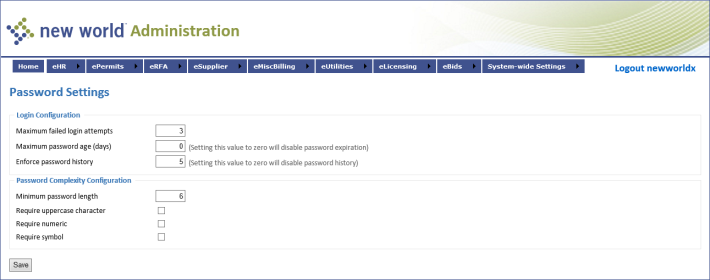
Also, the settings in the Login Configuration section are shared between UM administration and HR administration. When defining user password requirements, therefore, it is important to find a balance between UM and HR best practices.
If a user enters the wrong Username more than the number of times defined via the Maximum failed login attempts field, the user’s browser will be automatically locked. At that point, the user will have to close their browser, reopen it, and try again.
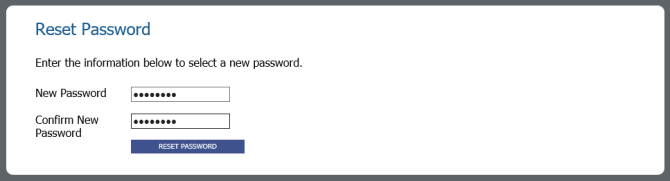
If, on the other hand, the user enters the wrong Password more than the number of times defined via the Maximum failed login attempts field, their user account/profile will be locked. At that point, the user has two options: 1) call and ask their utility to unlock their account/profile (Accessing a User’s eSuite Account via Utility Management), or 2) unlock it themselves via the Forgot Password feature (see Resetting a User’s Password).
New World ERP Administration
This section describes the email templates used in the various eSuite User Profiles processes, and the maintenance required to customize the templates to your organizations preferences.
Email Templates
new world ERP Suite > System > Email Templates > Application: Utility Management > Module: eSuite User Profiles
There are four different outbound email messages related to eSuite User Profile processes. Although they all come with default text messages, administrators will want to modify the text to reflect their organization’s preferences. Moreover, the From Address for each template must be changed to the appropriate email address, i.e., one that matches your organization’s domain.
The four templates are:
- Forgot Password
- Profile Information Updated
- User Profile Registration Confirm Email Address
- Username Recovery Email
Note: For more information about email templates, please click the Help button on the Email Template Setup page in New World ERP.
Utility Management Enhancements
Viewing a Customer’s eSuite Account via Utility Management
This section describes how customer service representatives (CSRs) using New World ERP Utility Management can leverage new functionality to better serve their eUtilities customers. Primary among the new enhancements is the CSR’s ability to quickly and easily access a customer’s eUtilities account.
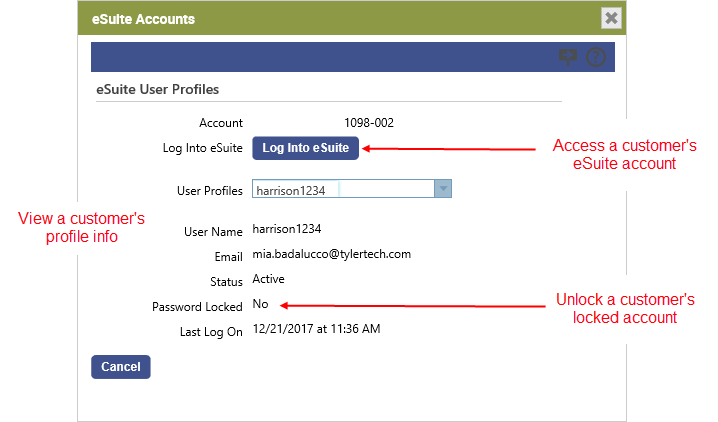
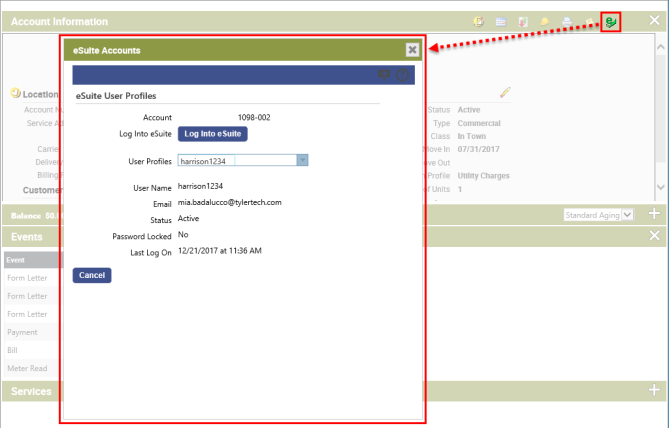
The new functionality discussed in this section is all provided through the new eSuite Accounts pop-up window (shown below). This window allows CSRs to do the following:
-
View a Customer’s eSuite Account (as mentioned above). Tell me more
-
View useful account and profile-related information. Tell me more
- Unlock a user account. Tell me more
For detailed instructions on accessing the eSuite Accounts window, see Step-by-Step: Viewing a Customer’s eSuite Account via Utility Management below.
Before you can take advantage of these new features, however, some system setup is required. See Setup for details.
Setup
System Security
Maintenance > new world ERP Suite > Security > Users > Select the appropriate user
The new eSuite User Profiles security component has been added to provide security over the eSuite Accounts pop-up window. Available permissions include View and Change. Assigning full permission gives the New World ERP user the ability to open the eSuite Accounts pop-up window (described above) and utilize the features within, including viewing a customer’s account in eSuite and unlocking a locked eSuite account.

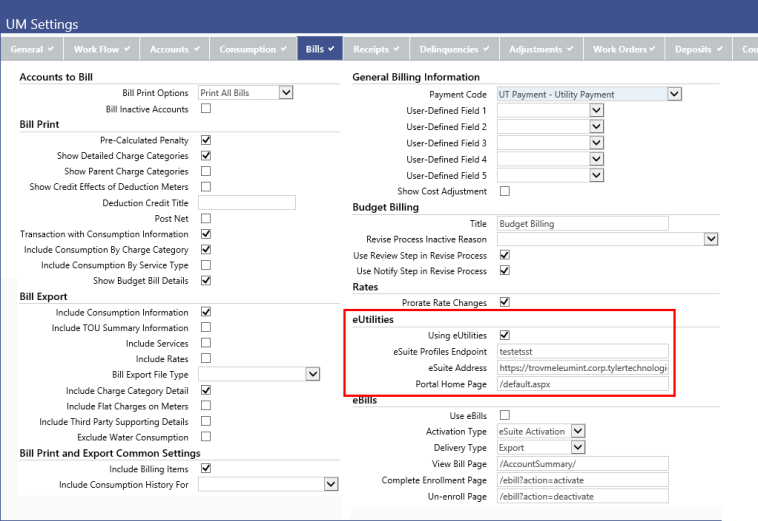
UM Settings
Maintenance > Utility Management > UM Settings
The UM Settings page has been enhanced with the addition of a new section called eUtilities (see image below).
All settings related to eUtilities are collected under this section, including two new settings related to the eSuite Accounts pop-up window: Using eUtilities and eSuite Profiles Endpoint. These settings are described in the table below.
The eSuite Address and Portal Home Page settings are not new, but they have been relocated from the eBills section to the eUtilities section.
| Name | Definition |
|---|---|
| Using eUtilities |
This check box determines whether or not Utility Management users can view their eSuite customers’ user account and profile information. If this check box is selected, the Log Into eSuite button on the eSuite Accounts pop-up window will be visible and enabled. If the check box is cleared, the Log Into eSuite button will not be visible. |
| eSuite Profiles Endpoint |
This field is only required if eSuite services are installed on a machine other than the one on which the main NWERP website lives. If this is the case, you will enter a value similar to the following: https://[ServerName]/Services.UM.Security/ In the above scenario, this setting is used to point NWERP to the eSuite service used to obtain eSuite Utilities user information, such as last sign in time, and to facilitate the unlocking of user accounts that have been locked due to multiple failed login attempts. |
Step-by-Step: Accessing a Customer’s eSuite Account via Utility Management
- In Utility Management, open Customer Service.
- Open the account of the customer whose eSuite account you would like to access.
- In the Account Information section, click the new eSuite Accounts
 toolbar button located in the upper right-hand corner of the section.
 The new eSuite Accounts pop-up window will open. This window displays the eSuite customer’s basic profile information, including his Account number, User Profiles (if the account has multiple profiles, you can select among them via this drop-down control), User Name, Email address, and current Status. You will also see an indication of whether the customer’s account password has been locked (Password Locked), as well as the last date and time at which they logged into the system (Last Log On).
For a more detailed description of the elements on this page, see the table below.
-
Click the Log Into eSuite button.
The eSuite application will open to the selected customer’s eUtilities account, allowing you to view the account as the customer sees it when he or she is in eUtilities.
| Name | Definition |
|---|---|
| Account | The identification number of the selected account. |
| Log Into eSuite |
Clicking this button opens eSuite and the selected customer’s eUtilities account. |
| User Profiles |
By default, the User Profiles field displays the account’s default user profile. If there are multiple user profiles associated with an account, the User Profile drop-down list will list them all. Selecting a different user profile will refresh the pop-up window and display information specific to the selected user. |
| User Name |
The user name associated with the selected user profile. |
| The email address associated with the selected user profile. | |
| Status |
This field will read either Active, Pending, or Locked. Active means the user’s account is active. A Pending status indicates that the customer has not yet validated his or her eSuite sign in and must do so to access their eSuite account. Locked means the account is locked (see Password Locked below). |
| Password Locked |
Indicates whether or not the user’s eSuite password has been locked. An account will be automatically locked if the user enters their password incorrectly too many times. If it is locked, the Unlock button will appear next to the field. Clicking it will unlock the customer’s account, allowing them to sign in. |
| Last Log On |
Indicates the date and time at which the user was last logged into eSuite. |