Deduction
This page contains the details of a deduction code.
| Field/Check Box | Description |
|---|---|
| Code |
Identifies the deduction, typically an abbreviated, easily recognizable version of the full description. This entry may contain 16 characters. Note: This code displays on employee pay checks. |
| Description |
Full description of the deduction Code. Note: This code displays on employee pay checks. |
| Active | Determines whether the deduction code is available for use. |
| Include in Benefit Plan | Marks the deduction code for use in a benefit plan. If your organization is licensed for Benefits Administration and this deduction needs to be used in a benefit plan, check the box. |
| Effective Date | Not available for entry. Once you save the deduction code, the default entry shows [Date Saved] - <Open>. If the deduction code is edited on a future date, the Effective Dates change to show [Date Saved] - [Date Ended], and the Effective Dates of the new or changed version of the deduction code show [Date Saved] - <Open>. |
| Start Date |
Start date of the deduction code. Typically this date is well in the past and used for all deduction codes during the initial setup. Once the deduction code is saved, this date is used to create an Effective Dates range located directly above the Start Date. |
| Deduction Type |
Three options: Standard, Deferred Compensation and Pension. Click in the field to make your selection from a drop-down list. |
| Vendor |
ID and name of the vendor to whom this deduction is paid. |
| Default Sequence |
Determines the order in which the deduction is taken from an employee's check. This sequence may be changed at the employee level. The available numbers are 1 through 999. Generally, give the more important deductions the lower numbers, so they are taken first. If the amount of an employee's check is inadequate to cover all deductions, the higher numbered deductions may be held until the next pay check. |
| Default Frequency | Determines what checks include this deduction. |
| Garnishment |
Identifies the deduction as a garnishment. This check box lets you set up only one deduction, i.e., child support, then override the vendor at the employee level. If the deduction is set up as a garnishment, you need to fill in an applicable employee's garnishment information (Case Number and Amount) to validate the employee in a pay batch. |
|
Credit Distribution Identifies the account to be credited with the amounts deducted from the pay checks. The Account or the G/L Account requires an entry. If you select an Account only, the account combines with an employee's organization set to create a complete G/L account when payroll is run. If you select a G/L Account, the account is credited when using this deduction code when payroll is completed. |
|
| Do Not Create Disbursement | Determines whether disbursements are created. If you do not want disbursements created, check this box. |
| Calculation Method |
Determines how the deduction amount calculates. The available options are Amount per Hour, Annual Rate Steps, Flat Amount, Flat Percent, Hourly Rate Steps, Pay Rate and Percent of Annual. Click in the field to select the option from a drop-down list. Different calculation methods enable different fields or tabs on the Deduction Steps Entry pop-up (Details button):
If the deduction amount or percentage changes for each employee, you may leave these fields blank and fill in the information for each employee. |
| Maximum |
Cap set for the maximum deduction amount to be taken per check, regardless of the percentage being used; for example, if a check amount is $500, the flat percent is 10% and the Deduction Maximum is $45, the system takes only $45. |
| Overtime Maximum |
Sets the payroll calculation process to stop including overtime hours after a selected number of hours have been used in the calendar year. This field displays when the benefit or deduction Calculation Method is Flat Percent. The Deduction Details Entry pop-up includes an Overtime Maximum tab to let you select the hours codes to be associated with the overtime maximum. The hours codes selected on this tab also need to be selected on the Hours Codes tab. |
| Net Pay Minimum | Amount below which this deduction should not reduce an employee's check. This field commonly is used for garnishments and child support. |
| Limit Type | Determines whether to limit the amount of the deduction by Year-to-Date, Life-to-Date or a User-Defined Date Range. |
| Deduction Limit Amount | Dollar amount of the deduction limit. |
| Deduction Gross Limit Amount |
Displayed and enabled when the Calculation Method is Flat Percent or CalPERS. Contributions stop when wages subject to the deduction selected hit the gross amount entered in this field. |
| User-Defined Start/End Date | If deduction amount is limited, identifies the start and end check dates used to measure the limit. |
| Include Longevity | Visible and enabled for the Annual Rate Steps of Flat PercentCalculation Method, determines whether longevity pay is included in this deduction. Check this box to include longevity pay. |
| Include Certification | Visible and enabled for the Flat Percent Calculation Method, determines whether certification pay is included in this deduction. Check this box to include certification pay. |
| ORS TDP (Michigan customers) |
Note: This feature requires separate licensing. Identifies the deduction as a TDP deduction. |
Once you save the deduction, click the Calculation button to open the Deduction Details Entry pop-up.
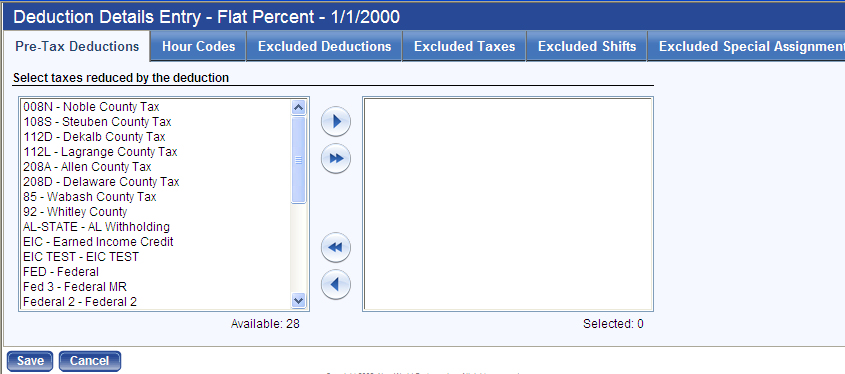
The tabs that are available on the pop-up depend on how you have set up the deduction.
Click a tab image to learn what it does:


The following two buttons are available for California (CalPERS) customers only and are changed if CalPERS needs them changed: