Human Resources > Workforce Administration > Search > Employee > Employment
The Employment tab contains an employee's employment status data and key dates used to generate benefit, accrual, seniority and other data.
Employee status reports and quarterly tax reports also use this data.
Note: In contrast, the Jobs tab contains data about the actual work an employee does.
Example of how to secure the Employment Status Eventfield:
- Navigate to Maintenance > new world ERP Suite > Security > Field-Level Security.
- Click in the Subject Area field to open the drop-down.
- Select Employee. The page loads with all fields related to Employee.
- In the Secured column, check the box corresponding to Status Event.
- Click Save.
- Navigate to Maintenance > new world ERP Suite > Security > Users.
- From the User List, select the user to whom permissions apply.
- Click the Permissions button. The Permissions page for the selected user opens.
- Click the Show Search link, located in the top-right corner of the page.
- In the Component Name field, type Employee.
- Click Search. The page loads with all security components related to Employee.
- Select the Status Event component.
-
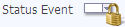
Check the processes to which the user is authorized; for example, if you only want the user to be able to view the status event, click in the View/Use column until a green check displays, and click in the other columns until red Xs display. When the user navigates to the Employment section of Workforce Administration, the Status Event is viewable, but when the section is in add or edit mode, the field is disabled, and a lock icon displays over it:
- Click Save.
| Securable Fields | ||
|---|---|---|
| 1099 | Accrual Date | Benefit Date |
| Comments | Company | EEOC |
| Employment Class | Employment Status | Employment Type |
| Event Reason | Hire Date | Seniority Date |
| Seniority Rank | Status Event | Termination Date |
To view a complete, chronological history of the employee's employment status, click the View History button, located on the right side of the section header.
The button label changes to View Previous, and a grid populated with the basic data of the employee's employment status history displays below the section header, with each row corresponding to a status event. Rows are sorted by Effective Date, from latest to earliest.

If comments have been attached to a status event, a highlighted icon displays in the Comments column. Hover the cursor over the Status Event to see the comments.
Clicking the Select icon ![]() in the far-left cell of a grid row populates the Employment Detail section with the detailed data for that employment record in view mode. (The View Previous button changes to View History.)
in the far-left cell of a grid row populates the Employment Detail section with the detailed data for that employment record in view mode. (The View Previous button changes to View History.)
To edit the data, click the Edit button, located on the left side of the section header.
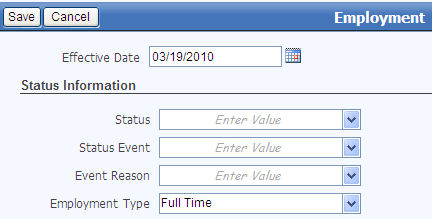
To record a new employment status event with a new effective date, click the Create Event button, located on the left side of the section header. All fields change to an editable state (![]() show me), and Save and Cancel buttons replace the original buttons in the section header.
show me), and Save and Cancel buttons replace the original buttons in the section header.
If you do not want to save your entries, click Cancel. If you are satisfied with your entries, click Save. The employment data updates, and the new effective date displays in the top-left corner of the section, immediately below the section header.
To edit saved data, click the Edit button, located on the left side of the section header. All fields change to an editable state (![]() show me), and Save and Cancel buttons replace the original buttons in the section header.
show me), and Save and Cancel buttons replace the original buttons in the section header.
If you do not want to save your entries, click Cancel. If you are satisfied with your entries, click Save. The employment data updates.
If you assign an employee to a Status/Status Event combination that has COBRA checked on the Employment Status Events Maintenance page, a ![]() COBRA pop-up opens automatically, giving you the option to create a COBRA beneficiary. The Event Date on the pop-up defaults from the Termination Date on the Employment tab.
COBRA pop-up opens automatically, giving you the option to create a COBRA beneficiary. The Event Date on the pop-up defaults from the Termination Date on the Employment tab.
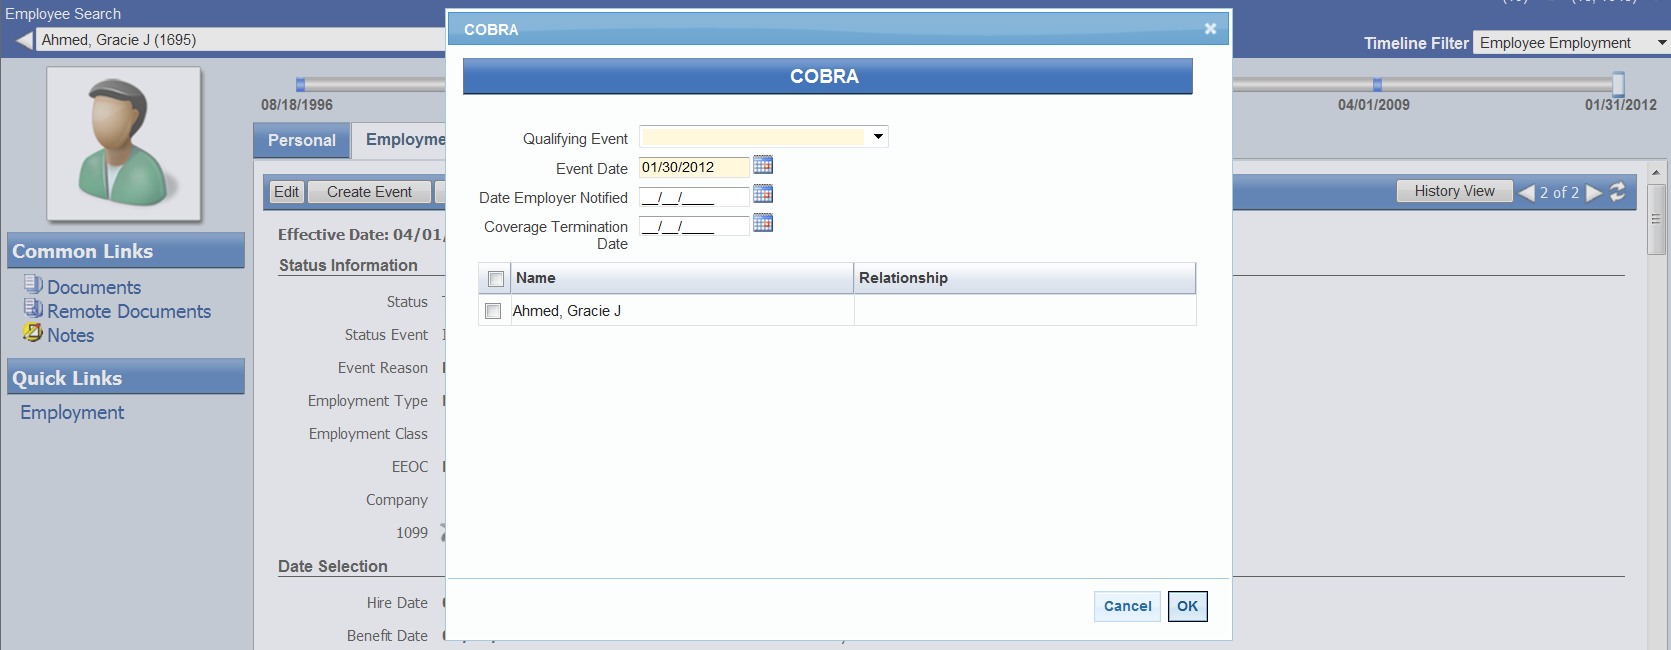
| Field | Description |
|---|---|
| Qualifying Event | Required. First event that made the beneficiary eligible for COBRA. The available options are Termination of Covered Employee, Reduction of Hours, Death of Employee, Divorce or Legal Separation, Eligible for Medicare, No Longer a Dependent Child. |
| Event Date | Required. Date the qualifying event occurred. Today’s date is defaulted. |
| Date Employer Notified | Required. Date the employer was notified of the qualifying event, the same date as the Event Date. |
| Coverage Termination Date | Required. Date COBRA coverage was terminated. The default entry is the Coverage End Date, if provided, from Benefit Plans in Workforce Administration; otherwise, the default entry is the Event Date. The Coverage End Date must be greater than or equal to the Event Date. |
 , located on the right side of the section header.
To delete an employment event, use the navigation control to find and populate the section with the correct, effective-dated employment data, and click the Delete Event button, located on the left side of the section header. A dialog prompts you to confirm the delete.
The following table contains descriptions of the fields in the Employment section:
| Field | Description |
|---|---|
| Effective Date | Effective date of the currently displayed employment status. This field may contain a future date. |
| Status Information | |
| Status | Required. Employee's employment standing. |
| Status Event | Required if one or more events are tied to the selected Status in Employment Status Events Maintenance, event that caused the currently displayed status. Only events tied to the selected status display on the drop-down. This data may be included in reports based on employee status. |
| Event Reason | Cause of the Status Event. Only those reasons that have been tied to the selected Status Event in Employment Status Events Maintenance display on the drop-down. This data may be included in reports based on employee status. |
| Employment Type | Tells whether an employee's position is full time, part time , seasonal or part time with benefits or other type. |
| Employment Class | Employment class. |
| EEOC | Used for Equal Employment Opportunity Commission reporting, tells whether an employee's position is full time, part time or excluded. |
| Company |
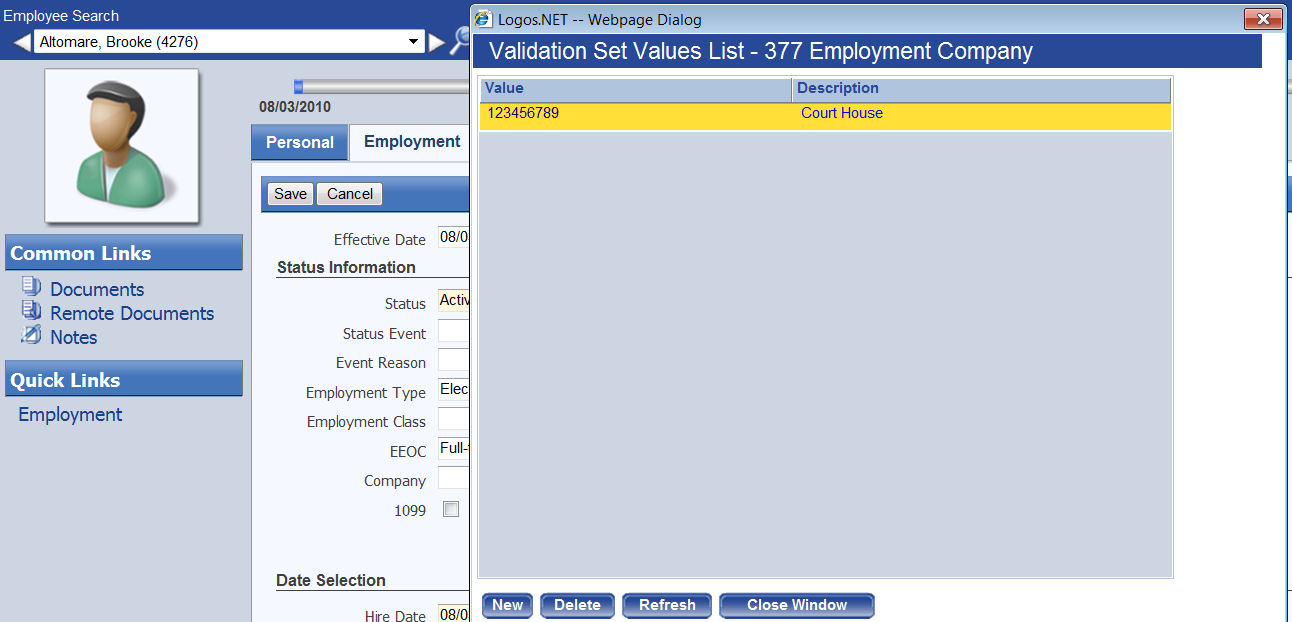
Identifies a company other than the one named in Company Suite Settings. This entry may refer to a pension company or some other company and has an Federal Employer Identification Number (FEIN) set up in validation set 377, Employment Company. The entry is used when W-2s are created for employees by company. To view, edit or add the FEIN values available for selection, hold down the <Shift> and <Ctrl> keys, and click once in the Company field. The Validation Set Values List-377 Employment Company pop-up opens. To add an FEIN to the Company drop-down selections, click the New button. To edit an FEIN or its description, click the hyperlinked Value (FEIN). |
| 1099 |
Identifies whether the employee is a 1099-R recipient. If multiple employment records are set up for the same employee, this box must be checked or unchecked for all. |
| Comments | Additional comments related to the currently displayed employment, typically to provide the details of a status change. Comments may contain 1,000 characters. |
| Date Selection | |
| Hire Date | Required. Employee's date of hire, not necessarily the first day of work. Longevity earnings may be based on this date. |
| Benefit Date | Required. Date on which employee's benefits are based. The default entry is the Create Event date. |
| Accrual Date | Required. Date on which employee's accrual hours are based. |
| Seniority Date |
Required. Date on which employee's seniority ranking is based. The default entry is the Create Event date. In situations where positions are filled in part by seniority within a group, this date may be separate from the Hire Date. |
| Seniority Rank | Number corresponding with employee's seniority ranking. |
| Termination Date |
Date employee ended work with employer. This date may be set for the future, ensuring an employee is paid while in an Active Status. To end a terminated employee's position, perform a create event on the employee's job and select a Job Event that is set to Out of Position. |
| IMP Start Date |
The IMP Start Date refers to the first day of the initial measurement period (IMP) for evaluating the status of all new employees enrolled in affordable care. Initial measurement periods are defined at Maintenance > Human Resources > Affordable Care Act > Look-Back Measurement Periods. If Specific Date is selected as the Start Date of the initial measurement period defined in Maintenance, select the IMP Start Date here. If Start Date or Next Month is selected as the Start Date, leave this field blank. |
|
User-Defined Fields User-defined employment fields, set up at Maintenance > new world ERP Suite > Security > User-Defined Fields, display in the bottom portion of the Employment section. Use these fields to maintain data not already included in the section. |
|