HR Contracts and K12 Modules
Contracts allow for pay amounts to be divided over set amount of pay periods. Following is a brief, step-by-step overview of the complete contract payment process:
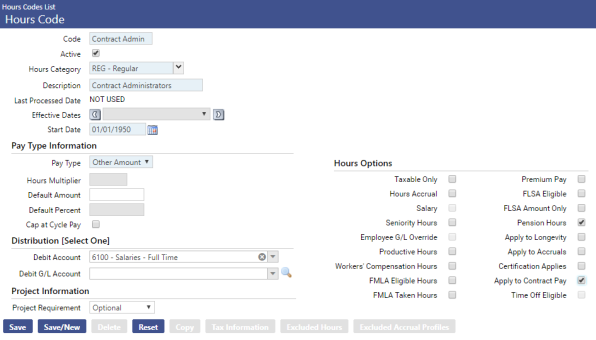
- On the Hours Code that will be used to pay contracts, check the Apply to Contract Pay box.
- Navigate to Maintenance > Human Resources > Employment Contracts to create a contract template.
- Navigate to Human Resources > Workforce Administration > Search.
- From the Contracts tab, assign contracts to employees.
- On the Payroll Manager-Initialize Batch page, select the contracts that will be included in the pay batch.
- Run payroll.
- Post payroll, updating the remaining pay periods and the Last Used in Payroll date.
Note: Recommend using annual grades as this works better with the contract calculation.
Hours Codes
Maintenance > Human Resources > Earnings Maintenance > Hours Codes
Before setting up the contract codes, contract hours codes must be made in order to subtract remaining balance on the contract. These can also be for state requirements to track contract and retirement hours. Apply to Contract Pay must be selected for any hours code that will be used to pay a contract employee. Selecting this box disables the Salary check box.
Note: If you use another hours code with the contract check box checked, both will reduce the balance.
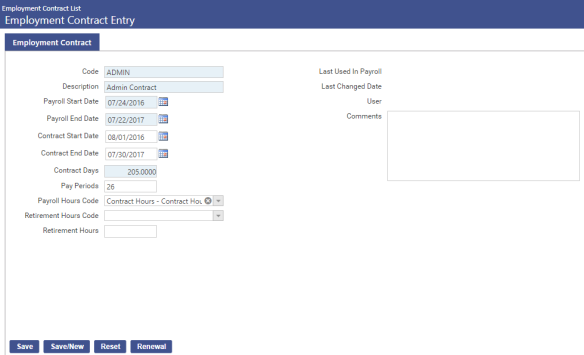
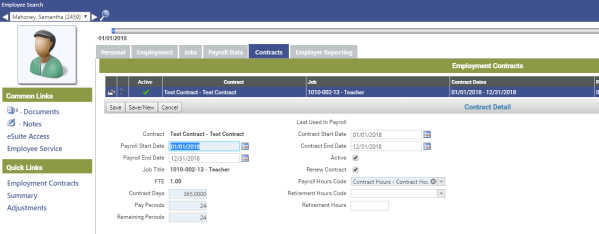
Employment Contract Entry
Maintenance > Human Resources > Employment Contracts
Use the fields on this page to add or edit contract data.
|
Field |
Description |
|---|---|
|
Code |
Required. Identifies the contract. This code must be unique across all contracts. Once the code has been saved, it cannot be changed. It also cannot be deleted once it has been used in payroll, assigned to an employee or assigned to a position. |
|
Description |
Required. Complete name of the contract. This name will be applied to an employee’s job. |
|
Payroll Start Date |
Required. Date range during which contract payments will be processed through payroll. |
|
Payroll End Date |
|
|
Contract Start Date |
Date range during which the contract is in effect. This date range will display on printed contracts. |
|
Contract End Date |
|
|
Contract Days |
Total number of days the contract is in effect. |
|
Pay Periods |
Total number of pay periods over which contract will be paid. |
|
Payroll Hours Code |
Hours code used to pay the contract employee. The drop-down will contain all hours codes that have the Apply to Contract Pay box checked in Maintenance. |
|
Retirement Hours Code (Michigan customers) |
Used to define the ORS hours that will default for an employee, eliminating the need to set up separately scheduled hours. An entry in one field requires an entry in the other. For the fields to show, permission must be given to them through the Retirement Hours security component in Maintenance (Maintenance > new world ERP Suite > Security > Users > User > Permissions). |
|
Retirement Hours (Michigan customers) |
|
|
Status |
Active or Inactive. |
|
Last Used in Payroll |
Last time the contract was processed in a payroll. This date is display-only. |
|
Last Changed Date User |
Last time the data of the selected contract was changed and the name of the user who changed it. |
|
Comments |
Free-form comments related to the selected contract. |
All data from this page will default to the employee record when the contract is attached to an employee through the Workforce Administration Contracts tab.
Renew Contracts
The contract renewal process involves two steps:
- Update contract codes with the dates of the new contract years and the pay period dates.
-
Determine who is eligible for the renewal process.
In a majority of the cases, enter the payroll dates of the previous year; for example, if you are renewing contracts for 2021-2022 school year, enter the payroll dates for the 2020-2021 school year contracts.
In a few cases, you can enter the payroll dates from other years, typically for coaching or extra curricular activities, etc., that may happen on a rotation. So the same person is not doing the activity every year, or the program itself is not run every year. In those cases, you may enter dates for a previous year to identify which employees should have their contracts renewed.
When the data on this page is edited as part of a contract renewal, if you want the renewal to occur automatically for employees who are associated with this contract and who have the Active and Renew Contract boxes checked on the Contracts tab in Workforce Administration, click the Renewal button. The Renewal pop-up will open.
If you only want to generate a report showing the employee contracts that will be renewed, leave the Report Only box checked, and click OK. A Contract Renewal Report will display in SSRS format, giving you the options to view it in other formats or send it to myReports.
If you want the contracts to be renewed, uncheck the box, and click OK. The report also will be displayed. For each employee, the renewed contract will be added as a row in the Employee Contracts grid on the Contracts tab in Workforce, with the payroll start and end dates and the contract start and end dates defaulted from the Employment Contract Entry page. The job grade/rate will be used to fill in the contract amount. All other data from the employee’s currently active contract will be copied to the renewed contract and may be edited. Only one contract may be renewed at a time.
Note: Since a snapshot of the job grade is taken at the time of renewal, it is recommended that you process pay rate changes prior to contract renewals. If a pay rate is not updated before the renewal, it’s recommneded to delete the conract, change the pay rate in the jobs tab, and then manually create the contract.
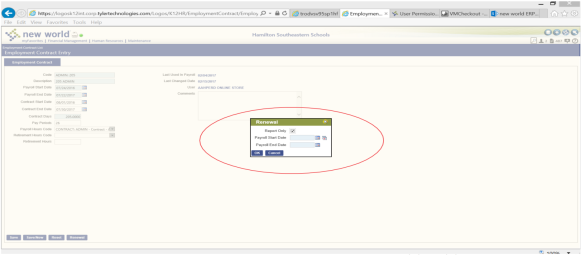
For the Renewal dates, they need to reflect the dates of the previous contract that is being renewed. For example, the new contract payroll dates are 07/24/2016 - 07/22/2017, so the renewal date needs to look at the previous contract date so that it knows what its renewing. For this example, you would need the dates of 07/22/2015 - 07/23/2016.
Note: When the report loads, you want the first page to say no records exist since it’s an audit report, then go to page 2 for the data.
If you want the contracts to be renewed, uncheck the box, and click OK. The report also will be displayed. For each employee, the renewed contract will be added as a row in the Employee Contracts grid on the Contracts tab, with the payroll start and end dates and the contract start and end dates defaulted from the Employment Contract Entry page. The job grade/rate will be used to fill in the contract amount. All other data from the employee’s currently active contract will be copied to the renewed contract and may be edited. Only one contract may be renewed at a time.
Employee Contracts
Human Resources > Workforce Administration > Search > Employee > Contracts
This section of the Contracts tab contains a grid of the contracts that are attached to the selected employee. Each row in the grid corresponds to a contract. Rows are sorted alphabetically by Contract, followed by Contract Dates in descending order.
On first navigating to this section, you will see only the active, or open, contracts. To populate the grid with all contracts ever assigned to the employee, including those that no longer are active, click the View All button, located on the right side of the section header.
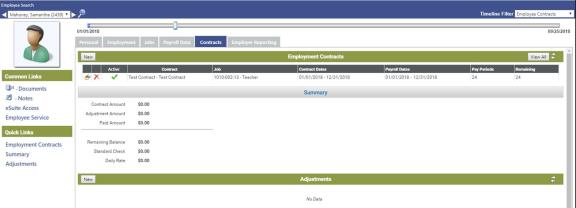
Once you have clicked View All, the button label will change to View Open. Click this button to repopulate the grid with active contracts only.
Contract Detail
Add or Edit a Contract
To add a contract to the grid, click the New button, located on the left side of the section header. The contract information fills in automatically based on the contract you pick and then you can select the job. Make sure the job pay rate is up to date because it pulls this one time when you add a new contract and once you change a job the contract calculation will not change. Otherwise an adjustment can be made (see adjustment section).
To edit a contract, click the edit icon, located in the left-most cell of the corresponding row. In either instance, the Contract Detail section displays below the grid. The fields in this section contain the details of the contract.
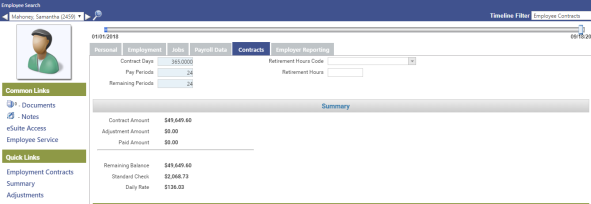
The Summary section displays the Contract Amount, Adjustment Amount, Paid Amount, Remaining Balance, Standard Check and Daily Rate. The Daily Rate is calculated as (contract amount + adjustment pay)/contract days and is rounded to two decimal places.
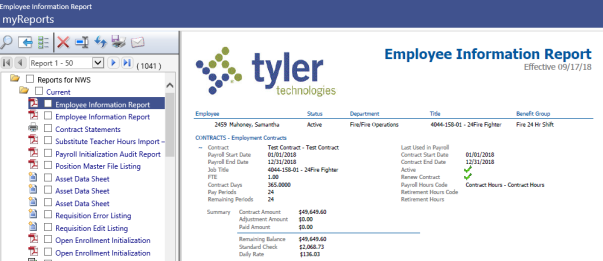
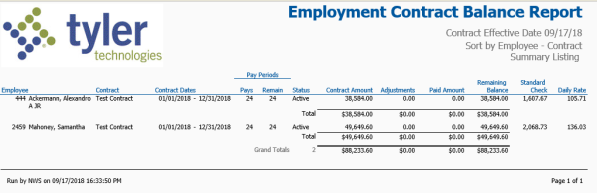
Information in this section also appears on the Employee Information Report and on all three versions of the Employment Contract Balance Report.
The following table contains descriptions of the fields in the Contract Detail section:
|
Field |
Description |
|---|---|
|
Contract |
Required. Code and description of the selected contract. After a new contract is saved, this entry cannot be edited. The contract will need to be deleted and re-added. |
|
Payroll Start Date |
Start date required. Date range during which contract payments will be processed through payroll. |
|
Payroll End Date |
|
|
Job Title |
Required. Code and description of the contracted job. This selection comes from the employee’s Jobs tab. When a contract is assigned to an employee, it is assigned to one job only and not to subsequent job events. Another contract needs to be assigned to another job. The effective period of a contract cannot overlap with that of another. A base contract is calculated from the job pay rate. After a new contract is saved, this entry cannot be edited. The contract will need to be deleted and re-added. |
|
FTE |
Number of employees (full-time equivalents) who may be active in this position at one time. This entry will default from the employee’s Jobs tab. |
|
Contract Days |
Required. Total number of days the contract is in effect. |
|
Pay Periods |
Required. Number of times the contract is paid during the length of the contract. Even if the employee belongs to a pay group, such as Biweekly, the payroll process will reference this number in calculating check amounts. |
|
Remaining Periods |
Required. Number of pay periods remaining for the contract. When a payroll is posted, this number will decrease by the number of contract payments that were made during the payroll period. Payments may include standard checks, separate checks and manual checks. The Remaining Periods number will continue to decrease until the number reaches 0.
Note: A voided contract payment will increase the number of Remaining Periods. |
|
Last Used in Payroll |
Last time the contract was processed in a payroll. If a Last Used in Payroll date is displayed on this page, the contract details cannot be edited. |
|
Contract Start Date |
Date range during which the contract is in effect. This date range will display on printed contracts. |
|
Contract End Date |
|
|
Active |
Tells whether the contract is active. This box is checked by default. |
|
Renew Contract |
Determines whether the contract will be renewed for the employee automatically when the contract template is updated and renewed from the Employment Contract Entry page in Employment Contracts Maintenance. When the contract is renewed, a new contract will be created and added to the Employee Contracts grid, with the payroll start and end dates and the contract start and end dates defaulted from the Employment Contract Entry page. The job grade/rate will be used to fill in the contract amount. All other data from the employee’s currently active contract will be copied to the renewed contract and may be edited. Only one contract may be renewed at a time. This process is similar to the Create Event process. |
|
Payroll Hours Code |
Hours code against which the contract is paid. Apply to Contract Pay must be checked on the hours code in Maintenance. |
|
Retirement Hours Code |
These fields track ORS hours. When you select a Contract, entries from the Retirement Hours Code and Retirement Hours fields on the Employment Contract Entry page in Maintenance will default here but may be overridden or cleared. Also, the Hours Code field in the Contract Detail section has been re-labeled as Payroll Hours Code to match the label of the same field on the Employment Contract Entry page. Note: When a contract is renewed, the retirement hours code and hours will default from the Contract Detail section in Workforce, not from Maintenance. The selection of a Retirement Hours Code requires the entry of Retirement Hours, and vice versa. Note: To use these fields, users will need permission to the Retirement Hours security component. Note: Payroll journal creation will include the hours code when creating payroll journals for wages. Journals will be created at the hours code-account level. |
|
Retirement Hours |
Summary
Human Resources > Workforce Administration > Search > Employee > Contracts
The Summary section, located immediately below the Employee Contracts section, summarizes the employee’s active contract, showing the total amount of the contract, the total amount of adjustments within the current payroll, the total amount that has been paid on the contract, the remaining balance of the contract and the amount of the standard check issued for the contract.
Note: This section will not display data until you have selected a contract in the Employee Contracts grid.

|
Field |
Description |
|---|---|
|
Contract Amount |
Total dollar amount of the contract. This amount comes from the Pay Rates grid in the Payroll section of the Jobs tab. Changing the pay rate on the Jobs tab will not affect the Contract Amount in the Summary section. |
|
Adjustment Amount |
Total dollar amount of the adjustments that have been made to the contract. |
|
Paid Amount |
Total dollar amount of the contract that has been paid to the employee to date within the payroll start and end dates of the contract, using the hours code that has been designated in Maintenance as applicable to contract pay. Including payments made by separate or manual checks written as a result of contract adjustments, this amount increases accordingly with each payroll post. |
|
Remaining Balance |
Contract Amount plus the Adjustment Amount minus the Paid Amount. Once contract is finished, this will be empty. |
|
Standard Check |
Dollar amount of each check paid to the employee, equal to the Remaining Balance divided by the Remaining Periods (from Contract Detail section of Employee Contracts). This amount may change as a result of adjustments. |
Summary Section Calculation Example
Contract Amount = $60,000
Adjustment Amount = $2,000
Paid Amount (have paid 10 out of 20 pays) = $30,000
Remaining Balance = $32,000
Standard Check (if 10 pays remain) = $3,000
If number of payments is changed so that 8 remain instead of 10, the Standard Check will equal $4,000 (Remaining Balance of $32,000 divided by 8 payments)
Daily Rate
Human Resources > Workforce Administration > Search > Employee > Contracts
Daily Rate has been added to the Summary section of the Contracts tab. It is calculated as (contract amount + adjustment pay)/contract days and is rounded to two decimal places:
This information also will appear on the Employee Information Report and as a new column on all three versions of the Employment Contract Balance Report.
Employee Information Report
Human Resources > Reports > Employee Reports > Employee Information Report
Employment Contract Balance Report
Human Resources > Reports > Employment Contracts > Contract Balance Report
Adjustments
Human Resources > Workforce Administration > Search > Employee > Contracts
Located immediately below the Summary section, the Adjustments section contains a grid of the adjustments that have been made to the contract within the payroll start and end dates. Each row in the grid corresponds to an adjustment.
Rows are sorted by Date in descending order, from latest to earliest.
Adjustments may be made to contract amounts and number of payments. An adjustment in pay may occur when an employee earns an additional degree, such as a master’s (any kind of pay rate change). Only the adjustments that occur up to the pay ending date of a payroll period are included in the payroll calculation.
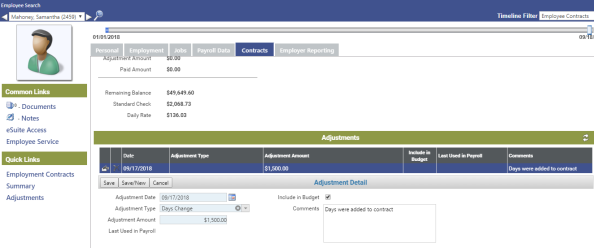
Add/Edit Adjustment
To add an adjustment to the grid, click the New button, located on the far-left side of the section header. An adjustment acts like a schedule as far as loading into payroll. The remaining balance divided by the remaining pay period is the amount that will load into the next payroll. Make sure to do the adjustment before you initialize payroll. If not, you can import contract pay per employee or by batch.
To edit and adjustment, click the edit icon, located in the far-left cell of the grid. In both cases, the Adjustment Detail section displays below the grid. The fields in this section contain the details of the adjustment.
Adjustment Detail section
|
Field |
Description |
|---|---|
|
Adjustment Date |
Date the adjustment is recorded. |
|
Adjustment Type |
From Validation Set 390, Employee Contract Adjustment Type. |
|
Adjustment Amount |
Dollar amount of the adjustment. This number may be positive or negative. |
|
Last Used in Payroll |
Displays the date of the last time the adjustment was processed in a payroll. |
|
Include in Budget |
Select to include the contract amount and adjustments of an employee's primary job in Position Budgeting calculations. Standard check amounts with any adjustments that have Include in Budget selected will be budgeted. |
|
Comments |
Free-form comments related to the adjustment. |
Note: Once an adjustment has been processed in a payroll, it cannot be edited or deleted.
Payroll
Human Resources > Payroll Manager
Initialize Pay Batch
Located on the left side of the page, the Pay Batch Summary section lists unposted pay batches currently in the system. Every payroll has its own Pay Group and Batch Number, so that multiple pay batches may be in progress at the same time.
Note: If you want a quick snapshot of the status, start date, end date and check date of a pay batch, hover the pointer over the Batch Number.
Initialized batches are displayed in blue and bold, uninitialized in gray. Initialized batches that have been printed also will show a printer symbol to the right of the batch number.
- To narrow the list of pay batches in the Pay Batch Summary section to all batches of a particular pay group, click in the Pay Group field, and select a pay group from the resulting list.
- Click the uninitialized (gray) Batch Number you want. The Initialize Batch page will open.
Note: A double-arrow button in the top-left corner of every Payroll Manager page lets you display or hide the Pay Batch Summary section. If the double arrows are pointing to the right, click the button to display the Pay Batch Summary section. When the section is displayed, you may select another pay batch. If the arrows are pointing to the left, click the button to hide the section.
- Visible when Split Payroll by Fiscal Year is selected on the Financial Management Setup page of Company HR Settings, Split Date is required if you want to split payroll. The default split date will be the first day of the Default Fiscal Start Month selected on the G/L Setup tab of the Company Suite Settings page.
Note: If batch initialization is submitted with a split date that is not the first of the month, the following warning will be provided: "The expected Split Date is the first day of the month." The employee wages will split from this day forward.
If an employee has a benefit (Benefit A) with the Split Between Fiscal Years check box selected on the Benefit page in Maintenance and another benefit (Benefit B) with the check box deselected, Benefit A will be prorated based on the wage; for example, if the benefit is 500 and the employee is paid 200 in the first month and 800 in the second month, 20% of 500 will go in the first month and 80% will go in the second month. All of Benefit B will go in the second month.
- To determine what information is loaded and created when the pay batch is initialized, select or deselect the applicable boxes in the Options section:
contractscontracts
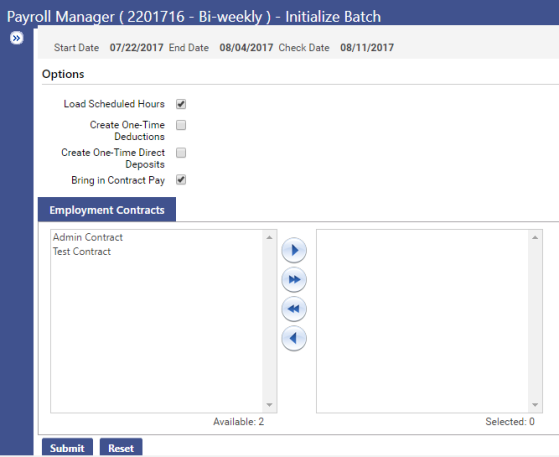
- If applicable, in the Available employee contracts list box, select the contracts that are to be included in the pay batch, and move them to the Selected box. Along with the schedule for the related job, the initialization process will bring in the selected contracts for payment. The payroll calculation will divide the flat amount of each contract by the number of pays.
Click Submit to begin the initialization process.
If errors occur, the process will be suspended, and the error descriptions will display at the top of the page. Errors must be fixed before a payroll can proceed. Common error messages refer to employees without general ledger accounts, positions or primary departments. If the initialization is successful, a small pop-up will open to tell you the "Calculation completed successfully."
Note: Often all contracts are moved over unless there are some contracts that don’t get paid every pay period for example those with periodic lump sums.
- Click OK on the pop-up. The Payroll Manager home page will reopen, with hyperlinked descriptions and corresponding icons of all steps involved in processing the initialized batch displayed in workflow order down the left side of the page. All steps may not be required to complete your payroll. Typically, the minimum number of required steps include Centralized Hours Entry, Validate, Payment Processing and Post Payroll.
Note: Once a pay batch has been initialized, you may suspend and restart the payroll process for that batch at any time before the actual checks are processed. However, if a mistake is make on the initialize screen, you have to reinitialize payroll.
Note: For K-12 organizations Organization sets are not used in payroll, instead employees are assigned full GL accounts. Also note that the Retro Pay module cannot be used.
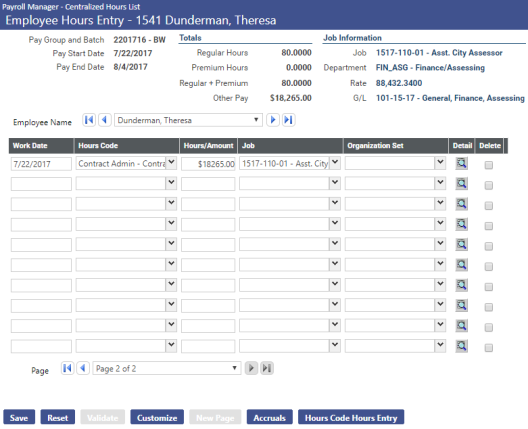
Once the batch is open, you can see the loaded contracts in the timesheets.
Import Contract Pay
Human Resources > Payroll Hours > Import Contract Pay
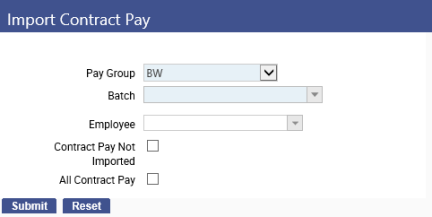
The most common use case is when they made changes to Contracts after payroll was initialized and they need those changes accounted for in payroll.
Note: To use this feature, users will need permission to the Import Contract Pay security component.
The factors determining the amount to be paid for a contract will include the following:
- Posted payroll (not the current batch or any open batches)
- Plus or minus adjustments as of the pay end date of the batch, divided by the remaining pay periods prior to this batch
Note: When the contract pay is initialized, contract pay amounts that have occurred during the current payroll will not be considered.
|
Field |
Description |
|---|---|
|
Pay Group |
Pay group to be initialized. This selection filters the Batch drop-down so that only those batches associated with the selected pay group will show. |
|
Batch |
Identifies the unposted batch of pay data to be initialized. |
|
Only one of the following three may be selected: |
|
|
Employee |
For the selected batch, drop-down contains all employees who had their contracts selected but whose contract pay has not been imported. |
|
Contract Pay Not Imported |
Select to have contract pay imported for all employees on the Employee drop-down. |
|
All Contract Pay |
Select to have previously imported contract pay deleted and re-imported for all employees on the Employee drop-down. |
Import Substitute Teacher Hours
Human Resources > Payroll Hours > Import Substitute Teacher Hours
If your organization uses a third-party program to track substitute teacher work data, you will import those hours to the Substitute Teacher Entry page using this feature. Import files must be in CSV (comma separated values) format.
User Permission to Import Substitute Teacher Hours
To use the Import Substitute Teacher Hours feature, users will need permission to its security component:
- Navigate to Maintenance > new world ERP Suite > Security > Users.
- Select the user.
- Click the Permissions button.
- Click the Show Search link.
- In the Component Name field, type import substitute teacher hours (the field is not case sensitive).
- Click the Search button. The grid will refresh to show the Import Substitute Teacher Hours component.
- Select All so that a green check appears in the column.
- Click Save. Permission to Import Substitute Teacher Hours will take effect after the user logs off and logs back on the system.
Sample third-party file, each line equating with one substitute teacher hours record
Items each line may contain and order in which they must appear to be imported successfully
- TeacherNew World ERP
- TeacherNew World ERP
- Teacher HoursNew World ERPHoursteacher
- HoursTeacher Hours
- hoursNew World ERP
- Substitute TeacherNew World ERP
- Substitute TeacherNew World ERP
- Substitute Teacher HoursNew World ERPHourssubstitute teacher
- Substitute TeacherSubstitute Teacher Hours
- Substitute TeacherSubstitute Teacher Hours
- New World ERP
Fields Import Wizard Page 1
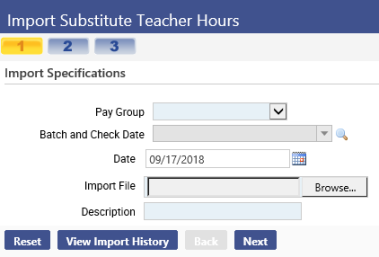
|
Field |
Description |
|---|---|
|
Pay Group |
Required. Pay group for which hours will be imported. |
|
Batch and Check Date |
Required. Pay batch and check date for which hours will be imported. |
|
Date |
Required. Date of the import. The current date is the default. Click the calendar prompt to select a different date or type the date directly in the control. |
|
Import Type |
Required. Import type defined in Maintenance (Maintenance > new world ERP Suite > System > Import/Export > Import Type List). Click the drop-down prompt to select from a list of available import type(s). Note: The list will contain only the payroll import type(s) you defined in Maintenance. |
|
Import File |
Required. Tells the path to the CSV file you are importing. Click the Browse button to select the file or type the path directly in the control. |
|
Description |
Required. Free-form description of the import, 50 characters maximum. |
To reset entries to the way they were when page 1 of the import process last was opened, click Reset.
After making your entries on page 1 of the import wizard, click Next to open page 2.
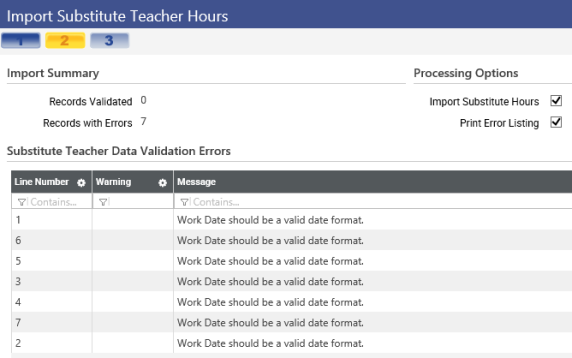
This page displays a summary of the initial processing of the import file, including the details of any data errors that have been detected.
The Import Summary section tells how many payroll hours records are valid for import and how many records contain errors.
The Substitute Teacher Data Validation Errors section describes the data errors.
In the Processing Options section, you may select any of the following:
|
Field |
Description |
|---|---|
|
Import Substitute Hours |
Imports payroll hours records that have been deemed valid for import (see Import Summary section). This check box is selected by default. |
|
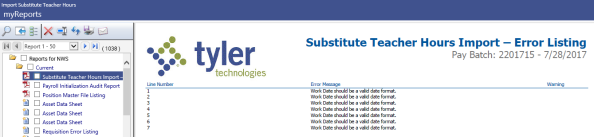
Print Error Listing |
Generates a listing of errors associated with the import and sends it to myReports. This check box is selected by default. |
After reviewing the information and making your selections, click Finish to complete the import process and open the third and final page of the import wizard.

This page shows the results of the import, including the number of records imported successfully. If errors occurred, the error messages and the line numbers where they appear will be listed under the Substitute Teacher Hours Process Errors header.
If you want to re-import the file or import a new file, click Reset. You will be returned to the first page of the import wizard.
If you need to go back and view the results of an import, click the View Import History button available on all three pages of the import wizard.
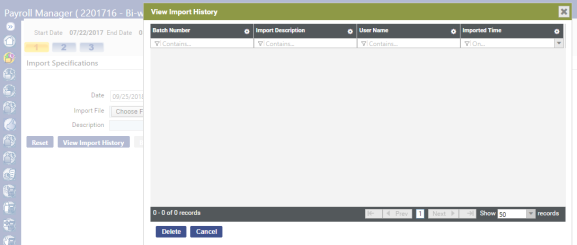
If a pay batch of imported records has been printed or posted, the Delete button on the View Import History dialog will be disabled.
Once you have imported the records, navigate to Human Resources > Payroll Hours > Substitute Teacher Entry, select the Pay Group, the Batch and Check Date, and click Search. The records will populate the Substitute Teacher Entry grid.
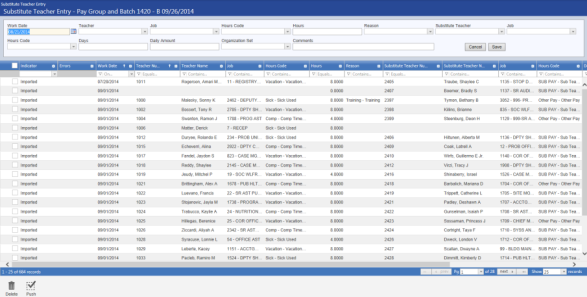
Note: When a record is imported into Substitute Teacher Entry, all corresponding records in Payroll Hours are invalidated.
Payroll Manager also provides an option to import substitute teacher hours.
Substitute Teacher Entry
Human Resources > Payroll Hours > Substitute Teacher Entry
Use this page to make teacher and substitute teacher entries for a selected work date. You can import this into payroll on top of what is already there. This allows of a substitute to take on attributes for who they are subbing for (GLs, etc.) and receive a flat amount pay for the day. This can be worked on even if payroll is not open.
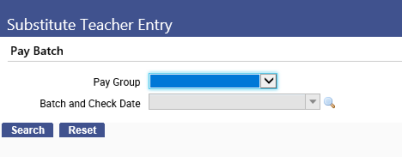
Search for the pay batch.
Enter in the substitute per the fields in the table below.
Note: To use this option, users will need permission to the Substitute Teacher Entry security component.
|
Field |
Description |
|---|---|
|
Work Date |
Date for which hours are being recorded. If the date does not fall between the pay batch start and end dates, it will appear in red. If Default Work Date is selected on the Hours Entry Setup page in Company HR Settings, today's date will default in the field. |
|
Teacher |
Teacher who required a substitute. |
|
Job |
Teacher's primary job as of the Work Date selected. |
|
Hours Code |
Required if a Teacher is selected, hours code for teacher's absence. |
|
Hours |
Required if a teacher is selected, number of hours taken in leave. |
|
Reason |
Reason for teacher's absence. |
|
Substitute Teacher |
Teacher who substituted. |
|
Job |
Substitute teacher's primary job as of the Work Date selected. |
|
Hours Code |
Required if a substitute teacher is selected, hours code for substitute payment. If a substitute teacher hours code default has been set up in Company HR Settings, it will default here. Only flat-amount hours codes apply. |
|
Days |
Required if a substitute teacher is selected, proportion of a day being subbed. |
|
Daily Amount |
Required if a substitute teacher is selected, pay rate for the substitute. If applicable, the dollar amount from the hours code will default here. |
|
G/L Account |
An override general ledger account for the substitute. If a teacher and substitute are selected and the teacher has one distribution, the teacher's general ledger account will default here. |
|
Comments |
Free-form text comment. |
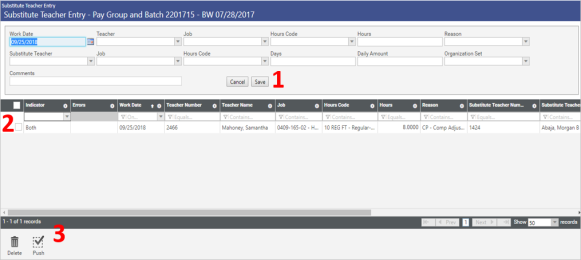
After you have made your selections, click Save to validate and save them. A row containing your selections will be added to the grid. In the first column of the grid, use the Indicator drop-down to select whether you want the grid to show only the rows with errors, only teachers, only substitute teachers or teachers and substitute teachers. If one or more errors occurred on validation, a red X will display in the second column. Click the X to display a pop-up of the error description(s).
To push one or more validated substitute teacher hours entries to payroll hours entry, select the check boxes corresponding with the appropriate entries, and click the Push button in the bottom-left of the page. To push all validated hours entries, you need only click the Push button without selecting check boxes.
Once in payroll hours entry, the hours are not editable since it’s pulling directly from this module, so you will need to do any updates in the Substitute Teacher Entry and re-submitted.
If a substitute teacher entry includes a full-time teacher and a substitute, two payroll hours records will be created in hours entry.
For manual check processing, select only a teacher or substitute teacher, since the pay batch will contain only one employee.
Changing a record in Substitute Teacher Entry will invalidate all corresponding records in payroll hours entry.
To delete a row from the grid, select it and click the Delete button in the bottom left of the page.
Note: Substitute teacher entries cannot be edited after checks have been printed or posted.
Reports
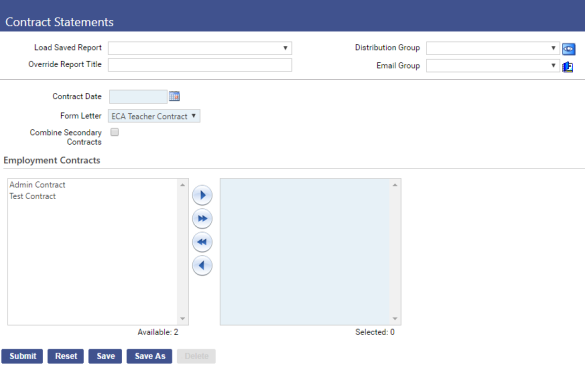
Contract Statements
Human Resources > Reports > Employment Contracts > Contract Statements
Using mail merge templates, the Contract Statements page lets you generate and print the contracts that employees may review, sign and return to the appropriate departments.
Security
Unless you choose to include each employee’s secondary contract data with the primary contract data on the same statement, one statement per contract will be produced for each employee.
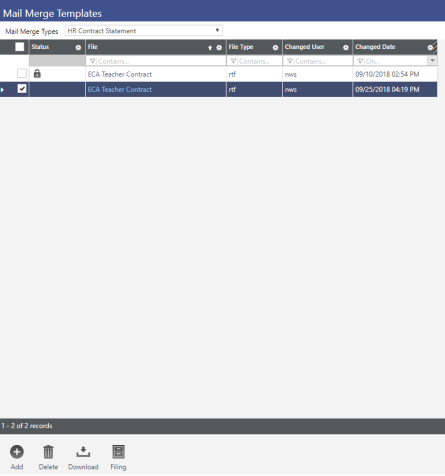
Data fields may be added, deleted and rearranged on the mail merge templates. A sample mail merge template, HR Contract Statements, has been created for use in Mail Merge Templates (Maintenance > new world ERP Suite > System > Mail Merge Templates).
Fields
|
Field |
Description |
|---|---|
|
Payroll Start Date |
Required. Payroll date range for which contract statements will be generated. Statements will be generated for selected contract types that were being paid during this time. |
|
Payroll End Date |
|
|
Form Letter |
Required. Mail merge template to be used in generating and formatting the statements. Templates are sorted alphabetically on the drop-down. To view, edit or create a mail merge template, navigate to Maintenance > new world ERP Suite > System > Mail Merge Templates. |
|
Combine Secondary Contracts |
Determines whether to group an employee’s secondary contract job(s) on the same statement with the primary contract job. Secondary contract data will be summarized. |
List Boxes
Use the Employment Contracts list boxes to select the contract types for which statements will be generated. To select a contract type, move it from the Available box to the Selected box.
The contract types listed in the Available box come from the Employment Contract List page in Maintenance (Maintenance > Human Resources > Employment Contracts).
Once you have made your entries on this page, click the Submit button to create the statements in myReports. The form will generate, filling in the tagged fields automatically.
Create a Mail Merge Form
- Navigate to Maintenance > new world ERP Suite > System > Mail Merge Templates.
- From the Mail Merge Types drop-down, select Sample Templates. Use these templates to create your mail merge form.
- Click the Description link of the form you want to create. A File Download pop-up opens.
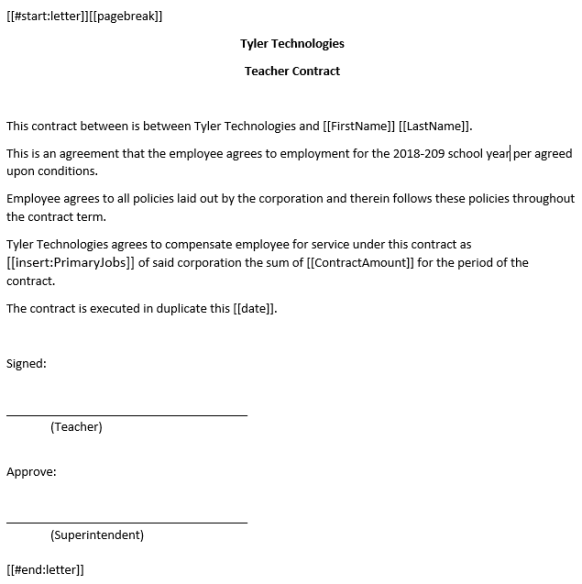
- Click Open. The sample template opens in Microsoft Word. You may work off this form or begin a new Word document. The fields in brackets [ ] are the mail merge fields.
- Copy and paste these fields where you want the information to appear on the mail merge form. All forms must begin with [[#start:letter]][[pagebreak]] and end with [[#end:letter]].
- After you have edited the form, navigate to File > Save As. The Save As pop-up opens.
- Save the form as the file type specified on the template to the drive and folder of your choice. After you save the form, check it in. This process saves it to the New World ERP server.
- From the Mail Merge Types drop-down, select the type of form to check in.
- Click Add to add a new form. An Upload Document pop-up opens.
- Select the File Type (RTF, XML, etc.). Type a Description for the form.
- Browse for the file you saved on your computer. Double-click the file to enter it in the File box on the Upload Document pop-up.
- Click OK. The form you uploaded is added to the grid on the Mail Merge Templates page, showing a green check mark in the Status column.
The second half of the check-in process involves placing a copy of your file on the server.
- Click Filing and Check In. The Upload Document pop-up opens again.
- Browse for your file. Double-click the file to enter it in the File box of the Upload Document pop-up.
- Click OK. The form is checked in, and the green check mark is removed from the Status column of the Mail Merge Templates page.
- Now that your form is checked in, click Filing and Finalize to complete the process. A padlock icon appears in the Status column of the Mail Merge Templates page. Your mail merge form now may be used.

Sample fields with tags:
[[#start:letter]][[pagebreak]]
Date: [[date]]
Employee Name: [[FirstName]]
[[MiddleName]]
[[LastName]]
[[Title]]
[[Suffix]]
Employee Number: [[EmployeeNumber]]
Employee SSN: [[EmployeeSSN]]
Contract Description: [[ContractDescription]]
Payroll Start Date: [[PayrollStartDate]]
Payroll End Date: [[PayrollEndDate]]
Contract Start Date: [[ContractStartDate]]
Contract End Date: [[ContractEndDate]]
Pay Periods: [[PayPeriods]]
Contract Amount: [[ContractAmount]]
Employee Grade: [[EmployeeGrade]]
Employee Grade Step: [[EmployeeStep]]
Projected Annual Salary: [[ProjectedAnnualSalary]]
Contract Days: [[ContractDays]]
Pay Group: [[PayGroup]]
Standard Pay Check: [[StandardPayCheck]]
Daily Rate: [[DailyRate]]
Primary Adjustments:[[PrimaryAnnualAdjustment]]
Total Adjustments: [[GroupedAnnualAdjustment]]
Secondary Adjustment Total:[[SecondaryAdjustmentTotal]]
Secondary Contract Total:[[SecondaryContractTotal]]
Grand Total:[[GrandTotal]]
Adjustments
[[insert:Adjustments]]
Secondary Jobs
[[insert:SecondaryJobs]]
[[#end:letter]]
[[#start:Adjustments]]
[[ContractDescription: Contract:20:left]]
[[AdjustmentDate: Adjustment Date:20:center]]
[[AdjustmentType: Adjustment Type:20:left]]
[[AnnualAdjustment: Annual Amount:20:right]]
[[#end:Adjustments]]
[[#start:SecondaryJobs]]
[[ContractDescription: Contract:30:left]]
[[ComputedJobTitle: Job Title:30:left]]
[[ContractAmount: Amount:30:left]]
[[#end:SecondaryJobs]
Employment Contract Balance Report
Human Resources > Reports > Employment Contracts > Contract Balance Report
This page lets you generate reports showing the remaining balances of employee contracts. According to the effective date, contracts and departments you select, the appropriate data will be extracted from the Workforce Administration Contracts tab and provided in SSRS format, with options to recast the data in other formats for easy editing.
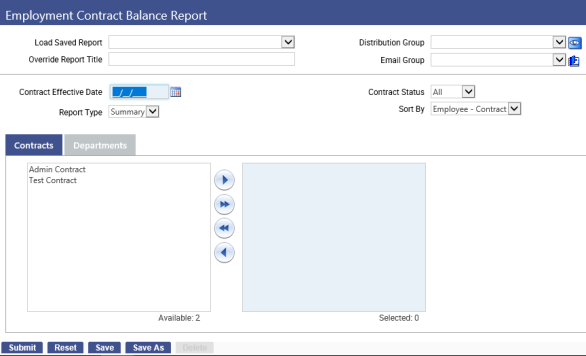
You may run summarized and detailed versions of the report and sort the output by employee or contract.
Permissions
- Department security will be handled through the report user interface.
- Security will be by department, filtered by user.
- With a contract tied to a job, the department security configured for that contract will be used.
Department Security Setup
- Navigate to Maintenance > new world ERP Suite > Process Manager.
- Select Payroll-Department/Employee Inquiry.
- Click the Set Up Departments button.
- Set up the departments for the user.
- Click Save.
Security Component
To authorize users to view and generate the Employment Contract Balance Report, follow these steps:
- Navigate to Maintenance > new world ERP Suite > Security > Users. The User List page will open.
- Select the user.
- Click the Permissions button. The Permissions page will open.
- Click the Show Search link, located in the top-right corner of the page.
- In the Feature Group field, select HR-Reports.
- In the Component Name field, type contract balance. (Entries are not case sensitive, and partial entries are acceptable.)
- Click the Search button.
- Select the Employment Contract Balance Report row.
- Click in the All cell until a green check mark appears in the All and Print cells.
- Click Save.
- For the authorization to take effect, the user will need to log off and log back on.
Fields
|
Field |
Description |
|---|---|
|
Load Saved Report |
Saves this version of the report as a template for later use. When you click Save, a dialog will ask you to name the report. Type the name, and click OK. The next time you want to run this report, select its name from the Load Saved Report drop-down, and the fields will be populated automatically. If necessary, you may edit entries before running the report. You may save as many templates as you would like. |
|
Override Report Title |
Overrides the default report title, (Employment Contract Balance Report. |
|
Distribution Group |
A group of people selected to receive the report in myReports. Click in the field to select from a list of existing groups, or click the blue-eye prompt to create a new distribution group. The report will be sent to myReports for each person in the group. |
|
Email Group |
A group of people selected to receive the report by email. Click in the field to select from a list of existing groups. |
|
Contract Effective Date |
Beginning contract date—for example, selecting a date of 11/01/2013 and a Contract Status of Active would return all active contracts as of a start date of 11/01.2013. You may click the common dates prompt to select a list of time intervals, such as, This Week, Last Month, This Year, etc. |
|
Report Type |
Summary or Detail. Summary displays one line per contract with corresponding values for the contract. The adjustment total will reflect the aggregate amount of all adjustments that make up the total. Detail display the adjustment amount per contract for an employee. The total of each adjustment line item is the sum of the total adjustment amount on the summary report type. |
|
Contract Status |
Active, Inactive or All contracts. |
|
Sort by |
Sort options for summary report only: Employee-Contract or Contract-Employee . This field is disabled when the Report Type is Detail. The detail report sorts automatically by employee. |
Multi-Select List Boxes
The Contract, Department tabs contain multi-select list boxes for the selection of contracts and departments to be included in the report. Select at least one contract and one department.
From the Available list box, select one or more contracts or departments.
To select multiple items dispersed throughout the list, hold down the <Ctrl> key while selecting. To select multiple, consecutive items, hold down the <Shift> key, and select the first item, then the last. Selected items will be highlighted.
To move selected items from the Available to the Selected list box, click. To move all items, selected or not, to the Selected box, click.
To return selected items to the Available box, click. To return all items to the Available box, click.
After making all of your selections on this page, click Submit to generate and display the report. Once the report displays, you will have the opportunity to send it to myReports as a PDF or to save the data in other formats, such as CSV, Excel and Word.
Note: Amounts shown in the Summary section of the Workforce Administration Contracts tab should equal the amounts shown on the Employment Contract Balance Report.

Other Yearly Processes
Fiscal Year End Accruals
Human Resources > Year End Processing > Fiscal Year End Accrual Report
This process is just for K-12 Michigan customers. Depending on when you run this, it will calculate the expenses for any payrolls remaining from that point forward until the end of the contract year. It will generate a Journal Import file for each pay period that is then imported on the FM side, so the payroll expense is recognized in the current fiscal year.
If your fiscal year differs from your contract year, you may run this report to determine your remaining contract expenses following the end of the fiscal year; for example, if the fiscal year ends on 6/30 and teachers' contracts run until 8/30, the report will show what is left to be paid between 6/30 and 8/30.
All employer-related costs, including wages, employer taxes and benefits, will be calculated. Once this data is generated, contract-year payments may be exported to the fiscal-year books.
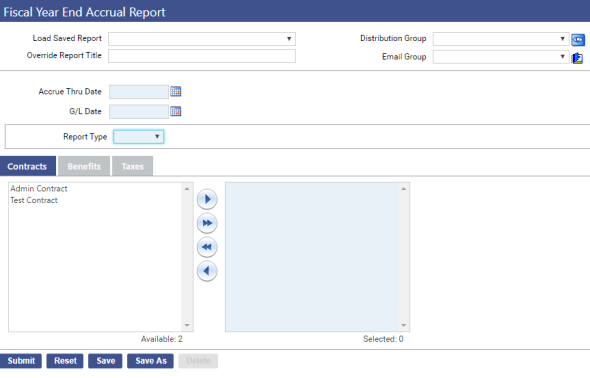
Fields
|
Field |
Description |
|---|---|
|
Accrue Through Date |
Required. Amounts calculated from today’s date through this date. Data will be calculated according to the number of pay batches created during this time frame. |
|
G/L Date |
Required. Date the results of the calculation are to be exported to the Financial Management Journals. The text (csv) file that is created as part of the report process and intended for export to the Financial Management Journals will contain this date. |
|
Report Type |
Required. Summary or Detail. The summary report will present data by employee, while the detail report will present data by batch. |
Multi-Select List Boxes
Use the multi-select list boxes to select the types of contracts, benefits and taxes to be included in the calculation. To select a contract, benefit or tax, click the corresponding tab. The list box on the left (Available) is populated with all available selections. In this box, select the contract, benefit or tax tied to the employees you want the report or transmittal file to contain, and click the right-arrow button to move your selections to the list box on the right (Selected).
Note: The contract types listed in the Available box come from the Employment Contract List page in Maintenance (Maintenance > Human Resources > Employment Contracts).
Note: In selecting the taxes, you will want to include only the employer-related taxes: FICA, Medicare, FUTA and SUTA.
Once you have made your selections on this page, click the Submit button to generate and submit the Fiscal Year-End Validation Error Report, Fiscal Year-End Journal Register and Fiscal Year-End Journal Export File to myReports. The data in the Fiscal Year-End Journal Export File matches the standard text (csv) file format that may be exported to the Financial Management Journals.
Each export file will equal one pay batch; for example, if five pay batches are included in the time period for which the report is run, five export files will be created.
Although payrolls are calculated through this process, they are not actually run (refer to the example below).
Note: Each time this report is submitted, data will be recalculated.
Export to Financial Management Journals
To export fiscal year-end accrual data to the Financial Management Journals, follow these steps:
- Navigate to Financial Management > Journals > Journals. The Journal List page will open, showing a grid of journals.
- Click the Import button, located in the bottom border of the grid. The Journal Import page will open.
- In the Import Type field, select Journal Import (Standard CSV). (The Fiscal Year-End Journal Export File, generated when you run the Fiscal Year-End Accrual Report, has been designed for this type of import.)
- Perform the remaining steps of the import process.
- When the next normal payroll process is run following the date of the import, you will reverse the journal that has been posted to Financial Management to create a net effect of zero.
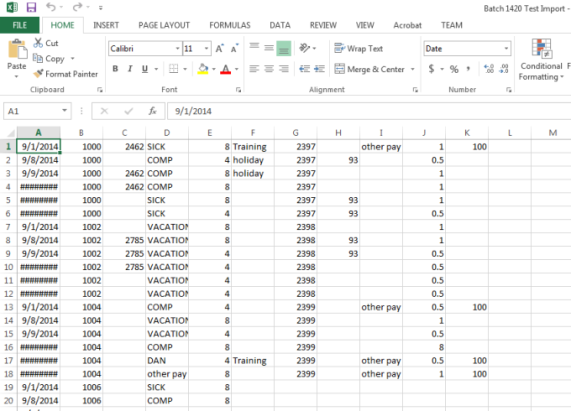
Sample Fiscal Year-End Journal Export File
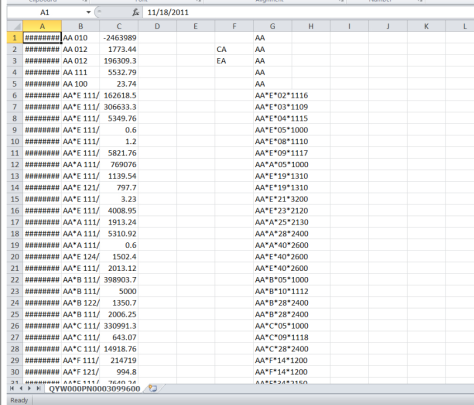
The image above shows the format of the file you will export to Financial Management Journals.
From left to right, the file contains the following columns of data:
GL Date
GL Account
Amount
Description (blank)
Source (blank)
Due To/Due From Fund
Org Set
Project Code 1
Project Code 2
Project Code 3
Pay Rate Increases
At the beginning of the school year (usually around October but timeframe varies school to school), most schools give pay rate increases to their teachers. Due to how contracts work in the system, New World usually scripts this process.