Inspection Processing
Welcome to New World ERP Inspection Processing. This topic will guide the user through both the setup and processing aspects of Inspection Processing.
It is divided into two sections:
The System Administrator will focus on the set-up components necessary to utilize Inspection Processing within New World ERP. This will include detailed information on master files that must be set-up such as Inspection and Inspector types, and will also include the security settings which will be utilized to enable workflow and tailor user options to your needs.
The End User will describe the steps, workflow and options available in Inspection Processing to the end-user. It will guide you through the process from requesting inspection, through to scheduling and logging inspections.
System Administrator
Community Development System Settings
Maintenance > Community Development > Systems Setting s> Inspections Tab
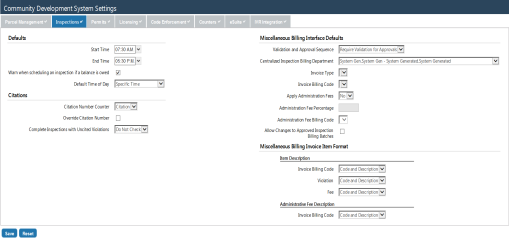
The System Settings area contains universal behavior that will control system behavior within the Inspection Module.
The following fields are available in the Inspections tab. The setup in this tab will allow users to perform different functions within the Inspection module. The fields are listed below:
Defaults Header
Start Time – The default start time for inspectors in your organization. Note: This can be changed for each unique inspector if desired in Inspector Maintenance.
End Time – The default end time for inspectors in your organization. Note: This can be changed for each unique inspector if desired in Inspector Maintenance.
Warn Checkbox – Select this if you would like a warning message to populate should there be a balance owning on the inspection parent (i.e., Permit Balance owning).
Default Time of Day – Select from four options: Specific Time scheduling, Any Time scheduling, AM scheduling, or PM scheduling. Note: All options are always available to users that desire unique scheduling types. The default may be changed to any of the other three choices for any inspection.
Citations Header
Note: This will be required only if your organization uses the Inspection Citation Billing module.
Citation Number Counter – Select the desired counter from the drop-down. If nothing populates in the drop-down, create the citation counter by navigating to Maintenance > new world ERP Suite > System > Counters
Override Citation Number – Check the box should you want the ability to override the system created citation number
Miscellaneous Billing Interface Defaults Header
Note: This will be required only if your organization uses the Inspection Citation Billing module.
Validation & Approval Sequence – Determines the requirements for batch validations and approvals. Financial Management staff may be helpful in this determination.
Centralized Inspection Billing Department – Select the department that will be managing the inspection billing invoices.
Invoice Type – Select the Invoice Type that will be used for inspection billing. Financial Management staff may be helpful in this determination.
Invoice Billing Code – Select the appropriate billing code for Inspection Billing. Financial Management staff may be helpful in this determination.
Apply Administration Fees – Select whether or not Administration Fees will apply to Inspection Billing.
Administration Fee Percentage – If Administration Fees will apply, select the appropriate percentage charged.
Administration Fee Billing Code – Select the appropriate billing code for the Administration Fee if applicable. Financial Management staff may be helpful in this determination.
Allow Changes to Approved Inspection Billing Batches – Financial Management staff may be helpful in this determination.
Miscellaneous Billing Invoice Item Format Header
Note: This will be required only if your organization uses the Inspection Citation Billing module.
This area allows users to decide what content will display on the Inspection Billing Invoice. Select Code, Description, or Code & Description for the following:
Invoice Billing Code, Violation, Fee & Invoice Billing Code
Inspection Maintenance
The following options are available for administrators that are managing the back office setup of the Inspections Module. Access this area of the software by navigating to Maintenance > Community Development > Inspections:
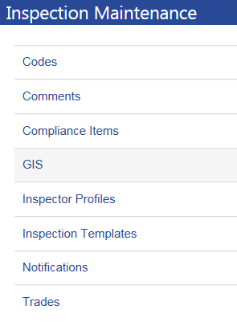
The items to be managed in the Inspections Module are listed in alphabetical order. However, there is some logic to consider regarding the order in which each attribute is setup. If setting up the system for the first time, this guide recommends the following order:
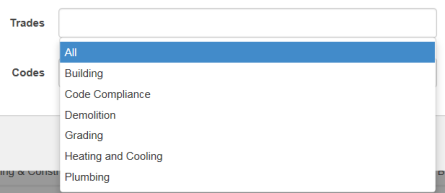
Trades
Trades are used as a sorting tool for various Inspection Maintenance items. Each trade serves as a grouping mechanism to categorize and filter data based on the type of trade and its association with a particular inspection template. You may assign multiple trades to codes, comments, compliance items and inspector profiles.
Examples include, but are not limited to: Building, Engineering, Planning, Electrical, Mechanical, Plumbing, Code Enforcement, Rental, etc.
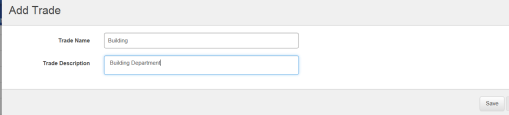
Adding a Trade
To create a Trade, click the Add Trade button:

Enter a required Trade Name and trade description if desired. Click Save when finished:
Inspector Profiles
Use this feature to add and edit each inspector’s contact information and default work schedule. An inspector may be an employee of your organization or an outside contractor. If the inspector is an employee and you are using the New World ERP Human Resources application, his or her contact information will be defaulted from Workforce Administration.
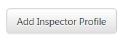
Adding an Inspector Profile
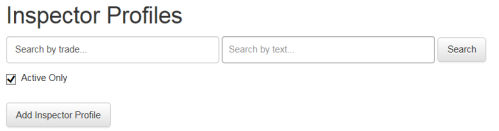
Click on the Add Inspector Profile button:
Inspector Profile Tab Features:
Inspector Type – Inspectors can be classified as External, Internal or Third Party Contractor.
- External – Classify your inspector as external if you do not use the New Word ERP Human Resources software for employee tracking, or if you simply do not want to select your inspectors from a list of Human Resources Employees
- Internal – Classify your inspector as internal if you prefer to create your inspectors from the Human Resources Employee list. A drop-down list will populate if you choose this option
- Third Party Contractor – Classify your inspector as such and a list of vendors will populate in a drop-down list. This will be the vendor list used for Miscellaneous Billing and Accounts Payable vendors. This list is typically created and managed by the Finance Department. Note: If the third party inspector you are trying to create is not available in this list, use the External option listed above as an alternative
Active Checkbox – Leave this box checked as long as the individual is serving your organization as an inspector
Link to User – This feature links the inspector to their New World ERP user profile, and is required if your organization will be using the Inspection Mobile App in the field. Otherwise this is not a requirement.
Job Title – A placeholder for the inspector’s title if desired
Trades – Attach a trade (or multiple trades) to the inspector to aid in search classification
Inspection Worksheet – Select the Standard form or a Custom Worksheet (built in the Mail Merge module) for that individual’s daily run sheet (or other documentation).
Inspection Result Form – Select the Standard form or a Custom Result Form (built in the Mail Merge module) for the individual’s inspection result report.
General Information – Enter the personal details of the inspector here. Include the email address of the inspector if you would like to utilize the Appointment Invitation functionality. First & Last Name are required. Note: If using the Human Resources List to create inspectors, the full proper name of the individual will default into the First, Middle & Last Name fields. These may be overwritten here to display the name of your choosing in the software.
Note: The Receive Appointment Invites checkbox when selected, will push scheduled inspections to the Inspectors Microsoft Outlook Calendar, if Outlook Integration has been administered in your environment.
Company Information – Enter the company details for third party inspectors here if desired
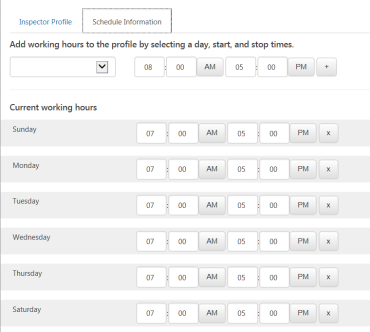
Schedule Information Tab – Add working hours to the inspector profile by selecting the days and times the inspector is normally on duty. Users will receive warning messages when trying to schedule inspections during the off times of the inspector. Click SAVE when finished.
Codes
This feature will be a repository for any desired code regulation data (i.e. ICC, IFC, Local Municipal Code, etc.) that you would like to track on your inspections. The software offers the ability to upload these as a group via an import template or individually on a manual basis. Linked to Compliance Items (discussed later), these Codes may be shared across multiple trades.
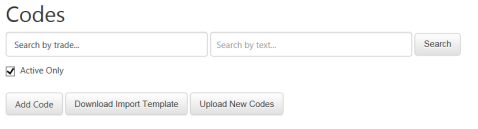
Adding Codes Manually
Click on the Add Code button:

Book/Year – Enter the Code Book and Year here. (Examples might include IFC 2012, City Ordinance 2014, ICC 2015, etc.). This is a required field.
Code – The code number assigned by the Book (i.e. 301.2 or 415.27 (a)). This is a required field.
Identification – A short description of the code. Typically the title of the code ID. (i.e. Unlicensed Vehicles). This is a required field.
Short Description – An abridged version of the official code text (Required)
Description – Official language from the code library describing the code in detail. This tends to be the “long” version of the code. (Required)
Code Comment – Free form text field for additional notes on the code if desired
Effective Date – Defaults to the current date with the ability to select a date from the date selector.
End Date – Date the selected version of the of the code is no longer in effect
Trades – Select the trade(s) that the code applies to. In doing so, the trade will only populate for compliance items that have a matching trade. This will simplify the user’s selection process and increase efficiency.
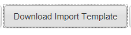
Adding Codes with the Import Template
Click on the Download Import Template button:
Add data to the spreadsheet - An Excel Spreadsheet with 8 column headers will open. The headers represent the Codes data fields mentioned above. Note that the required fields are marked with an asterisk (*). Fill out the spreadsheet and save it to your computer
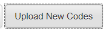
Click on the Upload New Codes button:
Click the Select File button when the window opens:
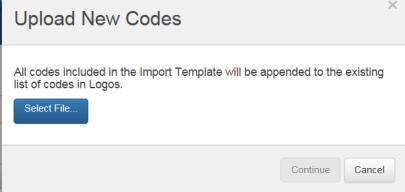
Once you’ve selected the Import Template, click the Continue button. A window will appear indicating the success or failure of your import. Note that the import will append the Codes list, it will not overwrite it. Additionally, Trades are not an importable feature so you will want to add trades to the newly imported Codes. These will be easy to spot as Codes in the list that already have Trades will display them in green, just beneath the Code. Your newly imported Codes will not have this displayed.

Adding New Versions of a Code
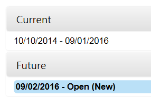
The software offers the ability to update Codes to accommodate changes in the Code Book over time. The Version History section contains three sub-sections showing the effective dates of the Current version of the code, the Future version(s) and the Archived version(s) for historical records. Click the title bar of each sub-section to view or hide effective dates
To update a Code, click on the Code Link from the Codes list
Give the current version of the Code an End Date based on the date you plan on adopting the new version of the code. Click Save when finished.

Click on the New Version button:

The system will open a new Code Profile and add a new date range starting one day after the End Date of the Current Code profile:
At this point, the Administrator can make any changes to any of the offered Code Fields. Click Save when finished. As of the future Effective Date, the new Code and its newly changed features will become available to inspectors.
Compliance Items
Compliance Items, previously known as Tasks, comprise a list of activities that are typically done during an inspection. The software requires that a minimum of one Compliance Item be attached to each Inspection Template. One might wonder why this manual recommends that Compliance Items be created prior to the Inspection Templates they are a part of. To answer this, it is important to explain that Trades & Codes are attached only to Compliance Items and not to Inspection Templates. Should different Trades be associated with different Compliance Items on the same Inspection Template, any Inspector that is associated with any of the Trades pinned to these Compliance Items will be prioritized where Inspector eligibility is concerned. If this seems confusing, this will be explained more thoroughly in the Inspection Scheduling processes defined in the Inspection Processing section of this guide.
Important: It is highly recommended that you plan which Compliance Items will be tracked on each Inspection Template prior to entering data. Additionally, the Compliance Item list will tend to be very long. It is advisable to create the Inspection Template immediately after creating all of its Compliance Items. This will allow the addition of the Compliance Items before the Item list gets too long. One more item worth noting. Code all of the Compliance Items with an identical numeric or word based code to keep them together in the list as the system will list them alphabetically:
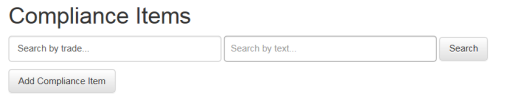
Adding a Compliance Item
Click on the Add Compliance Item Button:

Enter a required description.
Enter a short description. This field is used only to abridge the Compliance Item description on the Mobile App display. Customers not using the Inspectors Mobile App may ignore this field.
Click in the Trades field. Notice that all active trades are eligible to be added to the compliance item. Click on all eligible Trades. There is no limit to the number of Trades you can add:
The Trades field will look like this once all of your selections have been made:

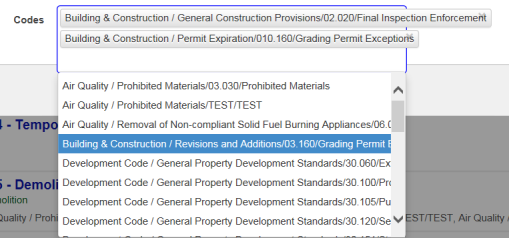
Click into the Codes field. Click on any Codes that could be sited on that particular task. There is no limit to the number of Codes that may be added. Click Save when finished.
Continue entering the Compliance Items for each Inspection. Once entered the administrator can begin creating Inspection Templates.
Inspection Templates
Formerly known as Inspection Types, Inspection Templates represent the group of inspections done by each department. Each Inspection Template will have one required Compliance Item among several other features. As mentioned previously, it is recommended that a naming convention be utilized so that Inspection Templates and Compliance Items can be paired more easily.
![]()
Adding Inspection Templates
To begin adding an Inspection Template click on the Add Inspection Template button:
General Details
The Add Inspection Template module is divided into three sections. The top section is list of general details that can be managed.
Name – Name the Inspection here.
Active Checkbox – Uncheck only if the inspection Template is no longer being used.
Estimated Duration – The default time it takes to complete the inspection. This will be the default timeframe seen on an inspector’s calendar after the inspection is scheduled. Note: This duration can be manually adjusted for each inspection as needed.
Results Method – Three options are offered:
- Pass/ Fail – Inspectors will be able to Pass, Fail, or Conditionally Pass an inspection.
- Points – Each compliance item will have a predetermined point value. The system will offer a default pass or fail result based on the number of points earned compared to the total amount required to pass.
- In/Out – A points based inspection typically used for Health Inspections.
Create Reinspection – Checking this box will allow users to set up follow up inspections after resulting an inspection
Override Results – Allows users to override the system’s default result (i.e. when a points based inspection does not meet the points requirement and the inspector would like to pass the inspection regardless).
Allow Compliance Item Edits on Inspection – Checking this box allows users to add or subtract Compliance Items for any individual inspection on the fly should the need arise. Note: This will not impact the default compliance items set up on the Inspection Template
Compliance Item Result Default: Three options are offered:
Not Resulted – The user will result each Compliance Item individually
Pass All – All Compliance Items will start with a result of “Pass” and may be adjusted accordingly after the inspection. Great for inspections that rarely fail.
Fail All - All Compliance Items will start with a result of “Fail” and may be adjusted accordingly after the inspection. Great for inspections that have a high rate of failure.
Compliance Items on the Inspection Template
To add (or manage) Compliance Items on your Inspection Template, click the Manage Compliance Items button.
Add Category – Allows users to categorize groups of Compliance Items for better organization. This feature is optional.

Type your category in the field provided. From here you can drag any Compliance Items previously created into the category field. Moreover any Compliance Items created subsequently can be added to a category as needed:

Add Compliance Items – Clicking here will populate a drop-down with the entire list of Compliance Items to choose from. Each item will need to be selected one by one until your list is complete:
Required Checkbox – Checking this will require that the user results that Compliance Item before the system will allow the user to result the inspection. Only use this feature if the Compliance Item is always necessary
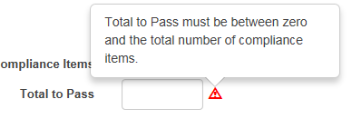
Total to Pass Field – This field gives administrators the option of determining how many passing Compliance Items will be required for the system to recommend a passing result for that inspection. (The system will recommend a “Fail” otherwise) If a passing result is to be assumed, put “0” in the field. Note: the Red Triangle icon indicates a unique message. Hover over it with your cursor to see its meaning:
Inspection User Defined Fields

Administrators may select any number of previously created Inspection Based User Defined Fields for tracking purposes. These UDF’s can be created in the UDF module. Navigate to the following to create UDFs:
Maintenance>new world ERP Suite>Security>User Defined Fields
Click Save when your Inspection Template creation steps are complete.
Comments
Unlimited pre-populated comments may be configured to aid users in adding comments on an inspection quickly and efficiently. Trades may be assigned to Comments to ensure that only the needed potion of the Comments lists populates on the Compliance Item being commented on. This feature is optional as manual comment entry may be preferred.
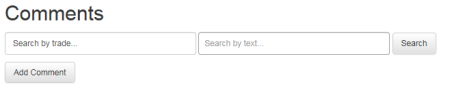
Adding Comments
Click on the Add Comment button:

Short Description – A code, or short version of the comment
Description – The full comment language desired
Trades – Apply Trades to insure this comment only populates when necessary. If Trades are not applied, the comment will be available on all Compliance Items for all Inspections
Click Save when finished:
![]()
Notifications
Notifications may be created for unique events that occur in the software. It is important to understand that the recipient of the notification is predetermined (in most cases) by the contacts set up in the Parent modules. Note that your SMTP server and email settings must be input correctly in Maintenance System Settings for the Notification feature to function properly.
Maintenance>new world ERP Suite>System>System Settings
Notification Recipients
The following items describe who will receive the Notification by default, based on the parent the inspection is attached to:
Permit Inspection Notifications:
If the Issue To is a Contractor, the notification will be delivered to the Licensee email address listed on the Contractor Licensee profile in the Licensing Module
If the Issue To is the Owner, and no Contractor is associated to the permit, the notification will be delivered to email address listed on the Parcel Owner profile in the Parcel Management module
If the Issue To is the Owner and a Contractor is associated with the permit, both the Owner and Contractor will receive emails based on the email sources listed above.
If the Permit Contact email field is utilized during permit creation, an email will be sent to this address as well.
Keep in mind that the three possible email option for Permit Inspections work independently from one another. The possibility that a recipient receives duplicate email does exist should the same email address be entered in two different places.
License Inspection Notifications – If a License Inspection produces a notification, the email address associated to the Licensee will receive the notification
Business Inspection Notifications – The email address associated with the Business Owner will receive the notification
Case Inspection Notifications – The email address associated with the Case on the Case Management page will receive the notification
Address Inspections – The email address associated with the Parcel Owner record in the Parcel Management module will receive the notification
Creating Notifications
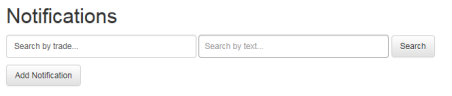
Click on the Add Notification button:

Notification Name – Enter a required name for the notification
Inspection Event – Eight events are offered that will drive the notification. Multiple events may be selected based on the notification required. This field is required:
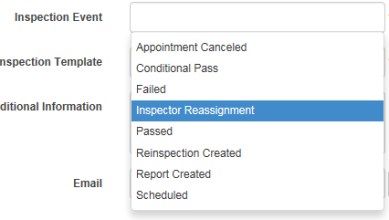
Inspection Template – Select the Inspection Template(s) that, when coupled with the Inspection Event(s) previously selected, will drive the Notification. At least one Inspection Template must be selected per Notification.
Additional Information – Enter free form text that will appear in the body of the Notification email if desired.
Email – If an email address is attached to a Notification, that address will receive an email based upon the notification criteria as described above. This feature is used for notifying internal staff as well as third parties that might have an interest in the inspection detail. To add an email, simply type it into the email field and click on the plus sign next to the field. An unlimited number of email addresses can be added to a Notification.
GIS
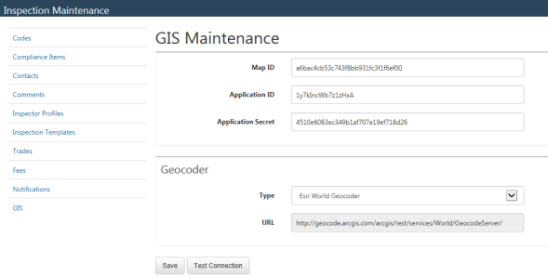
Use this page to configure the interface with Community Development and the ESRI map you have created in ArcGIS online:
Maps may be shared between ArcServer and ArcGIS online. You may use the ESRI Geocoder (identifies addresses by latitude/longitude) or your own. Credits are required for the GEOCoding Service if you use ArcGIS online. Map layers are supported. The feature is not tied to a specific version of ArcGIS.
Note: For the map link to be enabled, you must be licensed to GIS.
Note: If you use the ArcGIS World Geocoder service or a custom geocoder service that requires authentication, you will need to provide application credentials that allow for the use of the geocoding service. When the map loads in the map viewing area, it creates a login with the Application ID and the Application Secret. The response contains a token that is used on calls to the geocoder service or for any other service that requires the ability to consume credits.
GIS Maintenance
Map ID - Typically 32 characters long, free-form alphanumeric entry identifying the map. This field may hold 100 characters.
(Sample Map ID: a6bac4cb53c743f8bb931fc3f1f6ef00)
Application ID - Typically 16 characters long, free-form alphanumeric entry identifying the application. This field may hold 100 characters.
(Sample Application ID: CRnzN3SfV9X7sUS5)
Application Secret - Typically 32 characters long, free-form alphanumeric entry identifying the application secret. This field may hold 100 characters.
(Sample Application Secret: 4ac58cb17f6441998b011bc5e8fdeab1)
Geocoder Data
Type - Identifies the Geocoder type. Available selections: Esri World Geocoder and Custom
URL - Free-form alphanumeric entry identifying the Geocoder URL. This field may hold 200 characters.
If Geocoder Type = Esri World Geocoder, set value to http://geocode.arcgis.com/arcgis/rest/services/World/GeocodeServer/.
If Geocoder Type = Custom, key in the URL location of the custom geocoder service.
Once you have completed the setup on this page, clicking the Map button on the Inspector Planner page will replace the list of inspections with the map served up from ArcGIS Online. This will be described in more detail in the Inspection Processing Guide.
Security Setup
Security for Inspection Processing is controlled through Application Permissions and User-Based Security. Process Manager is not used under Inspection Security. Workflow is controlled through Permissions and User Based Security which will control what the user is allowed to enter.
Inspection Security
The checkboxes contained in this area are driven by the inspection entry, scheduling, and inspection creation. Selecting the checkboxes for individual levels within this area will allow the user to perform inspection processing functions for which they have application permissions, for that level. Not Selecting a level will deny the user access to the unselected level of security. This feature will be used to designate maintenance & inquiry capability for inspections.
Inspection Reports Security
The checkboxes contained in this area will give users ability to reports contained in the inspection module. Selecting a report will give users the ability to print that report.
Application Permissions
Application Permissions for Inspection Processing can typically be completed effectively with 3 general template groupings. The first is intended to give users all access to the Inspection & Inspection Reports feature group. The second template is used for all users that need access to enter/schedule inspections within New World ERP. The third template is used for all users that need access to view inspection results or the schedule of inspectors. This is considered a view only or inquiry only, so users can enter search for parcel information, but cannot add or change data.
Maintenance>new world ERP Suite>Security>Users>Click Permissions Button
Permission Type – Company Applications
Feature Group – All
Component Name – Inspection
Click Search

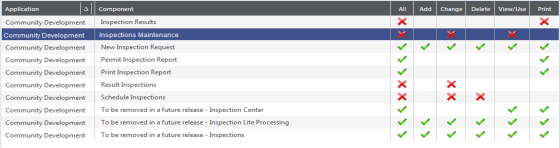
There are several new permissions that have been added to the inspections list. These will default with Deny privileges (red X’s across). Under Company Applications the new permissions will be:
Inspection Details
Inspection Results
Inspections Maintenance
Result Inspections
Schedule Inspections
Be sure to add these to the appropriate Security Template, or simply assign them per user
|
App |
Component |
Description |
All |
Add |
Change |
Delete |
View/Use |
|
|---|---|---|---|---|---|---|---|---|
|
CD |
Business Inspection Report |
Provides the ability to see the report for business code enforcement inspections |
X |
|
|
|
|
X |
|
CD |
CD Inspection Processing |
Provides the ability to log inspections within the inspection module |
X |
|
|
|
X |
|
|
CD |
CD License Inspection Report |
Provides the ability to see the License Inspection report |
X |
|
|
|
|
X |
|
CD |
Community Development Inspection Standard Responses |
Provides the ability to enter, change, and view inspection standard responses under either tasks or violations. |
X |
X |
X |
X |
X |
X |
|
CD |
Community Development Inspection Type |
Provides the ability to add, change, view inspection types under maintenance |
X |
X |
X |
X |
X |
X |
|
CD |
Inspection Billing Batches |
Provides the ability to Create Inspection Billing Batches |
X |
X |
X |
X |
X |
X |
|
CD |
Inspection Billing Batches – Process Manager Approve |
Provides the ability to approve Inspection Billing Batches |
X |
|
X |
|
|
|
|
CD |
Inspection Billing Batches – Process Manager Post |
Provides the ability to post Inspection Billing Batches |
X |
|
X |
|
|
|
|
CD |
Inspection Billing Batches – Process Manager Validate |
Provides the ability to validate Inspection Billing Batches |
X |
|
X |
|
|
|
|
CD |
Inspection Billing Batches – Edit & Post Listing |
Provides the ability to produce the Edit & Post Listing Reports for an Inspection Billing Batch |
X |
|
|
|
|
X |
|
CD |
Inspection Billing Batches – Error Listing |
Provides the ability to produce the Error Listing Reports for an Inspection Billing Batch |
X |
|
|
|
|
X |
|
CD |
Inspection Citation Form |
Provides access to the inspection citation form mail merge document if created |
X |
|
|
|
|
X |
|
CD |
Inspection Details |
Provides access to the Inspection Details page in the inspection edit mode |
X |
|
X |
|
X |
|
|
CD |
Inspectors Results |
Provides access to the Inspection Result page |
X |
|
|
|
|
X |
|
CD |
Inspections Maintenance |
Provides administrators access to the Inspection Maintenance module |
X |
|
X |
|
X |
|
|
CD |
Permit Inspection Report |
Provides access to the Permit Inspection Report in Permit Reports |
X |
|
|
|
|
X |
|
CD |
Print Inspection Report |
Provides access to the Print Inspection Report Button in the inspection edit mode |
X |
|
|
|
|
X |
|
CD |
Schedule Inspections |
Provides the ability to schedule inspections |
X |
|
X |
X |
|
|
Permission Type – Company Applications
Feature Group – All
Component Name – Inspector
Click Search

|
App |
Component |
Description |
All |
Add |
Change |
Delete |
View/Use |
|
|---|---|---|---|---|---|---|---|---|
|
CD |
Community Development Inspectors |
Provides administrators access to create and edit inspectors in Maintenance |
X |
|
|
|
|
X |
|
CD |
Inspector’s Worksheet |
Provides users access to create standard Inspector’s Worksheets |
X |
|
|
|
|
X |
|
CD |
Inspector’s Worksheet Mail Merge |
Provides users access to create Inspector’s Worksheets created as a Mail Merge form |
X |
X |
|
|
X |
|
Permission Type – Company Documents and Notes
Feature Group – All
Component Name – Inspection
Click Search

|
App |
Component |
Description |
All |
Add |
Change |
Delete |
View/Use |
|
Checkout |
Undo |
Finalize |
Reminder |
|---|---|---|---|---|---|---|---|---|---|---|---|---|
|
CD |
Inspection Compliance Item Documents |
Provides ability to upload and use Compliance Item Documents |
ü |
ü |
ü |
ü |
ü |
ü |
ü |
ü |
ü |
ü |
|
CD |
Inspection Documents |
Provides users access to attach documents when logging inspections |
ü |
ü |
ü |
ü |
ü |
ü |
ü |
ü |
ü |
ü |
|
CD |
Inspection Notes |
Provides users access to notes when logging inspections |
ü |
ü |
ü |
ü |
ü |
ü |
|
|
|
|
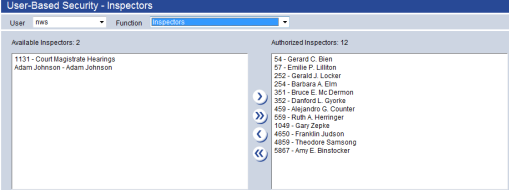
User-Based Security
User Based Security gives access to specific functions within New World ERP. Once permission based security is granted, this second level of security will determine what the user can see and use once they access a module. Where inspections are concerned, Inspector User Based Security will need to be granted.
User Based Security/Inspector Tab
Maintenance>new world ERP Suite>Security>User Based Security
The Inspector Tab within User Based Security is shown below. Select the user that needs security to particular inspectors, then move the appropriate inspectors from Available Inspectors to Authorized Inspectors:
Inspection Processing
Inspection Processing in New World ERP offers three unique inspection processing functions (List/Search, Scheduler, Planner) as well as the Inspection Billing Batch module for those who are utilizing the Citation Billing functionality.
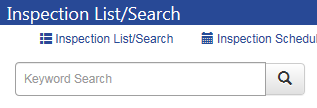
Inspection List/Search
Community Development>Inspections>Inspection List/Search
The Inspection List/Search page is the central location for finding and processing inspections, viewing associated parent information and printing inspection result reports.
Use the fields and check boxes in the left pane to generate a list of inspections in the center pane. Use the blue menu bar in the right pane to perform actions on selected inspections.
When you first navigate to this page, the list of inspections will default to those that have been scheduled for today. Use the following fields and check boxes in the left pane to generate the list of inspections you want to review or process.
Search Functionality (Left Pane)
Keyword Search - The left pane gives users the ability to produce inspection cards that match the text you type into the search field. To get results, simply click on the magnifying glass or press enter:
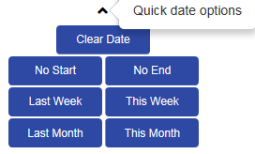
Date Range – Shows Inspection Cards with statuses that were applied with the date range selected. Some unique features can be utilized within the date range:
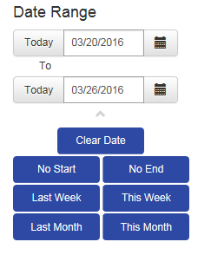
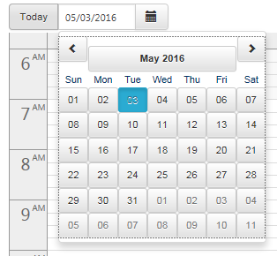
- Today Button – Clicking the Today button will default today’s date into the date field:

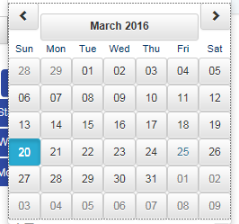
- Calendar Button – Populates a calendar for date selection:
- Quick Date Options – offers quick access to commonly used date ranges. Note you may do searches without start and/or end dates. The search will find all inspections based on your other search criteria in this case. Click on the Chevron below the End Date filed to access these options:
Linked To - Show inspection cards linked to the types of parent items selected here. Selecting a Permit or License parent will display another set of check boxes giving you the option to narrow the search further by selecting the permit or license types:
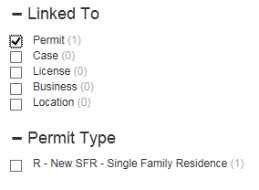
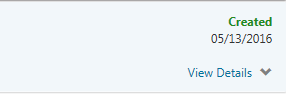
Status – There are a number of statuses to filter by. They are defined below:
- Created – Inspections that were selected during permit creation that have not been scheduled yet.
- Requested – Inspections that were requested from permit holders from the ePermits. Note: this is a new definition of the term requested compared to the classic CD product. It is important to understand that the created status mentioned above is different from the requested status.
- Scheduled – Inspections that have been scheduled & assigned to inspectors. When selected another set of check boxes will populate allowing users to filter by inspector
- Resulted – Inspection that have been Passed, Conditionally Passed or Failed. Note when this status is selected, another set of check boxes will populate allowing users to filter by specific result and/or inspecto:
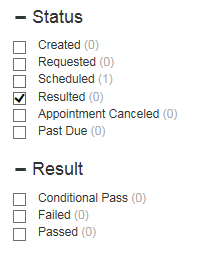
- Appointment Canceled – Inspections that were once scheduled, but were later canceled.
- Past Due – Inspections that were scheduled to be completed prior to today’s date but are not yet resulted.
Trades – Inspection cards for the trades listed here
Inspectors – Shows the inspection cards
Inspection Card View (Middle Pane)
Your search will produce Inspection Cards in the middle pane. The following are features of the inspection cards:

Address – The address will be visible in the upper left corner
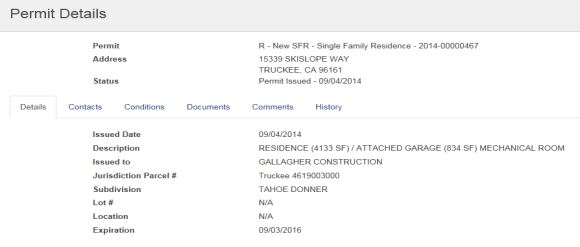
Parent – The inspection’s parent will be visible as a hyperlink in the lower left corner. Clicking on the hyperlink will open a window that will provide users with a read only view of all parent attributes:
Parent Alerts – This is represented by a red dot next to the parent (if applicable). Hovering over the red dot with your cursor will reveal any alerts on the permit record. Examples might include parcel messages or balances owed on the permit.
Inspection Template – The type of inspection and inspector assigned (if applicable) will be visible in the upper middle of the inspection card
Status & Status Date – These will be visible in the upper right corner
Inspection View Details – This link will be available in the lower right corner of the inspection card and is one portal to the Inspection Details mode. From here users can result Compliance Items, result inspections, view history, manage Inspection UDF’s, view documents, schedule inspections, and print Inspection Worksheets. Note: These items will be explained further below.
Blue Menu Bar (Right Pane)
The following features are available in the Blue Menu Bar:
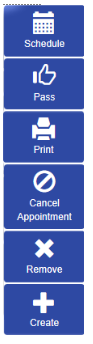
Schedule
- The Schedule Inspection dialog opens when you select an inspection with a status of Created, Requested or Appointment Canceled and click the Schedule button.
- The Reschedule Inspection dialog opens when you select an inspection with a status of Scheduled or Past Due.
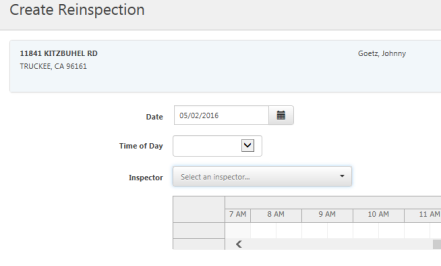
- If you select an inspection with a status of Resulted, the label of the Schedule button will change to Re-inspection. Clicking it will open the Create Re-inspection dialog.
- All three dialogs ask you to select the date of the inspection, time of day and inspector.
Pass - To pass a scheduled inspection, select it in the list of inspection cards, and click this button. Passed will display in green in the right column of the inspection row. You may pass multiple, scheduled inspections simultaneously by selecting each one in the list, then clicking Pass.
Print - Enabled for inspections with a status of Resulted, this button generates and displays an Inspection Results Report containing the details of the resulted inspection.
Cancel Appointment - To cancel a scheduled inspection, select it in the list of inspections, and click this button. Appointment Canceled will display in red in the right column of the inspection card. You may cancel multiple, scheduled inspections simultaneously by selecting each one in the list, then clicking Cancel Appointment. Note: This will requeue the inspection making it eligible to be rescheduled in the future
Remove - To remove an inspection, select it in the list of inspection cards, and click this button. A dialog will display to alert you that this action will delete the inspection from the system permanently. To proceed with the removal, click Yes. To cancel the removal, click No.
Note: An inspection with citations attached cannot be removed until the citations have been removed.
Create – Allows users to create inspections from scratch, attaching them to the appropriate parent
Resulting an Inspection from the Inspection List/Search
Quick Pass – For those inspections that have passed and no comments are necessary.
- Search for your scheduled inspections.
- Highlight the Inspection Card(s) you would like to Quick Pass.
- Click on the Pass button in the right pane.

- A confirmation window will open. Click Yes to pass your inspections:
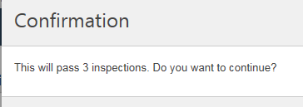
Note: Multiple Inspections may be Quick Passed at once
Detailed Resulting – Typically used for failed inspections, conditionally passed inspections or any inspections requiring comments.
- Search for your scheduled inspections.
- Click on the Inspection Details Link (the Inspection Number).

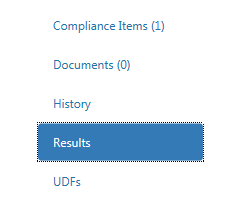
- When the Inspection Details screen opens, click on the Results option.
- You have the option of managing your compliance item(s) individually, or resulting the inspection outright, without managing the compliance item(s).
Compliance Item Resulting
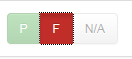
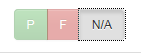
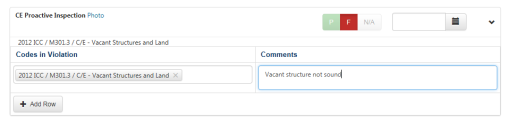
Pass, Fail or N/A - Simply click on the appropriate box to indicate your selection. Note: resulting Compliance Items does not result the Inspection. The Compliance Items indicate which portions of the inspection passed, failed or were not applicable to that inspection:
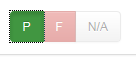
Note: Failing an inspection will automatically pass any Compliance Item that has not been resulted. Many users will therefore manage only the Compliance Items that have failed and allow the system to pass all others when they result the inspection.
Adding Comments and/or Violations to a Compliance Item
- Click on the Chevron next to the Compliance Item Pass, Fail, N/A option:

-
Click on the Add Row button:

- A box will open for both Comments and Codes. Select a prepopulated comment from the comments list (if created in setup) or type in your own unique comment. Select a code (if created in setup) from the Codes in Violation Box if desired.
Repeat for all Compliance Items you wish to result. Be sure to click Save at the bottom of the page when finished:

Inspection Comments – Any general inspection comments can be entered in the inspection Comments field. Click Save when complete:
![]()
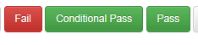
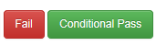
Inspection Resulting – The system offers 3 result options: Pass, Fail & Conditional Pass. Any of these may be selected regardless of how the Compliance Items are resulted:
When any of these options are selected a window will appear that will allow for the following:
- Entering the Actual Date of the inspection should it be different than the default of Today’s Date
- Adding a Comment – Any comment entered here will appear in the General Inspection Comments field after any comments input in that field previously.
- Changing the inspector of record if necessary
- Adding a Reinspection (see details below)
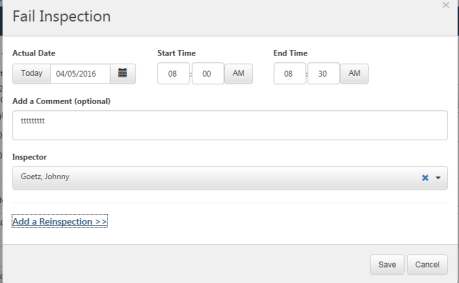
Adding a Reinspection – If this feature was included on the Inspection Template during setup, users can add follow up reinspections during the inspection resulting process,
- Click the Add a Reinspection Link, as seen in the image above
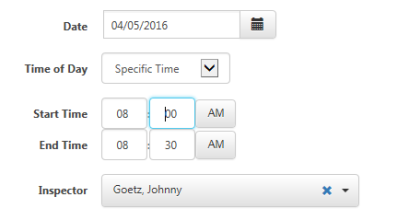
- If you want to schedule an inspection immediately, select the date, time of day option, start and end time (if applicable) and Inspector. Click OK when finished. The inspection will then have a status of Scheduled and appear on the Inspector’s Planner:
- If you want to Create the inspection on the permit, and leave it in queue for future scheduling (i.e., waiting for a contractor to call for reinspection), click on the X in the inspector field, insuring the field is empty. Clicking the OK button will classify this inspection as Created. This inspection may then be scheduled at a later date:
Here is an example of a search done for the reinspection that was just created from the filed inspection:

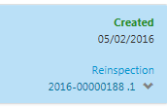
Note the inspection is now classified as a reinspection and the inspection number reflects the original inspection number with a (.1) added. The two inspections are now linked, as will be any subsequent reinspections.
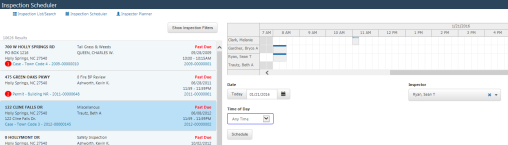
Inspection Scheduler
Community Development > Inspections > Inspections Scheduler
The Inspection Scheduler View functions as a tool that allows for centralized scheduling for multiple inspectors. The scheduler uses the same elastic search functionality as the Inspection List/Search view, and allows for drag and drop scheduling for an unlimited number of inspectors. Great for comparing inspectors’ schedules, this area allows for easy inspection rescheduling, resulting, moving an inspection from one inspector to another and parent detail viewing.
Filtering the Inspector List
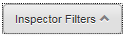
Inspector Filters Dropdown – Click on the Inspector Filters button to populate two fields that allow you to produce an Inspector list for scheduling:
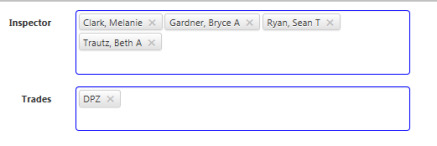
Inspector – Placing your cursor into this field will populate the entire list of inspectors to choose from. Simply click on the inspector that needs to be added and the name will appear in the box. Note: The list will remain open so that users may easily click on all of the inspectors desired, without having to reopen the list. For extremely long lists, users may type a portion of the inspector’s first or last name to filter the list. An unlimited number of inspectors may be selected:
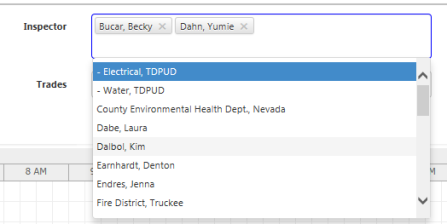
- Trades – Placing your cursor in the Trades field will allow you to select all inspectors tied the trade(s) selected. This is a quick method of populating all of the inspectors in a particular department, for example. Below is a list of inspectors that populated by selecting the DPZ trade.
Filter Options – There are 4 selections that can be made regarding filters:

- Save Filter – Saves the filter selections for the user. The saved filter criteria will populate every time the user navigates to the Inspection Scheduler page.
- Clear – Removes any changes since the last filter Save or Apply.
- Apply – Changes your current filter options without changing your saved filter. The next time you navigate to the Inspection Scheduler, your saved filter will populate.
- Cancel – Closes the filter without making changes.
Finding the Inspections You Want to Schedule
Inspection Filters – Similar to the Inspection List Search section of this manual, the left side of the Inspection Scheduler offers a Keyword Inspection search with various filters to help accomplish finding the Created, Requested, Past Due & Cancelled Appointment inspections that may need to be scheduled.
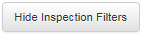
Important: Once your selection criteria in this search are made, you must click on the Hide Inspection Filters button at the top of the Left Pane to see your results:
Scheduling Inspections
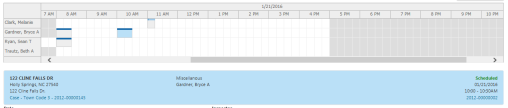
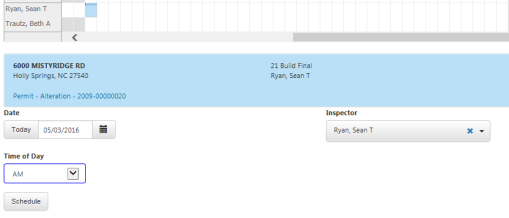
To view the inspection card for a particular inspection, click the corresponding shaded area. The inspection card will appear in blue below the calendar, providing all the same information and links it provides on the Inspection List/Search page:
You may add an inspection to the calendar one of two ways:
-
Use the fields below the calendar, selecting the Date, Time of Day, Inspector, Start Time and End Time and clicking the Schedule button. Use these fields, also, to reschedule an inspection already on the calendar: Click the inspection on the calendar. The inspection card will appear below the calendar. Make your selections in the date, time and inspector fields, and click Schedule:
- From your list of inspections in the left pane, click and drag the inspection to the desired place on the calendar. Any scheduling pre-conditions are verified and communicated. This method is convenient for scheduling a batch of inspections.
Rescheduling from the Inspection Scheduler
There are two methods of rescheduling with the Inspection Scheduler:
Drag & Drop - This method is great for moving an inspection from one inspector to another on the same day. Simply hold LEFT + Click on the inspection block you’d like to move and drag it to another block on any of the visible inspectors’ calendars
Highlight & Change Inspection Criteria – Once an inspection is highlighted on the inspection scheduler, the blue inspection card will appear and the Date, Inspector & Time of Day fields can be changed to reflect the rescheduling. Be sure to click on the Schedule button after the changes are made:
Resulting Inspections from the Inspection Scheduler
To result inspections from the inspection schedule, highlight a schedule block on the calendar. This will populate the blue inspection card under the calendar. Click on the inspection number on the bottom right:
When the Inspection Details screen opens, click on the Results option
You have the option of managing your compliance item(s) individually, or resulting the inspection outright, without managing the compliance item(s).
Compliance Item Resulting
Pass, Fail or N/A - Simply click on the appropriate box to indicate your selection. Note: resulting Compliance Items does not result the Inspection. The Compliance Items indicate which portions of the inspection passed, failed or were not applicable to that inspection:
Note: Failing an inspection will automatically pass any Compliance Item that has not been resulted. Many users will therefore manage only the Compliance Items that have failed and allow the system to pass all others when they result the inspection.
Adding Comments and/or Violations to a Compliance Item
- Click on the Chevron next to the Compliance Item Pass, Fail, N/A option:
-
Click on the Add Row button:
- A box will open for both Comments and Codes. Select a prepopulated comment from the comments list (if created in setup) or type in your own unique comment. Select a code (if created in setup) from the Codes in Violation Box if desired.
- Repeat for all Compliance Items you wish to result. Be sure to click Save at the bottom of the page when finished:
Inspection Comments – Any general inspection comments can be entered in the inspection Comments field. Click Save when complete:
![]()
Inspection Results – The system offers 3 result options: Pass, Fail & Conditional Pass. Any of these may be selected regardless of how the Compliance Items are resulted.
When any of these options are selected a window will appear that will allow for the following:
- Entering the Actual Date of the inspection should it be different than the default of Today’s Date.
- Adding a Comment – Any comment entered here will appear in the General Inspection Comments field after any comments input in that field previously.
- Changing the inspector of record if necessary
- Adding a Reinspection (see details below)
Adding a Reinspection
Note: If this feature was included on the Inspection Template during setup, users can add follow up reinspections during the inspection resulting process
Click the Add a Reinspection Link, as seen in the image above
If you want to schedule an inspection immediately, select the date, time of day option, start and end time (if applicable) and Inspector. Click OK when finished. The inspection will then have a status of Scheduled and appear on the Inspector’s Planner:
If you want to Create the inspection on the permit, and leave it in queue for future scheduling (i.e., waiting for a contractor to call for reinspection), click on the X in the inspector field, insuring the field is empty. Clicking the OK button will classify this inspection as Created. This inspection may then be scheduled at a later date:
Here is an example of a search done for the reinspection that was just created from the filed inspection:
Note the inspection is now classified as a reinspection and the inspection number reflects the original inspection number with a (.1) added. The two inspections are now linked, as will be any subsequent reinspections.
Inspector Planner
Community Development > Inspections > Inspector Planner
The Inspector Planner page provides inspectors with visual representations of what their workdays or weeks look like. While it can show the calendars for multiple inspectors, the primary design is to support an inspector who is logged into the system and quickly wants to view his or her workload. Although scheduling can be done from this area, this module is best for resulting and rescheduling inspections.
Loading Data
Date Field – Select the day you want to view. Today’s date is the default. Click the Today button to switch back to today’s date.
Inspector Filters Dropdown – Click on the Inspector Filters button to populate two fields that allow you to produce an Inspector list for scheduling:
Inspector Field – Placing your cursor into this field will populate the entire list of inspectors to choose from. Simply click on the inspector that needs to be added and the name will appear in the box. Note: The list will remain open so that users may easily click on all of the inspectors desired, without having to reopen the list. For extremely long lists, users may type a portion of the inspector’s first or last name to filter the list. An unlimited number of inspectors may be selected:
Trades Field – Placing your cursor in the Trades field will allow you to select all inspectors tied the trade(s) selected. This is a quick method of populating all of the inspectors in a particular department, for example. Below is a list of inspectors that populated by selecting the DPZ trade:
Filter Options – There are 4 selections that can be made regarding filters:
- Save Filter – Saves the filter selections for the user. The saved filter criteria will populate every time the user navigates to the Inspection Scheduler page.
- Clear – Removes any changes since the last filter Save or Apply.
- Apply – Changes your current filter options without changing your saved filter. The next time you navigate to the Inspection Scheduler, your saved filter will populate.
- Cancel – Closes the filter without making changes.
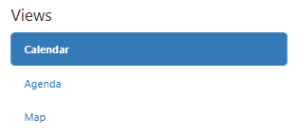
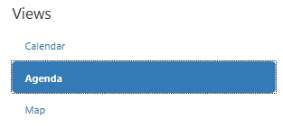
Planner Views
Calendar View – The default setting. Shows the inspections scheduled for one or more inspectors, based on the filters applied, in chronological order, in a calendar format.
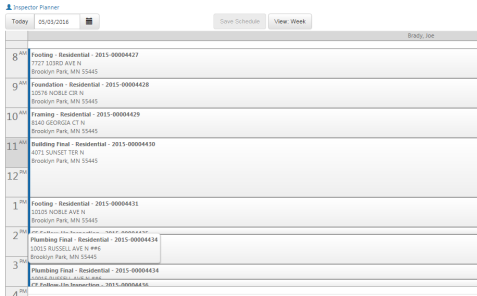
Calendar features:
- Rearrange / Re-order the inspection sequence
- Access Right Click menus (Quick Pass, Inspection Details, Parent Details)
- Print Inspection Schedule Report
- Print Inspection Worksheets
- Print Inspection Results Report
- View a Daily Summary
- Create Inspections on the fly by clicking a timeslot
- Drag & Drop rescheduling
- Inspector Week View
Agenda View – This view offers a more linear presentation of an inspector’s schedule, listing inspection cards in order of their occurrence in AM/PM sections.
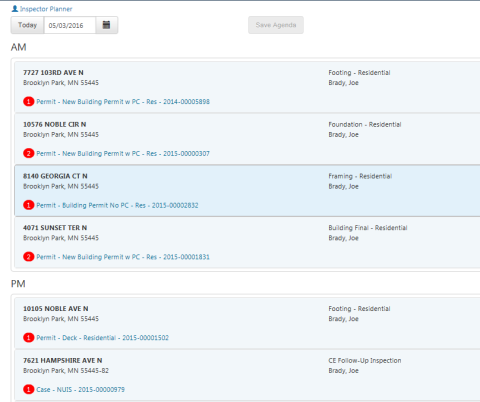
Agenda Features:
- Rearrange / Re-order the inspection sequence
- Access Right Click menus (Quick Pass, Inspection Details, Parent Details)
- Print Inspection Schedule Report
- Print Inspection Worksheets
- Print Inspection Results Report
Map View – This view pinpoints your inspections on a map to let you determine the most efficient driving route. Note: A GIS configuration in Inspection Maintenance is required to utilize this feature:
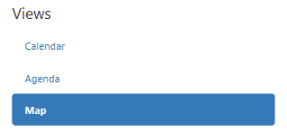

Map Features:
- Each inspection represented by a pin point on the map
- Pin colors differ by inspector
- Click on a pin to view inspection details, pass or cancel appointment
- (+ / -) feature allows for map zooming
- Map supports GIS layering for unique data view
Resulting Inspections from Calendar View
Right click on any inspection to access the following:
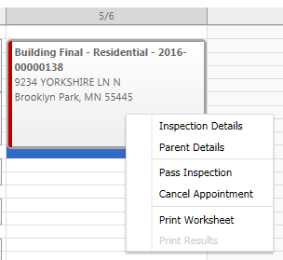
Inspection Details – As described above, this will open the inspection details page, giving the inspector the ability to result compliance items and the inspection.
Parent Details – Provides a pop up with the relevant parent details.
Pass Inspection – Allows the inspector to Quick Pass the inspection without comments.
Cancel Appointment – Ability to cancel the inspection and put it back in queue.
Print Worksheet – For inspectors that like something to write on when out in the field, this will produce a one page.
Printout Options in the Inspector Planner
Three canned printout options are available in the planner view:

Inspection Schedule – Provides a one page “run sheet” detailing all of the inspector’s inspections for the day.
Inspection Worksheet – Provides one page per inspection highlighting the inspection details and giving the inspector space to take notes for each inspection.
Inspection Results – Provides a one page list of the inspections for the day including results and comments for each inspection.
Inspection Billing Batches
For users that are managing Citation Bills via Case Inspections, the system offers the ability to add Code Violation fees to the inspections. Subsequently, Inspection Billing Batches can then be created to gather all of the outstanding fees and send them to Miscellaneous Billing for invoice processing.
Important: Currently, only Case Inspections can accommodate the adding of fees. Permit, License, Business and Location inspections are not compatible with the Inspection Billing process.
Adding Code Violation Fees to a Case Inspection
Access the Inspection Details screen for any case inspection. One way to do this would be to search for Created or Scheduled inspections linked to Cases in the Inspection List/Search view (See pg. 34)
When you’ve found your inspection click on the View Details link:
Click on the Results Tab:
Manage your Compliance items as described previously:
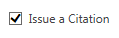
To add fees you will need to either Fail or Conditionally Pass the Inspection. The Issue a Citation option will not populate for a Passing inspection:
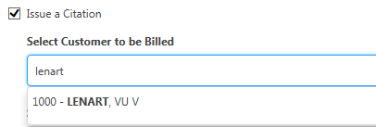
Click on the Issue a Citation checkbox:
Select a customer to be billed. You may type any part of the customer name to pare down the list. Note: If this is a first time customer, the customer will need to be added to the Miscellaneous Billing customer list. Please consult with a representative of your Finance Department for instructions and security access to this area of the software:
Select the Fee(s) to be included with this Citation Billing by clicking inside of the Select Fees to be Included field. Note: The fees that populate here are fees that have been specifically classified as Code Violation fees in the Community Development fee list.
Maintenance > Community Development >Fees
Please see your Community Development Fees administrator for questions regarding the creation of Code Violation fees.
Once your Fees have been selected click Save.
The fee will be stored in the background until an Inspection Billing Batch is created.
Stop Work
As of Version 9.5C, the new world ERP platform offers the ability to place a Stop Work on a Parcel or a Permit. (Note: The ability to place a Stop Work on an individual contractor will be available in the 9.6C release, May of 2017. We will update this guide appropriately). Stop Work will give users the ability to place a warn or a block on specific items within the parcel or permit. Notifications can also be configured to communicate with necessary parties to the stop work.
Tips and Tricks
- Use List/Search and Scheduler to quickly see inspections requested from ePermits – The “Requested” inspection status is exclusive to ePermit requests. The “Created” inspection status now represents inspections selected during the permit creation process.
- Use List/Search to search for Past Due Inspections. Great for deciphering why past inspections were not resulted timely.
- Use the Inspection Schedule report in the Planner to produce an easy to use “Run Sheet” for the day. Great for inspectors without technology in their vehicles.
- Use the Quick Pass option in List/Search to pass multiple inspections at once. A great time saver
- Inspections can be created “on the fly” in all three views. Use the Create button in the List/Search or click on a time slot in the Scheduler & Planner.
- Inspections may be tied to a location now. Great for “Courtesy” inspections that involve an address only.
- Use Trades in your Inspector filters in the Schuler and Planner to populate the schedules for the inspectors in an entire department.
- Use the chevron under the date range in the List/Search & Scheduler to populate shortcuts for selecting (or clearing) unique date ranges.