Asset Management
Welcome to the New World ERP Asset Management online guide. This online manual will guide you through the setup and processing aspects of the Asset Management module.
The guide is divided into two sections.
The System Administration section will focus on the set-up components necessary to utilize Asset Management within New World ERP. This will include detailed information on “master files” that must be set-up such as G/L Distribution Profiles and Asset Classifications and will also include the security settings which will be utilized to enable workflow and tailor user options to your needs.
The End User Processing section will describe the steps, workflow and options available in Asset Management to the end-user. It will guide you through the process from asset acquisition through the recording and depreciating of assets. Included in the section will be a guide to the standard reports available in the software.
System Administrator guide
Company FM Settings
The Company FM Settings area contains universal settings that control system behavior within the Asset Management Module.
Asset Management Tab
Maintenance > Financial Management > Company FM Settings>Asset Management tab
Fields:
General Ledger – Select this option if Asset Management should create journal entries and be sent to the General Ledger. If this checkbox is not selected, no transactions will be sent to the General Ledger. In that case, the Asset Management module will be used as a stand-alone tracking module.
Parcel Management – Select this option to interface the Asset Management module with the Community Development application and allow users to assign parcel numbers to different pieces of land acquired.
System Assigned Number – Select this option to have the system automatically assign each asset a number at the time of entry. If this option is not selected, a unique asset number must be entered for each asset.
Next Asset Number – This option is required if the System Assigned Number option is selected. This is the next number the system will use for a new asset entry. The system will number assets sequentially once this setting is saved. This is disabled if the System Assigned Number option is not selected.
Centralized Asset Management Department – This department is required if the General Ledger option is selected. The department selected here will be the department used in Journal Processing to post Asset Management journal entries to the General Ledger.
Validation and Approval Sequence – The selection in this drop-down defines the steps necessary to take for asset journals to be processed.
New World ERP Settings
Maintenance>new world ERP Suite>System>New World ERP Settings
The names of the organization’s Asset Classification levels are defined in New World ERP Settings on the Asset tab.
G/L Distribution Profiles
Maintenance>Financial Management>Asset Management>G/L Distribution Profiles
The G/L Distribution Profiles page is where G/L Accounts are defined for each type of asset, depending on how many capital asset accounts are defined in the General Ledger. These profiles will determine what accounts are used for any transaction associated to assets in the Asset Management module. When setting up an asset, an authorized user will assign the appropriate G/L Distribution Profile to the asset.
There should be one profile for each asset type (land, infrastructure, vehicles, etc.) per fund (governmental fixed asset and any proprietary funds). For example, if there are buildings in the general governmental fixed asset fund and in the Airport Fund (a proprietary fund) there will need to be two G/L distribution profiles for buildings.
In the G/L Accounts listed on the page, define the accounts that will be used when users record, depreciate, adjust, transfer, or write off an asset. There will be one depreciation expense account used in each fund. If depreciation needs to be broken out by function, a manual journal entry will need to be done at the end of the year.
Depreciation Methods
Maintenance>Financial Management>Asset Management>Depreciation Methods
The Depreciation Method List page allows authorized users to view, maintain, and add a list of all asset depreciation methods. The system only calculates depreciation using the straight line method. Depreciation begins the month after the capitalization date (e.g., an asset with a capitalization date of March 15 will begin depreciating in April). Another method can be used, however users will have to calculate the depreciation outside of the system and manually key it into the system.
Insurance Policies
Maintenance>Financial Management>Asset Management>Insurance Policies
The Insurance Policy page allows authorized users to enter and maintain insurance policy detail information for policies covering assets. A system administrator can set up different insurance policies and assign them to assets for the organization. This page is informational and optional.
Lease Contracts
Maintenance>Financial Management>Asset Management>Lease Contracts
The Lease Contract page allows authorized users to enter and maintain lease contract detail for goods leased for the company. Lease contracts can be set up and assigned to assets. This page is informational and optional.
Asset Classifications
Maintenance>Financial Management>Asset Management>Asset Classifications
The Asset Classification page allows authorized users to add and maintain the asset classification codes. All assets will be assigned a classification via the procurement item used to create the asset. All procurement items will be assigned a classification and will have default information used for asset entry. Reports can be run based on these classifications.
Procurement Items
Procurement items need to be set up in the system in order to enter new assets as well as create pending assets from the procurement and/or accounts payable modules. These items will be assigned an asset classification and will inherit the defaults set up for the given classification.
Description – Name the item the user will select when entering requisitions, purchase orders, accounts payable invoices, or when entering the asset directly into Asset Service.
Note: It may be helpful to describe the items in such a way that will make it easy to pick out the items when entering in requisitions/vouchers, purchase orders and accounts payable invoices (i.e. naming the items to start with “Fixed Asset”). There should also be one item for each classification (e.g., Fixed Asset – Land, Fixed Asset – Roads, Fixed Asset – Bridges, Fixed Asset – Autos, Fixed Asset – Trucks, etc.).
Primary Expense Account – Fill in the expense account to be used with the item. This is typically a capital outlay account within the organization set the user has access to.
Purchase Order – Select this for the item to be available for users when entering purchase orders.
Asset Item – Select this for asset item to be used in the Asset Management module.
Asset Classification – Select the classification this item will inherit when entered in the Asset Management module.
Fixed Asset Locations
Maintenance>new world ERP Suite>Miscellaneous Definitions>Locations, Location setup screen
Asset locations need to be set up in order to assign fixed assets to a location within the organization. Locations can be general or specific, depending on the organization’s goals in reporting and performing a physical inventory for assets. For each location where fixed assets reside, click the Fixed Asset checkbox.
Security Set-Up
Security for Asset Management is controlled through User Based Security, Application Permissions and Process Manager. Users can be designated to maintain and inquire on specific Asset Classifications or Responsible Departments labeled on assets.
User-Based Security/Asset Management Asset Classifications
Maintenance>new world ERP Suite>Security>User-Based Security
The Asset Management Asset Classifications function of User-Based Security is where users are assigned the Asset Classifications they can maintain and/or inquire on within the Asset Management module.
Listed in the Available Asset Classifications will be the Asset Classifications set up in the System Administrator Guide.
User-Based Security/Asset Management Sub Ledger
Maintenance>new world ERP Suite>Security>User-Based Security
Assign the Organization Sets the user can associate to each Asset.
Application Permissions
Application Permissions for Asset Management can typically be completed effectively within one template grouping. This template should be intended for Asset Management users in the Finance department and should contain all permissions within the Asset Management and Asset Management Reports feature groups.
Permission Type – Company Applications
Feature Group – Asset Management
|
App |
Component |
Description |
All |
Add |
Change |
Delete |
View/Use |
|
|---|---|---|---|---|---|---|---|---|
|
FM |
Asset Procurement Maintenance |
Ability to edit asset information from the requisition or purchase order entry screen. |
ü |
|
ü |
|
|
|
|
FM |
Adjust Asset Value |
Change the value of an asset. |
ü |
|
ü |
|
ü |
|
|
FM |
AM Asset Depreciation Batch Items |
|
ü |
ü |
ü |
ü |
ü |
ü |
|
FM |
AM Asset Depreciation Batches |
|
ü |
ü |
ü |
ü |
ü |
ü |
|
FM |
Asset - Record Asset Purchase Processing |
|
ü |
ü |
ü |
ü |
ü |
|
|
FM |
Asset Accounts Payable Transactions |
|
ü |
ü |
ü |
ü |
ü |
ü |
|
FM |
Asset Depreciation Batch Edit Listing |
Edit Listing report option within the Asset Depreciation process. |
ü |
|
|
|
|
ü |
|
FM |
Asset Depreciation Batch Error Listing |
Error Listing report option within the Asset Depreciation process. |
ü |
|
|
|
|
ü |
|
FM |
Asset Depreciation Batch G/L Dist Summary Listing |
G/L Distribution Summary Listing option within the Asset Depreciation process. |
ü |
|
|
|
|
ü |
|
FM |
Asset Depreciation Batch Print Reports |
|
ü |
|
|
|
|
ü |
|
FM |
Asset Depreciation Batch Process Manager |
|
ü |
|
|
|
ü |
|
|
FM |
Asset Depreciation Batch Process Manager Post |
Post button for the Asset Depreciation process. |
ü |
|
ü |
|
|
|
|
FM |
Asset Depreciation Batch Process Manager Print Edit Error |
Print Edit or Error listing for the Asset Depreciation process. |
ü |
|
|
|
|
ü |
|
FM |
Asset Depreciation Batch Process Manager Validate |
Validate button for the Asset Depreciation process. |
ü |
|
ü |
|
|
|
|
FM |
Asset Depreciation Batch Summary |
Summary screen within the Asset Depreciation batch. |
ü |
|
|
|
|
ü |
|
FM |
Asset History |
Detail section to see historical data for assets. |
ü |
|
|
|
|
|
|
FM |
Asset Inquiry |
Ability to look up assets. |
ü |
|
|
|
|
|
|
FM |
Asset Journal Batch Process Manager - Post |
Post button for the Asset Journals process. |
ü |
|
|
|
|
|
|
FM |
Asset Journal Batch Process Manager - Print Edit & Error Listing |
Print Edit or Error listing for the Asset Journals process. |
ü |
|
|
|
|
|
|
FM |
Asset Journal Batch Process Manager – Validate |
Validate button for the Asset Journals process. |
ü |
|
|
|
|
|
|
FM |
Asset Journal Batch Processing |
Access to the Asset Journals process. |
ü |
|
|
|
|
|
|
FM |
Asset Journal Batch Search |
Ability to search for asset s within the Asset Journals process. |
ü |
|
|
|
|
|
|
FM |
Asset Listing |
Report with various details to choose from for assets. |
ü |
|
|
|
|
|
|
FM |
Asset Maintenance |
Editing information for assets. |
ü |
|
|
|
|
|
|
FM |
Asset Management - Asset Classification |
Asset Classifications setup in Maintenance for the Asset Management module. |
ü |
|
|
|
|
|
|
FM |
Asset Management - Asset Journal Batch Edit & Post Listing |
Edit and Post Listing reports within the Asset Journals process. |
ü |
|
|
|
|
|
|
FM |
Asset Management - Asset Journal Batch Error Listing |
Error Listing report within the Asset Journals process. |
ü |
|
|
|
|
|
|
FM |
Asset Management - G/L Distribution Profile |
G/L Distribution Profiles setup in Maintenance for the Asset Management module. |
ü |
|
|
|
|
|
|
FM |
Asset Management - Insurance Policy |
Insurance Policies setup in Maintenance for the Asset Management module. |
ü |
|
|
|
|
|
|
FM |
Asset Management - Mass Update |
Option to mass update information for assets. |
ü |
|
|
|
|
|
|
FM |
Asset Management - Physical Inventory Batch Edit & Post Listing |
Edit and Post Listing reports within the Physical Inventory process of Asset Management. |
ü |
|
|
|
|
|
|
FM |
Asset Management - Physical Inventory Batch Error Listing |
Error Listing report within the Physical Inventory process of Asset Management. |
ü |
|
|
|
|
|
|
FM |
Asset Management - Physical Inventory Batch G/L Distribution Summary |
G/L Distribution Summary report within the Physical Inventory process of Asset Management. |
ü |
|
|
|
|
|
|
FM |
Asset Management - Physical Inventory Batch Process Manager - Post |
Post button within the Physical Inventory process of Asset Management. |
ü |
|
|
|
|
|
|
FM |
Asset Management - Physical Inventory Batch Process Manager - Print Edit & Error Listing |
Print Edit or Error Listing button within the Physical Inventory process of Asset Management. |
ü |
|
|
|
|
|
|
FM |
Asset Management - Physical Inventory Batch Process Manager - Validate |
Validate button within the Physical Inventory process of Asset Management. |
ü |
|
|
|
|
|
|
FM |
Asset Management - Physical Inventory Processing |
Physical Inventory menu option within Asset Management. |
ü |
|
|
|
|
|
|
FM |
Asset Management - Record Assets Batch |
Record Assets menu option within Asset Management. |
ü |
|
|
|
|
|
|
FM |
Asset Management - Record Assets Batch List |
Ability to see the Record Assets batches in process. |
ü |
|
|
|
|
|
|
FM |
Asset Management - Record Assets Purchase Processing - Error Listing |
Error Listing report within the Record Assets process in Asset Management. |
ü |
|
|
|
|
|
|
FM |
Asset Management - Record Assets Purchase Processing - Post |
Post button within the Record Assets process in Asset Management. |
ü |
|
|
|
|
|
|
FM |
Asset Management - Record Assets Purchase Processing - Print Edit & Error Listing |
Print Edit and Error Listing option within the Record Assets process in Asset Management. |
ü |
|
|
|
|
|
|
FM |
Asset Management - Record Assets Purchase Processing - Validate |
Validate option within the Record Assets process in Asset Management. |
ü |
|
|
|
|
|
|
FM |
Asset Procurement Transactions |
Transactions associated with assets from requisitions or purchase orders. |
ü |
|
|
|
|
|
|
FM |
Asset Profile Change |
|
ü |
|
|
|
|
|
|
FM |
Asset Profile Inquiry |
|
ü |
|
|
|
|
|
|
FM |
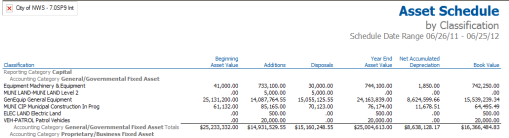
Asset Schedule |
Report showing additions, disposals and accumulated depreciation for a user-defined date range. |
ü |
|
|
|
|
|
|
FM |
Asset Status Change |
Update assets as active or inactive. |
ü |
|
|
|
|
|
|
FM |
Associate Transaction to Asset |
Flag procurement or accounts payable transaction as being associated with an already existing asset. |
ü |
|
|
|
|
|
|
FM |
Depreciation Method |
Adding or changing Depreciation Methods setup in Maintenance for the Asset Management module. |
ü |
|
|
|
|
|
|
FM |
Lease Contracts |
Adding or changing Lease Contracts setup in Maintenance for the Asset Management module. |
ü |
|
|
|
|
|
|
FM |
Physical Inventory Worksheet |
Report in the Physical Inventory process listing assets to be marked as lost or found. |
ü |
|
|
|
|
|
|
FM |
Transfer Asset |
Ability to change certain information for an asset after it has been recorded. |
ü |
|
|
|
|
|
Permission Type – Company Documents and Notes
Feature Group – Asset Management
|
App |
Component |
Description |
All |
Add |
Change |
Delete |
View/Use |
|
|---|---|---|---|---|---|---|---|---|
|
FM |
Asset Documents |
Ability to view existing and add files to assets. |
ü |
|
|
|
|
|
|
FM |
Asset Notes |
Ability to view existing and add new notes to assets. |
ü |
|
|
|
|
|
Permission Type – Company Applications
Feature Group – Asset Management Reports
|
App |
Component |
Description |
All |
Add |
Change |
Delete |
View/Use |
|
|---|---|---|---|---|---|---|---|---|
|
FM |
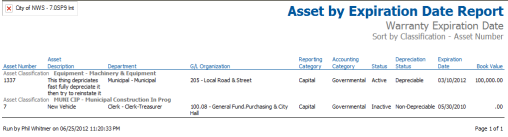
Asset by Expiration Date Report |
Listing of assets within a given expiration date for insurance policies, lease contracts, warranties or licenses. |
ü |
|
|
|
|
|
|
FM |
Asset by Profile Report |
Listing of assets based on location, assigned employee, insurance, g/l distribution, classification, department, g/l organization, or lease contract. |
ü |
|
|
|
|
|
|
FM |
Asset Depreciation Batch Print Reports |
Reports within the Asset Depreciation process. |
ü |
|
|
|
|
|
|
FM |
Asset Listing |
Listing of assets with various details as options to print on the report. |
ü |
|
|
|
|
|
|
FM |
Asset Schedule Supplemental |
Report showing additions, disposals and accumulated depreciation for a user-defined group of assets. |
ü |
|
|
|
|
|
|
FM |
Asset Status Report |
Report for assets changing status within a given date range. |
ü |
|
|
|
|
|
|
FM |
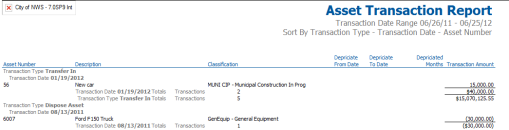
Asset Transaction Report |
Report showing different types of transactions within a given date range. |
ü |
|
|
|
|
|
|
FM |
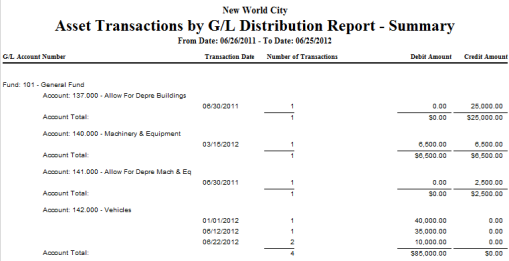
Asset Transactions by G/L Distribution Report |
Report showing different types of transactions within a given date range based on the G/L Account. |
ü |
|
|
|
|
|
|
FM |
Asset Value Report |
Report showing original value, adjustments made depreciation and book value of assets. |
ü |
|
|
|
|
|
|
FM |
Pending Asset Listing |
Report showing assets in pending mode. |
ü |
|
|
|
|
|
Process Manager
Process Manager is where users are assigned to functional departments in order to perform an asset inquiry, process a recording and depreciation batch for assets, view and edit all the information associated to assets and process a physical inventory batch.
Refer to the Process Manager guide to set up the appropriate departments and users within the asset management processes. The four processes to consider for asset management are as follows:
Asset Management – Inquiry: inquiries and reports access.
Asset Management – Journal Batch Processing: rights to departments for the Record Assets, Depreciate Assets and Asset Journals processes.
Asset Management – Maintenance: ability to view and edit assets in Asset Service.
Asset Management – Physical Inventory: rights to departments for the physical inventory process.
Asset Management Processing
Asset Service
Financial Management>Asset Management>Asset Service
The Asset Service page allows users to search for and view a list of all assets to which they have inquiry authority. New assets can also be added on this page. Before users can enter assets into New World ERP, the system administrator in their organization must first set up the asset information that will display for users viewing and adding assets.
Entering an Asset
Financial Management>Asset Management>Asset Service, New asset
There are two ways an asset can be entered into the Asset Management module. Going to Asset Service and clicking the New button is one way to add an asset.
Item – Procurement items set up as asset items. These items are explained in the System Administrator section of this document.
Asset Number – Enter an asset number in this field. If the background color of the field is white and it is left blank, by default, the system will assign an asset number upon clicking OK. A yellow background indicates that the user must enter a value.
Original Funding Source – enter the funding source for the asset.
Acquisition Date – enter the date the asset was acquired.
Original Purchase Price – enter the price of the asset.
Description – enter a brief description of the asset.
Another way for an asset to be added to the Asset Management module is for it to be entered from the Procurement or Accounts Payable invoice entry process.
Financial Management>Procurement>Purchasing>Purchase Orders, New PO
Fields:
Item –The item selected must be set up as an asset item.
Description – If a description is entered here, it will default in as the description of the asset in Asset Management. If no description is entered, the item name will become the description of the asset.
List Price per Unit – This will default in as the original purchase price for the asset. When the AP invoice associated with the PO is processed, the price of the asset will be updated if the price is different on the invoice.
Create New Asset – This check box is selected if the item chosen is set up as an asset item. If a new asset should not be created in Asset Management, clear this box.
Associate Asset – Click to associate this transaction to an asset already existing in Asset Management.
Searching Assets
Financial Management>Asset Management> Asset Service
There are two fields the user can use to search for an asset directly from the Asset Service screen. Type in the Asset Number or the Description of the asset and click Go.
The Advanced Search icon  can be clicked to search on any field within the Asset Management module. If multiple assets fit the entered search criteria, the user will get a list of assets to choose from. Click on the asset to show its details on the right portion of the screen.
General asset information will be shown on the right side of the screen immediately upon clicking on the asset. More information can be gathered by expanding the categories below.
On the left side of the screen, clicking an Asset folder  will display several items from which the user can select to view more information about the asset. When one of these items is clicked on in the Tree View section, the information displays accordingly in the Results section on the right side of the screen. The information that displays in the Results section changes based on the selection made in the Tree View section. The options in the folder are the following:
Map – Available if interfaced with the CD application.
History – View historical changes throughout the assets life in service (since being recorded).
User-Defined Fields – These are additional fields specific to your organization.
Documents – Add or view files attached to the asset. Refer to the Documents Processing guide for details.
Remote Documents – Refer to the Documents Processing guide for details.
Invoices – View all invoices associated with the asset.
Procurement – View any purchase orders, requisitions or bids associated with the asset.
Editing an Unrecorded Asset
As long as the asset is not recorded, any of the information can be edited. To edit the asset, click the Edit option in the yellow General section on the right portion of the screen.
In the Display Items area of the screen, the user can select the groups of fields they would like to see for the asset. Clicking the Show All or Show None option will display all fields or none of the fields, respectively. Once the desired display items have been selected, click the Save Display Settings icon. In addition to the fields described above in the Entering an Asset section, the following is a description of each field available on the Asset screen.
Detail Section
Reporting Category – choose between capital or controlled. Reports can be driven based on each of these categories.
Accounting Category – choose between General/Governmental or Proprietary/Business. Reports can be driven based on each of these categories.
Depreciation Status – choose between Non-depreciable (land assets), Depreciable, and Fully Depreciated. The depreciation process will only consider assets that are depreciable eligible for depreciating.
Asset Special Use – choose whether an asset has a special condition based on the following options:
- Infrastructure (Component) – A component asset of a master asset. The system allows this component to have a separate depreciation schedule and act as a single asset while showing the relationship to the master asset.
- Infrastructure (Master) – One large asset (i.e., Buildings, Bridges, etc.) that may have other components associated with it. The system allows this master to have a separate depreciation schedule and act as a single asset while showing a relationship to its component assets.
- Transferable Asset – A component asset that can be transferred to other assets (i.e., a snow plow that can be transferred to different trucks). The system allows this to be tracked as a separate asset with its own depreciation schedule. The asset can only be associated with one asset at a time and the associations are tracked in the asset history.
- Multi-Component Asset – Denotes a component of a larger asset (i.e., Conference Room Furniture: tables, chairs, etc.) Each item alone is not a fixed asset but the total of all the assets represent a fixed asset.
Master Asset – Only appears when Infrastructure (Component) is selected. Select the master infrastructure asset to which the current asset is assigned. The user must have authority to the asset by asset classification, asset current responsible department, and asset current responsible G/L Organization Set.
Parent Asset – Only appears when Transferable is selected and denotes the current parent asset. Select the asset that is the parent of the current asset, if applicable.
Method of Acquisition – Select the method with which the asset was acquired. These values are defined in validation set 75.
Community Name – only appears if the Asset Management module is interfaced with the Parcel Management module; this pulls from the Communities set up in the Community Development application.
Parcel – only appears if the Asset Management module is interfaced with the Parcel Management module; this pulls Parcels that have been set up in the Community Development application. This field displays the parcel number assigned to the asset (for assets categorized as Land). Click the Search  icon next to this field to open a pop-up which enables the user to search for the record to be displayed.
Original Acreage – the original acreage assigned to the asset when acquired. This field is informational and used for land assets.
Capitalization and Depreciation Section
Capitalization Date – Enter the date used for the depreciation calculation. Assets will begin depreciation the month after the capitalization date. When recording assets there is an option to use the capitalization date as the transaction date. The date must be a valid date greater than or equal to the Acquisition Date. This date will default as the asset’s acquisition date.
Asset Life in Months – Enter the amount of time over which the asset will be depreciated. This field is required if the Depreciation Status field under Detail is set to Non-Depreciable.
Depreciation Method – select the method for which the asset’s depreciation will be calculated. The options available here reflect what was set up in the Depreciation Methods section of the system administrator guide. This field is required if the Depreciation Status field under Detail is set to Depreciable or Fully Depreciated.
Estimated Salvage Value – the remaining value of the asset after it is fully depreciated. This is the estimated recovery/consideration when the asset is disposed of.
Management Section
Responsible Employee – the employee responsible for maintaining the asset file. If the organization is licensed to the Human Resources application, this list is populated from the employees entered there. Otherwise, this list is populated from validation set #38.
Assigned Employee – The employee assigned to the physical asset.
Locations Section
General – Primary location of the asset.
Specific – Secondary location of the asset. This is typically used for assets that are held in an aisle or shelf at a warehouse.
General Ledger Section
Record in G/L – Select this check box if the asset is to be tracked in the general ledger. Controlled assets are typically not recorded in the general ledger. This check box is functional only if the asset module is interfaced with the general ledger.
G/L Organization Set – The asset will inherit the function of government assigned to the organization set selected here.
G/L Distribution Profile – The profiles to choose from will come from those that are set up in the system administration guide. This field is active only when the Record in G/L option is selected. The value cannot be changed if open transactions exist for the asset.
Department Section
Department – Responsible department for the asset. Users that are assigned inquiry access to the department selected here will be able to run reports and inquire on the asset.
Insurance Section
Policy – Select from the insurance policies set up in the system administrator guide.
Lease Section
Lease Contract – Select from the lease contracts set up in the system administrator guide.
Manufacturer Section
Manufacturer – Select the manufacturer of the asset. This originates from validation set #76. If this field is filled in, the four fields below it are enabled. Example: Ford.
Model Number – Enter the model of the asset. Example: F150.
Serial Number – Enter the serial number of the asset. For a vehicle, this could be the VIN#.
Model Year – Enter the production year of the asset.
Warranty Expiration Date – Enter the date the asset’s warranty expires.
Identification Section
Barcode Number – Enter a barcode number of the asset, if applicable.
Badge Number – Enter a badge number of the asset, if applicable.
Vehicle License Number – Enter the license plate number for the asset if it is a vehicle. If this field is filled in, the two fields below are enabled.
Vehicle License Plate Type – Select the type of license plate for this asset. This field is validation set #77.
Vehicle License Expiration Date – Enter the date the license plate expires.
General
All of the general fields can be viewed on this screen. Each field is explained above.
Components
The icon for this screen is only available if the asset has an Asset Special Use or Multi-Component Asset. This screen is used to enter all the components associated with the fixed asset. Quantity, barcode number and description are the fields tracked for each component entered.
User-Defined Fields
This screen will show any additional fields the organization wishes to track outside of the fields explained above in the General screen. Refer to the User-Defined Fields system administrator guide for setting them up.
Documents
Add or view files attached to the asset on this screen. Refer to the Documents Processing Guide for details.
Remote Documents
Refer to the Documents Processing Guide for details.
Notes
Add or view notes already attached to the asset using this icon. Notes can be sent to a single user or a group of users. Refer to the Notes Guide for details.
Accounts Payable Transactions
View any accounts payable transactions associated with the asset or add any transactions that may have been missed. The invoice number is a link the user can click to view the invoice inquiry screen if they have the appropriate security rights. Search criteria can be changed at any time in the upper right hand corner of the screen. In order for the search criteria to display results, the Refresh  button must be clicked.
Purchase Orders
View any purchase order transactions associated with the asset or add any transactions that may have been missed. The purchase order number is a link and will display the purchase order inquiry screen if the user has the appropriate security rights.
The search criteria can be changed at any time in the upper right hand corner of the screen. In order for the search criteria to display the results, the Refresh button must be clicked.
Print an asset data sheet with this icon. A pop-up will appear allowing the user to select information to show on the report. Click OK for it to be sent to myReports. Refer to the myReports administration guide for details on how to view/print the report.
Record Assets
Financial Management>Asset Management>Record Assets
The Record Asset Batch page allows authorized users to enter and maintain batches of asset purchases for recording. Recording an asset allows the user to post assets that have been created. This is typically done once a month or once a year but can be done at any time. For assets that are recorded in the general ledger, a journal entry is sent to asset journals.
Buttons:
New – Click to create a new batch of assets to record.
Delete – Deletes an asset batch in the list yet to be posted.
Refresh – Updates the screen to reflect the latest information in the record assets list.
Maintain Assets – Click to view the list of assets to be recorded in a batch.
Creating a Record Asset Batch
Batch Information Section
Transaction Date – The date that the transaction will be recorded in the General Ledger.
Note: This is overridden if the Use Capitalization Date as Transaction Date check box is selected.
Responsible Department – Select the department responsible for this recording batch. The departments in this list are limited based on the user’s authorizations assigned in Process Manager.
Description – The description for the batch.
Use Capitalization Date as Transaction Date – Select this check box if the system should use the capitalization date entered on the asset in asset service as the transaction date.
Selection Criteria Section
Select Single Asset – Select to record a single asset.
Asset – This field is only active if the Select Single Asset option is selected. Select the asset to be recorded.
From Capitalization Date – This field is enabled if the Select Single Asset option is not selected. Enter the beginning date to search for multiple assets purchased according to their capitalization date.
To Capitalization Date – This field is enabled if the Select Single Asset option is not selected. Enter the ending date to search for multiple assets purchased according to their capitalization date.
Pending Assets – Choose to include, exclude or only record assets with a mode of pending. A pending asset is an asset that was entered into Asset Service via a purchase order or accounts payable invoice entry.
Tabs at the bottom of the screen:
Classifications – Select the classifications of the assets to be recorded.
Departments – Select the departments of the assets to be recorded.
G/L Organizations – Select the organizations of the assets to be recorded.
Tabs at the top of the screen:
General – Use this tab to enter the selection criteria for the batch.
Summary – Once the batch is created, use this tab to review a summary of the total number and dollar amounts of assets in the batch to be recorded. These are broken out by proprietary and general assets.
Buttons on the bottom of the Record Asset Batch screen:
Delete – Click to delete the batch after it has been created.
Reset – Click to revert the fields back to the last time saved.
Build Results – Gathers all the assets fitting the selection criteria to create the batch.
Maintain Results – Available once the batch has been created. Use this to view the list of assets fitting the selection criteria in the batch. Assets can be deselected for recording by unchecking the checkbox on the left. Users can also add or change funding sources for assets on this screen by clicking on the Funding Sources hyperlink for the asset in question.
Record Assets Workflow
Once the batch has been created, it needs to be taken through the workflow buttons shown on the Record Asset Batch List screen. The List icon is the first icon and it shows the status and other information related to the batch. To enter the batch and review or adjust the assets selected in it, click on the description of the batch.
Validation
To validate a batch of assets to be recorded, the user must click the Validation icon, select the check box(es) next to the batch(es) to be recorded and click Submit.
Print Edit & Error Listing
Users have the option of printing an Edit Listing and/or Error Listing. Clicking the Show Preferences link on the right side of the screen (not shown) reveals the Output Preferences shown above. Users can select the preferences which suit their needs, check the batch of assets to be shown on the report, then click Submit to generate the report. The report will then be available for viewing in myReports. Note that any selections made in the Output Preferences section will be saved for that user until the preference selections are changed.
Post
Once the batch has been validated, it will be available for posting. Users can check the batch(es) they wish to post by clicking the checkbox next to their batch and then clicking the Submit button.
Note: There is also a Show Preferences option when posting record asset batches. These options are supplements to the standard post listing and work the same way as the Edit Listing options explained in the step above.
Viewing and Updating a Recorded Asset
Once an asset is recorded it is considered placed in service. When the asset is viewed in Asset Service, additional asset value and life information can be obtained. Limited fields for the asset can be edited from the Asset Service page, but it must be processed as a correction, adjustment, transfer or status change. To view or update the recorded asset information, search for the asset in Asset Service.
The Summary section becomes available once the asset is recorded. Click anywhere on the yellow bar to view the asset’s value, life, or acreage.
To make a change to the asset, click the Edit option in the General bar (not shown above). All fields for the asset will display on the screen. Fields that do not have a gray font displayed in them can be edited. Since the asset is recorded, any change to it must be tracked for historical purposes. The effective date at the top will default as the current day. Adjust this according to when the change should be tracked for historical purposes.
If the user wishes to update a disabled field (gray font), the change must be done using one of four icons now available for the recorded asset.
Summary
View the asset’s value, life and acreage data in a pop-up window. Click OK or close the window to return to the asset.
Correct
The Attribute drop-down allows for four fields to be corrected on the asset. All of the options available for correcting an asset will not generate a General Ledger journal. These fields will update where the asset’s values are included in reports and inquiries. A comment can be left in the bottom field for additional information.
- Classification – corrects the asset to reflect a different classification based on those set up. Explanations of setting up asset classifications are explained in the system administrator guide.
- Reporting Category – Capital and Controlled are the only options for this field.
- Accounting Category – General/Governmental and Proprietary/Business Fixed Asset are the only options for this field.
- Depreciation Method – Update the asset’s depreciation method based on those that were set up. Explanations of setting up depreciation methods can be found in the system administrator guide.
Adjust
An adjustment can be done to the asset’s value or accumulated depreciation. Enter the Transaction Date as the date the adjustment should take place. This is the date the adjustment will affect the General Ledger if the asset is set up to update the G/L. Also, an Adjustment Reason needs to be selected to provide a basis for the adjustment. This drop-down shows the selections available in validation set #184.
There are two values available to adjust on an asset. To do so, replace the amount in one or both of the following options:
Asset Value – Enter the revised amount of the asset’s value. The Funding Source field becomes available when this is done to track the funding source for the amount of the value adjustment. This field is optional. Also optional is the Acreage field to track any land area adjustment made to the asset. Click Save to finish the value adjustment.
Accumulated Depreciation – Enter the revised amount of total depreciation for the asset. The Depreciate Through Date and Months of Depreciation fields become available once the accumulated depreciation value is revised. Enter the appropriate values in these fields to update the asset’s depreciation and future depreciation calculations.
Comments – Additional information may be entered in this field.
Transfer
Performing a transfer of an asset provides many fields to be updated within one transfer. Some value changes in the transfer process may result in a journal entry to update the General Ledger. To complete a transfer, enter the Effective Date the transfer should take place and fill in the fields for the asset.
Note: If a field should remain unchanged, it must be entered as the same value shown in the Currently Assigned To section of the screen.
Status Change
A status change is used for inactivating or reactivating an asset. If the asset is disposed of and was selected to be interfaced with the General Ledger, a journal entry will be generated as a result of the status change. Fill in the fields as appropriate for the status change.
Effective Date – The date the status change should be tracked for historical purposes. This is also the date the GL transaction will be created.
Active – Leave box cleared if the asset is to be marked as inactive. Select the check box if the asset is being reactivated.
Inactive Reason – Select the most appropriate option (Retired/Scrapped, Lost/Stolen, Sold, Donated, Trade In, and Canceled). These options are hard-coded and cannot be changed.
Consideration – If a dollar amount was obtained from the disposal of the asset, enter that amount in this field.
Note: If Sold was entered for the Inactive Reason, the consideration amount is required.
Comment – Provide additional information in the field regarding the status change.
Depreciate Assets
Financial Management>Asset Management>Depreciate Assets
The Asset Depreciation Batch page allows authorized users to define and maintain the depreciation expenses that will be charged to an asset up to a specific date. The depreciation of assets can be done monthly but many times, once a year is often enough to update an organization’s yearly fixed asset reports. For assets that will be recorded in the General Ledger, a journal entry will be sent to asset journals for the depreciation expense.
Buttons:
New – Click to create a new batch of assets to depreciate.
Delete – Deletes an asset depreciation batch in the list yet to be posted.
Refresh – Updates the screen to reflect the latest information in the Depreciate Asset Batch List.
Maintain Assets – Click to view and edit the list of assets to be depreciated in a batch.
Creating an Asset Depreciation Batch
Batch Information Section
Depreciate Through Date – Enter the ending date for which the system should use to calculate depreciation though.
Transaction Date – Enter the date for the depreciation to show on reports. This date can also be used as the date to record depreciation into the General Ledger.
Responsible Department – select the department responsible for this depreciation batch. The departments in this list are limited based on the user’s authorizations assigned in Process Manager.
Description – Type a description for the batch.
Selection Criteria Section
Select Single Asset – Select to depreciate a single asset.
Asset – This field is only active if the Select Single Asset option is selected. Select the asset to be recorded.
Tabs at the top of the screen:
General – Use this tab to enter the selection criteria for the batch.
Summary – Once the batch is created, use this tab to review a summary of the total number of assets and cumulative dollar amounts for all asset depreciation calculations within the batch.
Tabs at the bottom of the screen:
Classifications – Select the classifications of the assets to be depreciated.
Departments – Select the departments of the assets to be recorded.
G/L Organizations – Select the organizations of the assets to be recorded.
Buttons:
Delete – Deletes the batch after it has been created.
Reset – Reverts the fields back to the last time saved.
Build Results – Gathers all the assets fitting the selection criteria to create the batch.
Maintain Results – Available once the batch has been created. Click this button to view the list of assets fitting the selection criteria in the batch. Assets can be deselected for depreciation by unchecking the check box on the left. Users can also edit the depreciation amounts the system has calculated by clicking on the asset number. Additional months of depreciation can also be entered for individual assets by clicking on the asset number. Doing this will decrease the remaining months of depreciation left for the asset.
Depreciate Assets – Workflow
Once the batch has been created, it needs to be taken through the workflow buttons shown on the Asset Depreciation Batch List screen. The List icon is the first icon and it shows the status and other information related to the batch. To enter the batch and review or adjust the assets selected in it, click on the description of the batch.
Validation
To validate a batch of assets to be depreciated, the user must click the Validation icon, select the check box(es) next to the batch(es) to be recorded and click Submit.
Print Edit & Error Listing
Users have the option of printing an Edit Listing and/or Error Listing. Clicking the Show Preferences link on the right side of the screen (not shown) reveals the Output Preferences shown above. Users can select the preferences which suit their needs, check the depreciation batch(es) to show on the report, then click Submit to generate the report. The report will be available for viewing in myReports.
Note: Any selections made in the Output Preferences section will be saved for that user until the preference selections are changed.
Post
Once the batch has been validated, it will be available for posting. Users can check the batch(es) they wish to post by clicking the checkbox next to their batch and then Submit.
Note: there is also a Show Preferences option when posting depreciate asset batches. These options are supplements to the standard post listing and work the same way as the Edit Listing options explained in the step above.
Physical Inventory
Financial Management>Asset Management>Physical Inventory
The Physical Inventory option allows authorized users to initialize and manage the results of physical inventories of assets. Physical inventory batches can be run as many times as needed. After the physical inventory batches are created, users can print and distribute worksheets to perform the inventory.
Buttons:
New – Click to create a new batch for physical inventory.
Delete – Deletes the highlighted physical inventory batch in the list yet to be posted.
Refresh – Updates the screen to reflect the latest information in the Physical Inventory Batch List.
Maintain Results – View and edit the list of assets to be inventoried in a batch.
Export – Not available at this time, but will be operational in a future release.
Import – Not available at this time, but will be operational in a future release.
Worksheet – the report is generated in a worksheet format to allow for distribution to the responsible persons for performing the physical inventory task. Options on the worksheet are:
- Sort Order – Choose the order in which the worksheet should generate the list of assets.
- Include Detail – Select to include all the details for the assets on the worksheet.
- Include Result Values – Select to include the details of who inventoried which items and any comments made.
Creating a Physical Inventory Batch
Batch Information Section
Initiated Date – Enter the date the physical inventory process began.
Responsible Department – Select the department responsible for organizing the physical inventory process. The departments in this list are limited based on the user’s authorizations assigned in Process Manager.
Description – Enter a description for the batch.
Completed Date – Date the physical inventory process finished.
Buttons on the bottom of the screen:
Save – Click to save the Completed Date entry for the batch.
Delete – Click to delete the batch.
Reset – Click to revert the fields back to the last time saved.
Build Results – Gathers all the assets fitting the selection criteria to create the batch.
Maintain Results - Available once the batch has been created. Click this button to view the list of assets fitting the selection criteria in the batch.
Fields:
Complete – Select if the asset has finished the physical inventory process.
Inventory Date – Enter the date the asset completed the inventory process.
Inventory by User – Select the user who performed the physical inventory process.
Found – Select this check box if the item was found.
Comment – Click to add a comment to the asset item for future reference regarding this physical inventory action.
Asset Number – Click on the asset number to enter the Physical Inventory Asset page and enter more specific information for the asset. Once all fields have been filled in, click Save. Available fields within the specific asset page are:
- Inventory Complete – Same as the above Complete option. Select if the inventory check for this item has been performed.
- Inventory Date – Same as above.
- Inventory by User – Same as above.
- Update Asset Profile – Select to update the asset’s specific information as it reflects in Asset Service. If selected, many fields become available to update the asset’s status, accounting profile and physical location. Update fields as necessary.
Comments – Enter any comments regarding this asset in this field.
Physical Inventory – Workflow
Once the batch has been completed, it needs to be taken through the workflow buttons shown on the Physical Inventory Batch List screen. The List icon is the first icon and shows the status and other information related to the batch. To enter the batch and review or adjust the assets selected in it, click on its description.
Validation
To validate the batch of assets, the user must click the Validation icon, select the check box(es) next to the batch(es) and click Submit.
Print Edit & Error Listing
Users have the option of printing an Edit Listing and/or Error Listing. Clicking the Show Preferences link on the right side of the screen (not shown) reveals the Output Preferences (shown above). Users can select the preferences which suit their needs, check the physical inventory batch(es) to show on the report, then click Submit to generate the report. The report will then be available for viewing in myReports.
Note: any selections made in the Output Preferences section will be saved for that user until the preference selections are changed.
Post
Once the batch has been validated, it will be available for posting. Users can check the batch(es) they wish to post by selecting the checkbox next to their batch and then Submit. Note there is also a Show Preferences option when posting physical inventory batches. These options are supplements to the standard post listing and work the same way as the Edit Listing options explained in the step above.
Asset Journals
Financial Management>Asset Management>Asset Journals
The Asset Journal Batch List page allows authorized users to view and maintain a list of all batches containing asset general ledger transactions to be updated to journal processing. In the Asset Management Journals process, the system generates journal entries from the various asset processes (i.e., recording, depreciating, and adjusting assets). After these journals are created and posted from asset journals, a system-generated journal entry is sent to the journal list to be posted to the general ledger.
Buttons:
New – Click to create a new batch of asset journals.
Delete – Deletes the highlighted asset journal batch.
Refresh – Updates the screen to reflect the latest information in the Asset Journal Batch List.
Display Results – Click to view the list of GL accounts and assets associated with the highlighted asset journal batch.
Creating an Asset Journal Batch
Batch Information Section
G/L Date – Enter the date the asset journal should be posted to the General Ledger.
Fiscal Year – Enter the fiscal year of the journal to be created. This date is used to determine the appropriate next journal number.
From Transaction Date – Enter the beginning date to search for asset transactions.
To Transaction Date – Enter the ending date to search for asset transactions.
Responsible Department – Select the department responsible for this asset journal batch. The departments in this list are limited based on the user’s authorizations assigned in Process Manager.
Use Transaction Date as G/L Date – Select this check box if the transaction date is to be used as the G/L date for each transaction in the batch. If it is cleared, all transactions will have one G/L Date.
Transaction Types tab – Choose the transaction types to be included in the journal entry.
Tabs at the top of the screen:
General – Use this tab to enter the selection criteria for the batch.
Approvals – View the approvals placed on the asset journal batch. Hover the cursor over the gray checkmarks to view the available users.
Fund Summary – View the total debits and credits by fund.
Buttons:
Delete – Deletes the batch after it has been created.
Reset – Click to revert the fields back to the last time saved.
Build Results – Click to gather all the assets fitting the selection criteria to create the batch.
Display Results – Click to view a list of all batch transaction amounts by general ledger account. This page displays the journal entry that will be created. The G/L Account is an available hyperlink to view all the asset transactions comprising the total amount for that account. Once the user views the transactions, the Asset Number becomes a hyperlink to view more information for each asset transaction.
Assets Journals Workflow
Once the batch has been created, it needs to be taken through the workflow buttons shown on the Asset Journal Batch List screen. The List icon is the first icon and it shows the status and other information related to the batch. To enter the batch and review the transactions in it, click on the description of the batch or the Display Results button.
Validation
To validate a batch of asset journals, the user must click the Validation icon, then select the check box (es) next to the batch (es) and click Submit.
Print Edit & Error Listing
Users have the option of printing an Edit Listing and/or Error Listing. Clicking the Show Preferences link on the right side of the screen (not shown) reveals the Output Preferences shown above. Users can select the preferences which suit their needs, check the batch of assets to show on the report, and then click Submit to generate the report. The report will then be available for viewing in myReports.
Note: that any selections made in the Output Preferences section will be saved for that user until the preference selections are changed.
Approval
Once the batch has been validated, users must approve the journal batch. To do so, select the batch (es) they wish to post by clicking the checkbox next to the batch and then Submit.
Post
Once the batch has been approved, it will be available for posting. Users can check the batch (es) they wish to post by clicking the check box next to their batch and then Submit. Note there is also a Show Preferences option when posting record asset batches. These options are supplements to the standard post listing and work the same way as the Edit Listing options explained in the step above. Once the batch is posted, a journal will be in the Journal List waiting to be posted to the General Ledger.
Asset Management Reports and Inquiries
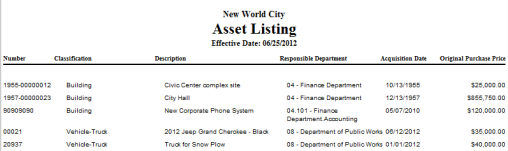
Asset Management Reports can be found by navigating to Financial Management>Reports>Asset Management.
The Asset Listing is the most basic of the asset reports. It provides a list of assets based on many options to search from.
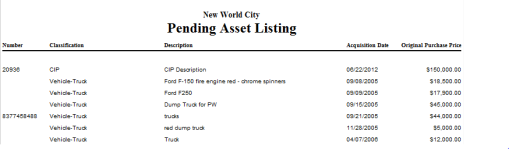
Pending Asset Listing
The Pending Asset Listing report is very similar to the Asset Listing; however, it only shows assets with a status of pending. A pending asset is an asset item that was initiated into the asset management module from a procurement or accounts payable entry.
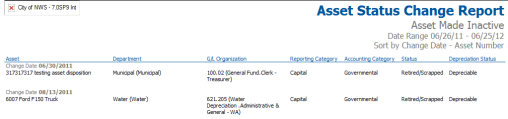
Asset Status Change Report
The Asset Status Change Report shows a listing of any assets having a status change within a given date range.
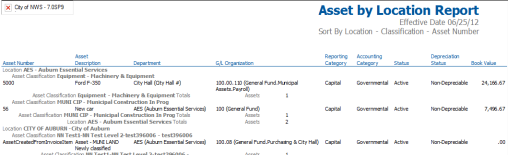
Asset by Profile Report
Assets and their book value listed by a selected profile.
Asset by Expiration Date Report
The Asset by Expiration Date report lists assets and their book values based on an insurance, lease, warranty or license expiration date.
Asset Transaction Report
The Asset Transaction report shows all transactions for assets within a given date range.
Asset Transactions by G/L Distribution Report
View transactions made to specified G/L accounts within a defined date range.
Asset Schedule
Asset Schedule, Asset Value Schedule and Depreciation can all be obtained using this report. These schedules show additions, disposals, depreciation and ending book value for a user-defined date range. This is a popular report for many organizations’ annual financial reports.
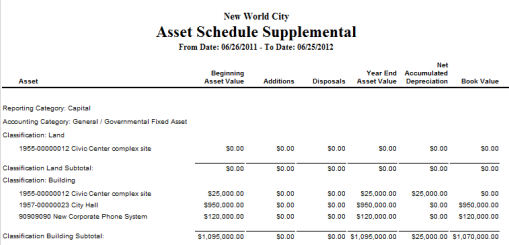
Asset Schedule Supplemental
The Asset Schedule Supplemental report generates the same three reports obtained from the Asset Schedule but with the assets listed in more detail.
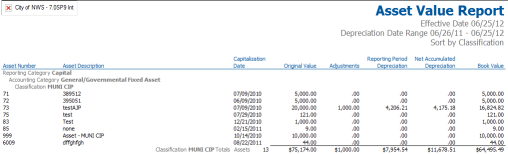
Asset Value Report
The Asset Value report shows original asset values with adjustments, depreciation and book value based on a selected effective date.
Asset Management Inquiry
Assets by Profile – view a grid or chart based on Responsible Employee, General Location, Department, G/L Organization or Classification. Once the profile is selected, click Search and the results will display. Clicking on a profile category will take the user to Asset Service and perform an advanced search based on the selection made.
Asset Management General Ledger Transactions
Note: GGCAF stands for General Governmental Capital Assets Fund.
Record Asset
Fund Account DescriptionDRCR
GGCAF Record Asset DebitXX
GGCAF Record Asset CreditXX
Example:
9000 Machinery & Equipment 100.00
9000 Capital Asset Expense 100.00
Record Depreciation
Fund Account Description DRCR
GGCAF Record Depreciation Debit XX
GGCAF Record Depreciation Credit XX
Example:
9000Depreciation Exp - Mach & Equip 20.00
9000 Accum. Depr – Mach & Equip20.00
Record Adjustment – Cost (Increase)
Fund Account DescriptionDRCR
GGCAF Record Asset DebitXX
GGCAF Record Asset Credit XX
Example:
9000Machinery & Equipment5.00
9000 Capital Asset Expense5.00
Record Adjustment – Cost (Decrease)
Fund Account DescriptionDRCR
GGCAF Record Asset CreditXX
GGCAF Record Asset DebitXX
Example:
9000Capital Asset Expense 5.00
9000Machinery & Equipment5.00
Record Adjustment – Depreciation (Increase)
Fund Account DescriptionDRCR
GGCAF Record Depreciation DebitXX
GGCAF Record Depreciation Credit XX
Example:
9000Depreciation Exp - Mach & Equip7.00
9000 Accum. Depr – Mach & Equip 7.00
Record Adjustment – Depreciation (Decrease)
Fund Account DescriptionDRCR
GGCAF Record Depreciation CreditXX
GGCAF Record Depreciation Debit XX
Example:
9000Accum. Depr. - Mach & Equip 7.00
9000 Depreciation Exp. – Mach & Equip 7.00
Record Transfer (From General Governmental Capital Assets Fund)
Fund Account DescriptionDRCR
GGCAF Transfer Out/Loss XX
GGCAFRecord Depreciation CreditXX
GGCAF Record Asset DebitXX
Example:
9000Transfer Out80.00
9000Accum. Depr – Mach. & Equip. 20.00
9000 Machinery & Equipment100.00
Record Transfer (To Proprietary Fund)
Fund Account DescriptionDRCR
Prop Fund Record Asset Debit XX
Prop Fund Record Depreciation Credit XX
Prop Fund Transfer In/NewXX
Example:
5501Machinery & Equipment 100.00
5501 Accum. Depr – Mach. & Equip.20.00
5501 Transfer In80.00
Record Disposition
Fund Account DescriptionDRCR
GGCAF Disposition Write off XX
GGCAF Record Depreciation CreditXX
GGCAF Record Asset DebitXX
Example:
9000Sale of General Capital Assets 80.00
9000Accum. Depr – Mach. & Equip. 20.00
9000 Machinery & Equipment100.00
Record Recovery of Disposition
Fund Account DescriptionDRCR
GGCAF Record Asset Debit XX
GGCAF Disposition Write off XX
GGCAF Record Depreciation Credit XX
Example:
9000Machinery & Equipment100.00
9000 Sale of General Capital Assets80.00
9000 Accum. Depr – Mach. & Equip.20.00