Contract Accounting
Welcome to the New World ERP Contract Accounting online guide. This guide will walk you through the setup and processing aspects of Contract Accounting. It is divided into two sections.
The System Administration section will focus on the set-up components necessary to utilize the Contract Accounting module within New World ERP. This will include detailed information on the security and configuration aspects.
The End User Processing section will describe the steps, workflow and options available in the Contract Accounting module to the end-user. This document is designed to guide you through the process of building a contract, adjusting contracts and how to apply contracts to purchasing transactions. Included in the section will be a guide on how to view inquiries and the standard reports available.
System Administrator Guide
Company FM Settings
The Company FM Settings area contains universal settings that will control system behavior within the Contract Accounting module.
Maintenance > Financial Management > Company FM Settings > Procurement Tab
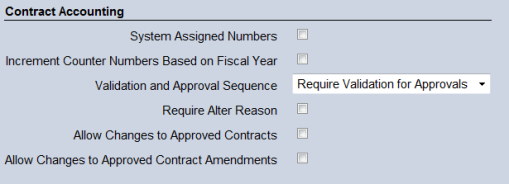
The Contract Accounting section contains the following fields that define how the contract accounting module works in your environment.
- System Assigned Numbers – Select the check box if you want the system to automatically assign the contract number by incrementing the previous contract number by 1. The system can be set up either to sequentially number contracts or to allow the user to manually enter the number during the Contract Preparation process. The format of the system-assigned number is XXXX-XXXXXXXX. The first four digits represent the Counter Year (e.g., 2008). The last eight digits represent the counter number (e.g., 1, 2, 3, etc.).
- Increment Counter Number Based on Fiscal Year – When using a system-assigned number, this check box determines which Counter Year sequence to use. If you select this check box, the contract number uses the fiscal year value as the prefix (i.e., Counter Year). If this check box is not selected, the calendar year is used as the prefix. The system uses the Contract Start Date as the determining date of the Counter Year. For example, an organization has a fiscal year ending 6/30. The Increment Counter Number Based on Fiscal Year check box in System Settings is selected. A contract with a Contract Start Date of 8/1/2008 is added. The system assigns the next available contract number beginning with the year 2009. It uses the value associated with the fiscal year in which the Contract Start date falls. If the Increment Counter Number Based on Fiscal Year check box in System Settings is not selected, the system uses the value associated with the calendar year in which the Contract Start date falls, or 2008.
- Validation and Approval Sequence – Select a value that allows your organization to determine the use and order of these two steps in the workflow process. The options are Require Approvals for Validation, Require Validation for Approvals, and Require No Dependencies. If a dependency is required, the workflow buttons display in the order of the dependency.
- Require Alter Reason – Select the check box if a reason must be supplied by a user when altering a contract. Altering any value in the contract record creates an entry for the contract; requiring the reason can help reduce accidental entries, and thus unnecessary records, in this process. Select this check box to require a reason when altering a contract.
- Allow Changes to Approved Contracts – Select the check box if changes can be made to a contract after approval. If this check box is not selected, approved contracts may not be edited.

Maintenance > Financial Management > Company FM Settings > Accounts Payable Tab
Default Retainage Released Invoice Description - Determines the text that is automatically assigned to Accounts Payable invoices created from the Release Contract Retainage page.
Validation Sets
|
Validation Set Number |
Validation Set Description |
Where Used |
Purpose |
Examples |
|---|---|---|---|---|
|
38 |
Employee |
Used when the Payroll module is not installed |
Defines the responsible employee assigned to a contract. |
|
|
307 |
Notification Priority |
Notification Manager – Process Maintenance |
Priorities to be assigned to notifications created by the Contract Preparation or Amendment process |
|
|
310 |
Preparation Status |
Prepare Contract |
Identifies where the contract is in the preparation process |
|
|
311 |
Contract Renewable Type |
|
Defines the way the contract will be renewed |
|
|
312 |
Contract Preparation Checklist Task Status |
|
Identifies the status of the preparation checklist task |
|
|
314 |
Contract Milestone Action |
|
Defines what actions are necessary after a milestone is achieved |
|
|
315 |
Contract Other Specific Event |
|
Allows for user-defined milestones for a contract |
|
|
333 |
Contract Amendment Reason - Amend |
Amend Contract – Type = Amend |
Defines the reason for amending the contract |
|
|
334 |
Contract Amendment Reason - Complete |
Amend Contract – Type = Complete |
Defines the reason for completing the contract |
|
|
335 |
Contract Amendment Reason - Renew |
Amend Contract – Type = Renew |
Defines the reason for renewing the contract |
|
|
336 |
Contract Amendment Reason - Replace |
Amend Contract – Type = Replace |
Defines the reason for replacing the contract |
|
|
337 |
Contractor Performance Rating |
Amend Contract – Type = Complete |
Defines the rating given to a contractor after they have completed a contract |
|
|
339 |
Contract Alter Reason |
Alter Contract |
Defines why the contract is being altered |
|
|
307 |
Notification Priority |
Notification Manager – Process Maintenance |
Priorities to be assigned to notifications created by the Contract Preparation or Amendment process |
|
|
340 |
Vendor Compliance Type |
Vendor Compliance Type |
Defines the status of Compliance types associated with a specific vendor |
|
User Defined Fields (UDFs)
Maintenance>new world ERP Suite> Security>User Defined Fields
User defined fields can be used in Contract Accounting to capture additional information about a contract. To set-up User Defined Fields, go to the User Defined Field list screen.
First, select the appropriate Record Type. The Record Type for Contract Accounting UDFs will be Procurement Forms.
The ability exists to categorize UDFs by Section Headers for organized presentation on the UDF screen. If a substantial number of UDFs are to be utilized, this can be helpful.
If UDF Section Headers are desired, they can be set-up by selecting the Maintenance Type of Section Headers.
To add a Section Header, click the New button.
UDF Section Header Add window
The Section Header description should contain the description of the category.
Sequence number field will sequence the Section Headers on the UDF screen in numerical order.
To add user defined fields, change the Maintenance Type to Attributes, then hit the New button to add a new field.
Adding a User Defined Field
- Name – This is the title of the User Defined Field.
- Section Header – If appropriate, select the Section Header
- Sequence Number – This will determine the order in which the field is presented within the section header
-
Data Type - This is a drop down with the following options:
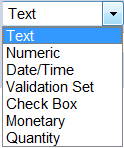
- Text – Select this option if the desired field should be free form text. If selected, an additional field will request the maximum number of allowable characters for the field. The options for this entry are 1 to 999.
- Numeric – Select this option if you wish to have a number entered in the user defined field. If selected, an additional prompt will request the minimum and maximum allowable values. These can be set to negative amounts if desired.
- Date/Time – Select this option if you wish to have a Date/Time for the User Defined Field.
- Validation Set – Select this option if you would like the UDF to present the user with a drop down from a validation set. If selected, an additional prompt will require specification of the validation set to use. If an additional validation set is required, go to Maintenance>new world ERP Suite>System>Validations Sets>Validation Set List and hit New to create an additional validation set and its entries. A unique (unused) number will be required for any new Validation Sets created.
- Check Box – Select this option if you wish the UDF to be a simple True/False utilizing a check box.
- Monetary – This allows for entry of a monetary figure. If selected, the user may specify the desired number of decimal places which can be useful for per unit information.
- Quantity – Select this option if you wish to record quantity information in the UDF. If selected, an additional prompt will request the number of decimal places to be recorded.
- Required – The required flag allows the UDF created to be a required field when inputting creating a contract.
- Available Applications – Select which procurement applications this UDF will be available to use.
-
After creating the desired UDFs, the list of UDFs will populate the User Defined Field List screen. They can be edited or changed by clicking on the Attribute Name to re-open them.
Contract Types - Creation
Maintenance > new world ERP Suite > Procurement > Contract Types
The Contract Type List page displays all contract types defined for the Contract Accounting module. Contract types allow users to group contracts together for inquiry, reporting and security purposes. From this page, users can add, edit, delete, and report on contract types. Click the New button to create a new contract type.
- Category - A purchasing type contract is a more basic contract type than a commodity based one. Purchasing type contracts do not require specific items on a Requisition or Purchase Order. They also validate against the whole dollar amount of the contract versus a commodity type which can validate against line items of the contract.
- Code - Type a Code to uniquely identify the contract type. This value is required. It may contain up to 16 characters.
- Description - Type a Description of the contract type. This value is required. It may contain up to 64 characters. The Code and Description together identify the contract in the system and on report output.
- Allow Secondary Vendors - Select the Allow Secondary Vendors check box to associate other vendors to the contract in addition to the primary vendor specified. After you select this check box, it can only be deselected if no contracts with secondary vendors exist for this contract type.
- Contract Item Type - Select a Contract Item Type to indicate which type of contracted items are supported by this contract type for non-commodity based contracts. This box is enabled if the Category value is Commodity. The options are:
- None - No contracts of this type use contracted items.
- Quantity-Based Items—there are no monetary-based contracted items for contracts of this type.
- Monetary-Based Items—there are no quantity-based contracted items for contracts of this type.
- Both Monetary - and Quantity-Based Items - Allows both item types to exist for this contract type.
Click Save when all of these choices have been selected. Click on the Preparation Checklist icon (next icon to the right).
Adding or Editing a Checklist
Follow the steps below to add a new checklist or edit an existing checklist:
In the Checklist box, select a specific checklist item from the drop-down list, or navigate through the existing checklists using the move arrows. This box is disabled with a default value of <New> when no checklist exists for the contract type or when the page is in Add mode to create a new checklist.
Type a Description of the checklist. This value must be unique for the contract type. This control is required and can contain up to 64 characters.
- Select the Active check box if the current checklist is active in the system.
Type a Sequence Number to indicate the order of this checklist among the other checklists that exist for this contract type. This value is required; it must be between 1 and 999, and it must be unique for this contract type.
Select the Required check box if the checklist must be completed before the contract can be validated and posted.
Click to retain the checklist or click to retain this checklist and clear the fields so another checklist can be added.
After a checklist has been added, a new grid displays at the bottom of the screen where you can add new tasks.
To add a task to a checklist, click below the list. To edit an existing task, click the hyperlink text in the Description column.
- Sequence Number - designate the order in which the checklist task should be performed. This value is required; it must be between 1 and 999, and it must be unique for this contract type checklist.
- Description – Description of the task to be performed. This value is required; it can contain up to 64 characters and must be unique for this contract type checklist.
- Active - Check box, if the current task is active for this checklist.
- Required - Check box if the current task is required for this checklist.
- Internal Task - Check box if the task will be completed by internal staff.
- Responsible Department - This is the department that normally completes this task. This value is required.
- Responsible Employee - If you would like to only include tasks for a specific employee. Otherwise, leave this field blank to include tasks for all Responsible Employees. If your organization has a license for the Human Resource module, the value in this drop-down list comes from the employees set up on the Employee Maintenance page, located under the Human Resources menu. If your organization does not have a license for the Human Resources module, this value comes from Validation Set 38 - Employee (used when the Payroll module is not installed).
Click OK to add the task to the checklist.
The Milestones page allows users to define the milestone types associated to the contract type. Milestones occur after the contract is adopted and is used to notify users of specific events in the life of the contract so they can take the appropriate action.
Adding or Editing a Milestone
To add a new milestone, click New. To edit an existing milestone, click the hyperlink text in the Description column.
- Sequence Number - Designate the order in which the milestone should be performed. This value is required and must be between 1 and 999; it must be unique for this contract type.
- Description - Description of the milestone to be achieved. This value is required; it can contain up to 64 characters and must be unique for this contract type.
- Active - check box that determines if the current milestone is active for this contract type.
-
Milestone Type - This value defines the basic characteristics of the milestone and is required. The options are: Date, Duration, Percentage Expensed, Amount Expensed, and Other Specific Event Based on the Milestone Type selected, an additional field displays to allow the user to specify a default value for that milestone type.
Date—the Milestone Date field displays. This value is required.
Duration—the Duration (in days) and Based On fields display. In Duration, enter the length of time in days that this milestone took to achieve. This value is required; the maximum value is 999 days. In Based On, select the point from which the duration is measured. The options are: After Date Signed, After Contract Start Date, Prior to Contract End Date, After Contract End Date, and After Other Milestone.
- Percentage Expensed - The Percent field displays. This value is required. The acceptable range is 0.01 through 100.00.
- Amount Expensed — The Amount expensed in Accounts Payable. This value is required. The acceptable range is $0.01 through $999,999,999.99.
- Other Specific Event — The Other field displays. This value is required; the options are defined in Validation Set 315.
- Select a Milestone Action, if desired. This value indicates what action should be taken after the milestone is achieved. The options are defined in Validation Set 314, Contract Milestone Action.
Security Set-Up
Security for Contract Accounting is controlled through permissions, user based security and process manager. Permissions control which pages a user can access and can be grouped by permission templates. Depending on a municipalities needs, departments are generally given access to adding and maintaining contracts, or contracts are administered centrally by a purchasing coordinator.
User based security controls what contract types a user has access to. Additionally, process manager controls the workflow related to creating, altering (non-material change) and amending contracts (material change).
Maintenance>new world ERP Suite>Security>User Based Security
Change the function to Contract Types.
Add the applicable contract types to each user.
Permissions related to contract accounting generally fall in two groups. The first group is set-up for administration purposes, which includes all permissions related to Contract Accounting. The second is used for decentralizing the entry, altering and sometimes the amendment of a contract. This allows the system administrator to pick and choose what functions a decentralized contracts user has access to.
Permission Type – Company Applications
Feature Group – FM – Contract Accounting
|
App |
Component |
Description |
All |
Add |
Change |
Delete |
View/Use |
|
|---|---|---|---|---|---|---|---|---|
|
FM |
Contract Alter – View/Change |
Provides the ability to add, change, delete and view/use contracts on the alter contract list |
x |
x |
x |
x |
x |
|
|
FM |
Contract Amendment – Create/Edit |
Works in conjunction with Contract Amendment Process Manager, this is needed to create and change an open contract amendment |
x |
x |
x |
x |
x |
x |
|
FM |
Contract Amendment Error Listing |
Ability to print an error listing during the print edit and error listing workflow process. Must have Contract Amendment Process Manager – Print Edit and Error listing enabled as well. |
x |
|
|
|
x |
|
|
FM |
Contract Amendment Process Manager |
Ability to get to the contract amendment list. |
x |
|
|
|
x |
|
|
FM |
Contract Amendment Process Manager - Adopt |
Enables the adopt icon on the contract amendment list page. |
x |
|
x |
|
|
|
|
FM |
Contract Amendment Process Manager – Execute All Processes |
Enables the execute all processes icon on the contract amendment list page. |
x |
|
x |
|
|
|
|
FM |
Contract Amendment Process Manager – Print Edit & Error Listing |
Enables the edit and error listing icon on the contract amendment list page. |
x |
|
|
|
|
x |
|
FM |
Contract Amendment Process Manager – Validate |
Enables the validate icon on the contract amendment list page. |
x |
|
x |
|
|
|
|
FM |
Contract Audit Listing |
Ability to print a contract audit listing. |
x |
|
|
|
|
x |
|
FM |
Contract Expiration Report |
Ability to print a contract expiration report. |
x |
|
|
|
|
x |
|
FM |
Contract Inquiry |
Ability to access the contract inquiry screens. |
x |
|
|
|
x |
|
|
FM |
Contract Listing |
Ability to print a contract listing. |
x |
|
|
|
|
x |
|
FM |
Contract Preparation – Create/Edit |
Enables a user to create and edit a contract |
x |
x |
x |
x |
x |
x |
|
FM |
Contract Preparation – Preparation Checklist |
Provides the ability to add, change, delete and view/use contracts in the contract list |
x |
x |
x |
x |
x |
x |
|
FM |
Contract Preparation – Error Listing |
Ability to print an error listing contract in the preparation contract preparation list |
x |
|
|
|
|
x |
|
FM |
Contract Preparation Process Manager |
Ability to get to the contract preparation list. |
x |
|
|
|
x |
|
|
FM |
Contract Preparation – Process Manager Adopt |
Enables the adopt icon on the contract preparation list screen. |
x |
|
x |
|
|
|
|
FM |
Contract Preparation Process Manager – Execute All Processes |
Enables the execute all processes icon on the contract preparation list screen. |
x |
|
x |
|
|
|
|
FM |
Contract Preparation Process Manager – Print Edit & Error Listing |
Enables the print edit and error listing icon on the contract preparation list screen. |
x |
|
|
|
|
x |
|
FM |
Contract Preparation Process Manager – Validate |
Enables the validate icon on the contract preparation list screen. |
x |
|
x |
|
|
|
|
FM |
Contract Retainage Override |
Allows the user to change the remit amount of the retainage balance in accounts payable invoice entry |
x |
|
x |
|
x |
|
|
FM |
Contract Retainage Reconciliation Report |
Ability to print the contract retainage reconciliation report. |
x |
|
|
|
|
x |
|
FM |
Contract Types |
Ability to create, change, delete, view and print contract type and default contract type information. |
x |
x |
x |
x |
x |
x |
|
FM |
Hold Contract |
Allows the ability to put contracts in a hold status on the contract preparation list. |
x |
|
x |
|
|
|
|
FM |
Open Contract Balance Report |
Ability to print an open contract balance report. |
x |
|
|
|
|
x |
|
FM |
Release Contract Retainage |
Ability to release contract retainage in accounts payable. |
x |
x |
x |
|
x |
|
|
FM |
Select Contract Items |
Ability to release retainage down to the item level on a contract |
x |
|
|
|
x |
|
Permission Type – Company Documents and Notes
Feature Group – FM – Contract Accounting
|
App |
Component |
Description |
All |
Add |
Change |
Delete |
View/Use |
|
Checkout |
Undo |
Finalize |
Reminder |
|---|---|---|---|---|---|---|---|---|---|---|---|---|
|
FM |
Contract Documents |
Ability to add, view and work with documents to a contract. Any user attaching documents to the contract will need this permission. Despite the availability of a “Change” permission, document attachments cannot be changed |
ü |
ü |
ü |
ü |
ü |
ü |
ü |
|
|
|
|
FM |
Contract Notes |
Ability to add Notes to a contract. Any user attaching notes to the contract will need this permission. |
ü |
ü |
ü |
ü |
ü |
ü |
|
|
|
|
|
FM |
Contract Preparation Task Documents |
Ability to add, view and work with documents assigned to a task within the contract. |
ü |
ü |
ü |
ü |
ü |
ü |
ü |
|
|
|
|
FM |
Contract Preparation Checklist Task Notes |
Ability to add Notes to for each preparation task checklist during the contract preparation phase in the checklist. |
ü |
ü |
ü |
ü |
ü |
ü |
|
|
|
|
Maintenance > new world ERP Suite > Process Manager
There are three different processes within process manager that control the approval processes within contract accounting.
Purchasing – Contract Preparation: Contract preparation allows the user to define what the workflow process is when preparing/creating a contract.
Purchasing – Contract Alteration: This allows the user to define the available departments and associated users who can alter contracts. Contract alterations are non-material changes (IE descriptions, milestones, authorized departments, etc.) made to a contract that has been posted.
Purchasing – Contract Amendments: Contract amendments allow the user to make material changes (IE contract amounts, retainages, etc.) that can be made to a contract that has been posted.
Highlight the Purchasing – Contract Preparation row and click Departments. This allows the user to define what departments can create/use contracts and the default approval process. The approval process levels can be overridden at the department level if necessary.
Breadcrumb back to the process manager list and click the plus sign next to the Purchasing – Contract Preparation row. Click the plus sign next to the department you’d like to view. This allows the user to see what approval process, within a department, within the contract preparation process.
Highlight each approval level and click the <Approvals> button at the bottom of the page. Each approval level within each department will need approvals assigned.
Repeat this process for the Purchasing – Contract Alteration and Purchasing – Contract Amendment Processes.
Contract Preparation
Contract Preparation - Contract List
Financial Management > Procurement > Contracts > Prepare Contract
The Contract List page is the central location for adding and preparing contracts in the system. The list is populated with all contracts with a Preparation or On Hold status to which the user has authority to the contract type and functional department defined in Process Manager under Purchasing – Contract Preparation.
The data displayed in the columns is as follows:
myTasks – A checkmark appears if the contract includes any approved tasks for the user logged into the system.
Validated – a checkmark appears if the contract has passed its system validation. An X is displayed if the validation process failed. The row is blank if the validation has not been performed.
Approvals – The contract’s current approval status. For example, 0 of 1 at 1, where the first number is the current number of approvals, the second number is the approvals required, and the third number is the approval level at which approvals are currently needed. When the contract has been fully approved, this column displays the word Approved.
Status – The current preparation status of the contract. Most contracts display the status defined in validation set 310, Preparation Status, if this has been defined on the contract. Contracts that have been held display On Hold.
Department – The responsible department to which the contract is associated. This value is the primary sort criterion for the list.
Contract Number – The number that uniquely identifies the contract. In situations where contract numbers are manually assigned or where contracts have been created from a bid, this value may be blank.
Contract Title – A description of the contract. This value is the secondary sort criterion for the list. It is also a hyperlink that launches the Contract page in Edit mode.
Attachments – Icons that indicate what attachments have been added to the contract. The options are: Documents, Remote Documents, and Notes. Clicking on an icon launches the corresponding pop-up page.
The standard New, Delete and Refresh buttons appear on the page.
To inactivate a contract, select the contract to highlight it and click Hold. The status then changes to On Hold. When the user opens a contract that is on hold, the user can only view the information and cannot edit the contract. Click to return the contract to the active mode and the status to Edit. The Hold and Remove Hold buttons are enabled and disabled based on the status of the row that is selected.
Financial Management > Procurement > Contracts > Prepare Contract, select the Validation Icon
The Validation page allows users to validate multiple contracts at the same time. Whether validation is required for approvals or vice versa is determined by the configuration defined on the Procurement tab in Company FM Settings.
For each contract that needs to be validated, click the check box at the far left side of the row to select that row. To select all contracts, click the check box in the column header. Click Submit to execute the validation.
Financial Management > Procurement > Contracts > Prepare Contracts, select the edit listing icon
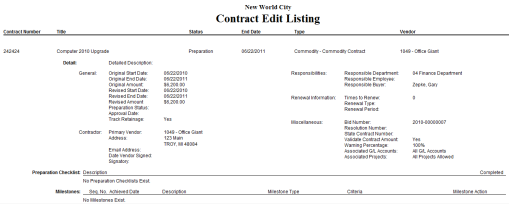
Use the Print Edit & Error Listing page to produce lists of all contracts in the contract preparation workflow process. Use the Edit Listing to view the details of all contracts before they are adopted. Use the Error Listing to view contracts at-a-glance that has errors.
For each contract that needs to have the Edit and Error Listing printed, click the check box at the far left side of the row to select that row. To select all contracts, click the check box in the column header. Click Submit to print a Print Edit and Error Listing to myReports.
The report output resembles the following:

Financial Management > Procurement > Contracts > Prepare Contract, select approvals icon
The approval levels required for the contract are defined in process Manager. Whether approvals are required for validation or vice versa is determined by the configuration defined on the Procurement tab in Company FM Settings.
For each contract that needs to be approved, click the check box at the far left side of the row to select that row. To select all contracts, click the check box in the column header. Click Submit to execute the approvals.
Financial Management > Procurement > Contracts > Prepare Contract, select adopt icon
Adopting a contract is equivalent to posting a transaction in another module. When a contract is adopted, NO G/L transactions are created, but transactions can then be applied to a contract.
For each contract that needs to be adopted, click the check box at the far left side of the row to select that row. To select all contracts, click the check box in the column header.
To include additional information in the output, select the Show Output Preferences link in the upper right corner of the screen.
Select the information that the user wants to include and click Submit. The adopt listing will be sent to myReports. The show Output Preferences is also available during the edit listing stage.
Financial Management > Procurement > Contracts > Prepare contract, select Execute All Processes Icon
The Execute All Processes option allows a user to validate, print an edit/error listing, approve and adopt all in one step. If the user isn’t at the highest approval level, the system will stop the user from adopting the contract until the required approvals have been made.
Select individual contracts by clicking the checkbox at the left of the row, or click the checkbox in the column header to select all contracts.
Click Submit to Execute All Processes.
Creating a Contract
The General page contains fields that uniquely identify the contract and organizes the basic contact details.
When the user is on the Contract List page, click New or select the Contract Title hyperlink to view a contract in edit mode.
- Contract Type – These values pull from the contract types in the system administrator session. The preparation checklist and contract milestones will default in if setup on the contract type. A user must have security rights in user-based security to select a contract type.
-
Contract Number – Entered either manually or assigned, based on the Company FM Settings. This field accepts up to 16 alphanumeric characters. This value uniquely identifies the contract in the system. This field is disabled if the number is automatically assigned by the system and Auto Assigned displays in the field.
- The contract number may be left blank during the preparation phase. A contract number is needed to validate the contract amount, but is not needed for preliminary precessing.
- Title - This is a short description of the contract. This value is required; it may contain up to 64 characters. Click the Full Description icon to the right of the Title field to display another field where you can add a full description of the contract. This entry is optional; it can contain up to 1024 characters. If a description is entered, an asterisk (*) displays to the right of the icon.
-
Start Date - The first date that activity for the contract can be recorded. This is the start date as defined by the contract. This value is required. This allows the organization to enter contracts in advance, but not allow them to be used until a later date.
- The start date is also used in conjunction with the Increment Counter Number Based on Fiscal Year check box on the Procurement tab in Company FM Settings. It determines the appropriate contract counter number to use if the system is set up to automatically assign the contract number.
- End Date - The end date as defined by the contract. This value is required. When applying requisitions and purchase orders to contracts, the system prevents you from assigning a contract to an item on a requisition or purchase order if the G/L date is greater than the contract end date. The system allows you to change purchase orders and enter accounts payable invoices with G/L dates after the contract end date.
-
Amount - This value is the total amount of the contract. The acceptable range is $0.01 through $999,999,999.99. This value displays on contract inquiries and reports in the system.
- For purchasing-type contracts, you can enter the amount directly into this field. This field is required if the Validate Contract Amount check box is selected on this page. Otherwise, you can leave this field blank.
- For commodity-type contracts, this field is disabled. You need to navigate to the Contract Items page to create contract items, which populate this field. If the Validate Contract Amount check box on this page is not selected, the system still requires an amount, due to contract items requir¬ing a value of at least $0.01.
- Preparation Status - This field allows the user to provide the contract with a status of where the contract is in the preparation process, before it is adopted. The values are defined in Validation Set 310. If the Hold or the Delete button is used, this value is required.
- Approval Date - This is an informational date that allows the organization to record the date the contract completed its internal approval process and was authorized.
- Track Retainages - Check box if retainages is tracked for this contract. This enables the Retainage Schedule workflow page, where you define the retainage percentage and cap amount for the contract. See the Retainage icon for more details.
- The Contractor section contains the fields that define the primary contractor to which the contract is associated. To define or edit the information in the Contractor section, follow the steps below:
- Primary Vendor – This is the primary contractor for the contract. This value is required. The Contact Address displays the address used for this vendor. This value is populated with all contacts defined for the vendor. This field is informational only. The primary contact address is the default value. These values are displayed only if the user has security for the vendor contact information.
- Date Assigned - The date that the primary contractor/vendor signed the contract. This value is required if the Signatory field is blank. The value must be less than the Contract End Date.
- Signatory - Type the full name of the person who signed the contract on behalf of the primary contractor/vendor. This value is required if the Date Signed field is not blank. It can contain up to 64 characters.
- The Responsibilities section organizes the fields that define the groups/individuals responsible for the contract. To define or edit the information in the Responsibilities section, follow the steps below:
- Department - Department that is responsible for the contract. The default department is determined by the user’s security: the user’s home department, the centralized Purchasing Department, or blank. This value is required; it is populated with the departments to which the user has authority as defined in the Process Manager under Purchasing - Contract Preparation. It is disabled in Preparation mode if any approvals exist for the contract.
- Employee - Responsible employee for the contract, if desired. This field is used as selection criteria on most of the contract inquiries and reports. If the human resources module is being used, the drop down values is displayed from the Employee Central Name table. If the Human Resources module is not used, this value comes from Validation Set 38.
- Buyer – Buyer responsible for the contract, if desired. The field is populated with all the buyers defined in the Buyers table (Maintenance > new world ERP Suite > Procurement > Buyers). This field is used as selection criteria on most of the contract inquiries and reports.
- Times to Renew - This number indicates the number of times that the contract may be renewed. The acceptable range is between 0 and 99. Enter 0 if the contract may not be renewed. This field is informational only.
- Renewal Type - This field is enabled and required when a Times to Renew value greater than zero is entered. The options are defined in Validation Set 311. This field is informational only.
- Renewal Period - This field is enabled and required when a Times to Renew value greater than zero is entered. The options are: Monthly, Quarterly, Semi-Annually, and Annually. This field is informational only.
- Bid Number – The bid number is displayed as if the bid module was used to create the contract. This number cannot be edited. If the organization does not have a license for the Bids module, this field is not displayed.
- Resolution Number - Enter the resolution number if a governing board issued a resolution that authorized the contract. This field can contain up to 64 characters. The advanced search option on the Contract Inquiry page includes this field so you can search for contracts by this number.
- State Contract Number - If there is a state contract number associated to the sub-contract. It can contain up to 64 characters. The advanced search option on the Contract Inquiry page includes this field so the user can search for contracts by this number. In many cases, the state contract is available via a web site or a hyperlink. In these cases, enter a Remote Document to provide easy access to the contract.
- Validate Contract Amount - Check box if the system will not allow a transaction to be validated that exceeds the contract balance. If this check box is not selected, all transactions against the contract can be processed.
- Warning Percentage - Box is enabled if the Validate Contract Amount check box is selected. This value is the percentage threshold at which the users will start receiving warning messages. The default value is 100%. The acceptable range is 0 through 100 percent.
- Associated G/L Accounts - Value is currently set at All G/L Accounts and is disabled. This field is informational only.
- Associated Projects - Value is currently set at All Projects Allowed and is disabled. This field is informational only.
Click Save when complete.
Once the General Page is completed, select the Preparation Checklist icon.
The Preparation Checklist page allows the user to monitor the lists of checklists and related tasks that may need to be completed in the preparation of a contract. If a preparation checklist was defined on the contract type the checklist will default in.
The data on the page is displayed as follows:
- Preparation Checklist – Drop down menu that allows you to select from the checklist that has been defined in Contract Maintenance Types.
- Required – If selected, the checklist is required for the contract.
- Completed – If selected, the checklist is complete.
- Attachments – Icons for any documents, remote documents, and notes tied to the checklist. Click an icon to open the entry page for that attachment type. The icon changes from gray to color when an attachment of that type is created.
To define or edit the information on the Preparation Checklist page, follow the steps below:
Click to add a new task to an existing checklist, or click the task Description hyperlink to edit an existing task.
- Required – Check box if the task must be completed before the contract can be validated and adopted.
- Applicable – Check box if this task is applicable to the checklist. The original tasks are defaulted into the checklist based on the contract type selected, so not all tasks may be relevant.
- Sequence Number – Indicated the order of this checklist among the other checklists that exist for this contract.
- Description – Define the description of the task. This value must be unique for the checklist. Value is required and can contain up to 64 characters.
- Internal – Check box if the task will be completed by an internal user.
- Responsible Department – Department that normally completes this task. This is informational only.
- Responsible Employee – Add responsible employee if you would like to include tasks for an employee to complete. Leave this field blank to include tasks for all employees. This field will pull from Human Resources module if licensed. If not, this field will pull from Validation set 38.
- Completed – Check box if the task has been completed.
- Percent Complete – If task is not completed yet, you can track the percentage done.
- Status – Ability to track what the status is of a project. The values in the drop down menu are defined in Validation Set 318.
- Status Date – Identifies the last time the Task’s status was changed. This value must be filled in by the user.
Click OK to save the task to the checklist.
The Milestones page allows users to track milestones for the contract which can trigger a notification when certain events occur. The milestones displayed during the creation of a contract are inherited from the milestones defined for the contract type.
The first column displays a check box that allows you to indicate if the milestone is applicable to this contract. If all milestones are applicable, the check box in the column header can be used to select the check box for all rows in the list.
To add or edit a milestone, follow the steps below:
Click New to add a new milestone or click the milestone Description hyperlink to edit an existing milestone.
- Applicable – Check box if the milestone is applicable to this contract.
- Sequence Number – Designate the order which the milestones should display on the page.
- Description – Description of the milestone to be achieved. Value is required and can contain up to 64 characters. Must be unique for this contract. The description entered here is used on the milestone notification sent to the user.
- Milestone Type – Value defines the basic characteristic of the milestone and is required. Options are: Date, Duration, Percentage Expensed, Amount Expensed, or Other Specific Event.
- Date – Enter the date of the milestone. Examples are 1st Payment Due and Contract Review Date.
- Duration – The Duration (in days). Examples are 90 days prior to contract end date and 30 days after contract start date.
- Based On – Select the point for where the duration is measured. Options are: After Date Signed, After Contract Date, Prior to Contract End Date, Prior to Contract End Date, After Contract End Date, and After Other Milestone
- Percentage Expensed – The Percent field displays. Enter a percentage of the contract amount, which when achieved, triggers this milestone. Examples are 80%, 90% or 100%.
- Include Allocated – Check box if the percentage expensed should include requisition and purchase order amounts. If left deselected, the percentage expensed will only include accounts payable invoices.
- Amount Expensed – The amount invoiced in Accounts Payable.
- Other Specific Event – Options are defined in Validation Set 315. Examples are Phase 1 Complete and Inspection Approved.
- Milestone Action – This field is informational only. It indicates what should happen after this milestone occur. Options are defined in Validation Set 314.
- Milestone Achieved Notification User – Select available users in the list and add them to the selected users list. The users selected are notified on the New World ERP homepage or via email when the contract milestone is reached.
Click OK to save the milestone.
The contract items icon is only displayed if the contract type is a commodity based contract. This page is where you can define the items that are associated to a contract.
Click New to create a new contract item. There is no limit to the amount of contract items that can be created.
-
Contract Item Type – Options available are based on the contract type.
- Quantity-Based Item – These are for tracking multiple item contracts that have a fixed cost per item. An example would be a contract for 300 hours at $125 per hour. Contract amount will be calculated based on number of items and cost per item. Price per item can’t be modified on this contract on a requisitions, purchase order or invoice.
- Monetary-Based Item – These are mainly for flat fee items. An example would be Project Management Fees for $20,000. The system validates against the items total, not against the price per unit. In the example above, you could create a transaction against the contract for $3,000 of the $20,000 item.
- Item – Select the procurement item being purchased. The item must be unique per contract. Available items are defined in Maintenance > new world ERP Suite > Procurement > Items.
- Description – Add a detailed description of the item. This value may contain up to 64 characters.
- Quantity – Add the quantity of the item.
- Unit of Measure – Describes the quantity. Available values are defined in Validation Set 30.
- List Price per Unit – Cost of the unit of the item. The total cost is displayed to the right.
- Discount Percent – Add amount to be discounted if applicable.
- Default G/L Account – This value is required. This value is for informational purposes only.
- Vendor Part Number – Identify the part number if needed. This value is for informational purposes only.
- Ship Via – This is the shipping method that should be used for the item. Options are defined in Validation Set 36.
- Ship To – The ship to address.
- Freight Terms – These are terms that are applied to the shipping of the item. Options are defined in validation set 28.
- Taxable Item – Check box if tax should be applied to this item.
- 1099 Item – Check box if this item should be recorded as a 1099 transaction.
Click Save to save the entry.
The Authorized Departments page allows the user to specify departments that can be used with this contract type. When contracts are used in purchasing transactions, the responsible department chosen for that requisition or purchase order will only be allowed to use the contract if it’s defined as the Responsible Department on the General page or listed as an authorized Department.
Click New to add authorized departments.
Highlight the departments you would like to add and move them to the Selected Departments sections.
The Secondary Vendors page tracks vendors in addition to the primary vendor who are associated to the contract. This option is available only if the contract type for this contract allows secondary vendors. This allows the user to define additional vendors that can be used with this contract in purchasing and accounts payable.
Click New to add a secondary vendor.
- Active – Identifies if the secondary vendor can still be used.
- Secondary Vendor – Begin typing to filter the vendor drop down list. Select the additional vendor that can be used with this contract.
- Amount – Enter the maximum amount to be allocated to the vendor.
Click Save/New to add additional Secondary Vendors or click Save once you’re completed.
The user has the ability to identify the recommended G/L accounts associated with the contract. This will not restrict what G/L accounts can be used with the contract and is informational only.
Click New to add a recommended G/L account.
- Active – Identifies if the G/L account associated to the contract is still active
- G/L Account – Select the G/L account associated to the contract
Click Save/New to add additional G/L accounts or click Save once you’re completed.
The projects page lists the recommended projects associated with the contract. This will not restrict what projects can be used with the contract and is for informational purposes only.
Click New to add a new associated Project.
- Active – Identifies if the project is still associated to the contract.
- Project – Select the appropriate project from the drop down menu.
The Retainage Schedule page allows the user to define the money that should be withheld from this contract to ensure that services are completed. The Track Retainages check box on the General page must be selected to save the Retainage Schedule.
- Retainage Percent – Define a percentage that will be withheld on an Accounts Payable invoice associated with this contract. For example, if the invoice amount is $1,000 and the Retainage percent is set to 10%, the system retains $100 from the invoice. The amount appears as a separate item included in the calculation of the net invoice amount.
- Retainage Cap
- Percentage of Total Contract – The system sets the retainage cap to the Retainage Percentage multiplied by the revised contract amount. For example, with a Retainage Percent of 10% and the revised contract amount is $50,000, the retainage cap is set to $5,000. If the retainage needs to be capped at a different amount, you’d check this check box.
- Amount – If retainage is capped by a flat dollar amount, enter the dollar amount here.
Click Save to retain the entry.
If there is additional information the user wants to track on the contract you can create user defined fields. All user defined fields set up for the contract module appear under the user defined fields page.
Enter the values in to the user-defined fields as you see fit. Click Save once completed.
The documents section allows an organization to scan and attach an electronic document to a contract. An example would be to scan the contract agreement.
Click New to add a new document.
- File Type – Select the type of file to upload.
- Description – Can be seen on the document list page.
- File – Browse out and find the file.
This allows an organization to point a URL link to an internal document on the municipality’s webpage or Sharepoint site.
Click New to create a new remote document.
- Description – Identify a unique description of the document link
- URL – Identify the URL or link to the document.
Contract processing includes the standard Notes feature that allows contract information to be sent to an individual or groups of users.
- Subject – the subject line or header of the note.
- Message – Identify the message that needs to be sent to the user. Messages appear on the users’ homepage.
- Available Users: Select the user to receive the note that is tied to this contract.
Click the Validate icon to validate the contract. Validation is the system going through a series of checks and gives warnings and error messages if needed.
The contract can be validated from the contract list or directly from the contract. Approval of the contract can’t occur until the validation results show the contract is valid.
The approval page displays the approval process defined for the Contract’s responsible functional department. Click Approve to approve the contract. Approving the contract at a lower level is the trigger that sends an approval to users at the next level.
This icon allows the user the ability to print all the information related to that specific contract.
Select the desired information to be printed and click OK.
Alter Contract
After a contract has been adopted, it disappears from the contract list and only certain details can be altered. The Alter Contract process provides a workflow to enter these changes. Alterations are created for non-material changes to the contract. Examples of non-material changes are milestones, secondary vendors, G/L accounts, projects and user-defined fields.
Alter Contract list
Financial Management > Procurement > Contracts > Alter Contract
The contracts a user can see/use are controlled by the contract types in user-based security and the departments defined in the Purchasing - Alter Contract process in process manager.
The search fields at the top allow you to filter the contracts in the list. You can also click on the column headers to sort the list in the desired order.
Alter Contract – Define Non-Material Changes
Financial Management > Procurement > Contracts > Alter Contract > General Page
Click on the Contract Title hyperlink to alter a specific contract. This brings the user to the General Page.
The General page contains fields that uniquely identify the contract and organizes the basic contact details. This is the same General page used in Contract Preparation, but a number of the fields that pertain to material changes are disabled. Each icon that was included in the contract preparation phase is included in the alter contract process. The following information can be changed.
- General Page
- Title
- Date Signed
- Signatory
- Responsible Department
- Employee
- Buyer
- Resolution Number
- State Contract Number
- Validate Contract Amount
- Warning Percentage
- Milestones
- Contract Items (everything except Contract Item Type, Quantity, Unit of Measure, Price per Unit, and G/L Account).
- Authorized Departments
- Secondary Vendors
- G/L Accounts
- Projects
- User-Defined Fields
- Documents
- Remote Documents
- Notes
After the change is made, select an Alter Reason, which appears at the top of all work flow pages in the Alter Contract process. If the Require Alter Reason system setting was selected, this field must be populated and saved before any contract information can be altered. If the Require Alter Reason system setting is not selected, providing an Alter Reason value is optional.
The Alter Reason is defined in Validation Set 339. If additional detail is needed, you can select the icon next to the alter reason and type the reason why an alteration is being made.
Click Save to update the system with the changes made.
Amend Contracts
After a contract has been adopted, certain details of it can be amended, if necessary. The Amend Contract process provides a workflow to enter these changes. Amendments are created for material changes to the contract (e.g., amount, start date, end date, or primary vendor renewal information).
To amend contracts, a user must have the proper contract type authorization defined in user-based security and have access to the contract’s responsible department under Purchasing – Contract Amendment in process manager.
Contract Amendment List
Financial Management > Procurement > Contracts > Amend Contract
The Contract Amendment List page displays the adopted contracts that are currently in the amendment process.
Contract Amendment – Material Changes
Contract amendments make use of a workflow process that enables the user to make multiple attribute changes as needed without having to step through each one individually.
Click New or select the Contract Title hyperlink of an existing contract being amended.
- Contract – Select or type the contract to be amended.
- Action – What you would like to do with the contract
- Amend – Make a material change
- Complete – Close or end the contract.
Click Select to perform the desired action.
If the action that was selected was to amend the contract, select a reason, which now appears in the upper right corner of the page. The reasons for amending the contract are defined in Validation Set 333. Examples are Increased Amount, Extend End Date, Change Primary Vendor, etc.
The current values section for the contract displays above the amended values section so you can compare these values as you make the changes.
The following material data can be changed on the contract:
- Start Date
- End Date
- Amount
- Vendor
- Time to Renew
- Renewal Type
- Renewal Period
- Contract Items
- Retainage Schedule
- Documents
- Remote Documents
- Notes
Complete Contract
Financial Management > Procurement > Contracts > Amend Contract > Complete
- Reason – Reason for completion, if desired. The options in this field are defined in Validation Set 334.
- Completion Date – Date the contract was completed.
- Contractor Performance Rating – Values are defined in Validation Set 337. Used to evaluate how a specific vendor performed. This value can be viewed in the contract inquiry.
- Contractor Performance Notes – Field can be used to offer supporting details about the performance rating.
Click Save to update the contract’s status to complete.
Contract Amendment Workflow Process
Contract Amendments are designed to go through the standard workflow pages of validating, printing the edit/error listing, approving and adopting/posting. The validation and approval process can be done directly from within the contract you’re amending, or you can bread-crumb back to the Contract Amendment list page. The changes made to the contract will not take effect until the amendment has been posted. Please refer to the Contract Preparation section to detailed instructions on how to complete the workflow process.
Selecting a Contract on a Purchasing Transaction
Financial Management > Procurement > Purchasing > Purchase Orders
On the standard purchase order entry page, there are a few different ways you can select a contract based on how the contract was created.
The  icon to the right of the vendor field allows you to search for an adopted contract.
Type in the Primary or Secondary Vendor first and select the appropriate vendor. Your available contracts will be filtered by the vendor you select. If you’re unsure which contract to select, you can click on the  icon which will bring you to the contract inquiry page. This will allow you to see all the information that was entered during the Contract Preperation phase.
Click Select when finished.
If you select a Commodity Type Contract, fill in the following fields:
- Department – Identify the purchase order’s functional department.
- Vendor – Vendor field should populate with the vendor selected on the previous screen.
- Description – Purchase Order description
- Type – Select the type of PO used
- Form Type – Select the PO form’s format. The list is populated with form types defined in Validation Set 37.
- Purchasing Address – Populated after the vendor is selected.
- G/L Date – Purchase Order’s G/L date
- Deliver by Date – The latest date the contract item should be delivered
- Bill to Location – Contains the location to be billed for the items ordered. This box is populated with values defined in the Master Location List.
- G/L Account – G/L account the item should use.
The item tab allows additional information about the requested items to be added to the contract items. This information populates the detail fields on the purchase order.
- Item – You cannot edit the item value. This is defined on the contract.
- Description – Meant to provide a more detailed description about the item being selected on the purchase order.
- Quantity – Add the quantity to be added to the purchase order. Once selected, the user can change the defined quantity on the purchase order.
- Unit of Measure – Shows the purchasing unit of measure.
- Net Price Per Unit – Box displays the cost of one unit of this item, in whatever way it’s packaged. The price per unit cannot be changed for quantity based contract items. The price can be changed for monetary type items.
Click Save/Maintain to go back to the Purchase Order Entry screen with the purchasing fields populated with the information that was just entered. This will allow you to review what’s been entered and make changes if necessary. Or click Save/New to enter a new Purchase Order.
Requisitions can also be tied to a contract. The process is the same as what was identified above.
Awarding a Bid to a Contract
Financial Management > Procurement > Bid Service
Bids with a status of Evaluation can be promoted to a contract. New World ERP will then link the bid to the contract module in the contract inquiry.
- Contract Start Date – Identify the date the contract starts
- Contract End Date – Identify the date the contract ends
- Contract Type – Select the appropriate contract type
Click OK and the system creates the contract in the Contract Preparation List. The contract still needs to go through the standard workflow process before it can be used.
Contract Inquiry
Search
The contract inquiry page is to locate existing contract in the system. Use the fields in the search pane to locate a contract in the system.
- Contract Number – Search by contract number
- Title – Search by contract title
The advanced search icon  allows additional search functionality.
- Contract Number – Search by contract number
- Title – Search by contract title
- Type – Search by type of contract
- Responsible Department – Search by responsible department
- Responsible Buyer – Search by buyer
- Responsible Employee – Search by employee
- Status – Search by status. The possible values are Preparation, Open, Closed/Completed, On Hold, Canceled or All.
- Vendor – Search by Vendor
- From Date – Search by a specified from date
- To Date – Search by a specified to date
- Date Type – Identifies the type of date that controls the from and to date search features. Possible values are Contract Start Date and Contract End Date.
- Resolution Number – Search by resolution number
- State Contract Number – Search by contract number
The default is to show all contracts with a start date within the last year. If your contract started longer than a year ago you’ll need to change the from date before searching.
Click Go to search. Available contracts will be listed with the contract number and description.
Click on the folder next to a contract to view more information.
Contract Inquiry
Each yellow with a white checkmark has additional information available.
Summary Tab
The summary tab gives a high-level snap shot of the contract’s history. You can see what’s been expensed through accounts payable, allocated through the purchasing system, unposted transactions and the remaining balance.
General Tab
Displays the general information related to that contract.
Change History
Identifies a list of all contract amendments. You can drill-down on the effective date to view details of the change.
Preparation Checklist
The checklist that was built when the contract was in the preparation phase.
Milestones
List of all milestones identified on the contract.
Contract Items
Contract items with the original quantity and price per unit.
Authorized Departments
List of Departments that are authorized to apply transactions to this contract.
Secondary Vendors
Vendors in addition to the primary vendor that can be used with this contract.
G/L Accounts
Recommended G/L accounts to use with this contract.
Projects
Recommended projects to use with this contract.
Retainage Schedule
Retainage schedule defined on the contract.
Documents
Allows the user to add, delete and finalize attached documents.
Remote Documents
Ability to identify a URL link from the contract.
Contract Item Analysis
Select the Contract Item Analysis Icon from the Contract Inquiry List. This icon is only available for commodity type contracts. The user will see the following page appear:
Each item that is selected shows an analysis. Select the item description to show a different item.
G/L Account Analysis
Select the G/L Account Analysis icon from the Contract Inquiry List.
Each G/L account that has been applied against this project will be displayed. Select a different G/L account row for the top pane to update.
Project Analysis
View the project activity related to this contract.
Requisitions
Requisition activity associated to this contract.
Purchase Order
Purchase order activity related to this contract.
Accounts Payable
Accounts Payable activity related to this contract.
Contract Accounting Reports
Contract Accounting Reports can be found by navigating to Financial Management > Reports > Contract Accounting.
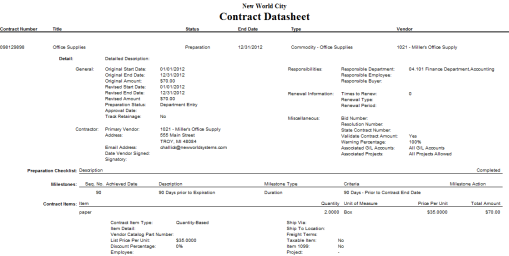
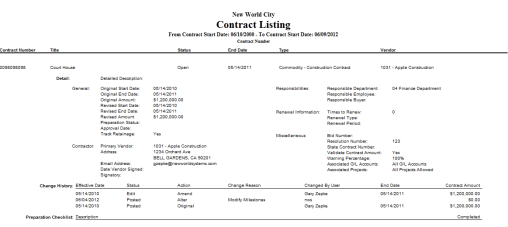
Contract Listing
The Contract Listing report allows an organization to view all the detail information that was entered during the Contract Preperation process.
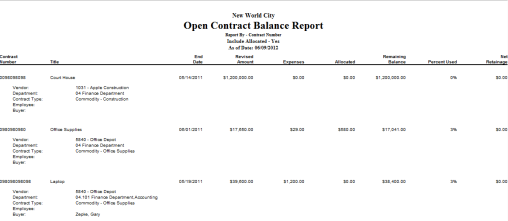
Open Contract Balance Report
The Open Contract Balance Report shows a listing of open contracts that has the contract amount, amount expensed, amount allocated and remaining balance.
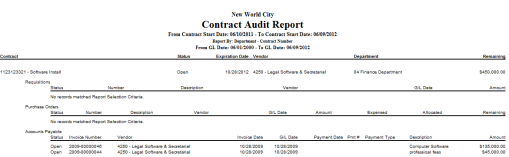
Contract Audit Report
The Contract Audit Report gives an organization the ability to verify that all purchasing and accounts payable transactions have been properly applied to the contract.
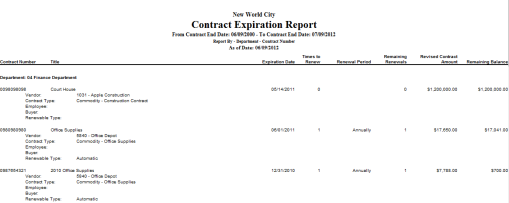
Contract Expiration Report
The Contract Expiration Report allows an organization to view all the contracts that are going to expire within a certain date range.
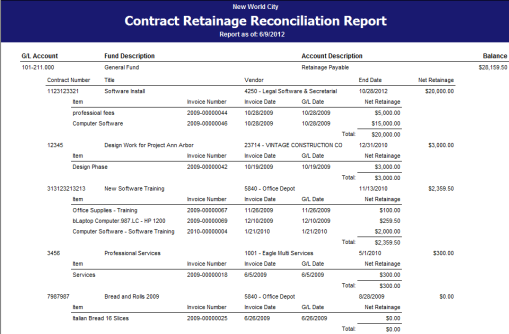
Contract Retainage Reconciliation Report
The Contract Retainage Reconciliation Report allows an organization to reconcile the retainage withheld on a contract to the contract retainage liability account.