Utility Management Adjustments
Introduction
Welcome to the New World ERP Utility Management Adjustment Processing guide. This manual will guide you through both the setup and processing aspects of Adjustment Processing.
In the process of billing customers for licensed services, every so often there could discrepancies between what someone’s balance is in New World ERP, and what it should be in reality. This could be due to a myriad of items such as incorrect billed amounts, misapplied payments, or even the potential waiving of a delinquent charge. Whatever the reason may be, users can use the Utility Management Adjustment Process to correct those individual charges, and ensure a customer balance is correct moving forward. Using the standard workflow process for Adjustments organizations can create, review, approve and post these corrected transactions within New World ERP.
This guide is divided into two sections:
The System Administration Guide will focus on the components that need to be in place in order to process an adjustment within New World ERP. This will include information on setting up Adjustment Reasons (Validation Set #108), various securities that correspond with the adjustment process, as well as how to setup the Process Manager to ensure the appropriate approval levels needed to post an adjustment are in place.
The End User Processing Guide will describe the steps, workflow, and procedures an organization will utilize when processing an adjustment. This section will be split out into two sections: Adjustment Processing and Refund Processing.
System Administration Guide
Before an adjustment can be processed within Utility Management, there are several items that need to be set up, and certain security settings that need to be in place. Ensuring the appropriate definition of the following items will give users all the appropriate items they need to successfully process adjustments.
Set Up
Validation Set 108: Utility Management Adjustment Reason
The first step when setting up adjustments within New World ERP is to define the Utility Management Adjustment Reasons. These fields will represent the various reasons why an organization would be changing the balances on accounts. Correctly defining an Adjustment Reason will provide further clarification as to why the Adjustment was made.
- Navigate to Maintenance > new world ERP Suite > System > Validation Sets > Validation Set List.
- Scroll down to Validation Set 108: Utility Management Adjustment Reason. Highlight the row and click the Values button. This will open up the Set List for Utility Management Adjustment Reasons.
- Click the New button to add the Utility Management Adjustment Value and Description.
- Once defined, either click Save to create the reason or Save/New to save the value you have created and create another Adjustment Reason.
Example Utility Management Adjustment Reasons:
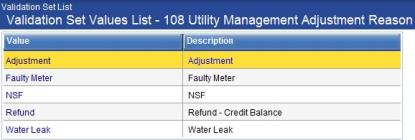
Maintenance > new world ERP Suite > System > Validation Sets > Validation Set List > Validation Set 108: Utility Management Adjustment Reason
UM Settings
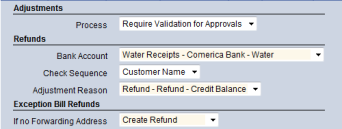
Within the UM Settings page there is a tab specifically for Adjustments. This tab allows organizations to define the settings that apply to adjustments and refunds.
- Navigate to Maintenance > Utility Management > UM Settings.
- Once within UM Settings, navigate to the tab titled Adjustments.
- First define the Process field. This will define the dependency between validation and approvals for adjustment processing. The default value is Require Validation for Approvals.
- Next, users will define how refunds are to be handled within Adjustments:
- Define the Bank Account from which refunds will be drawn.
- Define the Check Sequence in which checks will be printed. Options are Customer Name and Account Number.
- Select the Adjustment Reason for refunds. This value will display as the default adjustment reason when processing refunds.
- Lastly, define the If No Forwarding Address field. This will pertain specifically to refunds for Move Out bills with credit balances. Essentially, if an account is being finalized, and that individual has a credit balance, how will that refund be treated if there is no forwarding address to send the check to? Options are Create Refund and Do Not Create Refund.
- Click Save to update the Adjustment page in UM Settings.
UM Settings: Adjustments Tab
Process Manager
One of the most essential setup items in regards to Utility Management Adjustments is the definition of the Process Manager. Within the Process Manager, users can define the different departments that would post an adjustment, as well as the different levels of approvals.
- Navigate to Maintenance > new world ERP Suite > Process Manager. Once in the Process Manager listing, navigate towards the bottom and locate the Utility Management-Utility Adjustment Processing Process. Click on the icon to highlight the row.

- First, set up the department(s) that are to process UM Adjustments. With the field highlighted click the Set Up Departments button.
- Use the Approval Levels field to select how many levels of approvals are needed to post the adjustment. Click the Plus or Minus icons to specify the number of levels.
- Once the number of Approval Levels have been determined, define names of the different Levels.
- Select the available departments that could fall under this level of approvals.
- Click Save.
- Navigate back to the Process Manager and click the Plus icon next to Utility Management – Utility Adjustment Processing. This will open up all the departments that have Approval Levels defined for the Adjustment Process. Click the Plus icon next to the department you are setting up. This should open up the different levels that were defined during the previous step.
- To setup Approval Users for the individual departments, click the Name of the desired Department, then click the Approval Users button. Select the individual users that need to have Approval responsibilities for each of the levels that were previously set up. Repeat this process for as many approval levels the organization has defined to be responsible to approving adjustments.
- Approval levels have now been defined and individual users now have the ability to lend their approvals to adjustments before they can be posted to the General Ledger.
In the example below, there are two Approval levels being set up (Utilities Clerk & Utilities Supervisor) for the Water Department. The box to the right of the Utilities Clerk, and Utilities Supervisor Levels (1&1), signify how many approvals are required at that level.

Security
Along with the previously reviewed setup items there are some security items that need to be defined in order for individual users within an organization to process adjustments.
Permissions
1. Navigate to Maintenance > new world ERP Suite > Securities > Users.
2. Highlight the users whose permissions are to be updated. Once selected, click the Permissions button.
3. Navigate to the Permission Type of Non-Company Applications, and feature group of UM Adjustments. Modify the appropriate permissions for the user you have selected.
|
App |
Component |
Description |
All |
Add |
Change |
Delete |
View/Use |
|
|---|---|---|---|---|---|---|---|---|
|
UM |
Adjustment Approval |
Provides the ability to change or view the approval levels associated with an Adjustment |
ü |
|
ü |
|
ü |
|
|
UM |
Adjustment Edit Listing |
Ability to View/Use the Adjustment Edit Listing |
ü |
|
|
|
ü |
|
|
UM |
Adjustment Post |
Ability to Post Adjustments |
ü |
|
ü |
|
ü |
|
|
UM |
Adjustment Validate |
Ability to Validate Adjustments |
ü |
|
ü |
|
ü |
|
|
UM |
Adjustments |
The ability to Create, Edit, Delete, or View Adjustments |
ü |
ü |
ü |
ü |
ü |
|
|
UM |
UM Adjustment-Payment Assistance Report |
The ability to run an a Payment Assistance Report when processing an Adjustment |
ü |
|
|
|
|
ü |
|
UM |
UM Customer Service-Adjustments |
The ability to create an Adjustment from Customer Service. |
ü |
ü |
ü |
ü |
ü |
|
|
UM |
UM Mass Adjustments |
The ability to process Multiple Adjustments at once. |
ü |
ü |
|
|
ü |
ü |
End User Guide
Once the appropriate setup and security items are completed, the organization is now ready to process adjustments within New World ERP.
Adjustment Processing
Creating an Adjustment
- The first step in the adjustment process is to identify the account you intend to correct the balance on. There are two places where users can begin the adjustment process:
-

The first (and most commonly used) is within a customer account. After identifying an account, users can create an adjustment from their customer service page. Clicking the adjustment icon in the upper right hand corner will allow us to begin this process.
- The second place users can begin an adjustment is within the adjustment process (Utility Management> Adjustments). Once on the adjustment page, click the New button to create the adjustment.
- Once an account has been selected for an adjustment, define the Transaction Details:
- Transaction Date will be used as the date of the Adjustment.
- G/L Date will represent the date the Adjustment will hit the General Leger Accounts
- Select an Adjustment Type. The type of Adjustment will depend on the nature of what is being adjusted. Choose from one of the following types.
- Raise or Lower Bill - This type of adjustment will alter the amount of a bill. Reasons the original bill amount may be incorrect include a meter malfunction, an incorrect read, or a data entry error.
- Raise or Lower Payment - This type of adjustment will alter the amount of a payment. Reasons that a payment amount may be incorrect include a check being returned for insufficient funds or a data entry error.
- Overpayment - This type of adjustment will alter the amount of an overpayment on the account. Reasons this amount may be incorrect include a payment being incorrectly applied, where the correct application of the payment results in an overpayment.
- After the Transaction Details are defined, users must then complete the Adjustment Reason portion.
- Reference Transaction is not required; however it will provide further clarity as to why the adjustment is being made. Click the
 icon to search for transitions based on Dates, Types, or Amounts. Once the transaction has been found, click the date to reference the desired transaction.
 - Activity Date will represent the date of the Transaction. If a reference transaction is selected, it will default to that date. This date will determine how the delinquent will treat the adjustment.
- Select the Reason for the Adjustment. Choices will come directly from Validation Set 108.
- Define a Description for the adjustment. This field is not required, but will provide further clarification as to why the adjustment is being done.
- Once the Transaction Details and Reason have been specified, begin defining the Charge Category breakdown of how the balance will be affected. In the Adjustment column, specify the dollar amounts that will change the total balance on the account.
- Remember that while users may be adjusting a total dollar amount; be aware of how that balance came to be. Take for example the adjustment of an incorrect bill. The total amount could be $50 dollars, but that amount has likely accumulated from multiple charge categories (ex. Water Charges, Flat Charges, Late Fees…etc.). In order for the adjustment to be correct for the Finance Department, users need to know how that charge amount breaks down.
- The best place to find how that charge breaks down would be to expand the transaction details on the customer’s account. Under the Transactions page in Customer Service, click the date of the individual transaction. Next, click the plus sign next to the Current Charges field to see the breakdown.
-
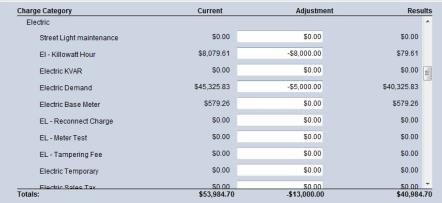
After the dollar amounts have been specified for the individual charge categories, the total adjustment to the balance should be clear. If the desired results are correct, click the Save button to create the adjustment.
In the example above notice the Current, Adjustment, and Results column. As soon as an Adjustment amount is entered the Totals field should update, allowing for easy understanding of what is being done to the overall balance.
Processing an Adjustment
Once an adjustment has been initiated it is ready to be processed. At this point if the user navigated to any account that has been identified to have an adjustment, they should see that adjustment in either the events chart, or transactions page as pending.
-
Navigate to Utility Management > Adjustments. In the list page users should see the Adjustment(s) that have been created. And depending on permissions, a user may be able to see others peoples Adjustments as well. Similar to the many other processes in New World ERP, notice the workflow icons at the top of the page. For Adjustments there are 7 icons that involved in the process. Two of these work flow icons are reserved only for the Refund process.

The first workflow icon is the Adjustment List page. Notice the User and Type drop-down boxes. Depending on permissions you may be able to see other users’ adjustments by changing the user in this drop-down. The Type drop-down filters out the list page based on the Type of adjustment being processed.
-
For certain adjustments like Overpayments, and Refunds users may need to change their Type to view them in the list page. The default Type is Bill and Payment; however the list can be filtered by either Bill or Payment Adjustments.
Within the list page users can create new adjustments by clicking the New button. Also for any Adjustment that is in the process of being posted notice its status based on the Validated, and/or Approved columns. To see the more on a given adjustment, click the Account Number link to view Transaction Details, Reasons and Charge Category breakdowns.
-
-
Once an adjustment has been created and reviewed it is ready to be processed. Navigate to the second icon in the work flow, representing the Edit and Error listing. Click the check box to the far left of the individual adjustment, or click the top check box to select all adjustments. After an Adjustment has been selected click the Submit button to print the Edit & Error Listing.
The Edit & Error Listing has now been created and should appear on the screen. Use this listing to verify the adjustment(s) before moving on to the next icon. This report can be sent to my reports by clicking the Send to myReports button.
- Once the adjustment has been verified move onto the next icon, and Validate the adjustment. Just like for the previous work flow icon click the checkbox or checkboxes to select the adjustment. Click the Submit icon to lend validation to the adjustment.
-
Navigate to the fourth work flow icon of Approvals. Click the check box(s), and then click the Submit button to give the approval to the adjustment. Depending on how the Process Manager is set up this could be the last step for an individual user.
- Notice the field under the Approved column. This will inform a user of how many approval levels are needed to post a given Adjustment. For example if a user saw 0 of 2 at 1, that would correspond to that individual adjustment needing two approvals at the first approval level. There could potentially be another approval level after the first requiring one, or many users approving the adjustment. For further explanations on Approval Levels please contact a Utilities Trainer or Utility Supervisor.
- The next two icons are reserved only for the processing of Refund Checks. Please review the Refund Processing section on page 15 for further explanation.
-
After all the appropriate Approvals have been lent to the adjustment(s), navigate to the seventh workflow icon to Post the adjustment. Click the check box for the adjustment(s) and click the Submit button.
- Remember, as with all processes in New World ERP, nothing is official until the post step. If there are any changes that need to be made to an individual adjustment make sure to do them before you post that adjustment. If an adjustment is incorrect, and has been posted, the only way to change it would be with another adjustment.
Once the adjustment is posted, the user should get another Edit & Error listing, similar to the one from the second workflow icon. While the first edit listing is designed to be used as verification that an adjustment is correct, the one from posting could potentially be archived, or send to the Finance Department.
- Once the Adjustment has been posted the updated balance should be immediately visible on a customer’s account. The adjustment can now be viewed as posted under the Transactions page.
Refund Processing
In New World ERP, the process of refunding Deposit Amounts, or in effect Credit Balances, are handled through adjustments. Going through the workflow icons will be very similar to a normal adjustment, with the exception of the fifth and sixth icons (Create Payments and Payment Batches) which are exclusively used for refunds.
Creating a Deposit Refund
As stated above there are two situations where a refund can be created; from a deposit or a credit balance. In New World ERP the refunding of a deposit is treated as a payment to the account. Essentially, even if a refund started as a deposit amount, it becomes a payment to the account when refunded. Therefore, a check can only be cut if the account has a credit balance. There are also two options when refunding a deposit; doing so on an individual account, or on a Mass Deposit Refund Basis.
Refunding an Individual Deposit
- Navigate to a customer’s account in Customer Service, who is to have a deposit refunded. After the account has been located, click on their deposits page. As long as the deposit has been collected, it is eligible for a refund. Near the bottom of the deposit page click the Refund button.
- After the Refund button has been clicked a Deposit Refund screen will be displayed. From here verify the refund date and amount for a customer. Users have the ability to change either the refund date or the amount being refunded for the deposit, or accumulated interest. Click OK if everything is correct to continue with the refund.
- Once the refund have been created Navigate to Utility Management > Additional Processes > Deposits > Deposit Refunds to refund the deposit. Go through the workflow icons to Refund the Deposit as a credit balance on an account.
Mass Deposit Refunds
-
If an organization refunds deposits for all customers with good credit history they will likely use the Mass Deposit Refund function. Navigate to Utility Management > Additional Processes > Deposits > Deposit Refunds. From here click the Mass Add button at the bottom of the screen. This will open up a window allowing users to define the criteria for those who are to get a deposit refunded.
- Select a Refund Date, which will act as the date of the refund. If a user is simply looking for a listing of all accounts that would get a deposit, under the selected criteria click the Report Only check box. As a recommendation use this checkbox to get a report before you create the Mass Add to verify accuracy.
- Under the Deposits to Refund header select the criteria to which the Mass Add will be created.
-
The Credit Required to Refund header outlines how Delinquent Activity and Credit Activity will be treated in the creation of the Mass Add of Deposit Refunds.
- Maximum Bad Credit Events pulls directly from the delinquent criteria that have defined in UM Settings. Depending on the weight assigned to each individual delinquent event, this will define who is eligible for a refund. Check UM Settings to understand how the Maximum Bad Credit Events will affect the Mass Add of Deposit Refunds.
- Credit Activity allows you to consider or ignore previous credit history before the deposit was collected. As in if an account had become delinquent before the deposit was collected, would the weight of that delinquent event be considered in regards to the refund of their current deposit.
- Click OK to create the refunds.
- Once a Mass Add of Deposit Refund has been created, navigate to the second workflow icon of Print Edit & Error Listing. Clicking the Submit button will send the listing to myReports. Navigate there to view the report.
-
After the Edit & Error Listing has been verified, navigate to the third icon to Post the Deposit Refund.
- Remember Refunding a Deposit will not automatically create a check. What will happen is that deposit amount will be added to the account as a payment towards the total balance. If a credit still exists a check can be cut through the Adjustment Process.
Creating a Refund
Because a Deposit simply gets applied to an account as a payment users must take an extra step to create a refund check. Remember, however, that whether it is from a Deposit Refund or an Overpayment, any credit balance can produce a refund check in New World ERP.
Another item to consider is the refunding of a deposit during the move out process. When a customer has a deposit and moves out, that deposit will automatically be refunded to the customer’s account as a payment, affecting their final account balance. In the case that a deposit refund pays the full amount of that final bill, a refund adjustment will automatically be ready to have a check cut in adjustments.
In the event that an account has a credit balance, follow the steps below to create a refund check:
- Navigate to the customer’s account in Customer Service. Make sure that the customer has a credit balance. If they don’t then a refund check cannot be created.
- If the account has a credit balance, navigate to the Transactions page. Near the bottom of the screen click the Refund button.
- A pop-up screen will be displayed. Verify the dates and amounts for the refund and click OK.
- The refund has now been created and is ready to be processed in adjustments.
Processing a Refund Adjustment
Once the refund has been created it should be waiting in adjustments to be processed. Going about posting the refund adjustment will be very similar to a normal adjustment, with the exception of two workflow icons.
- Navigate to Utility Management > Adjustments. Remember that users have to change the type to either Refunds or All to view the refund adjustment.
-
Once the Refund Adjustment has been identified on the Adjustment List page, users can navigate through the next three icons as if it were a regular adjustment. First run the Edit & Error listing to verify the adjustment, then lend it the appropriate Validation and Approval.
Depending on the Process Manager and Permissions this may be the last step for an individual user.
-
Once the adjustment has been approved move to the fifth icon and Create Payments. Click the check box for the refund and click the Submit button. A screen will appear displaying the information about the Refund. Transaction Date will default to today’s date, but may be overridden if necessary. The From Check field displays the starting check number; enter a new number if necessary.
Click OK to create the refund payments. If centralized check processing is used, the check is processed there. Otherwise, it is processed in the next workflow step, Payment Processing. The Payment Register is sent to myReports.
- Navigate to the next workflow icon of Payment Batches. Click the Print button to print the check. A pop-up will be displayed prompting the user to select certain criteria about the refund check. Make sure to click the override check format and choose the refund type defined for utilities. This will ensure that the check is printed in the correct format. Next click OK to print the check. This check will be sent to myReports where it can be physically printed.
- After the check has been printed navigate to the final icon and Post the adjustment. In doing so the defined refund balance should be refunded to the customer, and their account balance should be updated.