Utility Management Setup
Introduction
Welcome to the New World ERP Utility Management Setup manual. This manual will guide you through the setup of all items that need to be in place to begin training and testing with the Utility Management Module. These items represent the cornerstone requirements for Utility Management. Included in this section are the following tasks:
- Validation Sets
- Payment Codes
- Form Layout
- Charge Categories
- UM Settings
- Service Class
- Billing Calendar
- Rates
- G/L Distribution Profiles
- User Security/Permissions
There are a handful of other items that an organization may utilize. However, these items are not required in the setup of Utility Management, and depend on the organization’s licenses and scope of service. For further description on these items please consult the Online Help, or contact a Utility Management trainer:
- Device Types
- Non-Metered Type
- Delinquent Events
- Deposit Types
- Account Messages
- Work Order Types
Validation Sets
The first step when setting up the Utility Management Module is the definition of Validation Sets. These items represent a plethora of definitions, drop down fields, and reasons involved with the various processes in Utility Management. Overall there are eight validation sets that are required when setting up the Utility Management Module. And while these validation sets need to be set up before training and testing begins, there are many others that may or may not be used based on an organization’s processes, and requirements.
- Navigate to Maintenance > System > Validation Sets > Validation Set. This page shows a listing of the many validation sets associated with New World ERP. These validation sets represent many items for all applications, not just Utility Management.
- To define the fields of a validation set simply locate the Validation Set number you are planning to define, highlight the row of that Validation Set, and click the Values button. The eight required Validation Sets are listed below:
- Validation Set 102: Utility Account Type. This validation set represents the different types of Utility Accounts that an organization will assign to a customer’s account. Examples could be residential, commercial, or industrial.
- Validation Set 103: Route Level 1. Only one level of routes is required, however an organization may also define Validation Sets 104, and 105 if route levels break down to those levels. Essentially the route levels represent how the billing and reading of meters/non metered units break down. Take for example an organization that bills 4 Cycles. Within those 4 Cycles reading routes could be broken down by books.
- Route Level 1: Cycle 1, Cycle 2, Cycle 3, Cycle 4
- Route Level 2: Books 1-40
- Validation Set 108: Utility Management Adjustment Reason. This validation set represents the various reasons why an Adjustment is being done. Examples could be Misapplied Payment, Bill Correction, or NSF Check. Note: One value has to be setup for our Utility Management Refund Checks.
- Validation Set 142: Utility Bill Type. This validation set represents the type of bill that the organization uses to send to customers. Depending on whether an organization has a custom bill, or uses the New World ERP standard, this definition could change. A definition is required in order to save UM Settings
- Validation Set 177: Utility Statement Type. The defined fields here also correspond to items that will require definition in UM Settings. Depending on the organization’s use of the New World ERP standard statements will define how this fields are defined. Typical definitions would be an organizations different notice types.
- Validation Set 178: Utility Work Order Type. Similar to the previous two validation sets this value could change if the organization doesn’t use the New World ERP standard work order type. And like the previous two Validation Sets this item need to be defined in order to save UM Settings.
- Validation Set 203: Transaction Statement Form Type. The definition of this Validation Set corresponds with transaction statements that can be ran on customer’s accounts. Typical definition is Transaction Statement. Required to save UM Settings
- Validation Set 257: Budget Bill Inactive Reason: This field represents the reason why a customer may be inactivated from Budget Billing. Regardless if an organization uses budget billing this value is required to save UM Settings
- Validation Set 299: Consumption Statement Form Type. This value represents how the Consumption Statement will be defined. Required to save UM Settings.
- Validation Set 325: Utility Reporting Service. Needed for Consumption Report and eSuite.
- Aside from the eight validation sets listed above there are many more that an organization may define. Below is a listing of some of the validation sets that are not required, but commonly used.
- Validation Set 124: Work Order Results. When completing a work order users can choose a result that will describe what was done. Examples could be Completed, or Unable to Complete.
- Validation Set 140: Utility Account Class. Similar to Validation Set 102: Utility Account Type, this provides a further breakdown of accounts for reporting. Examples could be Swimming Pool, City Account, or Senior Citizen.
- Validation Set 191: Payment Plan Reason Code. If the organization uses Payment Plans specify the reasons someone may be on that plan. Examples could be Extension or Hardship.
- Validation Set 192: Payment Plan Inactive Reason. If payment plans are used by an organization reasons why someone has been taken off a payment plan must be defined. Examples could be Paid in Full, or Defaulted on Agreement.
- Validation Set 193: Utility Bill Group. If the organization prints bills in for certain groups in order, define the Utility Bill Groups. When bills are printed these groups will be “pulled to the top” of the pile, allowing the organization to send the groups all their bills at once.
- Validation Set 269: UM Relationship. When defining associated customers on accounts, an organization can further outline who those people are in relation to the primary on the with the UM Relationship. Examples could be Renter, Roommate, or Authorized Contact.
- Validation Set 353: Utility Delinquent Group. Definition of this validation set allows for an organization to break down delinquent processing into smaller groups. Typically this is used for organization’s that have a high volume of customers who become delinquent. If used further definition of Billing Calendar Dates are required.
- The previously mentioned Validation Sets represent the required and most commonly defined groups. These are just a handful of the available Validation Sets in Utility Management. Some of the other meter related validation sets, such as 110: Meter Size, 117: Utilities Unit of Measure is typically populated by the conversion. If there are any further questions on remaining validation sets please ask a Utilities Trainer.
Payment Codes
The next step in setting up Utility Management within New World ERP is the definition of Payment Codes. Typically these are created during the set-up of the Financial Management Module, but may require some tweaking. Payment Codes represent the various balances that a customer may be paying in regards to Utility Management. Essentially a customer coming to the window could be paying one of three balances, their Account Balance, Deposit Balance, or Bad Debt Balance. Organizations will have to define these three payment codes in order for New World ERP to associate the payment to the correct place.
- Navigate to Maintenance > new world ERP Suite > Revenue Collections > Payment Codes. If previously defined by the Financial Management Trainer navigate to the bottom of the list and locate a Category starting with Utility. The Payment Code Category is pulled from Validation Set 54: Payment Code Category. If previously defined there are likely three payment codes near the bottom of the list representing Bills, Deposits, and Bad Debt.
- If there are no Payment Codes currently under the Utility Collections Category, simply click New to create them.
- If there are payment codes already associated with Utility Management, simply click on the Code to verify their setup.
- Select the Category (if defined) that corresponds to Utility Management.
- The Code represents the name of the payment code that will be referenced in Revenue Collections. For easy referencing in Collections use a descriptor like “UM” at the beginning of the code.
- Description provides a further descriptor of the payment code itself.
- Define a Bank Account from which the Payment Code will be associated with.
- For Utility Management Payment Codes choose the Payment Code Type of New World Receivables.
- The A/R Sub Ledger should be defined as Utility Management for any UM Payment Codes.
- The Transaction Reference Number will be one of three choices for UM Payment Codes. Essentially these define what New World ERP looks for when an account is called upon.
- For the Utility Bill Payment Code, use the UM Account Number Transaction Reference.
- For Utility Deposit Payment Codes, use the UM Deposit and Customer Type Transaction Reference.
- For Utility Bad Debt Payment Codes, use the UM Bad Debt Account Number and Batch Transaction Reference.
- The remaining fields are not required, however they may be utilized by an organization. Please refer to the online help icon for further clarification.
-

Once the required fields are defined, click the Save button to create the payment code. In order to use a payment code it must also be validated. Click the Validate button to validate the payment code. Make sure to always click Validate after the Payment Code has been saved.
In the example above payment code for Bill Payments has been initiated. Notice the Transaction Reference Number is refering to the UM Account Number. This will allow New World ERP to understand that a payment for a customer’s overall balance is being reciepted. If defined correctly for Deposits and Bad Debt, New World ERP will populate the balance with the correct amount on a customer’s account when taking in any type of payment.
Charge Categories
Charge Categories represent groupings of charges in the Utility Management Module. Essentially Charge Categories are line items that appear on a customer’s bills. When defining Rates or Billing Items, Charge Categories can be associated for correct display on bills. When defining Charge Categories first create Parent Level Charge Categories, and then associate Summary Level Charge Categories under them.
Typically the completion of the organization’s Charge Categories are done after UM Settings have been fully defined and saved. However, at least one Summary Level Charge Category is required to save UM Settings. For an example of how Parent and Summary Level Charge Categories might break down take into consideration Water. While Water might be the Parent Level Charge Category, summary level Charge Categories could be Water Service Charge and Water Consumption. Defining these Summary Level Charge Categories in this situation will allow customers to understand how their total Water Charges break down.
- Navigate to Maintenance>Utility Management> Charge Category. Click the New button to create a new Summary Level Charge Category. Specify a Charge Category, and Description that the Summary Level Charge Categories will fall under. Typically Summary Level Charge Categories represent Services, and Charges. Examples could be Water, Garbage, or Fees/Charges. Click Save to create the Summary Level Charge Categories.
- Once Summary Level Charge Categories are defined click New button to create the Summary Level Charge Categories. Select the Type of Charge as opposed to Summary.
- Define a Charge Category, and Description that will define the Summary Level Charge Category.
- Bill Title represents how this Summary Level Charge Category will be displayed on a bill. This field is only required if the Charge Category is to have a different title when it appears on a customer’s bill.
- Define a Payment Priority. This field represents the priority ranking of which Charge Categories are to be paid off first. Acceptable values are 1 through 999. The lower the payment priority identifies which charges will be paid off first when a payment is made.
- Sum to Category represents the Parent Level Charge Category that this Summary Level Charge Category will fall under. Select the appropriate Parent Level Charge Category.
- A Reporting Service may be selected if desired. The values are defined in Validation Set 325, Utility Reporting Service. Reporting Services allow the user to define a different presentation for services on some reports.
- Select the Fund that is affected by dollar activity for this Charge Category.
- The remaining fields are used to define the overpayment charge category. If the offsetting G/L account selected in Fund is in use in charge categories, these fields are populated automatically and cannot be overwritten. Click Save to save the charge category. If the offsetting account selected has no current relationship to charge categories, the Overpayment Charge Category fields will need to be populated; saving the entry will create an overpayment charge category.
- Next define the Overpayment Charge Category fields. Charge Category and Description define the title of the Overpayment Charge Category.
- Under the Overpayment Charge Category header define a Cash Account that will be used for overpayments. Also define a Liability Account that will be used when overpayments are made.
- Click Save to create the Summary Level Charge Category.
-
Repeat this step for the many Charge Categories that the organization may use. Keep in mind that you will have to define a Parent Level Charge Category to associate the Summary Charge Category to.

In the above example a Water Charge has been defined. This Water Charge falls under the Parent Level of Water. Notice the Charges Accumulate From grid. This represents all the Summary Level Charge Categories that fall under the Water Parent Level Charge Category.
UM Settings
UM Settings represent the various settings that will define how the different Utility Management processes will function. In order to complete this page a very high level understanding of how the organization functions is necessary. Overall there are 11 tabs that will be defined.
Navigate to Maintenance>Utility Management>UM Settings to begin.
-
The first tab represents the General Utility Management Settings within New World ERP. Please click the Online Help button in the software for further explanation on all the fields that need to be defined.
-
Miscellaneous: In this portion of the General Tab define the Company and Utility Department for the organization.
- Route: For the route portion, identify the names of the different route levels an organization uses to read meters. Route Level 1 is required. Remember these should correspond to the Validation Sets that have been defined for routes.
- Initial Setup: Enforce Maintenance Rules is a way to lock down UM Settings for auditing purposes. This check box shouldn’t be checked until the organization is live on Utility Management.
- Form Types: Pulling straight from the Form Types previously defined under Validation Sets, select the different forms that will be sed in Utilities.
- Remittance Address: Fill out the remittance address for the organization.
-
-
The Second Tab represents the Work Flow, or essentially the different processes that will require definitions during the setup of accounts or services in Utility Management.
- New Accounts: This portion of the work flow tab defines the steps that users will have to go through when creating a New Account. Click the Use check box to identify the processes that may need definition when creating a brand new account. Clicking the Require check box will signify a process that needs to be defined before an account can be activated. The Require Before Next checkbox will require definition for an individual process before users can move on.
- Move In/Out Process: Similar to other work flow processes define what will be used when moving in a new customer.
- Add New Service: This is similar to other work flow processes and defines what will be used when adding a new service to an account.
- Customer Service: Similar to other work flow processes will be visible when looking at a customer’s account in Customer Service. Keep in mind that there could be a great deal of processes being utilized in Customer Service that would not be required for New Accounts, or Move Ins. An example would be Bad Debt, or Payment Plans. These are items that would not be used when creating an account, but would be after that account has been activated.
- Move In/Out Automation: Selecting this checkbox signifies that when a customer is defined to be moving into a property, the preceding account will automatically be sent to Exception Billing to get its final bill.
- Meter Entry: Allowing Quick Meter Entry from Meter Service Maintenance gives us the option to add a new meter directly from the Meter Maintenance page. Clicking this check box will save some steps when entering a new meter, if that meter doesn’t already exist in the device inventory.
- Billing: This portion of the Work Flow tab allows for the definition of the different processes that will be used in billing.
-
The third tab represents Account settings. Selecting the various options in this page will define how Accounts exist in Utility Management.
- Customer: If the organization requires either a SSN or DLN when a new customer is moving in select the checkboxes here. Keep in mind that these will be required for all accounts before you can move to the next step in the New Account, or Move In Process, not just residential accounts.
- Address: The Maintain Service Address checkbox signifies whether the Service Address can be updated. The value may be changed only if the organization licenses the Community Development application.
- Accounts: This section allows the user to define the length of account numbers and how they are assigned.
- Account Message: If the organization uses Account Messages define how they will appear.
- User-Defined Carry Over During Move In: If the organization uses UDF’s, choose which ones will carry over to the new account during the Move In process.
- Liability: The Liability section allows the organization to define the responsible parties and the extent of their responsibility for liabilities on the account.
- The Liability Lies With field indicates whether liability for account balances lies with the customer, the property, or is mixed (in the event of multiple services with different liability tracking rules). The default selection is Customer. If the selection is mixed, the Property Liabilities section is displayed. Click the Online Help icon for further explanation on how Liabilities are handed.
-
The Consumption tab allows an organization to define how consumption will be handled within Utility Management. Please refer to the Online Help button for further explanation on the individual fields.
- Read Types: This section allows the organization to define the titles for standard and user-defined read types. Be aware of the Default For columns. This is where users can define the default read type for manual entry, AMR import, and what reads can be considered for audits.
- Time of Use Titles: The Time of Use Titles section on the Consumption tab allows the organization to define the titles that should be used for time of use periods in electric billing. These fields are displayed only if the organization licenses electric billing.
- Seasonal Averaging: The Seasonal Averaging section on the Consumption tab allows the organization to set the parameters and
the defaults that the system should use to apply seasonal (sewer) averaging. - Tax Calculation: This section allows an organization to define a Tax Cap dollar amount when calculating taxes.
- Consumption Averaging: This section on the Consumption tab contains the fields that determine how replaced meters and prior customers will be used in consumption averaging.
- Gas Billing: The Gas Billing section on the Consumption tab contains the fields that determine heating degree days for gas billing.
- Electric Billing: The Electric Billing section on the Consumption tab contains the fields that determine heating degree days for gas billing.
- Consumption Audits: The Consumption Audits section contains the fields that determine what read audits will be performed. Click the Online Help button for further description on consumption audits.
- Billing Audits: This section contains the Bill Audit check box. If it is selected, a bill audit will be performed.
- Negative Consumption: This section contains the Calculation Action field. The value indicates how negative consumption will be treated when bills are calculated. The default value is Negative Consumption; the other option is Zero Consumption.
- Billing – Consumption Entry: The Billing - Consumption Entry section contains fields that determine how meter status will affect processing.
- Billed Demand Rules Default: The Billed Demand Rules Default section on the Consumption tab contains the fields that determine how demand is used in electric billing. This section is displayed only if the organization licenses electric billing.
-
The fifth tab, Bills, defines the settings associated with the billing process. Please refer to the Online Help button for further description on the different items for Bills.
- Accounts to Bill defines the criteria when creating bills. Users can choose how bills print with print options. The Bill Inactive accounts checkbox allows us to continue sending bills to inactive accounts that have a balance.
- The Bill Print section on the Bills tab organizes the fields that determine the settings for printing bills.
- The Bill Export section on the Bills tab determines the information that will be included in the bill export file, if an organization exports bills to a third party bill printer.
- Bill Print and Export Common Settings. This section contains the fields that comprise shared settings between the bill and the export processes.
- General Billing Information. This section contains the fields that define general properties of billing, including user-defined fields.
- Budget Billing Plan. This section contains the fields that define the default title for the budget billing plan, as well as the processing defaults for revising the plan.
- Rates. This section contains the Prorate Rate Changes check box. If it is selected, the system will bill the customer the accurate amount for the old rate up to the date of the rate change, and the new rate as of the date of the change. If this check box is not selected, the rate that is active on the Through Date of the billing cycle will be used for the entire cycle. This applies to mass rate changes only, not rate changes on individual accounts. The check box is cleared by default.
- eBills. This section on the Bills tab contains the fields that define the defaults for emailing bills.
-
The sixth tab of Receipts allows an organization to define how utility payments will be handled within the system.
- The Payoff defines how balances will be paid off on accounts.
- The Overpayment Rules. This section contains the Overpayment Application field, which indicates how the system should treat overpayments. Generic is the default value, which indicates that overpayments will be applied against any new charge regardless of the service or fund on the charge. The other option is Dedicated. Selecting this option will tell the system to earmark overpayments to pay off only charges in that overpayment fund.
- Bank Drafting. This section contains the Bank Account field. This value tells the system which bank account to use as the offset account where money will be deposited when it is taken from the citizens' banks.
- Revenue Collections-The Revenue section contains fields that pertain to how receipts should be handled.
- Budget Billing Plan Suspension. This section allows the organization to define whether a credit balance should remove the account from a budget billing plan.
-
Delinquencies. The seventh tab contains the settings that define the high-level operations of Budget Billing, Delinquent Processing (penalties and statements), and Bad Debt.
- Cancel Budget Billing Plan. The Cancel Budget Billing Plan section on the Delinquencies tab allows the organization to define the circumstances that will result in a customer's removal from their budget billing plan. Budget Billing plans are usually intended only for customers in good standing. However, all of the fields in this section are optional; leave them all blank if the Utility does not wish to cancel budget billing plans for any customers.
- Delinquent Processing. The Notice section of the Delinquencies tab allows the Utility to define general defaults for delinquent processing.
- Bad Debt. The Bad Debt section on the Delinquencies tab allows the organization to set up the bad debt batch types they want to use: Write Off, Transfer to Taxes, Transfer to Collection Agency, and Assign to Collection Agency.
-
Adjustments. The eighth tab in UM Settings allows an organization to define the settings that will apply to Adjustments and Refunds.
- Adjustments. The Process field defines the dependency between validation and approvals for Adjustment processing. The default value is Require Validation for Approvals.
- Refunds. This portion pertains to how refund adjustments will be handled. Define the Bank Account that refunds will be taken from when a refund is processed. The Check Sequence defines the order in which refund checks will be printed. Choose the default Adjustment Reason for refund adjustments. These fields are pulled directly from Validation Set #108: Utility Management Adjustment Reasons.
- Exception Bill Refunds. Define what will happen if there is no forwarding address for a final bill refund check.
-
The ninth tab of Work Orders defines the settings that will govern how work orders will be processed and what they will include.
-
Work Orders outlines the criteria by which work orders will follow.
Allowing Work Orders to be Completed in Maintenance is reserved for future use. Selecting this box has no bearing at this point.
Inactive Meter on Shut Off defines what will happen to a meter when it is Shut Off. If an organization plans of billing charges for a meter even when it is shut off, do not check this box.
The Print Work Orders as They are Entered check box will send a work order to myReports as soon as it is created. If the Require Rate and Service Information on Attach Work Orders check box is selected, an Attach work order will not be able to be saved unless rate and service details have been defined.
- The Form User-Defined Fields The User-Defined fields section allows users to select user-defined fields that should appear on their organization's custom work order forms. The options for User-Defined Fields 1-10 are all of the user-defined fields that exist for Utility Accounts and Devices. Up to 10 values may be selected. Note, however, that a custom form must be modified to include the fields before they will appear in the output.
-
-
The tenth tab of Deposits contains settings to determine a customer's eligibility for having their deposit amount refunded to them. Typically, mass refunds are done for accounts with good credit. The settings on this page construct a mini credit history to determine who qualifies for a deposit refund.
- The Bad Credit section contains fields that are used to define what constitutes a bad credit event. The Default Maximum defines the total allowable weighting to be considered for a deposit refund. Within the table below users can lend weights to individual delinquent events. Please review the online help button for further explanation on how to define the delinquent event weights, and how NSF’s will be considered when creating deposit refunds.
- Mass Deposit Refund allows us to define if inactive accounts will be included when considering weights in the refund of deposits in mass.
- The last tab of Counters allows the organization to define the number that will be incremented when accounts and work orders are entered into the system.
- After all the required UM Settings have been defined click the Save button to save the settings. If any required fields have been missed users should see errors with their descriptions at the top of the page. Keep in mind that if Enforce Maintenance Rules checkbox was unchecked on the General tab, it is still relatively simple to change any settings that have been made.
Service Class
The next step in Utility Management setup is the definition of licensed services that will be connected to accounts. Similar to the way users setup Charge Categories with a summary level falling under parent categories, Service Classes work nearly the same way. First users create Service Classes and then they associate individual Service Types that will fall under those classes. For example an organization might have a Water Service, but beneath it there could be Water/Sewer, Water Only, or perhaps Fire Line.
-
The first step in creating services is to define the Service Class. Click the New Service Class button to create service classes.
- Under the Licensed Service drop-down, select the service(s) that the organization will utilize. These Licensed Services are hard coded. Once a Licensed Service is selected define the Service Class and Description that will serve as identifiers for that service. Typically those fields are very similar to the Licensed Service that users have selected in the first drop down. Click Save to create the Service Class. Repeat the processes for all the services that the organization utilizes.
-
Now that at least one Service Class is defined, outline the individual Service Types that will fall under that service. The key when defining Service Types is the understanding of two items:
First, how much of a breakdown of types will the organization need? Take for example the Service Class of Water. Under this there could be the type of Water/Sewer, but there could also be Water Only or Sewer Only for accounts that would have just one or the other service. This will not only allow us to easily identify what service an account has, but also come in handy for reporting purposes.
The second item that needs consideration when creating types is to understand if the service will be Metered or Non Metered. In New World ERP there is a hierarchy in regards to billing accounts with services. This means that every account has a service, every service has a meter, and every meter has a rate:
Account>Service>Meter>Rate
But when billing something like garbage, there is no meter to keep track of consumption. Therefore, there is the option for Non-Metered measurement types. These Non-Metered units will in effect serve as place holders for a meter in regards to the billing hierarchy.
- Click the New Service Type button to create a service type that will fall under the Service Class. Define how a type will be referred to with the Service Type and Description. Depending on the type of service specify whether the Measurement is Metered or Non-Metered. Click OK to create the service type. Repeat this process for all Service Types that will fall under any Service Classes previously defined.
-
Once both the Service Classes and Service Types are defined take a look at the Service Class List. This will give the user an idea of how services will break down when assigning them to accounts.
In the example below notice the Service Classes and Service Types are defined. Also notice that measurment types for individual types.

Billing Calendar
Because New World ERP is so date driven, the definition of a Billing Calendar is essential to the Utility Management Module. Dates will need to be created for the various billing events (Bill Dates, Due Dates, Delinquent Events…etc.). Keep in mind that depending on how much historic data is being converted. Billing Calendars will need to be created for those events to fall into.
Frequencies
The first step in creating a billing calendar is to define the frequencies from which dates will get created. These frequencies will represent how new accounts can be billed, exception bills can be sent, and how prorated is based. Also define the default amounts of days (from day one in a billing cycle) that certain events are to happen.
- Navigate to Maintenance > Utility Management > Billing Calendar > Frequencies. Click the New button to create a new Billing Frequency.
-
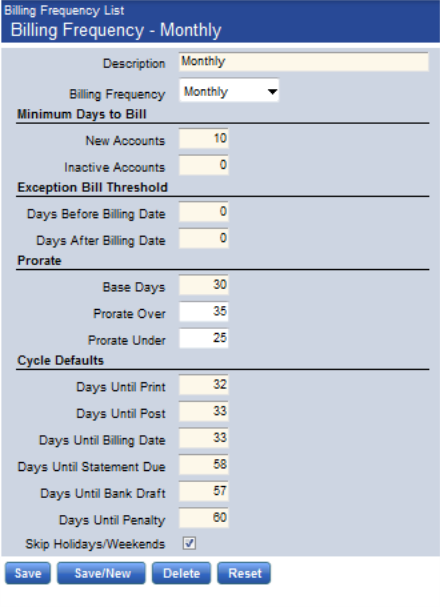
First define a Description that this frequency will be identified with. This description usually corresponds with the next drop-down of Billing Frequency. As in if a monthly frequency is created, that description might be Monthly for easy identification.
Choices for Billing Frequency are Monthly, Quarterly, or Bi-Monthly. If an organization bills based on an Annual or Semi Annual basis, choose the Quarterly frequency, and manually maintain the billing calendar. This will come into play during the actual setup of the calendar itself.
-
Next define the criteria for the Minimum Days to Bill. For New and Inactive accounts specify how many days that account needs to be in either status in to bill. Take for example a new account, and how many days those accounts need to be active in order to receive a bill. In the case of Inactive Accounts, if the organization bills inactive accounts set the minimum number of days an account needs to be inactive in order to get a bill between its final, and next cycle bill.
-
The Prorate portion lets us define how proration will work for accounts.
- Define a Base Days amount that will act as the average amount of days for a given billing frequency. For example, dealing with a Monthly cycle base days would be 30, as on average most months are around 30 days.
-
The Prorate Over and Prorate Under fields allow the user to define days by which accounts will not be prorated. Take for example a monthly cycle with base days of 30. The Prorate Over value could be 35, and the Prorate Under value could be 25. Therefore anything between 25 and 35 days will be billed the entire flat rate. Anything 24 days or less, or 36 days or more will have proration taken into account.
-
The Cycle Default section is reserved for when the Billing Cycle Wizard is used to create billing calendar date. Essentially when billing calendar dates are created, it can be done manually, cycle by cycle, or with the use of the cycle wizard to create multiple cycles at once. The dates defined in the Cycle Default section go under the assumption of number of days from day zero in the billing cycle. As in day one would be the first day after billing a given cycle.
- Days Until Print: The value here will be the default number of days after the billing date that the bills should be printed. In the billing process, when bills have not yet been printed, the date that is calculated from this value will display in a status message on the page.
- Days Until Post: The value here will be the default number of days after the billing date that the bills should be posted. In the billing process, when bills have not yet been posted, the date that is calculated from this value will display in a status message on the page.
- Days Until Billing Date is the number of days from the billing cycle’s From Date bills should be created.
- Days Until Statement Due is the number of days from the cycle’s From Date until the bills for the cycle are due.
- Days Until Bank Draft is the number of days from the cycle’s From Date until bank drafts should be run for the accounts that use bank drafting.
- Days Until Penalty is the number of days from the cycle’s From Date until penalties should be run for the accounts that are delinquent.
- Click the Skip Holidays/Weekends checkbox if the system is to move the event to the next business day when it falls on a weekend or holiday.
-
Once all the required dates are defined, click the Save button to create the billing frequency. If you have multiple cycles that have different billing frequencies repeat these steps for each frequency type.
In the example below a Monthly Frequency has been created. Notice the Prorate dated, and Cycle Defaults.
Billing Profiles
Billing Profiles represent the individual groupings by which billings are done. For example say four cycles were billed, once every Friday during the month. In this case there would likely be 4 billing profiles, perhaps named Weeks 1-4. These individual billing profiles are processed independently from one another. Depending on an organization’s frequencies, and breakdown of cycles you could have one or many billing profiles.
-
Click the New button to create a new billing profile. Doing so should take you to a page to specify the criteria for an individual billing profile.
- Define a Billing Profile name, and Description by which a profile will be referenced.
-
Depending on the Frequencies defined in the previous process, assign the correct frequency to the Billing Profile.
-
At this point there will be no routes to assign to a given Billing Profile. However the next step in creating a Billing Calendar is to create these routes based on the Validation Sets defined in previous steps. But in order to create those routes, first define Billing Profiles.
This means after Routes have been defined, return Billing Profiles to assign them to billing cycles.
- Click the Save button to create the Billing Profile. There shouldbe a warning at the top of the page stating that this billing profile will not be included in billing until a route is added. Click Accept, as a revisit to this process will be required once Routes have been created.
- Repeat this process for as many individual Billing Profiles that need to be defined.
Routes
Utility Routes are the segments of the billing area that will have their meters read in sequence. Route assignment can also be related to what group an account is billed in. Thus a route can be an indicator both of geography and bill timing. When a utility account is created, it is assigned to a route and given a read sequence within the route so that is it logically placed within the route for when meters are read.
It is at this point that the defined routes in the Validation Sets and their description in UM Settings come into play.
![]()
- Click the New button to create Routes that will fall into individual Billing Profiles. The page should look similar to the one below.
-
The first fields on the Route Definition page are taken straight from the Validation Sets, and Route Level definitions in UM Settings. As both Validation Sets 103, and 104 have been defined, signifying that routes breakdown into two parts. And in UM Settings, definition of those breakdowns, as Cycles then Books, has been outlined. Define the individual breakdowns for each Route Level 1, and how it breaks down further into Route Level 2, or even, and associate those breakdowns to a defined billing profile.
Click Save/New and repeat the process as many times as needed.
The last three fields deal with the AMR reads. Contact a Utility Trainer for further explanation on these items. They are however not required to create Routes.
-
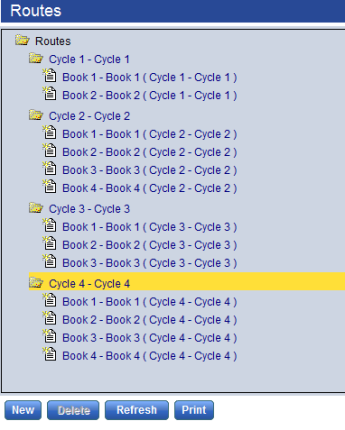
Once all the routes have been defined, navigate back to the Routes list page to view what was created.
In the example below notice that four cycles have been set up (Route Level 1). Within those four cycles the different books (Route Level 2) breakdown the reading of each individual meter within those cycles
For further explanation on how Routes work within New World ERP please refer to the Online Help, or contact a New World ERP Utility Management trainer.
Remember once Routes have been created, go back to the Billing Profiles and assign them to individual billings.
Billing Calendar
The billing calendar represents the dates from which different billing events will fall for individual profiles. Once billing dates are defined it is from here that dates of historic or future billing cycles can be viewed. But first the creation of the billing calendar must be done. There are two options when creating the billing calendar.
New Billing Cycle
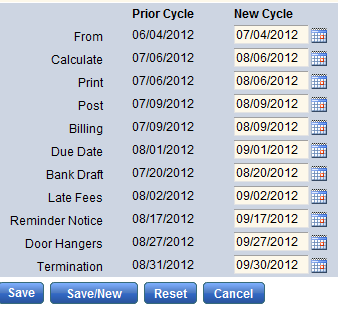
Use the New Billing Cycle if individual cycles are going to manually created. Clicking the New Billing Cycle button will open up a page where manual definition of dates for the individual events within a cycle can be done.
In the example below, dates have been manually entered for each individual event that falls within a defined billing cycle. This process will need to be repeated for each billing cycle, and individual billings within those cycles. However, if the New Cycle Wizard was used multiple cycles can be created all at once.
Click Save to create the billing calendar for the one individual cycle.
New Cycle Wizard
The cycle wizard allows the utility organization to define multiple billing cycles for a billing profile. If the organization defines cycles for an entire year; the wizard makes this an efficient process.
- Click the New Cycle Wizard to begin creation of billing cycles.
-
The first step in the New Cycle Wizard is to define Billing Profiles and Durations.
- First select which Billing Profile you are creating the calendar for. These Billing Profiles are pulled directly from the Billing Profiles created in previous processes.
- Next select a start date for the calendar. If historic dates have been created, by which the converted data will fall into, make sure to choose a date far enough back in time. This date will represent the first date (day 1) of a billing cycle.
- Next define when the cycle will end. Choices are after a certain number of cycles, or a certain date. For example if cycles are created for the fiscal year, and had a monthly frequency, end it after 12 cycles.
- Define when the cycle is to be repeated. Choices are on a day of the week, or on a certain day within each frequency.
-
Once all the required fields are defined click the Next button to move on to the second step.
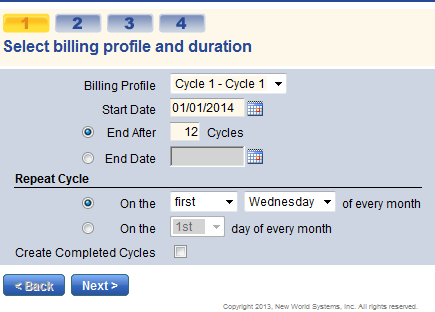
In the example above, a Billing Calendar has been started for the next year, which is to be repeated on the first Wednesday of each month.
-
Next, define the days until billing events. The dates that appear in this portion of the Cycle Wizard are pulled directly from the frequencies defined for the Billing Profiles. Update these dates if changes need to be made. Click Next to proceed to the next step.
-
You can preview how the defined dates from the previous two steps will fall on a monthly calendar. Navigate through the months to view how the Billing Cycle will break down. If changes need to be made navigate back to either one of the previous steps
-
The Automate Billing Events page is for future use. Eventually users can be notified of individual events when they happen. Click Save to create the Billing Calendar.
-
Navigate back to the Billing Calendar List View and view all the cycles for a given route by clicking the plus sign next to an individual billing profile. Click on the Billing Date to view the breakdown of all events within a given cycle.
Rates
Rates and rate components, organized within charge categories, provide the means for an organization to bill customers for the utility services they receive. Rate structure is highly configurable to allow you to define rates to meet specific requirements.
- Navigate to Maintenance > Utility Management > Rates > Rate. Click the New button to create a new rate.
-
Next, define a Rate name and Description by which the rate can be referenced. Also define a Start Date for the rate. If this is a rate that is to be converted, the recommendation is to use 01/01/1900. If a Rate Group has been defined, pick one, however it is not required. Specify the Service Class by which this rate will fall under. If the rate is to be prorated, specify a Period Based On. The choices are Billing Date Range, or Consumption Date Range.
Clicking the Save button will create the rate and allow you to specify the Rate Component.
-
In defining the Rate Components there are a few things that need to be taken into consideration. First, the type of charges will accumulate from this rate (Flat, Consumption Based, or Variable). Secondly, how will those charges break down?
As stated above there are three choices for the definition of rates. The type of rate will directly correspond to the Charge Type that is defined.
- Flat Charges represent the least complicated rates to setup. Essentially accounts using this rate will be charged the amount that is defined in the rate component. Please view the Online Help, or contact a Utility Trainer for more information on how flat rates work.
- Variable Charges are used for situations when a tax component is being setup for the rate code. This rate type is used very infrequently. Please view the Online Help, or contact a Utility Trainer for more information on how variable rates work.
- Consumption Charges represent the bulk of rates setup in New World ERP. This charge type is used when a rate is based on consumption. A few things to note is the Applies to Measurement Type, and the Through, Rate, and Other Amounts fields. The Applies to Measurement field allows us to accumulate consumption from individual dials on a meter, total consumption, or non-metered measurements. The Through Rate, and Other Amounts fields allow us to setup step rates by which charges will be accumulated. Please refer to the Online Help, or contact a Utility Trainer for more information on how consumption based rates work.
- Rate-based minimum charges are used when the rate as a whole has a complex minimum, often involving calculating based on a demand reading. It is available only if the utility is licensed to electric service and only if the rate has an electric Service Class. Please refer to the Online Help, or contact a Utility Trainer for more information on how Rate-Based Minimum rates work.
-
Regardless of the type of rate that you are creating there are a few required fields for each type. Always define a Component and Description that will be used to identify the rate. Along with that define a Charge Category by which the rate will display on a customer’s bill.
For an individual rate add as many components as needed. For example say a Water Rate is being created. The charges for that rate could represent Consumption as well as a Service Charge. In that case there would likely be two components, one Flat to handle the Service Charge, and another Consumption Based to handle consumption.
Rate set up can often be very complicated so be sure to have a copy of the organization’s rate schedule handy to refer to when creating rates. Also be aware that rates should be tested extensively to ensure they are correct.
-
Once a Rate, and its components are defined, click the Save button to create it. At that point navigate back to the Rate List to view the rates that have been created.
In the list below notice the different rates, their naming conventions, as well as their start dates. Defining rates correctly will make it easier for users to assign them to accounts.
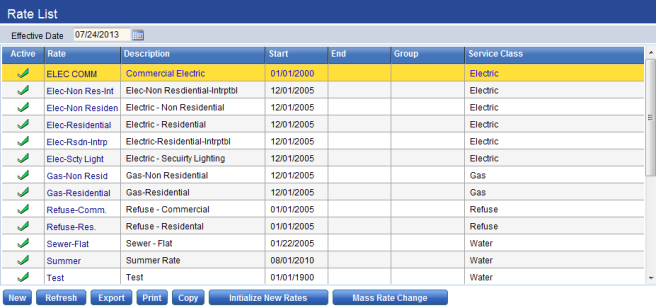
Again rates can be very complicated. Be sure to enlist the help of a Utility Trainer, or consult the Online Help when creating them.
G/L Distribution Profiles
G/L Distribution Profiles enable organizations to specify the accounts used when a balance transaction (bill or payment) is made. Profiles tell the system how the organization’s books should be affected when a charge category is used in a transaction; each profile contains a set of accounts that will be used when the charge category is affected. For example, in a billing transaction, an Accounts Receivable account is debited, and a Revenue account is credited. In a payment transaction, a Cash account is debited, and an Accounts Receivable account is credited. The G/L Distribution profiles specify the accounts that should be used for each charge category.
For G/L Distribution Profiles, individual profiles are defined by which accounts will be assigned. If all balance transactions go to the same General Leger accounts then only one profile will be setup. But in the event that charges break down differently for different account types, then multiple profiles would have to be setup.
- Click the New button to create a new G/L distribution profile. Define a Profile Code and Description by which the profile will be identified. Then click the Save button to create the profile.
- Once the profile is created define the individual G/L Account breakdown for defined Charge Categories. Click the individual Charge Category to define the G/L Accounts for Revenue, Accounts Receivable, Cash and Bad Debt Expense Accounts.
If the G/L accounts are not known, click the advanced search icon to find accounts.
Use the Apply to Common Categories button to apply the defined G/L accounts to all common categories. This button comes in handy when common categories have the same G/L breakdowns.
Define the G/L breakdowns for each charge category and click Save. Repeat the process for any other profiles that need to be created.