Content Manager and Forms Administrator
Welcome to the Content Manager and Forms Administrator's Guide. This guide shows you how to set up and configure Content Manager and Forms and how to manage user permissions for documents.
Content Manager
Content Manager, an industry-leading solution that lets you electronically capture, store and retrieve all of your documents, has been integrated with New World ERP to give you a more robust document processing tool.
With this integration, document counts will appear next to document icons, telling you at a glance whether the records you are viewing have documents attached and, if so, how many:
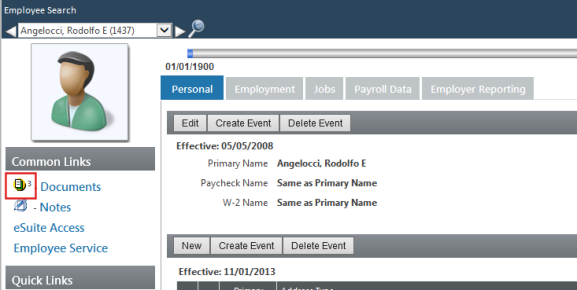
To review or add documents to a record, click the Documents icon. The Content Manager document viewer will open:
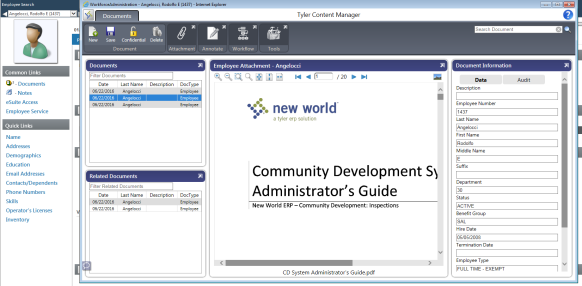
The left pane lists attached documents, the middle pane displays the selected document, and the right pane contains the document metadata.
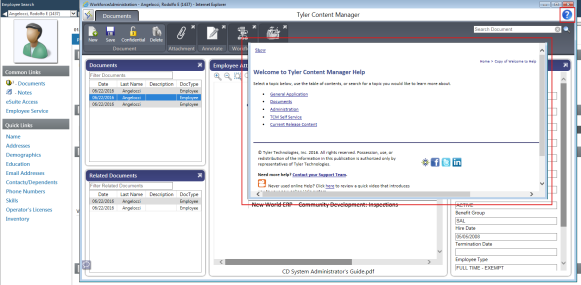
For more information on the document viewer, click the help icon in the top-right corner of the viewer:
Features of the Content Manager Standard Edition include the following:
- Bar code recognition
- Full-text searches
- Automatic document indexing
- Automatic redaction
- Integrated document retention schedules
- Audit history of images and document-related data
- Direct, broad-based access to all of your documents
The Content Manager Enterprise Edition includes all of the above while expanding Content Manager's useful functions outside of the Tyler solution and into your agency's complete daily workflow. Content Manager Enterprise lets you capture, deliver, manage and archive all of your documentation on a broader basis; integrate third-party systems; and boost your return on investment.
To learn about these products, please refer to the following guides:
- Content Manager SE User Guide
- Content Manager Full Client User Guide
- Content Manager HTML Integrated Viewer
Areas where the new document processing has been applied
Community Development
- Inspections: Inspections, Inspection Compliance Items
- Licensing: Licensee Animals, Licensee Businesses, Licensees, Licenses
- Parcel Management: Improvements, Parcels, Zoning Changes
- Permits: Permits
- Project Planning: Project Planning Activities
- Request for Service: Cases, Requests for Action
Financial Management
- Accounts Payable: Invoices, Template Invoices
- Annual Budget Processing: Budgets, Budget Organization
- Asset Management: Assets
- Bank Reconciliation: Bank Account Journals, Bank Reconciliation Batches
- Grant Management: Grants, Grant Preparation Items
- Journals: Journals, Investment Distribution Batches
- Maintenance: Compliance Types, GLs, Procurement Items, Vendors, Vendor Compliance Types
- Miscellaneous Billing: Miscellaneous Billing Customers, Miscellaneous Billing Invoices
- Payment Processing: Payment Reconciliation Attachment, Third Party Batches
- Procurement: Bids, Bidders, Contracts, Contract Checklist Items, Purchase Orders, Purchase Order Templates, Requisitions, Vendor Change Requests, Vouchers, Voucher Requisitions, Voucher Templates
- Project Accounting: Projects
- Receipt of Goods: Receipt of Goods
- Revenue Collections: Revenue Collection Batches
- Special Assessments: Special Assessment Districts, Special Assessment District Parcels
- Work Orders: Work Orders
Human Resources
- Applicant Tracking: Applicants, Job Postings
- COBRA Processing: COBRA Items
- Employee Event Tracking: Performance Evaluations
- Maintenance: Grievances, Positions
- Non-Employee: Retirees
- Personnel Actions: Personnel Action Items
- Roster Cards: Roster Employees, Rosters
- Workforce Administration: Benefits, Contracts, Direct Deposits, Employer Information, Employment, Jobs, Payroll, Personal, Taxes
- Workers’ Compensation: Workers’ Compensation Items
Utility Management
Utility Accounts
Content Manager setup and configuration
Note: If you are an existing customer using FSS and are migrating to Content Manager, you will need to run a data conversion before you set up and configure Content Manager.
To set up and configure Content Manager, navigate to the Management Console at https://APPLICATIONSERVERHOSTHEADERMAPPING/managementconsole#/Base where the APPLICATIONSERVERHOSTHEADERMAPPING piece of the URL is replaced by your specific value. Only users that are part of the ManagementConsoleGroup_INSTANCENAME security group on the Application Server will have rights to this site. On this page there is a Content Manager card.
Clicking the gear allows you to configure the Content Manager values.
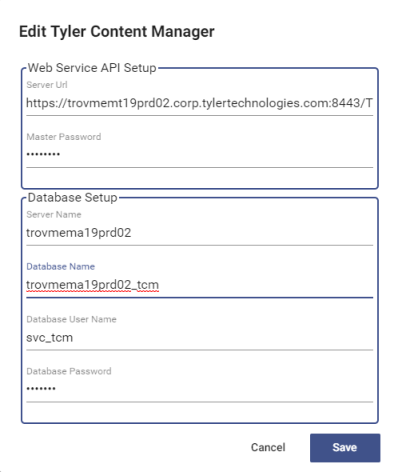
The Server URL is constructed of the machine name and the Content Manager instance name.
You may use any Master Password you want; it is not configured inside the Content Manager system. This password will be used in the synchronization of the Content Manager and New World ERP systems. It may be changed at any time.
Please note that this password allows administrator-like access to Content Manager; therefore, as with any password, take care to make it a strong one.
Note: Since Enterprise Content Management affects many areas of New World ERP, the ECM Configuration page needs to be modified with caution. If you are an existing customer, you must run a conversion before switching to Content Manager. Users of New World ERP may experience errors in processing that relies on the ECM configuration, so it is recommended that you make changes during off hours or low-usage times. Note that changes to the Content Manager configuration will take approximately one minute to propagate throughout the system.
Security
Although Content Manager has its own security implementation, New World ERP will handle all of the security setup and integration for you.
Security that determines a New World ERP user's document permissions is controlled by User Security. A user who is given permission to a document type in User Security will have permission to the same document type in Content Manager.
This process is referred to as security synchronization. At 8:30 every evening, a scheduled job will run to synchronize New World ERP security with Content Manager. If a more immediate synchronization is necessary, such as when a new employee's New World ERP user is created, a manual synchronization is available through a Sync Users with Content Manager button on the User List page (Maintenance > New World ERP Suite > Security > Users):
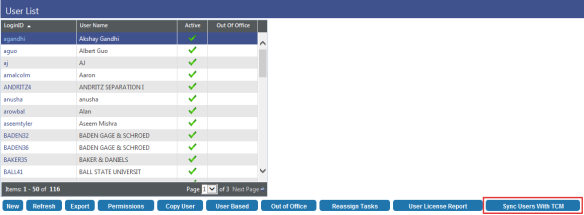
Use this button once you have made all of the security changes you need to make at this time; for example, if you need to make changes for multiple users, do so before synchronizing manually.
Managing user permissions for documents
After New World ERP is configured for Content Manager, an administrator will need to manage user permissions for documents and notes. When your environment is using Content Manager, you will see an Administrator column on the User Permissions page instead of the Undo Checkout and Finalize columns you see when your environment is using File Storage Service (FSS):
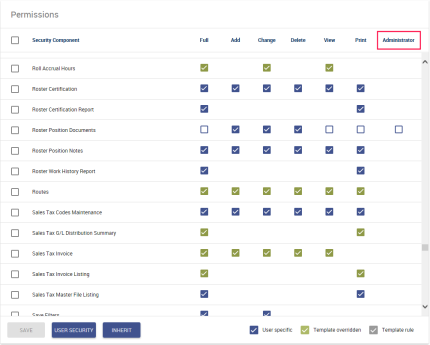
Permissions selection key for document and note components
You may set up document permissions in one of the following four ways:
- View only
- View and Add/Change
- View, Add/Change and Delete
- Full or Administrator
To adhere to one of these scenarios, the User Permissions page will auto-select certain permissions for you.
Remember to run the security sync to upload changes to Content Manager.
How selections affect permissions to Content Manager document and viewer functions
Once users have been synced with Content Manager, their access to the functions of the Document Viewer will be based on their permission selections. Examples:
View permissions only
Viewing is enabled, while all other functions are disabled.
Add/Change/View permissions

Viewing, adding and modifying functions are enabled, while deleting and redacting are disabled.
Add/Change/Delete/View permissions

Viewing, adding, modifying, deleting and redacting functions are enabled.
Content Manager Confidential
The Content Manager full client contains three default confidential reasons: AP, HR and Payroll. Along with that are two security groups per confidential reason: Mark and View/Mark. To give a user rights to mark or view/mark a document as confidential, perform the following steps in the Content Manager:
- Navigate to Administration > Security Manager.
-
Select Groups:
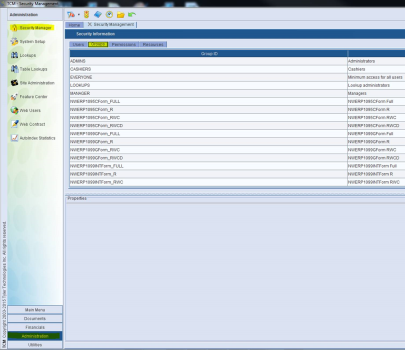
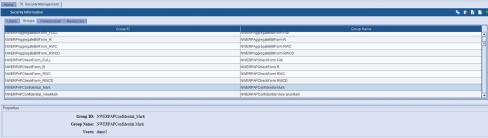
The default security groups available in release 2017.1 are as follows: NWERPAPConfidential_Mark, NWERPAPConfidential_ViewMark, NWERPHRConfidential_Mark, NWERPHRConfidential_ViewMark, NWERPPayrollConfidential_Mark, NWERPPayrollConfid_ViewMark:
-
To add a user to a group, double-click the group ID, and move the user from the Available Users List to the Selected Users List. (To remove a user, move him from the Selected Users List to the Available Users List). A user who is logged into the New World ERP application when this change is made will need to log out and log back in to see the change:
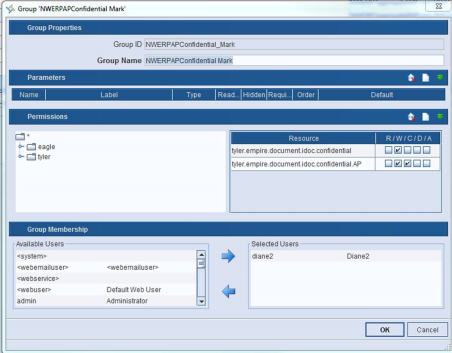
When a user is added to any group, the new confidential permissions will be applicable for all document types.
If a user is assigned to a Mark or View/Mark group, the Confidential button will be enabled in the Content Manager Document Viewer:
-
Click the Confidential button. A Confidential Reasons dialog will open, giving you three confidential reasons to select from:
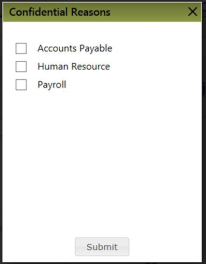
- You may select one or multiple reasons.
- Click the Submit button.
- On the Content Manager Document Viewer page, click the Save button.
After a document has been marked as confidential, a user with View/Mark rights will still see that document in the Content Manager Document Viewer. A user with Mark rights will be able to mark a document as confidential. After a document has been marked as confidential, only a user with View/Mark rights will be able to view the document. The document count will not account for a confidential document if a user does not have rights to it.
The lock on the Confidential button will appear locked when a document is marked as confidential:

It will appear unlocked when a document is not marked as confidential:

The Confidential button will be disabled if the user is not assigned to a Mark or View/Mark group in Content Manager client:

To remove the confidential mark from a document, you will need a user with View/Mark rights to open the Confidential Reasons dialog and deselect all options. Submit and save your changes.
Content Manager Verification Web Service
|
|
|---|
|
Verification Web Service |

Purpose
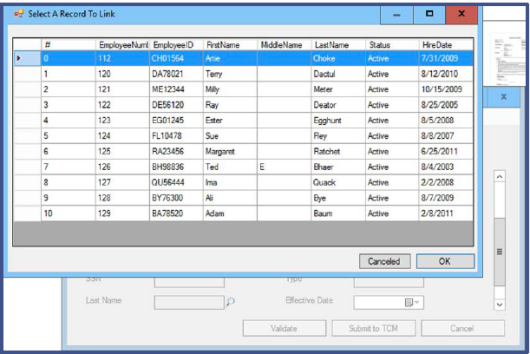
The verification web service verifies a document with New World ERP when the document is created in Content Manager using the Content Manager Print Driver or Content Capture; for example, a user creates an employee attachment record in Content Manager using the Content Manager Print Driver and wants it to share metadata with a record in New World ERP so the two can be linked. The user may type the employee’s number in the Employee Number field and click Verify. Content Manager then sends a Verification Web Service call to New World ERP, asking which record has that employee number. New World ERP responds with a record that matches the employee number, and the Content Manager Print Driver displays the result. The user then clicks the record to which the new Content Manager attachment should be linked, and the corresponding metadata fields are filled in.
Setup
Below is the System Setup page in Content Manager:
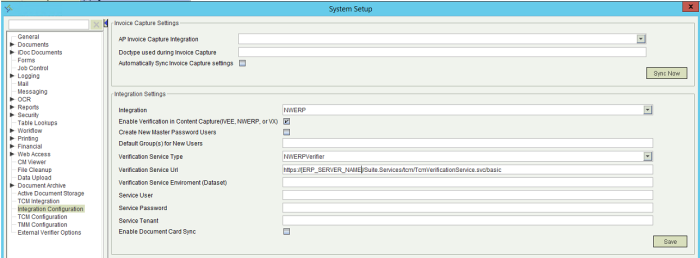
- In the Integration drop-down, select the NWERP option.
- Select the Enable Verification in Content Capture check box.
- In the Verification Service Type drop-down, select the NWERPVerifier option.
-
In the Verification Service Url field, type the following, replacing [ERP SERVER NAME] with your ERP application server name: http://[ERP_SERVER_NAME]/Suite.Services/tcm/TcmVerificationService.svc/basic
- Leave the remaining fields as they are.
- Click the Save button.
- Click the Apply button.
Content capture
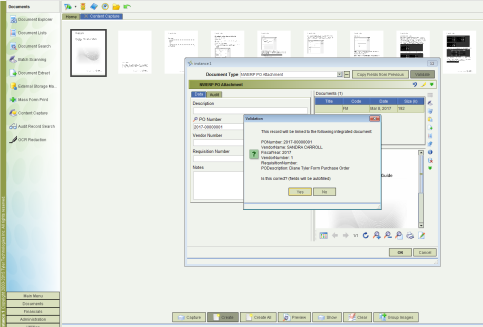
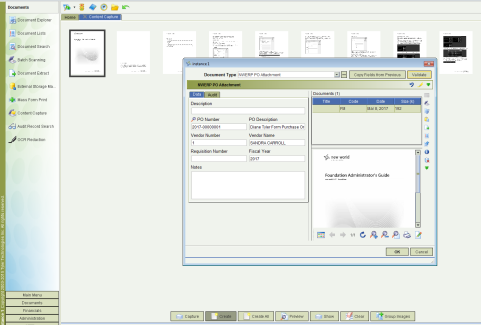
Content Capture is the first area that supports the verification service. When you create a document from captured content, you may enter the metadata manually, or you may use the Validate button to look up a record in New World ERP.
The page below does not contain a Validate button, so you would enter the metadata manually:
If the validation service integration is turned on, the page will contain a Validate button. The following steps provide an example of how to access the Validate button:
-
From the Content Manager Main Menu, click the Documents tab to open the Documents panel:
-
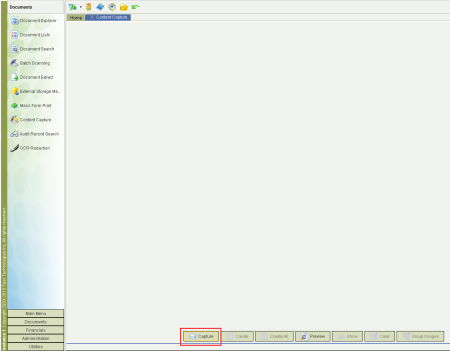
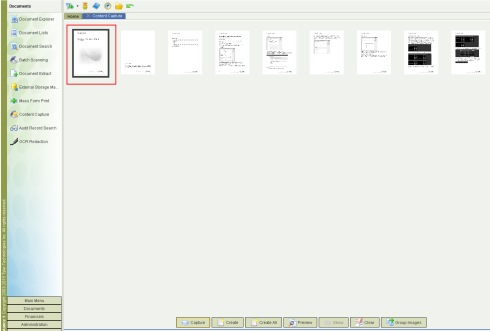
In the Documents panel, click Content Capture:

-
Click the Capture button:
-
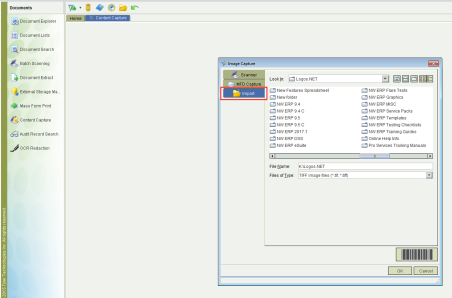
In the Image Capture dialog, click the Import button:
-
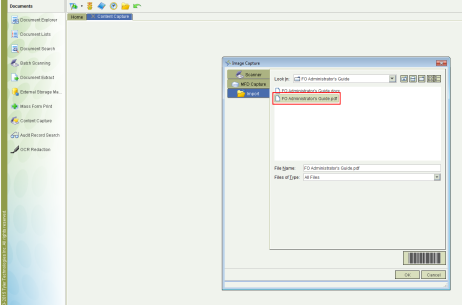
Select a file to import:
-
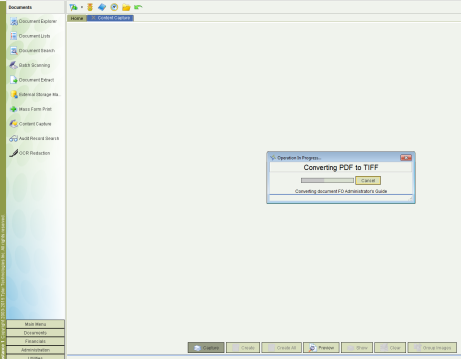
Click OK. The document will be converted to TIFF:
-
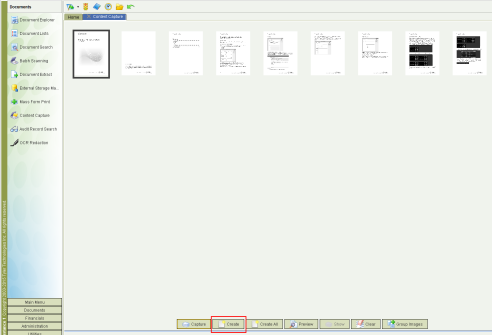
When the document displays in the Content Capture panel, select it:
-
Click the Create button:
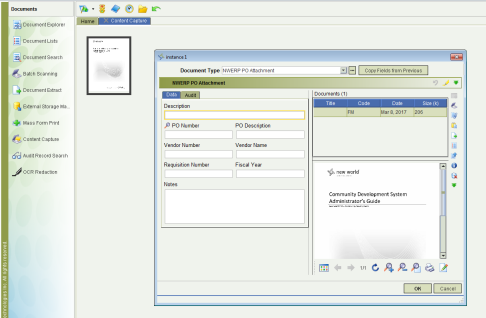
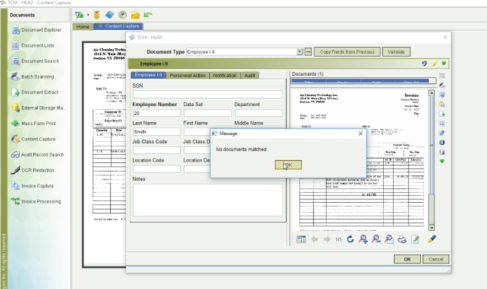
The Create dialog will open. This dialog contains the Validate button:
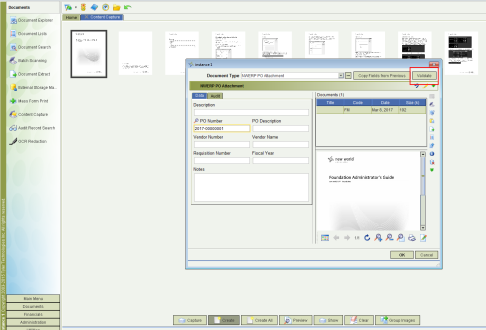
- The allowed search fields will be in bold. Type the criteria in one or more bold fields.
- Click Validate. You will receive a message showing no results or one result, or you will receive a grid of results from which to select. The page below is an example of a search that generated no results:
The page below is an example of a search that generated one result:
Print driver
Print Driver is the second area that supports the verification service. When you send a document through the print driver, you may enter the metadata manually, or you may use the Validate button to look up a record in New World ERP.
If the validation service integration is turned on, the page will contain a Validate button. Magnifying glasses will display to the right of the allowed search fields:
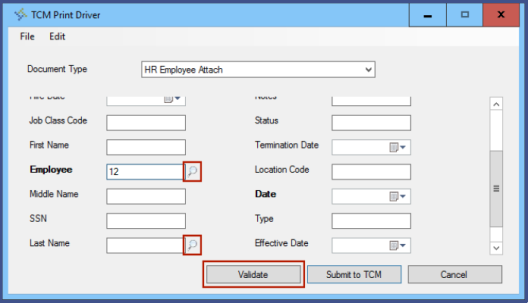
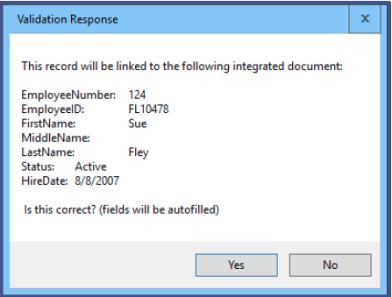
Type the criteria in one or more of the allowed search fields and click Validate. You will receive a message showing no results or one result, or you will receive a grid of results from which to select. The page below is an example of a search that generated one result:
The page below is an example of a search that generated multiple results:
See the document TCMPrintDriver.pdf for more details.
Content Manager integration with Accounts Payable
In release 2017.1, enhancements were made to facilitate the transfer of vendor invoice information from New World ERP to Content Manager.
Users who enter vendor invoices into the Accounts Payable module in New World ERP now have the option of printing barcode labels for the invoices they enter. Once the invoices have been entered into the system, the labels can be printed and attached to the physical copies of the invoices. When an invoice barcode is scanned, the invoice information is collected and transferred to the appropriate areas in Content Manager.
Setup for this feature is described below, as are the related components in Accounts Payable. Following that are instructions on how to actually print the bar code labels.
Note: The enhancements described here apply only to users of Content Manager. You must have Content Manager to use this functionality.
Setup
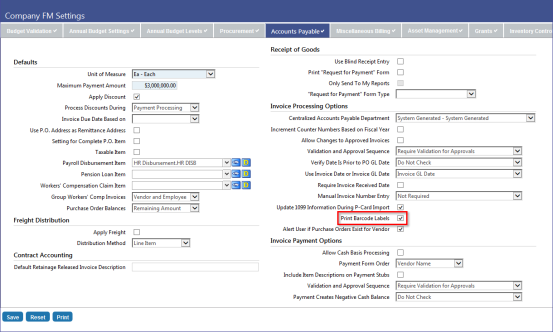
Maintenance > Financial Management > Company FM Settings > Accounts Payable
To enable barcode label printing in Accounts Payable, the feature must be turned on in Company FM Settings. This is done by opening the Accounts Payable tab, selecting the Print Barcode Labels check box, and clicking Save. The feature is then enabled.
Note: The Print Barcode Labels check box is only visible if your organization is licensed for Content Manager.
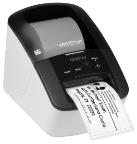
Equipment
With release 2017.1, New World ERP supports the Brother QL-700 Label Printer.
Accounts Payable
Financial Management > Accounts Payable > Invoice Entry Batches > New
If the Print Barcode Labels feature is enabled in Maintenance (see Setup above), then users entering vendor invoices in Accounts Payable will be able to print barcode labels.
As in Company FM Settings, the Print Barcode Labels check box has also been added to the following Invoice Batch entry pages: General, Quick Invoice Entry, Temporary Vendor Invoice Entry, Sales Tax Invoice Entry, Select Purchase Order, and Select Shipper pages. This allows users to control the printing of barcode labels at the invoice batch level. Selecting or clearing the Print Barcode Labels check box in the Invoice Defaults section of the General page determines the defaulting of the flag in all of the various entry pages in the invoice batch. All of the fields are still available and users can specify which invoices require labels.
Note: Changing the Print Barcode Labels setting at the invoice batch level does not affect the global Print Barcode Labels setting; nor will it affect other invoice batches. If the feature is turned on in Maintenance, the Print Barcode Labels check box will always default to the selected setting for NEW invoice batches.
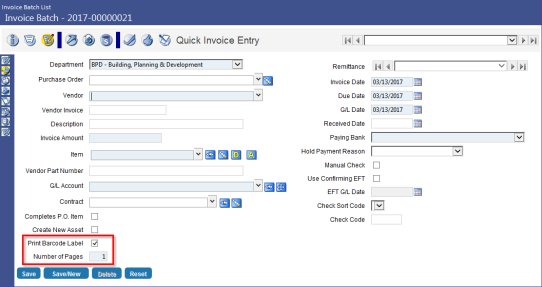
As an example, the screen shot below shows the Print Barcode Labels check box in the General page of an Invoice Batch.
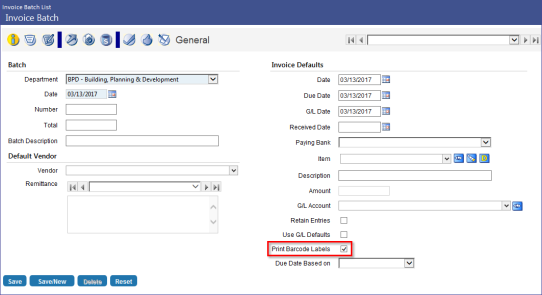
And below in the Quick Invoice Entry page. Notice that in the entry pages, below the Print Barcode Label check box, there is a field labeled Number of Pages. Content Manager requires that you provide the number of invoice pages that will be scanned into the system. Enter that number in this field.
Printing the bar code labels
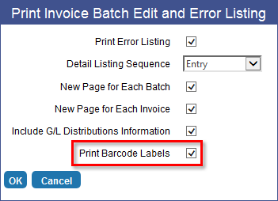
There are two ways to print barcode labels. If a user is within a batch, they can select the Print Edit and Error Listing  option to display the Print Invoice Batch Edit and Error Listing pop-up window (shown below). This window now includes the new Print Barcode Labels check box. This check box will always default to cleared; users must select the check box to print the labels. This prevents users from unintentionally printing the labels.
If this check box is selected, labels will print when the user selects OK.
The second way to print barcode labels is through the Invoice Batch List page.
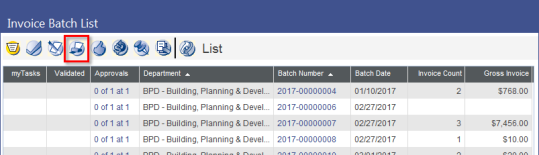
The Print Barcode Labels  workflow button has been added to this page.
Note: The Print Barcode Labels button only displays if Print Barcode Labels is enabled in Maintenance (see Setup above).
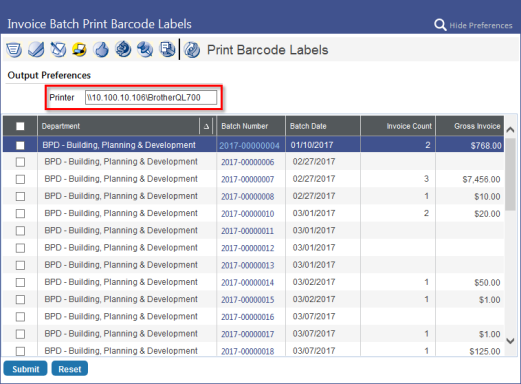
Clicking this button opens the Invoice Batch Print Barcode Labels window (shown below). Users can select the check box(es) associated with the batch number(s) for which they would like to print barcode labels and then click Submit. Labels will then print at the printer identified in the Printer field in Output Preferences (you may need to select Show Preferences to display).
Note: The barcode printer location must be entered in the Printer field in Output Preference prior to printing barcode labels via the Invoice Batch Print Barcode Labels window. Once the printer location is defined, it will be retained for future use; it will not have to be reentered.
When barcode labels print, users will be able to read the following information on the labels:
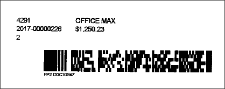
- Vendor number
- Vendor name
- Invoice number
- Invoice net amount
- Total number of invoice pages
Labels can then be attached to the physical invoices and scanned to transfer the invoice information to Content Manager.
Forms
Forms management software, ideal for creating or converting your paper forms to electronic format, has been integrated with New World ERP to create an automated, versatile, on-demand paperless environment.
This integration gives you the flexibility and control to determine where, how and in what order you print your purchase orders, invoices, checks and more.
If you also are using our Content Manager integration, individual PDFs are created for all form types and linked to the associated entity; for example, PDFs are created for paychecks and linked to the associated employee records.
Forms setup and configuration
The following technical specifications must be met for check printing with Forms:
- HP Brand Black/White Laser Jet Networked Printer with Static IP Address
- High Speed USB Port
- HP PCL 5e/6 Personality or Language Installed
- Automatic Duplexing Included and Enabled
- Minimum Memory 1024MB
- Minimum 80 Internal TrueType Scalable Fonts (80 HP Font Set)
- Minimum 2 Full Input Trays (Manual Feed Tray not usable)
- MICR toner cartridge
- Printers must have the latest firmware updates installed
Note: Printers that have been modified by a third party to include security features like an embedded signature system and MICR fonts will interfere with the Forms security features. They cannot be used to print checks with Forms.
The following technical specifications must be met for all other form (not check) printing with the Forms.
- Network Laser Jet Printer with Static IP Address
- PCL 5e/6 Personality or Language Installed
- Automatic Duplexing Included and Enabled*
- Minimum Memory 1024MB
- Minimum 80 Internal TrueType Scalable Fonts
- Minimum 2 Full Input Trays (Manual Feed Tray not usable)
- Accommodates Letter and Legal-Size Paper Stock
-
Printers must have the latest firmware updates installed
*Please note that for some non-check form designs you will need to have a duplexing capability.
Note: Our solution is designed for and guaranteed to work with HP black and white laser jet printers meeting the minimum requirements. For non-check forms we will make every effort to print to other networked printers that meet the technical requirements outlined above. While we routinely and successfully print other forms to many brands of laser printers, if we are unable to print to a printer on your site, you will be required to provide an alternate printer.
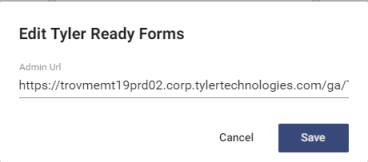
To set up and configure Forms, navigate to the Management Console at https://APPLICATIONSERVERHOSTHEADERMAPPING/managementconsole#/Base where the APPLICATIONSERVERHOSTHEADERMAPPING piece of the URL is replaced by your specific value. Only users that are part of the ManagementConsoleGroup_INSTANCENAME security group on the Application Server will have rights to this site. On this page there is a Forms card.
- Click the gear on the card to configure the URL for Forms.
-
The URL is the machine name that is hosting Forms, followed by the IIS application name. Make sure to include a forward slash (/) at the end of the URL. Example URL = https://HOSTHEADERMAPPING/ENVIRONMENTNAME/readyforms/administration/
Note: After changing the URL in the Management Console, the Forms URL needs to be changed in Tyler Deploy as well. If it is not changed, the next deployment of the Management Console will overwrite the configuration value. The Forms URL variable can be found in the advanced variables for the New World ERP deployment. Please note that the URL here is slightly different from the Management Console URL as the Deploy URL would access the API itself and the Management Console’s URL navigates to the Forms administration site. An example URL would be: https://HOSTHEADERMAPPING/ENVIRONMENTNAME/readyforms/api.

- On your application server box, start the windows service named {Instance Name} – New World ERP Tyler Forms Engine.
-
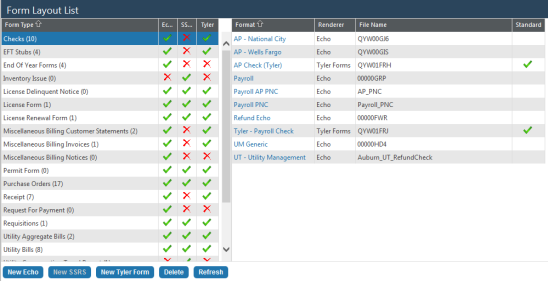
Navigate to Maintenance > New World ERP Suite > System > Form Layout:
-
To set up a Tyler form, select the form from the list, and click the New Tyler Form button. The Tyler Form Entry page for the selected form will open:
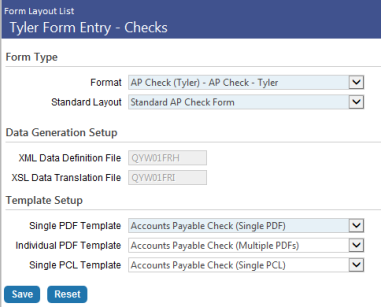
- Select the Format.
-
Select the Standard Layout. (Available for check type only.)
For each selection in steps 8 through 10, New World ERP will query the Forms software for available templates. A standard New World ERP template will be loaded for you already. If you have custom forms built, you will see those, also.
- Select a Single PDF Template. This template is used to generate the PDF file that will be sent to myReports.
- Select an Individual PDF Template. This template is used to generate individual PDF files that will be uploaded to Content Manager and attached as associated documents to entities in New World ERP; for example, when payroll check forms are printed, a PDF will be generated for each check in the batch, uploaded to Content Manager and attached as a document to the appropriate employee record in New World ERP. Note: This selection is available only if you are configured for Content Manager.
- Select a Single PCL Template. This template is used to generate the file that will be sent to the printer when the file created in step 8 above is printed. The purpose of this template is to handle special printing considerations, such as separate trays and overflow. Typically, this selection is relevant for check type only.
- Click Save.