SQL Database Backup and Restore
The following information provides general guidance regarding SQL database backups and restores. If you are unfamiliar with SQL server and are unsure performing these steps, it is recommended that you contact an IT resource that is familiar with database server administration. WARNING: Performing a database restore incorrectly can cause permanent and irrevocable loss of data in your New World ERP database.
Note: It is not recommended to copy the live configuration database (new in 2019.1) over the top of the test configuration database. One configuration database can actually serve both the live and test ERP databases. If you find a need to copy the live configuration database over the top of the test configuration database, please communicate with the NWERP support team first.
Database Backup:
-
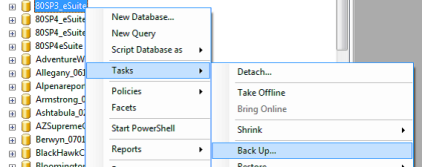
In SQL Management Studio right click on the database that needs to be backed up. Go to Tasks > Backup.Note: There is no need to stop the application while performing a backup of a database.
-
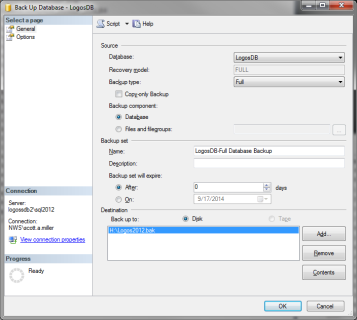
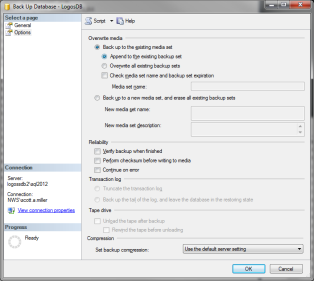
Use the default settings as shown below. If there is a file in the destination portion remove it and click Add. Then click OK.
-
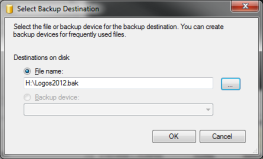
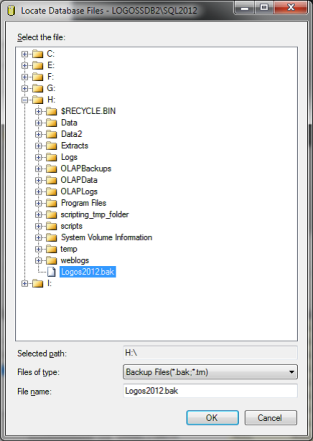
Next, specify the database backup file. Click on the ... button to access the Windows explorer screen.
-
From this screen choose the destination for the backup file and name it. (The file name needs to use underscores instead of spaces. Follow the name with a .bak extension.) Then choose the location, name the file and click OK twice.
-
Select the Options page and make sure the defaults below are in place and click OK.
-
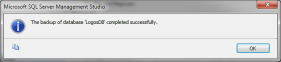
When the backup is complete, the following notification will be displayed. This completes the backup process.
Database Restore:
WARNING: Performing a database restore incorrectly or without an adequate backup can cause permanent and irrevocable loss of data in your new world ERP database.
- Stop all new world services on the TEST application server. From an elevated command prompt, perform an IIS reset. In version 2019.1, you can go to the NWERP Management Console (https://APPSERVERHOSTHEADERMAPPING/managementconsole#/Base). Only users with security access in the ManagementConsoleGroup_INSTANCENAME security group on the application server will be able to access this site.
- To stop all services, click on the vertical ellipsis on the New World ERP card and choose View Status.

-
From this page, ERPservices can all be controlled separately or altogether with one click of a mouse. The master status button at the top will either stop or start all ERP services at one time. Please note that all users will be kicked out of the software when you stop all services.
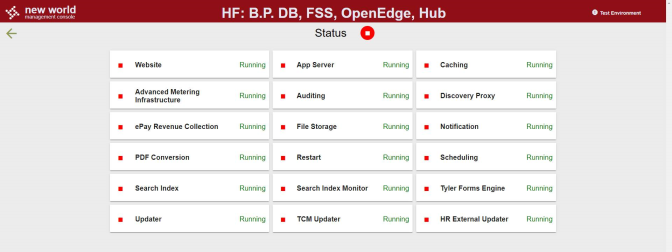
Note: This page now can stop the New World ERP website and eSuite Services that may hold a lock to the database. A new Website card has been added to stop the proper application pools in IIS.
- In the past, it was required to navigate to IIS and stop the Default Website (described in Appendix A). With the advent of the new Website card (shown in the prior step), this step should not be required. It is still documented in Appendix A in the event that it is needed on your server.
-
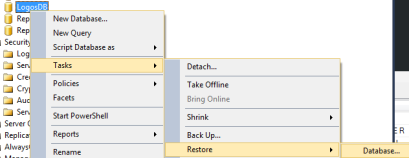
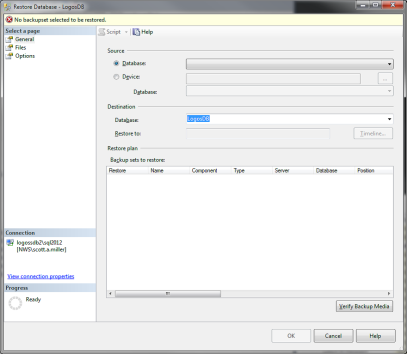
The next step is to restore the database to test. In SQL Management Studio, right click on the database to be restored. Go to Tasks > Restore > Database. The To Database field will be automatically filled. Choose to restore From device and click the ... button.
-
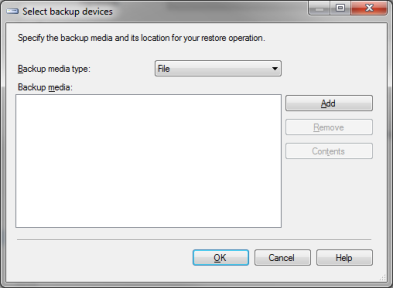
In the Source field select Device from the drop-down then click ‘…’ on the right.
-
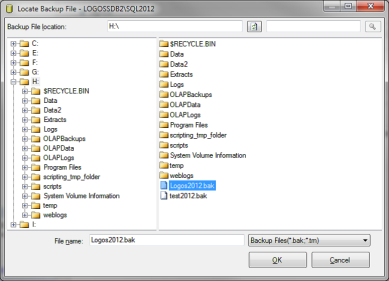
This will bring up a Windows explorer menu. Navigate to the backup file that needs to be restored and click OK twice.
-
Next, click the Options tab.
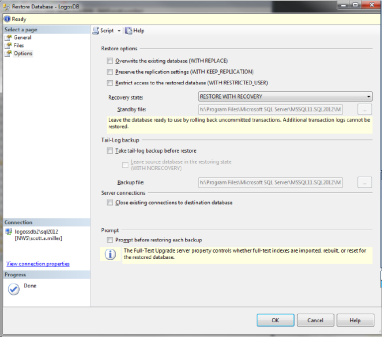
- Under the Restore options section, Select Overwrite the existing database (WITH REPLACE).
- In the Recovery state, select the RESTORE WITH RECOVERY options.
- Uncheck Take tail-log backup before restore
- Next click on Files. Be sure to choose the correct restore as .mdf and .log destinations.
- Click OK to start the process.
- Go back to the General tab and make sure the Destination Database is the one you want to restore. This often changes on SQL 2012 and higher to the source database name.
- After you restore the database, restart the services on the Test or Application server, which was stopped earlier in the instructions. You will also need to restart the Default Web Site in IIS.
- After the restore is complete, you can run the Database Upgrade Tool as described in the Cross Version Upgrades document to update the eSuite (if applicable) and ERP database up to the proper version on the test side. This is important as the Application Server could be patched higher than the database if this step is not done.
-
After copying the production database to a test side, it is recommended to synchronize the Tyler Identity IDs between the two instances. The process is documented in Appendix B.
Appendix A
Exclusive access could not be obtained because the database is in use
If you continue to receive a message that the system is failing to restore because the database is in use, perform the following steps:
1. Open IIS Manager (Start > Administrative Tools > Internet Information Services (IIS) Manager) and expand the server name > sites > right click on Default Web Site > Manage Web Site > Stop.
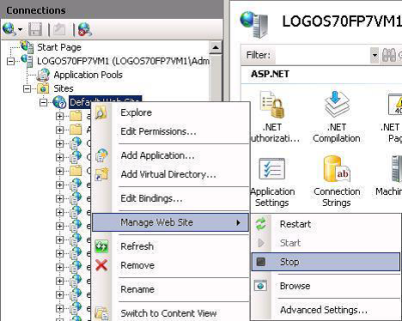
(After successfully restoring, be sure to come back in and start the Default Web Site again.)
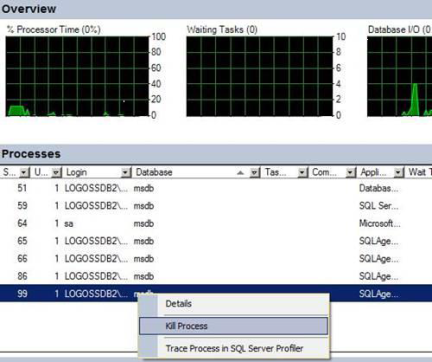
2. If you are still experiencing an issue, open the Activity Monitor in SQL Management Studio.

Expand Processes and click the arrow next to the Database header to sort by the database you are trying to restore to. If you see any open processes here, right click them and select Kill Process.
If you are unable to kill all processes or are still having any issues restoring your database, reboot or shut down the test app server. Restore the database while it is rebooting or off.
Appendix B
Synchronizing Live and Test Tyler Identity
- After the database has been restored, the Tyler Identity IDs in the database should be synched for best results in test. The Tyler Identity ID is now kept in the SecurityUser table of the New World ERP database. At times, the mapping of Tyler Identity IDs between live and test may drift and a utility is present to get these back into synchronization.
-
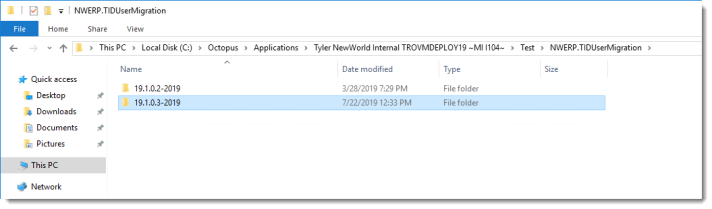
On the server where Tyler Identity was installed, navigate to {Tentacle Install Drive}\Octopus\Applications\{Tenant Name}\{Environment Name}\NWERP.TIDUserMigration. In this directory, you may see several versions. Choose the newest version on your server.
-
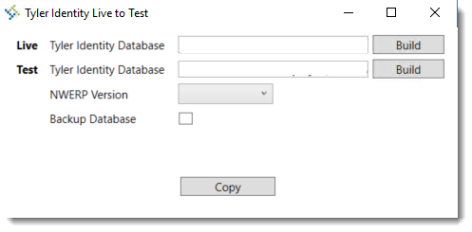
Open up the TylerIdentityLiveToTest.exe program. A screen like the below will appear.
-
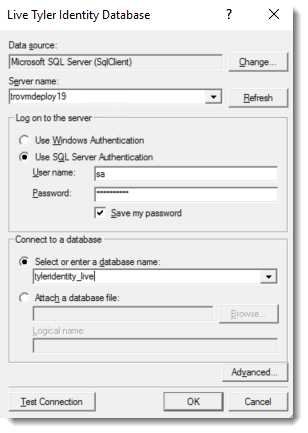
Click Build next to the Live Tyler Identity Database line. Build a connection to your live Tyler Identity database. Utilize the Test Connection button to ensure the connection is functional to the database. Click OK. Follow the same process to create a connection to the test Tyler Identity database.
-
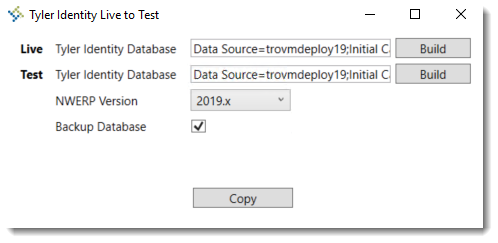
After populating the database strings, choose your New World ERP version, most likely 2019.x. The Backup Database check box will backup the test Tyler Identity database to the default database backup location on the SQL server. It is recommended to use this check box.
-
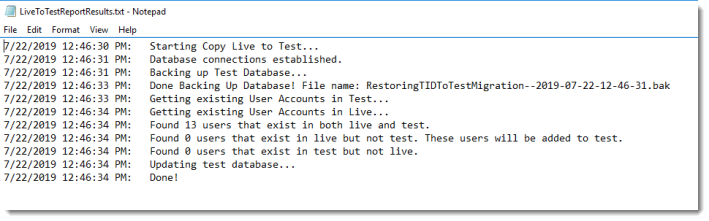
Click Copy. A log will generate after running the utility explaining the results.