2024 Financial Management 1099 Year-End Processing Guide
Using the Guide
The 2024 Financial Management Year-End Processing Guide provides you with a workflow-based approach to year-end processing. The steps outlined in this training manual are designed to assist with the processing of vendor 1099s in New World ERP®.
Vendor 1099 processing for Tax Year 2024 is available with release 2024.1.10.
New in Tax Year 2024
Following is an overview of what has been added or changed since the 2023 year-end:
1099 Transmittal File
- Combined Federal/State Filing (CF/SF) Program: The IRS has added Rhode Island to the list of participating states.
- A File Type dropdown has been added to allow users to select the following file types:
FIRE - Filing Information Returns Electronically
Financial Management > Year-End Processing > Vendor 1099 Processing > 1099 Transmittal
The processing of this file type remains unchanged in 2024.
IRIS - Information Returns Intake System
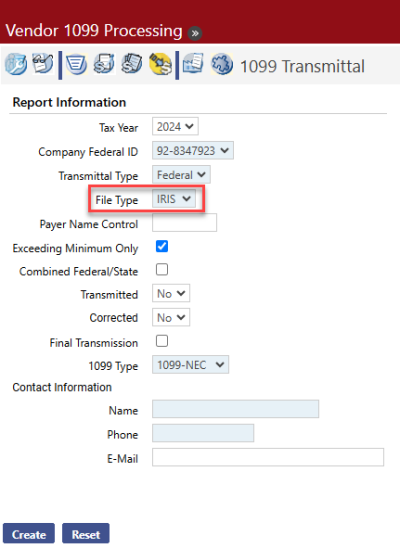
Selecting this option removes the Transmitter Control Code (TCC) field, since you will upload this file from the site and already will be signed in with your TCC.
This option also removes the 1099 Types list boxes and adds a 1099 Type dropdown. Since the IRIS export file is formatted as a CSV, and each 1099 type has a separate file layout, 1099 types must be run one at a time. Also, according to IRS requirements, the maximum number of 1099 records per file is 100, so a separate file is created in myReports for every 100 records:

Note: To avoid having to upload multiple files and perform additional setup, New World recommends using FIRE for the 2024 tax season.
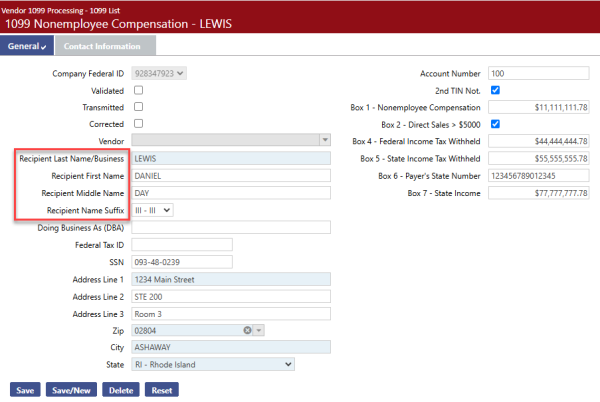
1099 Entry Pages
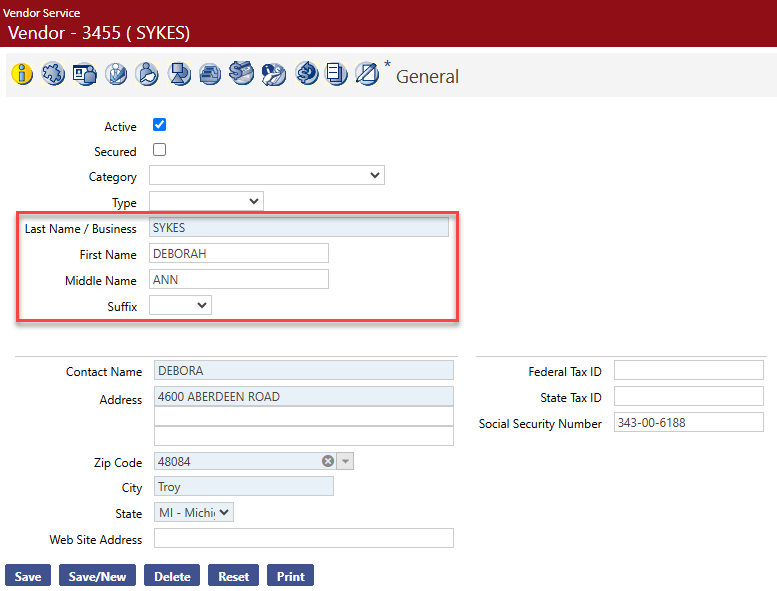
To accommodate IRIS reporting requirements, Recipient/Transferor name has been separated into the following fields:
- Last Name/Business
- First Name
- Middle Name
-
Suffix
Financial Management > Year-End Processing > Vendor 1099 Processing > 1099 List > Search > Recipient Name
If you are using IRIS, make sure to update the 1099 name fields on the Vendor-Miscellaneous page:
Maintenance > new world ERP Suite > Procurement > Vendor Service > Vendor > Edit > Miscellaneous
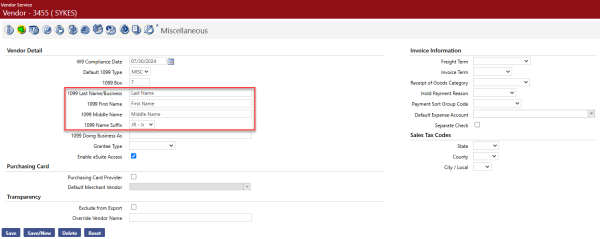
Entries in these fields default in the recipient name fields when you create 1099 data.
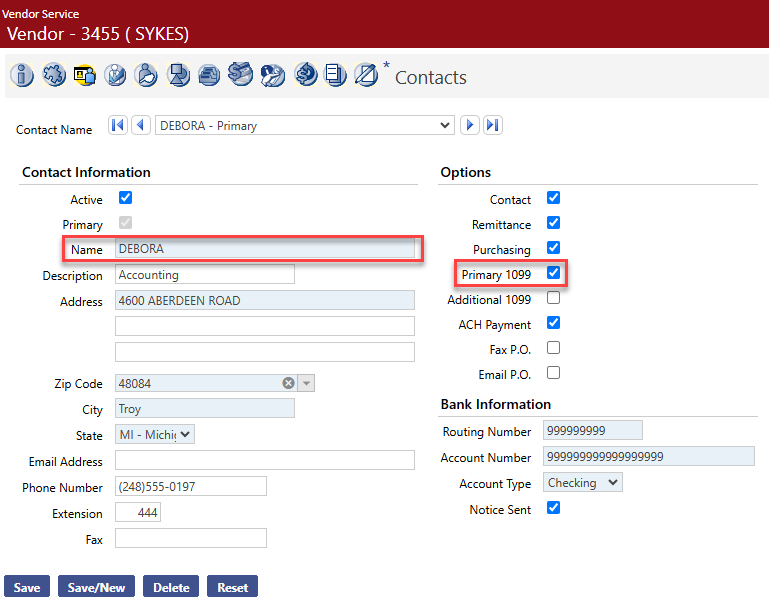
If these fields do not contain entries, the Name field on the Vendor-Contacts page is used if Primary 1099 is checked:
Maintenance > new world ERP Suite > Procurement > Vendor Service > Vendor > Edit > Contacts

If the 1099 name fields on the Vendor-Miscellaneous page do not contain entries and Primary 1099 is not checked on the Vendor-Contacts page, the name fields on the Vendor-General page are used:
Maintenance > new world ERP Suite > Procurement > Vendor Service > Vendor > Edit > General
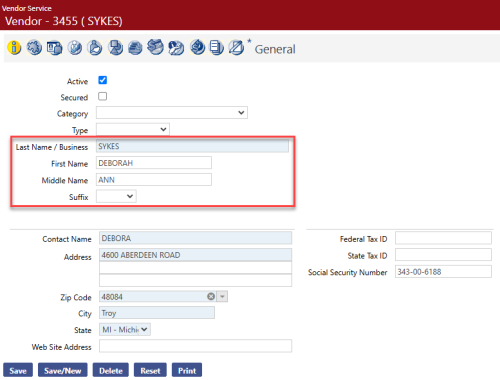
If you are using IRIS reporting, New World recommends making sure the 1099 name fields on the Vendor-Miscellaneous page contain entries.
Also updated with the new vendor name fields are the Vendor Listing and Vendor Data Sheet in Vendor Service, the Vendor Detail section on the Miscellaneous tab in Vendor Inquiry and the Vendor Change Request Entry-Miscellaneous page in Procurement.


1099-S Entry Page
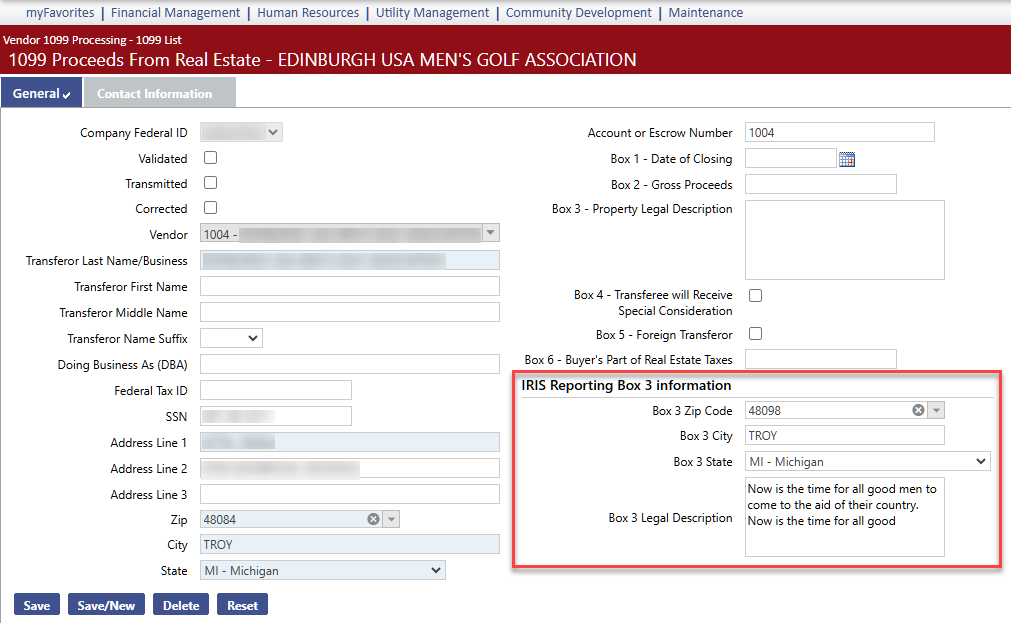
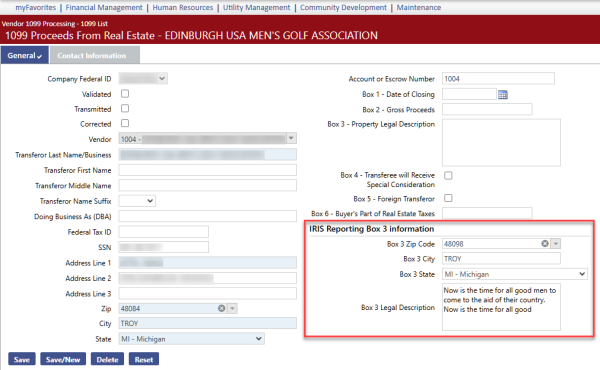
A new section, IRIS Reporting Box 3 Information, has been added to the Form 1099-S Entry page to accommodate IRIS transmittal file Box 3 reporting requirements. The section contains fields for Box 3 zip, city, state and legal description.
Financial Management > Year-End Processing > Vendor 1099 Processing > 1099 List > 1099 Type=1099-S > Search > Transferor Name
1099 Audit Report
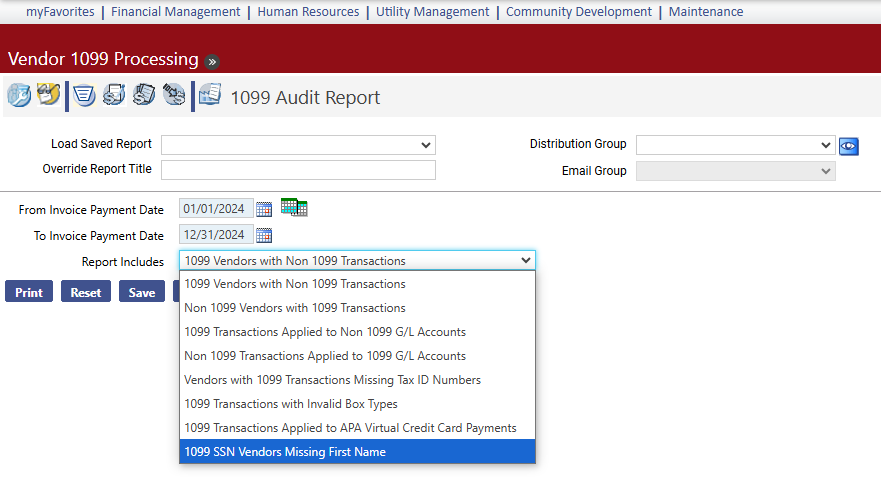
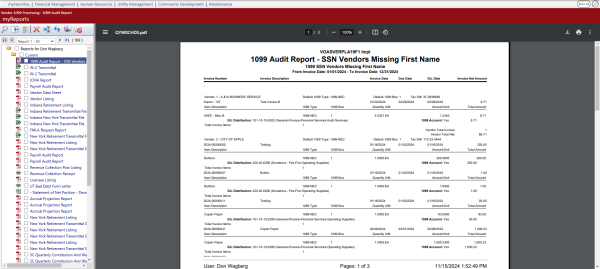
The 1099 SSN Vendors Missing First Name report has been added to assist users with identifying 1099 vendors on the Vendor Service page with a social security number but nothing entered in the First Name and 1099 First Name fields. This requirement is for IRIS reporting only:
Financial Management > Year-End Processing > Vendor 1099 Processing > 1099 Audit Report
The report contains vendors who meet the following criteria:
- The vendor is flagged as a 1099 vendor.
- 1099 Transactions exist for the vendor within the date range specified on the selection criteria.
- The social security number (SSN) field is populated on the vendor service page.
- An active vendor contact exists where the Primary 1099 option is checked, but the 1099 First Name field is blank.
- The First Name field on the General page is blank, the 1099 First Name is blank, and there are no active vendor contacts where the Primary 1099 option is checked.
1099 Country Mapping
-
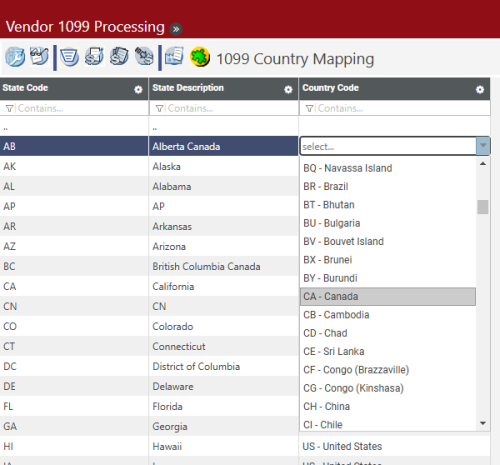
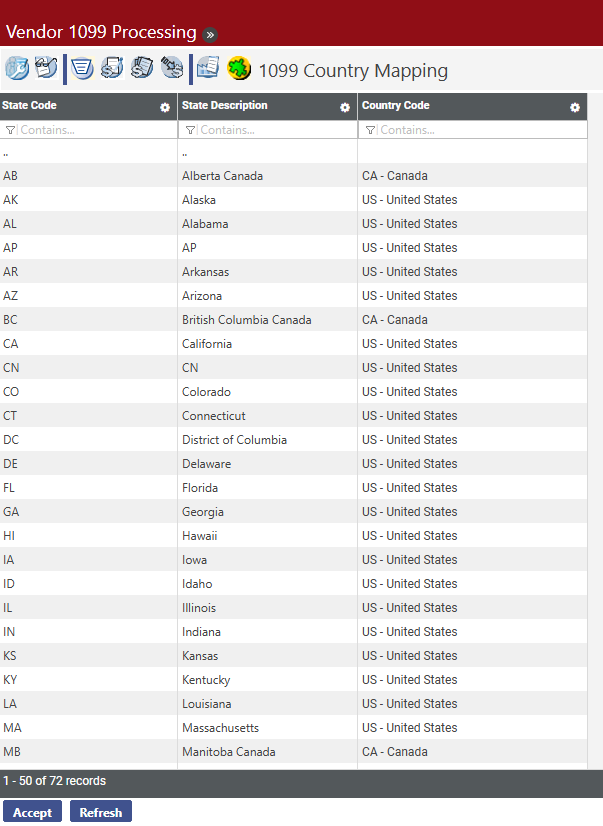
This page has been added to the 1099 Processing workflow to allow users to map country codes to state codes. The country code is a requirement for IRIS reporting only.
Financial Management > Year-End Processing > Vendor 1099 Processing > 1099 Country Mapping

Codes in the Country Code column default as blank and need to be entered. To speed up entry, the column lets you <Tab> from one code to the next. Make sure to complete these entries before creating the IRIS transmittal file.
All codes on the dropdown come from validation set 381, Country, which comes pre-loaded:
-
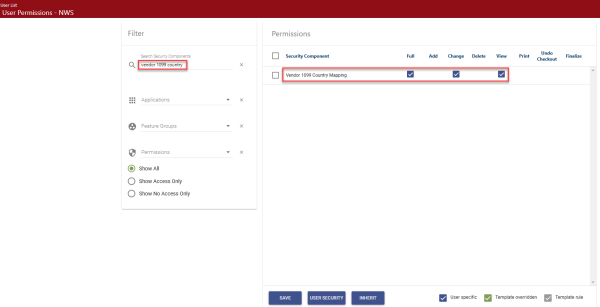
To have access to the 1099 Country mapping page, users must be authorized to the Vendor 1099 Country Mapping security component:
Maintenance > new world ERP Suite > Users > User Name > Permissions:


Year-Round Maintenance
Vendor Invoice Maintenance and 1099 Audit Reports are two functions of the Vendor 1099 Processing workflow that are intended to be used year-round to monitor 1099 vendors and transactions.
Vendor Invoice Maintenance
Financial Management > Year-End Processing > Vendor 1099 Processing
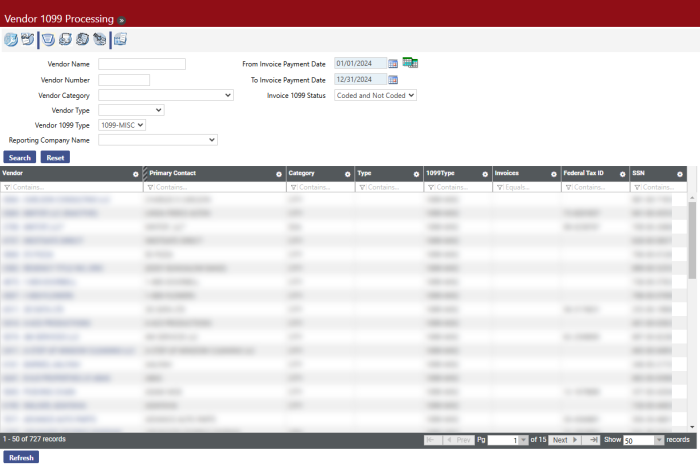
The Vendor Invoice Maintenance page allows you to search for a vendor and make corrections to the vendor record or vendor invoices as a result of the information returned on the 1099 Audit Reports. When you select this option, you will see a screen like the following:
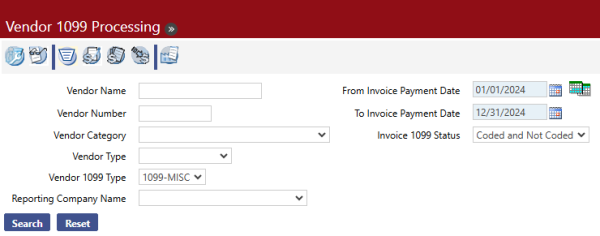
The fields on the left side of the screen are the vendor search fields, and the fields on the right side are the invoice search fields to locate invoices for the selected vendors.
- To search for a specific vendor or vendors, enter one or more of the following: Vendor Name, Vendor Number, Vendor Category, Vendor Type, or Vendor 1099 Type. These fields are optional. If left blank, all vendors will be returned.
- Specify the invoice related search criteria. The Invoice Payment Date range defaults to the current year. A date range is required. The Invoice 1099 Status options are Coded, Not Coded, and Coded and Not Coded as 1099 invoices.
-
Click Search. You will see a page like the following:
-
Values in the Vendor column are hyperlinks; clicking one takes you to the General page of the selected vendor:
Note: If, based on the search criteria, a vendor’s invoices are returned but the vendor is not, there will be no results displayed for that vendor. If, based on the search criteria, a vendor is returned but not their invoices, the vendor will display in the results, but the Invoices column will be empty.
-
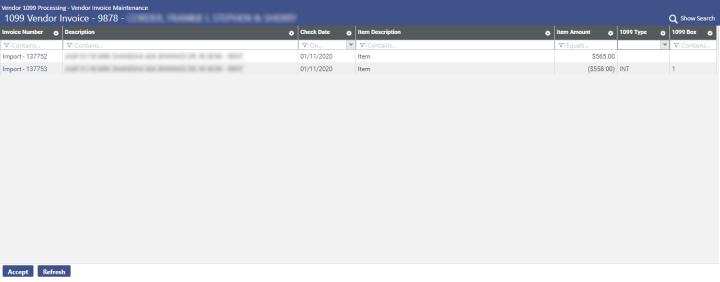
Values in the Invoices column of the Vendor 1099 Processing page are also hyperlinks. Clicking one will take you to the 1099 Vendor Invoice page as shown below.
The grid displays both invoice and general invoice item information together in the same row.

-
The invoice numbers listed in the Invoice Number column are hyperlinks. When an invoice number is clicked, the Accounts Payable Invoice pop-up window will open, displaying the relevant invoice information.
_816x124.png)
-
Hovering over the Item Description value will display the invoice item’s detail including Invoice Number, Item Description, Item Quantity, Unit of Measure, Unit Price, and Item Amount.
_816x223.png)
-
The 1099 Type and 1099 Box fields are editable directly within the Vendor Invoice grid. Double-clicking one of these fields puts the cursor focus within the field, allowing you to change the value. In this way, you can edit multiple different invoice items without leaving the Vendor Invoice page.
_816x167.png)
- After changes are made, click the Accept button at the bottom of the page to save your work.
-
1099 Audit Report
Financial Management > Year-End Processing > Vendor 1099 Processing
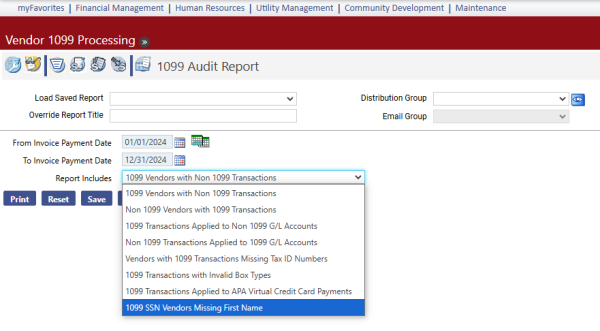
The 1099 Audit Report shows any issues with the 1099 data that was created. If this report is run throughout the year, the changes necessary can be made when they are discovered rather than performing this task at year-end processing time. When you select the 1099 Audit Report button , you will see a screen like the following:
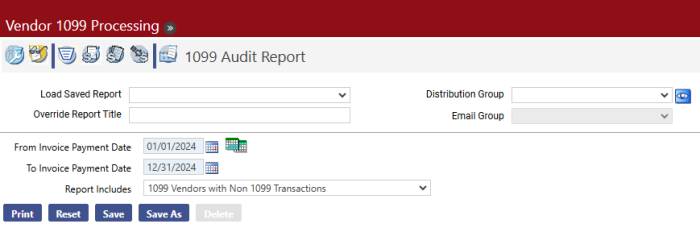
- Select the From Invoice Payment Date. This date is required. The first day of the current tax year is the default value.
- Select the To Invoice Payment Date. This date is required. The last day of the current tax year is the default value.
- Select the Report Includes value. This determines which type of audit report will be produced. The options are as follows:
- 1099 Vendors with Non-1099 Transactions
- Non-1099 Vendors with 1099 Transactions
- 1099 Transactions Applied to Non-1099 G/L Accounts
- Non-1099 Transactions Applied to 1099 G/L Accounts
- Vendors with 1099 Transactions Missing Tax ID Numbers
- 1099 Transactions with Invalid Box Types
- 1099 Transactions Applied to APA Virtual Credit Card Payments
- 1099 SSN Vendors Missing First Name (IRIS reporting only)
- Click Print to run the 1099 Audit Report.
-
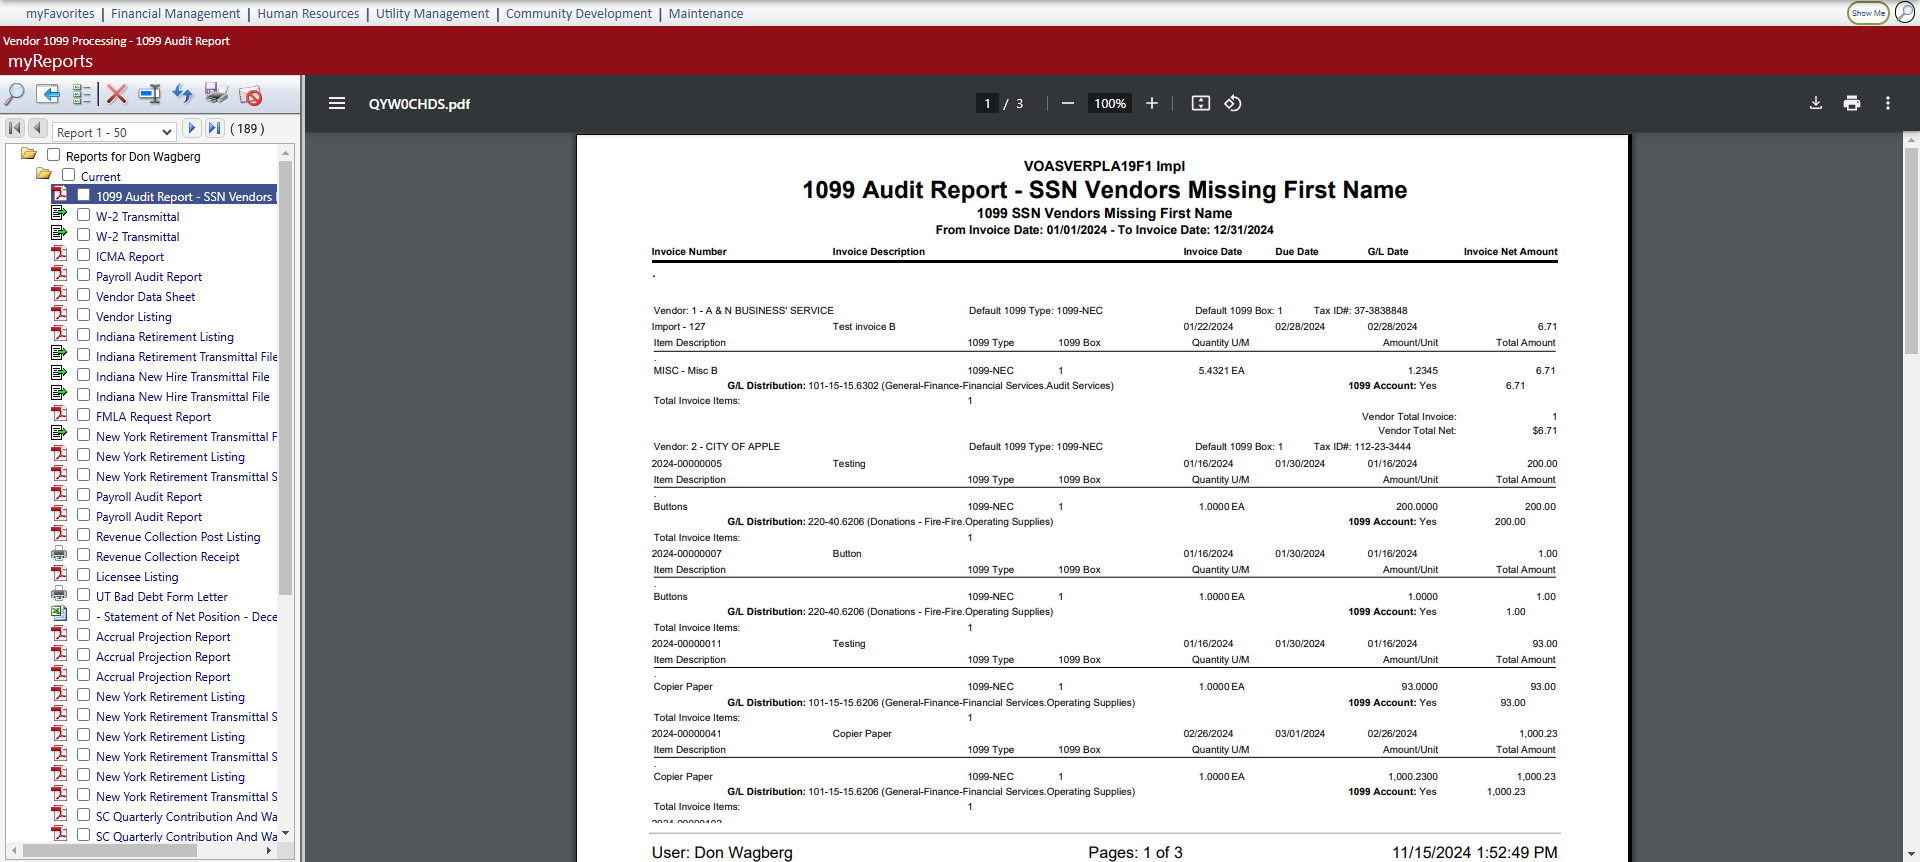
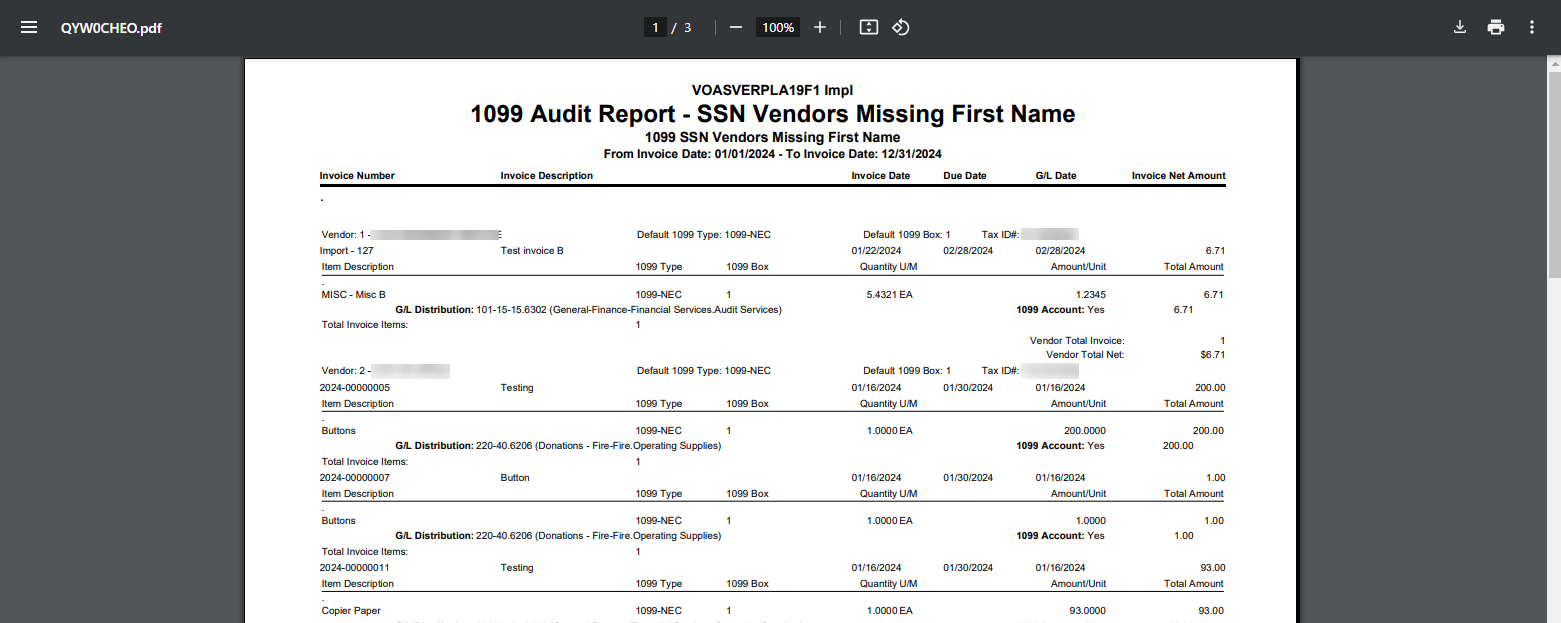
If you want to save the report criteria, click Save and provide a name for the report. Then click Print. The 1099 Audit Report is sent to myReports. The output resembles the following:

In each case, the report displays the Invoice Number, Invoice Description, Invoice Date, Due Date, G/L Date, and Invoice Net Amount. For each invoice item for the vendor, it displays the Item Description, 1099 Type, 1099 Box, Quantity, Unit of Measure (U/M), the Amount per Unit, and the Total Amount. It also displays the invoice count and net total for each vendor, as well as a total count and total net amount for all the vendors on the report.
Accounts Payable 1099 Activity Report
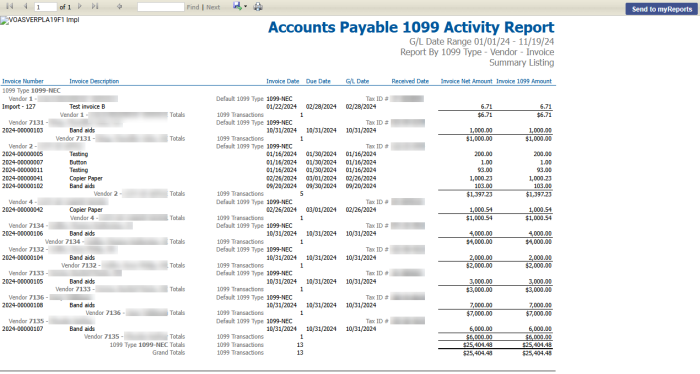
The Accounts Payable 1099 Activity Report is useful for mid-year reporting on 1099s. When you go to Financial Management > Reports > Accounts Payable > Accounts Payable 1099 Activity Report, you will see a screen like the following:
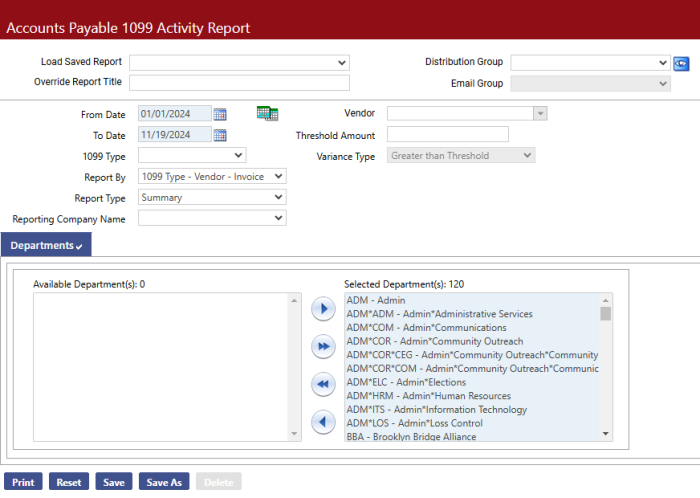
Where the 1099 Audit Report is designed to show only errors that will affect 1099 processing, this report shows all 1099 activity for the date range defined.
- Enter a valid date range in From Date and To Date. The From Date and To Date fields are required. The current tax year is the default range.
- Select the 1099 Type for which you want the report to be run. This field is blank by default. If it is left blank, the report will run for all 1099 types.
- Select a Report By value. This determines the hierarchy for presenting the information in the report output. The default value is Vendor - 1099 Type - Invoice. The other option is 1099 Type - Vendor - Invoice.
- Select the Report Type value. The default value is Summary. Other options are Detail and Detail with G/L Distribution.
- Select a Vendor if you want to run the report for a specific vendor. If you leave this field blank, a list is returned with all vendors that meet the other criteria selected.
- Enter a Threshold Amount, if desired. This field is blank by default. If it is left blank, no threshold is used. Acceptable values range from $0.00 to $999,999,999.99.
- If a Threshold Amount is entered, the Variance Type field is enabled. The options are Greater than Threshold and Less than Threshold. Greater than Threshold is the default value.
- Select the Departments that should be included on the report. At least one department is required.
-
Click Print to submit the report. The report output will resemble the following:
Year-End 1099 Processing
Before beginning year-end processing, you must first set up several different types of information, including
In addition, you must ensure your daily processing is already set up to record 1099 information throughout the year. See Daily Processing.
Setting up Defaults
Maintenance > New World ERP Suite > System > Company Suite Settings
The Vendor 1099 Processing section on the Vendor/Items tab in Company Suite Settings gives you the option to define a default 1099 year, company federal tax ID, and 1099 type form to display on all 1099 processing pages in New World ERP where applicable.
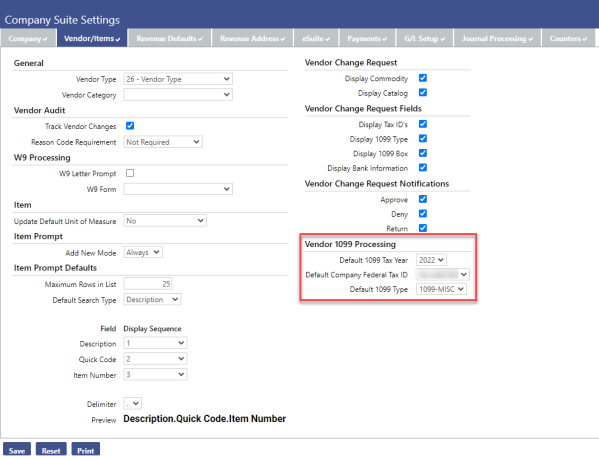
The default values that are available for you to select depend on the company information data entered on the 1099 Company List page for the corresponding year. See Setting Up Your Company Information.
Note: The default calendar year date range displays as the first and last date of the year for the default tax year you select (e.g., 2024= 01/01/2024– 12/31/2024).
Setting Up Your Company Information
Financial Management > Year-End Processing > Vendor 1099 Processing
Prior to beginning your 1099 Processing, your organization must first set up the Payer Company Information for the applicable tax year. What you need to do will vary based on whether this is your first year processing 1099s in New World ERP.
First Year Setup
If this is the first year you are processing Form 1099s on the New World ERP system, you need to define your Payer Company Information for each organization processing 1099s. To set this up, follow the steps below:
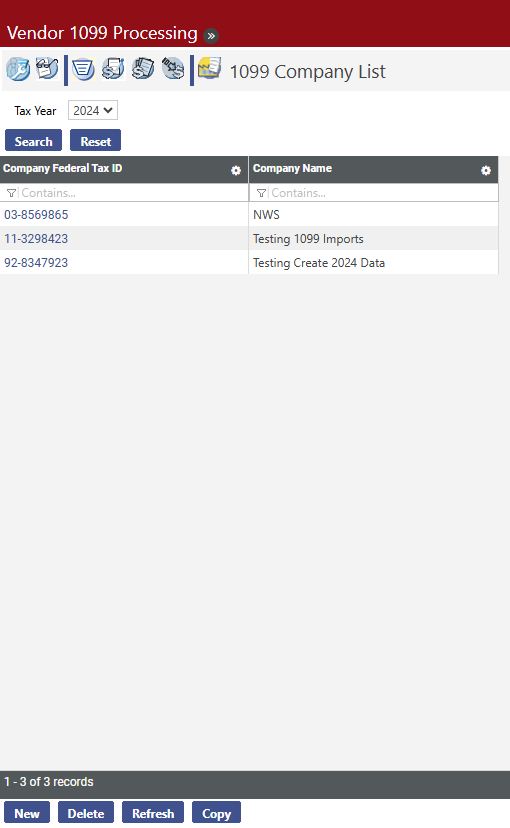
- Select the 1099 Company List icon to display the 1099 Company List.
- Select the tax year you would like to process 1099s for in the Tax Year drop-down list; the default value is determined by the Default 1099 Tax Year value on the Vendor/Items tab on the Company Suite Settings page.
- Click Search.
-
Verify that the 1099 Company List for that year is blank:
-
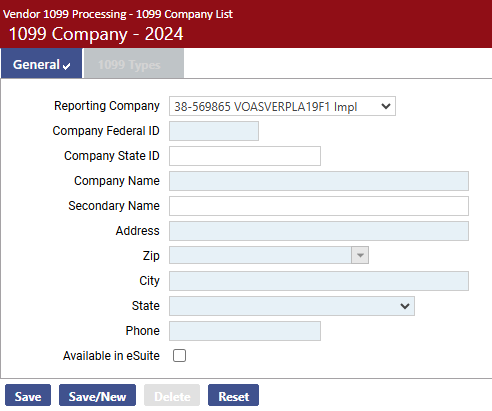
Click New. You will see a screen like the following:
-
Enter the following information:
- Company Federal ID. This is your organization's Federal Tax ID, which will print in the Payer's federal identification number field on the 1099 forms. This value contains nine characters.
- Company State ID. When populated, the ID will automatically default into the 1099 MISC Box 17 - Payer's State Number field.
- Company Name, Secondary Name, Address, Zip, City, State, and Phone. This information will print as the Payer's name and address information located in the upper left corner of the 1099 form. The Secondary Name is optional; all other information is required.
-
Select the Available in eSuite check box to make the 1099 forms available for viewing and printing in the eSuite eSupplier module.
Note: This box should only be checked after you have finalized your 1099 data.
-
Select the Interfaced to ReadyForms check box if the company is interfaced to and using ReadyForms.
Note: This check box is visible only if your organization is licensed to Tyler ReadyForms and the appropriate URL is defined in System Settings.
Wherever form types are defined in the software, the available options will include only the appropriate ReadyForms, i.e., 2020 1099-MISC ReadyForm Standard and 2020 1099-MISC ReadyForm Z-Fold.
- Click Save.
-
Click the 1099 Types tab. You will see the following screen:
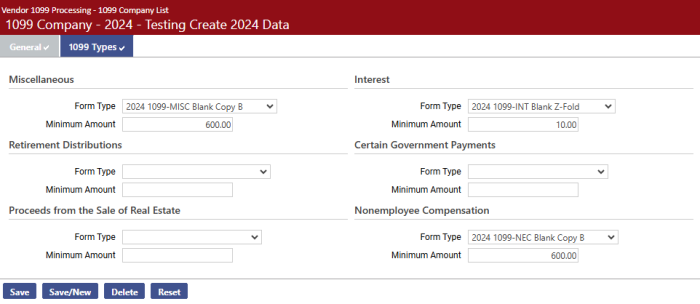
- For each 1099 type supported (MISC, INT, R, S, G, and NEC) you can select the Form Type you plan to use for printing. This form type will default when selecting the corresponding 1099 type when printing 1099 forms.
- In Minimum Amount, you can also enter the minimum dollar value for which a 1099 should be created. The acceptable range of values is $0.01 through $999,999,999.99. If this field is left blank, a 1099 will be generated for any amount paid to a 1099 vendor.
- Click Save to retain the values.
Subsequent Year Setup
If you have used Vendor 1099 Processing in previous years, the first step is to copy the Company Information from a previous year into the current year.
- Navigate to Financial Management > Year-End Processing > Vendor 1099 Processing.
- Click the last tab for 1099 Company List.
- Select the tax year in the Tax Year drop-down list for the most recent tax year when you processed 1099s on the system (i.e., 2020).
- Click Search. If more than one company is returned, highlight the applicable company.
- Click Copy and select the tax year for which you would like to process 1099s (i.e., 2024).
- Click OK. You return to the 1099 Company List page for the tax year selected.
Modify Company Information
After copying Company Information from the previous year, you may modify the information for the current year.
- Navigate to Maintenance > new world ERP > System > Company Suite Settings.
- Click Vendor/Item tab.
- On the 1099 Company List page, click the Company Federal Tax ID hyperlink for the company you need to modify.
- On the General tab, review the company information and verify that all name, address, and phone information is still pertinent and modify, if needed. You may also choose to select the Available in eSuite check box if you would like to make the 1099 forms available in the eSuite eSupplier module.
- On the 1099 Types tab, modify the Form Type and the Minimum Amount, if necessary.
- Click Save.
Creating 1099 Data
Financial Management > Year-End Processing > Vendor 1099 Processing
-
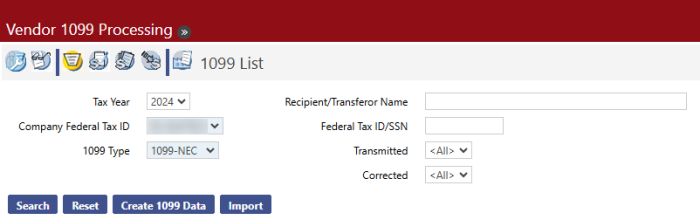
Select the 1099 List icon to display the 1099 List page. The current year will default in the Tax Year drop-down list.
-
Click Create 1099 Data. The Create 1099 Data dialog box appears:
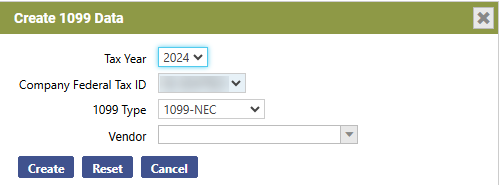
- The Tax Year and 1099 Type selected on the previous page are displayed as default values on this page.
- Select a Company Federal Tax ID from the drop-down list. Leave the Vendor field blank to create 1099s for all vendors.
- Click Create. If 1099 data already exists for the vendors, you will see the message “1099 Data exists for selected vendor(s). Overwrite this data?”
-
Click Cancel after the data is created successfully.
After you select a Tax Year, Company Federal ID and a 1099 Type, you can view existing 1099 data on the 1099 List page.
- Select the Tax Year. The default value is determined by the Default 1099 Tax Year value on the Vendor/Items tab on the Company Suite Settings page. 1099 data can also be viewed for previous tax years.
- Select the Company Federal Tax ID. This field is required. The company’s tax ID(s) populates this drop-down list.
- Select the 1099 Type. This field is required. The possible values are 1099-MISC, 1099-INT, 1099-R, 1099-S, and 1099-G.
- The Recipient/Transferor Name field allows you to search for a 1099 for a recipient who is not a vendor. The value can contain up to 192 characters.
- The Federal Tax ID/SSN field is another option that allows you to search for a 1099 for a recipient who is not a vendor. It can be used with the Recipient/Transferor Name field or by itself.
- The Transmittal field allows you to limit the search results based on the transmission status. Options include:
- All - If this option is selected, all returns matching all the user-defined search criteria will be included in the grid, regardless of their transmission status.
- Yes - If this option is selected, search results will be limited to information returns that have already been transmitted. Returns that have not been transmitted will not appear in the search results.
- No - If this option is selected, only those information returns that have not yet been transmitted will be included in the search results; previously transmitted information returns will not appear in the search results.
- The Corrected field allows users to limit search results based on whether or not the 1099 data contain corrections. Options include:
- All - If this option is selected, all returns matching the other user-defined search criteria will be included in the grid, whether they include corrections or not.
- Yes - If this option is selected, search results will be limited to information returns that include corrections. Returns that do not include corrections will not appear in the search results.
- No - If this option is selected, only those information returns that do not include corrections will be included in the search results; information returns with corrections will not appear in the search results.
-
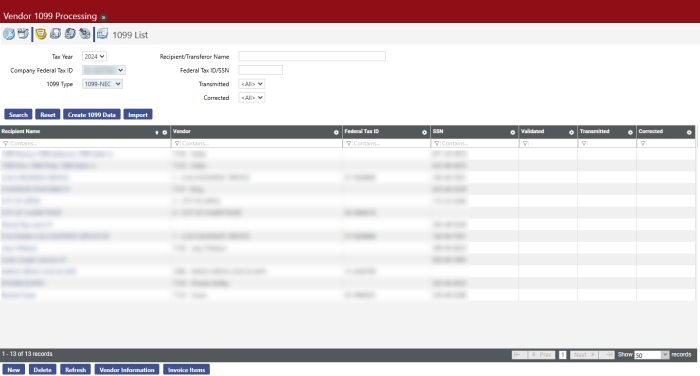
Click Search to return 1099 data created for the values you selected:
Importing Vendor 1099 Data
Setup — Permissions
Users with Add authority to the following security components will be able to import vendor data from a third-party system into the New World ERP software.
Use — Import
Clicking Import on the 1099 List page opens the following screen, which allows you to define the 1099 import batch:
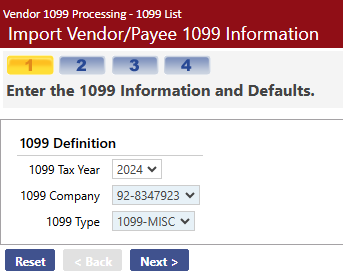
- Select the 1099 Tax Year. The default value is determined by the Default 1099 Tax Year value on the Vendor/Items tab on the Company Suite Settings page. 1099 data can be created for previous tax years.
- In the 1099 Company field, select the company’s federal tax ID. This field is required. The company’s tax ID(s) populates this drop-down list.
- Select the 1099 Type. This field is required. The possible values are 1099-MISC, 1099-INT, 1099-R, 1099-G, and 1099-S.
-
Click Next to continue. You will see the following screen, which allows you to define the specifications to use for the import:
- Select the Import Type value. This field is required. Values (e.g., XML) are defined in the Import Type master file (Maintenance > System > Import/Export > Import Type List).
- Type the Import File Location/Name value or click Browse to locate the value. This field is required. It may contain up to 256 characters.
- The Merge with Existing 1099s field appears on this page if there are already 1099 transactions for the 1099 Tax Year, 1099 Company, and 1099 Type specified on the previous page.
- If this field is displayed, the check box is selected by default.
- If you clear the check box, a warning informs you that “Multiple 1099s of the same type could be issued to the same Vendor/Payee.”
-
Click Next to continue. You will see the following screen, which displays the validation results and allows you to complete the import:
The Processing Options section of this page allows you to indicate which edit and audit reports to generate and whether to complete the import.
- If you select the Import 1099 Transactions check box, it indicates that valid transactions should be included in the import process. The default value is based on the validation results. It is selected by default if there are no error messages or only warning messages. By default, it is not selected if there are any error messages.
- If you select the Print Import 1099 Transactions Edit Listing check box, this tells the system to create this listing and to include every valid transaction that will be part of the import batch. The default value is based on the validation results. If there are any transactions without an error message, the check box is selected by default. If there are no error-free rows, by default the check box is not selected.
-
If you select the Print Import 1099 Transactions Error Listing check box, this tells the system to create this listing and to include every transaction in the import table that has an error or a warning message associated with it. The default value is based on the validation results. If any warning or error messages exist, the check box is selected by default. It is selected by default if no errors exist.
The Import Batch Information section contains the import batch summary counts and amount fields and cannot be edited.
- The Total Transactions Processed field displays the number of transactions processed in the validation.
- The Total Transactions Processed with Errors field displays the number of transactions that had errors.
-
The Total Transactions to Import field displays the count of transactions that did not have any errors. This is the total number of transactions that will be imported.
The Validation Error and Warning Messages section is a grid that displays all the warning and error messages generated in the validation process and the transactions associated to each message. If there are no error messages for any transactions in the batch, the text “No Validation Error or Warning Messages Exist” will display instead of the grid.
The grid is sorted by error type (error messages first, then warning messages).
- The Type column displays either Error or Warning, based upon the type of message that was triggered.
- The Count column displays the number of transactions with this particular validation message.
-
The Message column displays the message text.
When the primary row in the grid is expanded, the grid displays the following additional columns.
- The Payee Name column displays the name of the Payee associated with the transaction.
- The Payee ID Number column displays the ID number that is used as the vendor’s ID number. This is most likely the SSN, the Federal Tax ID, or the State Tax ID number.
- The Payee ID Number Type column displays the type of ID being displayed for this payee. In addition to the options shown in the previous column, Driver’s License Number, Employee Number, Other, or Undefined may also be displayed.
- The Payee Account Number column displays the account number associated to the payee. It is blank if no account number is defined.
-
Click Finish to finalize the import. You will see a screen like the following, indicating that the transactions have been imported and the requested reports have been sent to myReports:
-
You can now continue 1099 processing as usual.
The error listing output resembles the following:
_731x268.png)
The edit listing output resembles the following:
_731x313.png)
Searching for 1099 Data
Financial Management > Year-End Processing > Vendor 1099 Processing
Select the 1099 List icon to display the 1099 List page. After the 1099 data has been created or imported, it can be viewed on the 1099 List page.
- Make sure the Tax Year, Company Federal ID, and 1099 Type fields have the values they contained when the 1099 data was created. (See Creating 1099 Data.)
-
Click Search. A list of 1099 vendors appears on the page:
Vendors can be maintained as needed from this list.
Using the 1099 List
The 1099 List page displays the following vendor information:
- Recipient Name
- Vendor Number and Name
- Federal Tax ID
- SSN (Social Security Number)
Each page of this list contains 50 vendors. You can scroll through the current page and use the Previous Page, Next Page, or options at the bottom of the list to navigate among the pages. The segment of the list being displayed and the total number of vendors returned by the search displays at the bottom left-hand side of the page: .
Sorting the 1099 List
The 1099 List by default is sorted by Recipient Name in ascending alphabetical order. The list can be sorted by clicking on the column header of the column you wish to use as the new primary sort criterion. To re-sort the list in descending order, click on the same column heading again.
Modifications to the sort order are retained only for the current page session. If you close the session or navigate to another page using one of the buttons at the bottom of the page, the page returns to the default sort order.
Modifying 1099 Form Information
After 1099 Data is created, you can view the data created for a particular vendor and edit it as needed.
-
On the 1099 List page, click the Recipient Name (or Transferor name, for 1099-S) hyperlink for the vendor you wish to view. You will see a screen like the following:
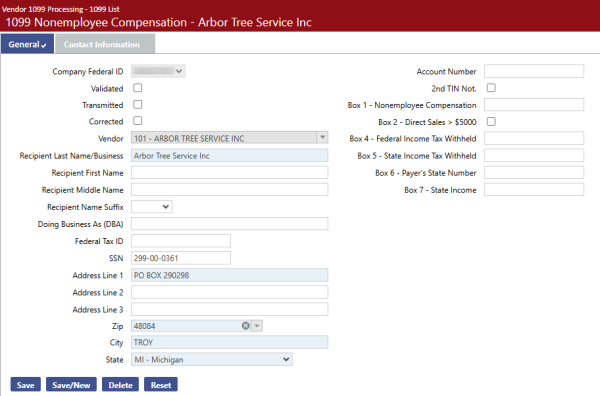
- All of the information except the vendor’s name and tax ID can be edited as needed. Click Save when all changes are complete. The updates will be saved to the 1099 file.

Modifying Vendor Mailing Address Information
If the vendor’s mailing address information has changed during the year, it can be modified before 1099s are printed.
-
On the 1099 List page, select and highlight the row for the vendor you need to change. Then click Vendor Information. You will see a screen like the following:
- The contact information is highlighted in the box; update it as needed. The Contact Name, first line of the Address, Zip Code, City, and State are all required.
- Click Save when all changes are complete. The updates will be saved to the 1099 file.
Modifying Invoice Item Information
If 1099 information on an invoice item must be modified, you can access the invoice from the 1099 List page.
- Select and highlight the row for the vendor whose invoice you need to work with.
- Click the Invoice Items button.
-
The 1099 Vendor Invoice page will open listing all of the invoice items. The fields in the 1099 Type and 1099 Box columns are editable. Double-clicking one of these fields puts cursor focus within the field, allowing you to change the value.
Make the necessary changes and click Accept.
- Return to the 1099 List page and click Create 1099 Data to update the information. The item amount is applied to the 1099 box and 1099 type you specified.
-
Click the Recipient Name hyperlink. The invoice item amount displays in the box you specified.
- Repeat as needed for other invoice items for the vendor to populate the appropriate 1099 box fields on the screen with the amounts that should appear on the 1099 form.
Note: If you are entering someone who is not normally a vendor, see Adding a Vendor to the 1099 List for more information.
Adding a Vendor to the 1099 List
If there are vendors who are not normally 1099 vendors but who need to receive a 1099, you can add them to the 1099 list. It is also possible to add someone to the 1099 list who is not normally a vendor.
-
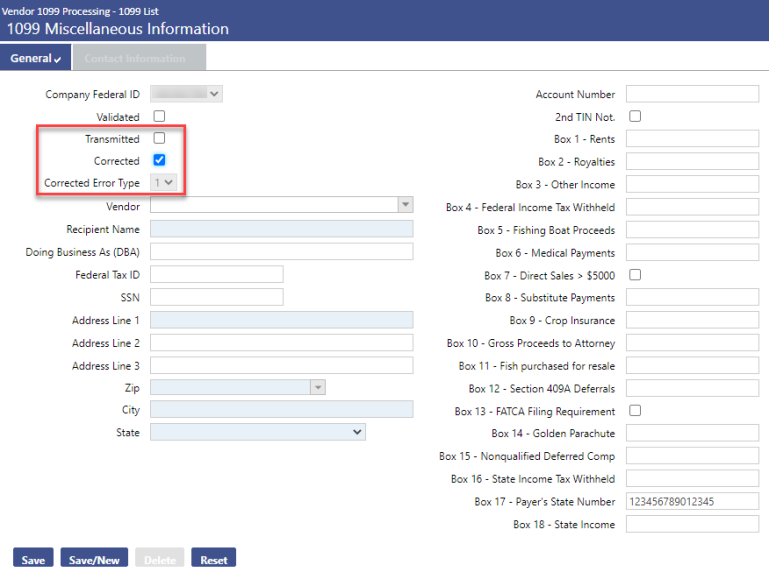
On the 1099 List page, click New. The following page will display:
If you are adding a vendor with a 1099-S form type, an additional section, IRIS Reporting Box 3 Information, displays to accommodate IRIS transmittal file Box 3 reporting requirements. The section contains fields for Box 3 zip, city, state and legal description.
- The Validated check box is used with the 1099 Register, which can be run for all transactions, validated transactions only, or not validated transactions only. This check box is used to determine which 1099s are included on the report.
- Selecting the Transmitted check box indicates that the transaction has been transmitted.
- Selecting the Corrected check box indicates that the transaction represents a correction.
- When the Corrected check box is selected (see above), the Corrected Error Type drop-down field displays beneath the Corrected check box. The IRS recognizes two types of corrections: 1) Corrected dollar amounts, and 2) corrected recipients/tax IDs. New World ERP supports Type 1 corrections only, not Type 2 corrections. For this reason, the Corrected Error Type field defaults to 1 and is always disabled.
- Select a name in the Vendor drop-down list. You can type the vendor number or part of the name to filter the available choices in the list. After you select the vendor, the name and address information from the vendor record populates the fields on this page.
- As needed, populate the Recipient Name, Doing Business As (DBA), Federal Tax ID or SSN, Address Line 1, and Zip Code fields. The Zip Code value populates the City and State fields. This information must be provided for the record to be saved.
- When you click Save, the non-1099 vendor becomes part of the 1099 List.
To update the invoice item information for the vendor, see Modifying Invoice Item Information.
Note: After you update the invoice item information, a 1099 is created for the amounts you specified, but this person or company will not be flagged as a 1099 vendor or included in the vendor list.
Deleting a 1099 Vendor from the 1099 List
If a vendor is no longer a 1099 vendor, it can be deleted from the 1099 List. To do this, follow the steps below:
- Go to the vendor record for the vendor you want to delete from the 1099 List. Select and highlight the row for the vendor and click Vendor Information.
- Go to the Miscellaneous page for the vendor.
-
Select the <blank> option in the Default 1099 Type drop-down list and delete the value in the 1099 Box field.
- Click Save. The vendor is now no longer flagged as a 1099 vendor but is still a vendor in the system.
- Go to the 1099 List. Highlight the vendor and click Delete. The vendor has now been removed from the 1099 List.
1099 Register
Financial Management > Year-End Processing > Vendor 1099 Processing
The 1099 Register page shows all the transactions for each 1099 vendor, sub-totaled by vendor. All transactions are listed in this report, which includes transactions for vendors that did not exceed the minimum amount required to print a 1099. This report allows you to verify the inclusion of all valid 1099 transactions and also the exclusion of non-1099 transactions.
Select the 1099 Register icon and you will see a screen like the following:
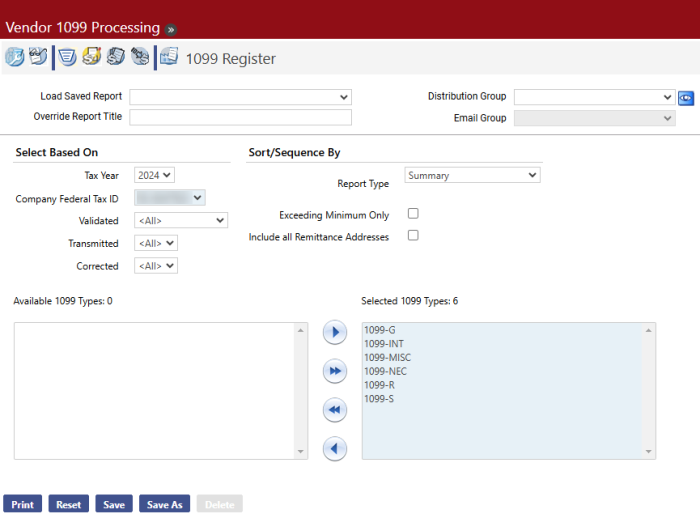
- Select the Tax Year. The options are 2003 through 2024. The default value is determined by the Default 1099 Tax Year value on the Vendor/Items tab on the Company Suite Settings page.
- Select the Company Federal Tax ID. This field is required. Many organizations have only one Company Federal Tax ID, but in the case of a multi-company scenario, the register may be run for only one company at a time.
- Select the Validated status for transactions that should be included in the register. The default value is <All>; the other options are Validated and Not Yet Validated.
-
The Transmitted drop-down field allows users to filter the register by transaction transmission status. The following options may be selected:
- All - If this option is selected, all transactions will be included in the register whether or not they have already been transmitted.
- Yes - If this option is selected, only transmitted transactions will be included on the register. Transactions that have not been transmitted will be omitted from the report.
- No - If this option is selected, only those transactions that have not been transmitted will appear on the register; transmitted transactions will be omitted from the register.
- The Corrected drop-down field allows users to include or omit correction transactions from the register. The following options are available:
- All - If this option is selected, both corrected and non-corrected returns will be included on the register.
- Yes - If this option is selected, only corrected returns will be included on the register. Returns that have not been corrected will be omitted from the register.
- No - If this option is selected, corrected returns will be omitted from the register.
- Select the Report Type. The options are Summary, Detail, Detail with G/L Distribution, and User Adjustment Listing. Detail is selected by default.
- If Summary is selected, the report displays the vendor’s Name, Number, and Address information, plus the box totals for the vendor’s 1099.
- If Detail is selected, the report displays the Payment Date, Invoice Number, Invoice Date, Item Description, and Item Amount for each vendor receiving the 1099 type(s) selected.
- If Detail with G/L Distribution is selected, the report displays the same information as the Detail report, but also includes the G/L Distribution for each invoice item.
- If User Adjustment Listing is selected, the report displays only those vendors whose 1099 information has been adjusted for the 1099 type(s) selected. It displays the vendor’s Name and Vendor ID, the Box Number where the value was changed, the Original Amount, the Amount on 1099, and the Adjusted Amount.
- Determine whether Exceeding Minimum Only should be selected. By default, this check box is not selected. If it is not selected, 1099 transactions for all vendors, regardless of the amount, will appear on the register. If the check box is selected, only vendors whose transactions exceed the minimum amount required to print a 1099 will appear on the register.
- The Include All Remittance Addresses check box is cleared by default. Select it if all additional contact remittance addresses for a vendor should appear in the listing.
- Select the 1099 Types that should be included on the register. At least one 1099 Type must be selected. Select the Type and click the Move button to add just one type, or click the Move All button to add all types.
- Click Print to run the 1099 Register.
- If you want to save the report criteria, click Save and provide a name for the report. Then click Print. The 1099 Register is sent to myReports.
1099 Forms Produced Using SSRS
The 1099 Forms are produced using SQL Server Reporting Services (SSRS) reports. This feature has the following benefits:
- High-quality forms in PDF format with more consistent output.
- More flexibility in printing; no need to print from a server setup as in Echo forms.
- Reports and forms are attractively presented.
- WYSIWYG (What You See Is What You Get) layout for optimal printing.
Print Directly on Blank Stock Forms
Organizations must use IRS Blank Stock tax forms to print 1099s. When printed, the 1099 Blank form types available in New World ERP are replicas of the IRS forms.
It is recommended that you test print one form to ensure the paper is loaded correctly in your printer before you mass print all forms. In addition, the 1099 tax forms are now automatically saved as Adobe Acrobat PDF files in the system when generated.
Note: When printing, 1099-INT, 1099-G, and 1099-S, you must orient the form so that the “Detach Before Mailing” perforation is on the right-hand side of the printed page.
Printing 1099 Forms
Financial Management > Year-End Processing > Vendor 1099 Processing
The 1099 Form page allows you to specify the 1099 form to be printed, and then print the 1099s to send to vendors.
Note: For special instructions on printing the 1099-R Z-fold form, see 1099-R Z-fold Form for 2024 Tax Year.
-
Select the 1099 Form icon to open the 1099 Form page.

- Select the Tax Year. The options are 2003 through 2024. The default value is determined by the Default 1099 Tax Year value on the Vendor/Items tab on the Company Suite Settings page.
- Select the Company Federal Tax ID. This field is required. Many organizations have only one Company Federal Tax ID, but in the case of a multi-company scenario, the forms may be printed for only one company at a time.
- Select the 1099 Type. The options are 1099-MISC, 1099-INT, 1099-R, 1099-G, and 1099-S. 1099-MISC is selected by default.
-
Select the Form Type. This field is required. Options will vary.
Tip: If the Form Type drop-down list is empty, either the year-end update has not yet been applied or it was applied incorrectly. Ask your IT staff to re-apply the update.
-
The Truncate SSN check box may or may not display, depending on the specific form type selected. If it does display, select this check box if social security numbers should be truncated, for security reasons, when printed.
The Truncate SSN check box will appear for the following copies of the form:
1099 Types with Truncated SSN 1099-MISC 1099-INT 1099-R 1099-G 1099-S NEC Blank Copy B
Blank Copy B Blank Copy C Blank Copy B Blank Copy B Blank Copy B Blank Z-Fold Blank Z-Fold Blank Z-Fold - The Exceeding Minimum Only check box is selected by default. If selected, only vendors whose transactions exceed the minimum amount required to print a 1099 will be printed. If the check box is cleared, 1099 transactions for all vendors, regardless of the amount, will be printed.
- Leave the Vendor field blank to print 1099s for all vendors. Select a vendor if 1099s should be printed for only one vendor.
- The Recipient/Transferor Name field allows you to print a 1099 for a recipient who is not a vendor. The value can contain up to 192 characters.
- The Federal Tax ID/SSN field is another option that allows you to print a 1099 for a recipient who is not a vendor. It can be used with the Recipient/Transferor Name field or by itself.
- The Transmitted field allows you to print 1099s based on their transmission status. Select Yes to print only those 1099s that have been transmitted or No to print only those that have not yet been transmitted. Select All to print all 1099s regardless of their transmission status.
- The Corrected field allows you to print 1099s based on whether or not they include corrected information. Select Yes to print only those 1099s that include corrected information or No to print only those that have not been corrected. Select All to print all 1099s regardless of their transmission status.
- Click Print to send the print file to myReports.
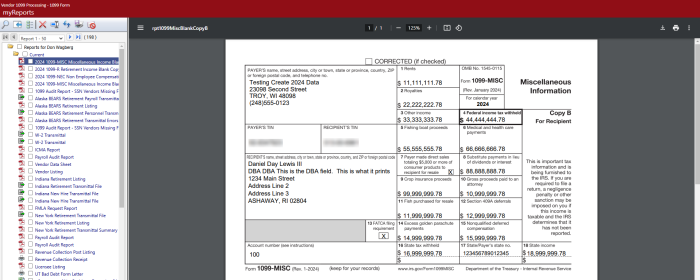
- Go to myReports. Click a 2024 1099 Form link on the left side of the page. Only the tax values for the 1099 form appear on the screen and can be reviewed before you print the form.
- Load the appropriate blank IRS tax forms into your printer based on the form type you are printing.
-
Print the forms.
Different browsers provide different printing options. The printing process will therefore vary depending on your browser type. Follow the steps below based on your browser type, or download the forms and print them using Adobe Reader print features (see Print Dialog Settings for Adobe Version X and Higher).
Note: Tyler recommends that you use Google Chrome as your browser.
If you use Google Chrome, do the following:
-
On the myReports preview page, click the Print button on the Adobe toolbar.
-
The Print preview screen will display. Modify print settings as needed.
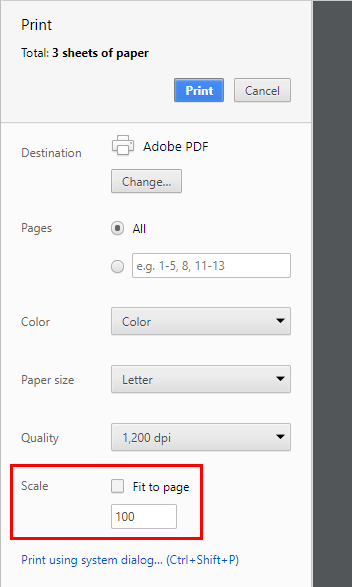
It is important to note that the Fit to page check box (see below) should be selected for the following form types:
- 1099-R Blank Copy 2/C Back
- 1099-MISC Z-Fold Back
- Click Print.
If you use Internet Explorer:
- On the myReports preview page, click the Print button on the Adobe toolbar. This toolbar appears when you hover over the report in the preview pane.
-
The Adobe Print dialog box will open.
It is important to note that the Actual size check box should be selected for most form types. However, the Fit check box should be selected for the following types.
- 1099-R Blank Copy 2/C Back
- 1099-MISC Z-Fold Back
Modify print settings as needed.
- Click Print.

If you use Firefox or Microsoft Edge:
Download the forms and print using Adobe print options. See Print Dialog Settings for Adobe Version X and Higher below.
-

Print Dialog Settings for Adobe Version X and Higher
The Adobe Reader Print dialog allows you to set multiple print settings based on your organizations preferences and requirements.
Following are a few details to keep in mind when printing your forms with Adobe Reader.
- Although the Actual size check box (located under the Page Sizing & Handling label) should be selected for most form types, the Fit check box should be selected for the following types:
- 1099-R Blank Copy 2/C Back
- 1099-MISC Z-Fold Back
- Before you print all forms, it is recommended that you first print just one form to ensure that the paper is loaded correctly in your printer.
- After you print your 1099 forms, be sure to return your printer setup to the previous default settings. Otherwise, subsequent print submissions may print in an unintended format.
- Return to the step-by-step instructions for printing regular or Z-fold forms.
1099-R Z-fold Form for 2024 Tax Year
The Z-fold version of the 1099-R form prints on legal-size paper. Printing from New World ERP uses the default paper size for the printer you select, so unless that is the default for your printer, you need to change the network printer’s default paper size to Legal.
- Click
 in the Adobe tool bar at the top of the preview pane to print the form.
 -
Select the following print options:
Note: If you are using a version of Adobe Acrobat X or later, the print dialog screen has changed. See the section on Acrobat Reader X Print Dialog Settings above.
- In Page Scaling, select None.
-
Clear the Auto-Rotate and Center check box.
-
Click the Properties button and select the Printing Shortcuts tab on the Document Properties window.
- In Paper sizes, select Legal.
-
Adjust the other print options as needed and click OK. The output for 1099-INT should resemble the following:

Important: After you print your 1099 forms, be sure to return your printer setup to the previous default settings. Otherwise, subsequent printing of New World ERP data may not print in the desired format.
1099-R Z-fold Form for Years Prior to 2009
Note: The 1099-R Z-fold form for tax years prior to 2009 must be printed on a network printer, due to some additional printer setup that needs to be performed.
The Z-fold version of the 1099-R form prints on legal-size paper. Printing from New World ERP uses the default paper size for the printer you select, so unless that is the default for your printer, you need to follow the steps below to change the network printer’s default paper size to legal.
-
Connect to the server that houses the application server or the report server (if installed) by going to the taskbar and click Start > Run. In the Open field, type mstsc /console. You will see the following screen:
- Type in the name of your server and click Connect.
- Log into the server using the administrator log in.
- Select Start > Devices and Printers or Start > Printers and Faxes.
- Right click the printer you will use to print the Z-fold 1099-R forms. Remember that it should be a network printer, not a local printer.
-
Right-click the icon and select Printing Preferences. Set the default paper size to Legal. Below is an example for an HP PCL5 printer:
-
Click Apply to make the changes.
Note: The logon user for the service must have rights to the printer that you will use to print the Z-fold forms. This setup has been performed if the printer is available for selection on the myReports page.
- You can now print the 1099-R Z-fold forms from the 1099 Form page in New World ERP. Remember to select the 1099-R Blank Z-fold option in the Form Type field. When you click at the top of the preview pane in myReports, the printer expects legal-size paper to be used.
- After the forms are printed, return your network printer to its default settings.
Creating a 1099 Transmittal File
Financial Management > Year-End Processing > Vendor 1099 Processing
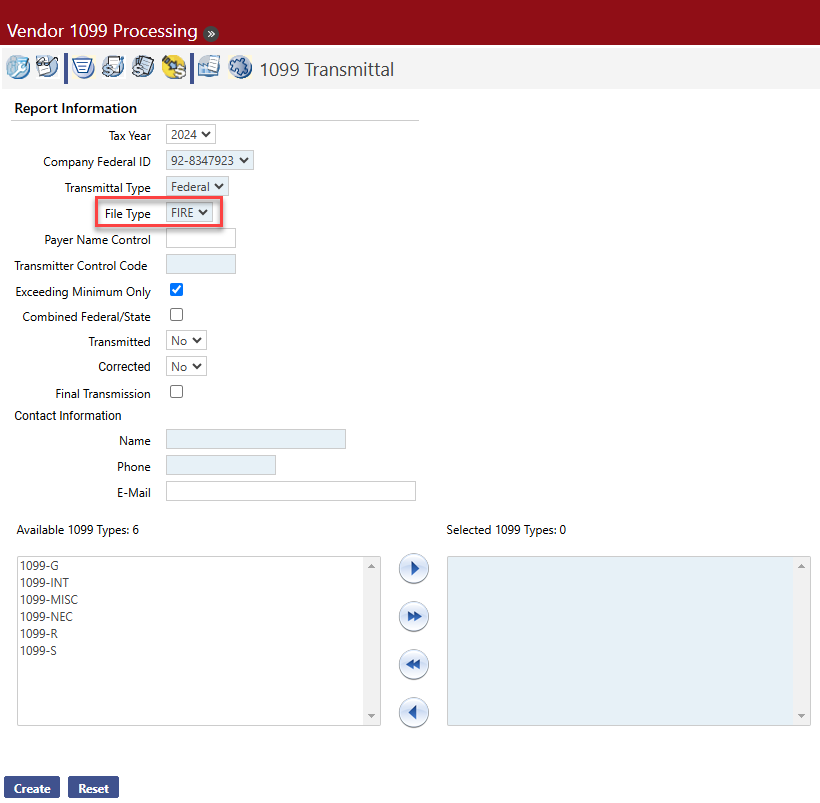
Select the 1099 Transmittal icon to display the 1099 Transmittal page, where you can create an electronic 1099 file to send to the IRS.
![]()
- Select the Tax Year. The options are 2003 through 2024. The default value is determined by the Default 1099 Tax Year value on the Vendor/Items tab on the Company Suite Settings page.
- In Company Federal ID, select the company federal tax ID in the drop-down list. This field is required. Many organizations have only one company federal tax ID, but in the case of a multi-company scenario, the transmittal file may be created for only one company at a time.
- In the Transmittal Type field, Federal is the default selection, which will create the standard transmittal file for the IRS. Select State to create a transmittal file to be submitted at the state level. Currently, this option is available for the states of Pennsylvania and West Virginia. If State is selected, alternate controls will be displayed on the page:
- In the State field, PA will be selected by default.
- In the Payer’s PA Account Number field, enter the state tax ID.
- 1099-MISC will be defaulted into the File Type field.
- Determine whether the Exceeding Minimum Only check box should be selected. This check box is selected by default. If it is selected, only vendors whose transactions exceeded the minimum amount required to print a 1099 will be transmitted. If the check box is not selected, 1099 transactions for all vendors, regardless of the amount, will be transmitted.
-
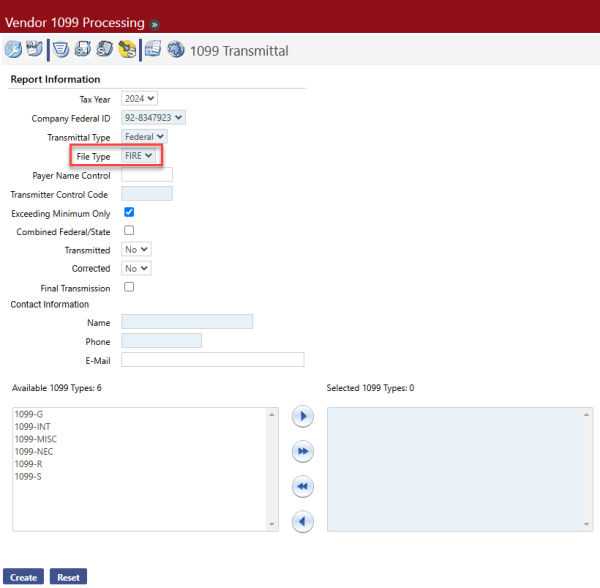
Select the File Type: FIRE(Filing Information Returns Electronically) or IRIS (Information Returns Intake System).
Note: Although New World recommends using FIRE for the 2024 tax season, see the following section, "1099 Processing Using the IRIS Export," for additional setup requirements if you are using IRIS.
- Enter the Payer Name Control. This code identifies the payer and may contain up to 80 characters. It is provided by the IRS. See IRS Publication 1220 for more information about this field.
-
Enter the Transmitter Control Code. This field is required to transmit 1099s. This code is also provided by the IRS and is five characters long.
Note: If IRIS is selected as the File Type, this field does not display.
- Determine whether the Exceeding Minimum Only check box should be selected. This check box is selected by default. If it is selected, only vendors whose transactions exceed the minimum amount required to print a 1099 will be transmitted. If the check box is not selected, 1099 transactions for all vendors, regardless of the amount, will be transmitted.
- Select the Combined Federal/State check box if your organization participates in the combined federal/state filing program.
- If you selected the Combined Federal/State check box, the Types section appears. Select a check box to identify the form(s) you are using.
- The Transmitted field allows you to include or exclude information that has already been transmitted. Select Yes to only include information that has already been transmitted or No to exclude information that has been transmitted.
- The Corrected field allows you to include or exclude corrected information. Select Yes to include only those 1099s that include corrected information or No to exclude corrected information.
- If this transmission is final, mark the Final Transmission check box.
- If IRIS is selected as the File Type, the 1099 Type field displays. From the dropdown, select the 1099 type to create the transmittal for. The IRIS export file is formatted as a CSV, and each 1099 type has a separate file layout, so 1099 types must be run one at a time.
-
Enter the Name. This is the name of the person at your organization that the IRS should contact if there are concerns about the transmittal file. The name is required; it may contain up to 40 characters.
- Enter the Phone. This is the phone number of the contact person at your organization that the IRS should contact if there are concerns about the transmittal file. The phone number is required; it may contain 10 characters.
-
Enter the E-Mail address. The contact person’s e-mail address may contain up to 35 characters.
-
Use the Available 1099 Types and Selected 1099 Types controls to indicate which 1099 type or types you would like to transmit.
Note: If IRIS is selected as the File Type, these list boxes do not display.
-
Click Create. The transmittal file is sent to myReports.
-
Go to myReports. Click the 2024 - 1099 Transmittal link on the left side of the page. You will see a page like the following:
- Click Save and save the file to a folder on your computer where it can be located to send to the IRS.
Note: If the transmittal file is created in advance of the submission deadline, wait to submit it to the IRS in case there are corrections. Corrected forms are not supported, but the file can be recreated as needed for any corrections that occur.
The following outlines the steps involved in processing 1099s using the IRIS Export:
-
Run the 1099 SSN Vendors Missing First Name audit report to identify 1099 vendors on the Vendor Service page with a social security number but nothing entered in the First Name and 1099 First Name fields:
Financial Management > Year-End Processing > Vendor 1099 Processing > 1099 Audit Report
- Correct all applicable vendor names, preferably 1099 names.
-
Update the 1099 Country Mapping page. Map all states to the applicable countries.
Financial Management > Year-End Processing > Vendor 1099 Processing > 1099 Country Mapping
Map all states to the applicable countries.
Codes in the Country Code column default as blank and need to be entered. To speed up entry, the column lets you <Tab> from one code to the next. Make sure to complete these entries before creating the IRIS transmittal file.
All codes on the dropdown come from validation set 381, Country, which comes pre-loaded:
To have access to the 1099 Country mapping page, users must be authorized to the Vendor 1099 Country Mapping security component:
Maintenance > new world ERP Suite > Users > User Name > Permissions:
- Create/Copy the 1099 Company for tax year 2024.
- Create 1099 Data.
- Run the 1099 Register to review 1099 data.
- Print 1099 forms.
-
Create the 1099 Transmittal for IRIS for all applicable 1099 types.
According to IRS requirements, the maximum number of 1099 records per file is 100, so a separate file is created in myReports for every 100 records:
-
Note: To avoid having to upload multiple files and perform additional setup, New World recommends using FIRE for the 2024 tax season.
Support for Corrected and Omitted Vendor 1099 Forms
New World ERP supports 1099 corrections. The IRS recognizes two types of corrections: 1) Corrected dollar amounts, and 2) corrected recipients, tax IDs, and/or payee name. New World ERP supports Type 1 corrections only.
All 1099 processing areas accommodate the task of filing a correct return, including the 1099 List, entry, Register, Form, Transmittal, and Vendor Inquiry pages, as well as the printed register.
Note: The features and functionality described in this section are only for tax year 2016 and later. The controls described below do not display in the software for tax years prior to 2016.
As background, enhancements related to this functionality were made available with the New World ERP 2017 release and include the following:
- The 1099 vendor entry page is enhanced to allow users to flag a 1099 as having been transmitted.
- The 1099 vendor entry page is enhanced to allow users to flag a 1099 as a Type 1 correction.
- The 1099 List, Register, Form, and Transmittal pages have been enhanced to allow users to filter search/output results by 1099 correction and/or transmittal status.
- Transmitted and Correction columns have been added to the printed register.
- The printed 1099 form will now insert an “X” in the Corrected check box at the top of the form to flag the 1099 as corrected.
- The 1099 History node in Vendor Inquiry now includes information about corrected and transmitted status.
See below for details.
1099 List Page
Financial Management > Year-End Processing > Vendor 1099 Processing > Click 1099 List
The Transmitted and Corrected drop-down fields on the search criteria portion of the 1099 List page allow users to filter search results based on the recipients’ form transmission and correction status. For more information, see the table below.
Also, the Transmitted and Corrected columns in the search grid allow users to see at a glance whether a given recipient’s 1099 has been transmitted and/or includes corrections respectively. A green check mark  in the Transmitted column indicates that a recipient’s information has been transmitted; a green check mark in the Corrected column indicates that the recipient’s information includes a correction. The grid can be sorted by either one of these values by clicking on the column name.
![]()
| Name | Description |
|---|---|
| Transmitted
(drop-down field) |
Allows users to limit search results based on 1099 form transmission status. The following values can be selected from the drop-down list:
|
| Corrected
(drop-down field) |
Allows users to limit search results based on 1099 form correction status, i.e., by whether or not the forms include corrections. The following values can be selected from the drop-down list:
|
The 1099 Vendor Entry Page
Financial Management > Year-End Processing > Vendor 1099 Processing > Click 1099 List > Enter criteria and click Search > Click New or select a recipient from the grid
The Transmitted and Corrected check boxes on the 1099 vendor entry page allow users to indicate whether a given 1099 has been transmitted and/or corrected respectively. The Corrected Error Type drop-down list displays only when the Corrected check box is selected.
These controls are available for all 1099 types, i.e., 1099-Misc., 1099-INT, 1099-R, 1099-G, 1099-S, and 1099-NEC.
See the table below for a detailed description of these new controls.
| Name | Description |
|---|---|
| Transmitted
(check box) |
This check box displays only for tax year 2016 and beyond. If a tax year prior to 2016 is opened, the Transmitted check box does not display. Selecting this check box indicates that the 1099 information has been flagged as transmitted. If the entry page is opened in New mode (i.e., accessed by clicking New on the 1099 List page), the Transmitted check box defaults to cleared. Once the check box is manually selected or cleared and then saved, the value is retained. |
| Corrected
(check box) |
This check box displays only for tax year 2016 and beyond. If a tax year prior to 2016 is opened, the Corrected check box does not display. Selecting this check box indicates that the 1099 information has been flagged as corrected. If the Transmitted check box is selected when the Corrected check box is selected, the Transmitted check box will be cleared because the system assumes that the correction has not yet been transmitted. If the entry page is opened in New mode (i.e., accessed by clicking New on the 1099 List page), the Corrected check box defaults to cleared. Once the check box is manually selected and then saved, the value is retained. When the Corrected check box is selected for a given record, the code "G" is inserted in field position 6 of the "B" record on the 1099 transmittal file. When creating the transmittal file for corrected returns, only corrected records with a cleared Transmitted check box will be included in the file. |
| Corrected Error Type
(drop-down field) |
When the Corrected check box is selected, the new Corrected Error Type drop-down field displays beneath the Corrected check box. This field defaults to 1 and is always disabled. Note: The IRS recognizes two types of corrections: 1) Corrected dollar amounts, and 2) corrected recipients, tax IDs, and/or payee name. New World ERP supports Type 1 corrections only. |
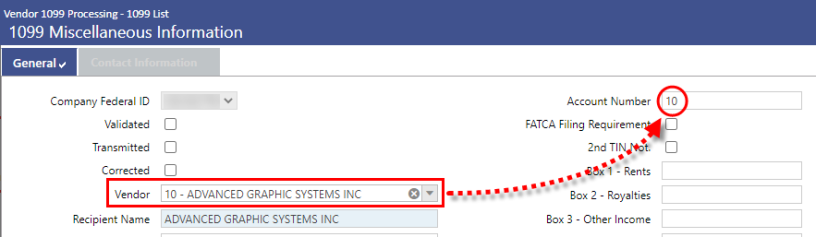
When a 1099 is added and a Vendor is selected, the vendor’s associated account number is automatically inserted in the Account Number field.
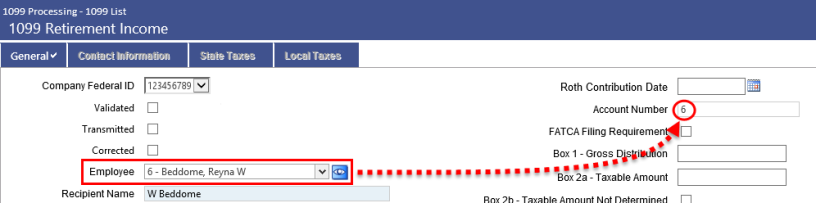
When a 1099-R is created in HR/Payroll and an Employee is selected, the employee’s identification number will be automatically inserted in the Account Number field.
1099 Register Page 
Financial Management > Year-End Processing > Click 1099 Register
On the 1099 Register page, the Transmitted and Corrected drop-down controls allow users to filter register report output based on transaction transmission and/or correction status.
See the table below for a detailed description of these fields.
![]()
| Name | Description |
|---|---|
| Transmitted
(drop-down field) |
Allows users to filter report output by transmission status, i.e., by whether or not transactions have been transmitted. The following values can be selected from the drop-down list:
|
| Corrected
(drop-down field) |
Allows users to filter report output based on transaction correction status, i.e., based on whether or not the transactions include corrections. The following values can be selected from the drop-down list:
|
On the register report itself, the Corrected and Transmitted columns are located on the far right-hand side of the page. The Corrected column indicates whether or not a given information return includes a correction. The Transmitted column indicates whether or not a return has been transmitted.
See the sample register below.
_768x168.png)
1099 Form Page

Financial Management > Year-End Processing > Click 1099 Form
On the 1099 Form page, the Transmitted and Corrected drop-down controls allow users to print 1099 forms based on their transmission and/or correction status.
See the table below for a detailed description of these fields.
![]()
| Name | Description |
|---|---|
| Transmitted
(drop-down field) |
Allows users to print 1099s based on their transmission status, i.e., based on whether or not the transactions have been transmitted. The following values can be selected from the drop-down list:
|
| Corrected
(drop-down field) |
Allows users to print 1099s based on their correction status, i.e., based on whether or not they represent a correction to a previously transmitted 1099. The following values can be selected from the drop-down list:
|
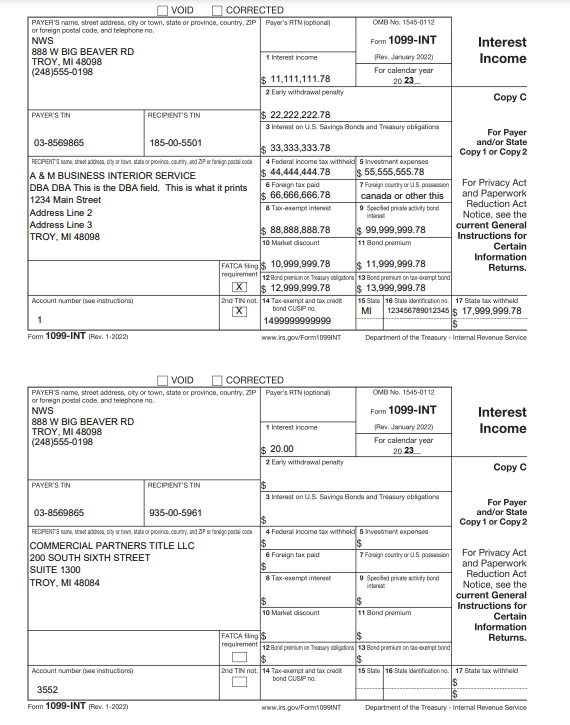
1099 Form
The 1099 form has been enhanced to insert an “X” in the Corrected check box at the top of the form if 1) the 1099 represents a correction to a previously submitted 1099, and 2) the Corrected check box was selected on the 1099 entry page. If these two conditions are true, then the Corrected check box on the form will be automatically selected to inform the IRS that the form was previously filed.
This applies to all form types (i.e., 1099-MISC, 1099-INT, 1099-R, 1099-S, 1099-G, and 1099-NEC).
_761x506.png)
1099 Transmittal Page 
Financial Management > Year-End Processing > Click 1099 Transmittal
Creating a Transmittal File for Corrected and Omitted 1099 Forms
The Transmitted and Corrected drop-down controls on the 1099 Transmittal page allow users to indicate whether the transmittal file should consist of 1099 forms that have been transmitted or non-transmitted and corrected or non-corrected, respectively.
See the table below for a detailed description of these new controls.
In addition to being able to file a corrected return, users can also create a transmittal file for omitted 1099 forms, i.e., new 1099 forms, opposed to corrected or original 1099 forms, that, for whatever reason, should have been sent out but weren’t. Users can create a transmittal file for just those items.
![]()
| Name | Description |
|---|---|
| Transmitted
(drop-down field) |
Allows users to determine whether or not transmitted 1099 forms should be included in the transmittal file. Available field entries are:
|
| Corrected
(drop-down field) |
Allows users to determine whether or not corrected 1099 forms should be included in the transmittal file. Available field entries are:
Note: When creating the transmittal file for corrected returns, only corrected 1099 forms with a cleared Transmitted check box will be included in the file. |
| Final Transmission
(check box) |
Selecting this check box indicates that the transmittal will be the final transmission. If selected, the system will flag all associated transactions as transmitted so the user does not have to do that manually. |
Vendor Inquiry
Inquiries > Vendors > Select a vendor > 1099 History node
The Transmitted and Corrected columns are available in tables throughout the 1099 History node in Vendor Inquiry. A check mark in the Transmitted column indicates that the vendor 1099 has been transmitted. A check mark in the Corrected column indicates that the vendor 1099 includes a correction.
_567x340.png)
Setup
Note: If your Vendors and Accounts are already set up to use 1099s, proceed to Daily Processing.
Before beginning year-end processing, you must first set up several different types of information, including vendor and account information. The processes for completing these procedures is explained in the following sections.
Vendor Information
Maintenance > New World ERP Suite > Procurement > Vendor Service
If a vendor is going to receive a 1099 from your organization, the vendor needs to be set up as a 1099 vendor so that the system properly tracks payments to them throughout the year.
- Enter the name and number of the vendor you need to set up or update. Click Go to search for the vendor record.
-
Click the folder next to the vendor name. Inquiry information about the vendor appears on the right-hand side of the page:
-
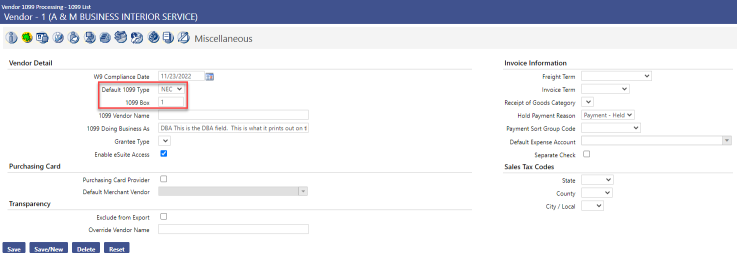
Click the icon on the Miscellaneous header bar. You will see a screen like the following:
_764x256.png)
- Select the Default 1099 Type for the vendor. The options are MISC, INT, R, S, G, and NEC.
- Enter the default 1099 Box for the vendor.
- Entering the last two values will have the following effects:
- When a user enters a purchase order item from this vendor, the 1099 Item check box (on the Purchase Order screen) will automatically be checked.
- When a user enters an accounts payable invoice item from this vendor, the 1099 Type and 1099 Box fields (on the Invoice Entry screen) will be automatically filled in with the default 1099 type and default 1099 box information selected above.
- Enter the 1099 Vendor Name, if applicable. If this name is provided, it appears as the first line in the Recipient’s Name box on the 1099 form; otherwise, the vendor primary contact name is the default value. The value may contain up to 65 characters.
- If the vendor uses a 1099 Doing Business As (DBA) name, enter that value. This name appears as the second line in the Recipient’s Name box on the 1099. The value may contain up to 65 characters.
- When you have entered any other information you need on the page, click Save.
Accounts
Maintenance > New World ERP Suite > Chart of Accounts > Accounts
- In the Type drop-down list, select Expense.
-
Click Search. The list of expense accounts displays:
- Click the Account Number hyperlink of an expense account that will be subject to 1099s.
-
Select the Subject to 1099 check box.
Note: If this account does not have the Subject to 1099 check box selected, a purchase order or accounts payable invoice is entered using the account, and the vendor being used is a 1099 vendor, the following message will appear: “A 1099 transaction will be generated for this invoice item when it is paid despite the fact that a non ‘Subject to 1099’ account is part of the general ledger distribution defined for the invoice item.” You can proceed by clicking on the Accept hyperlink that accompanies the message.
- Click Save.
Forms Layout
No special setup is required if your organization uses standard blank forms. The year-end update includes all the necessary form information.
Transmittal File
No special setup is required for the transmittal file. The year-end update includes all of the necessary information.
Daily Processing
Note: If your daily processing is already set up to record 1099 information throughout the year, proceed to Year-Round Maintenance.
Transactions that will be applied to a vendor’s 1099 must be flagged as 1099 items as they are entered.
Purchase Order Processing
Financial Management > Procurement > Purchasing > Purchase Orders > New button
When you select a vendor that is marked as a 1099 vendor, the 1099 Item check box on the purchase order item will be selected automatically. If the item should not be included in the vendor’s 1099, clear the 1099 Item check box.
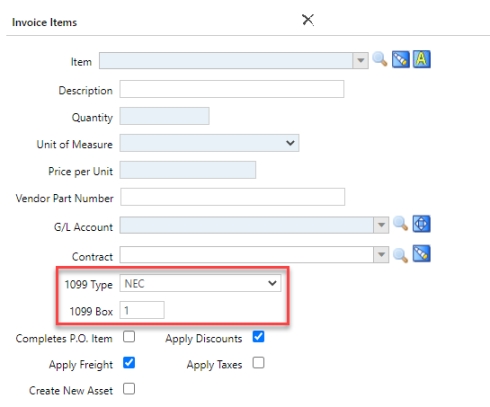
Accounts Payable Invoice Processing
Financial Management > Accounts Payable > Invoice Entry Batches
When invoices are entered for a 1099 vendor, the vendor’s default 1099 Type and 1099 Box will display on the invoice item. Both values can be changed, if necessary.