1099 List 
Use this page to search for or create the data that fills 1099-R forms.
To search for data that already has been created, make the appropriate selections in the fields provided, and click the Search button.
| Field | Description |
|---|---|
| Tax Year | Tax year being reported. The current year is the default selection. You may create 1099 data for previous tax years. |
| Company Federal Tax ID | Required. Click in the field to select from a drop-down list of valid IDs. Note: once you have selected an ID, you may create the data. |
| 1099 Type | Populated with 1099-R and disabled. |
| Recipient/Transferor Name | Optional. |
| Federal Tax ID/SSN | Optional. |
A grid containing the data that matches your selections displays below the fields.
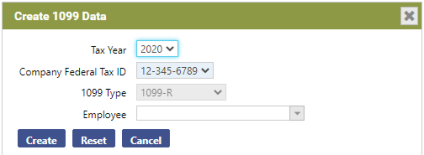
If you are overwriting previously created data or creating it from scratch, click the Create 1099 Data button. The Create 1099 Data pop-up opens. ![]() Show me.
Show me.
| Field | Description |
|---|---|
| Tax Year | Tax year being reported. The year you selected on the 1099 List page is the default. |
| Company Federal Tax ID | Required. Click in the field to select from a drop-down list of valid IDs. |
| 1099 Type | Populated with 1099-R and disabled. |
| Employee | Creates 1099-R data for a selected employee. Leave this field blank to create data for all employees. |
After making your selections on the pop-up, click Create to create the 1099-R data.
If the 1099-R data matching your selections already has been created, the following message displays: "1099 data exists for selected employee(s). Overwrite this data?" To proceed, click Accept; to call off, click Cancel.
When data has been created, the following message displays: "1099 employee data has been created successfully." Click OK.
Close the Create 1099 Data pop-up. A grid displays on the 1099 List page, populated with all of the 1099-R data that has been created and sorted alphabetically by Recipient Name.
The grid shows 50 recipients at a time. Use the paging functions located at the bottom of the grid to show another 50 recipients.
By default, the grid is sorted in ascending alphabetical order by Recipient Name; however, you may sort the grid by any other column simply by clicking the column header. To re-sort the grid in descending order, click the same column header again.
Modifications to the sort order are retained only for the current page session. If you close the session or navigate to another page, the page returns to the default sort order.
After you have created 1099-R data, follow these steps to view the data for a particular employee and edit as needed:
- On the 1099 List page, click the Recipient Name hyperlink. The 1099 Retirement Income page opens, defaulted to the General tab.
- You may edit any of the data except for the Company Federal ID.
- When your edits are complete, click Save. The updated record is saved to the 1099 file.
If an employee who is not in the grid needs to receive a 1099-R, follow these steps to add him to the grid:
- On the 1099 List page, click the New button. The 1099 Retirement Income page opens, defaulted to the General tab.
- If the Validated check box is checked, it confirms that this person should receive a 1099-R rather than a W-2. This check box is informational only.
- Select the name from the Employee field, or you may begin to type the name to open a drop-down list of names that most closely match your entry. Once you select the employee, the name, address and social security number from the employee record populate the corresponding fields on this page.
- If you are adding a non-employee to the grid, type his name in the Recipient Name field.
- If applicable, use the Doing Business As (DBA) field to type the name under which the company is conducting business.
- Provide a Federal Tax ID or an SSN.
- For a non-employee, fill in the address (Address Line 1 is required), Zip, City and State fields. The Zip entry populates the City and State fields.
- Fill the appropriate 1099-R boxes with the amounts that should appear on the 1099-R.
- When you click Save, the employee is added to the grid on the 1099 List page. A 1099-R is created for the amounts you specified, but this person is not flagged as a 1099 employee.
If an employee no longer is a 1099-R employee, follow these steps to remove him from the grid:
- Navigate to Human Resources > Employee Maintenance.
- Search for and select the employee.
- Select the User-Defined attribute.
- Clear the 1099-R user-defined value.
- Click Save. The employee receives a W-2 when Create W-2 Data is run.
- Navigate to Human Resources > Year-End Processing > 1099 Processing.
- Click the 1099 List icon
 .
. - Select (Highlight) the row containing the employee.
- Click the Delete button.
To see help for another page in the 1099 Processing workflow, click the appropriate link provided below:
