Print W-2 Form 
Use this page to generate the actual W-2s.
| Field | Description |
|---|---|
| Tax Year | Tax year being reported. The current year is the default selection. |
| EIN | Employer Identification Number. This entry defaults from the W-2 Employee List page. |
| Employee | Print W-2 for one employee only. Leave this field blank to print W-2s for all employees. |
| Truncate SSN | Masks social security numbers on W-2s, showing only the last four digits. |
| Sort By | Employee Name or Department. |
| W-2 Form | Required. W-2 form to be used. |
| Form Type | Employee or Employer. The default selection is Employee. |
| Statuses |
Status(es) for which W-2 forms are created. Forms are created for employees who have the selected status(es) as of the date the print job is submitted. The available status selections come from Choosing to create the form for a particular Employee disables the list boxes. |
After making your entries, click Print to send the file of W-2 forms to myReports.
Note: A W-2 does not print for any employee who has elected to go paperless and has a primary email address set up in Workforce Administration; however, if an employee is selected in the Employee prompt (step 3 above), a W-2 prints. The Employer W-2 prints all employees.
From myReports, click the Print W-2 Form-Employee or Print W-2 Form-Employer link located on the left side of the page. The form displays on the right side of the page, allowing the user to view the forms before printing:

Click  in the Adobe toolbar of the preview pane:
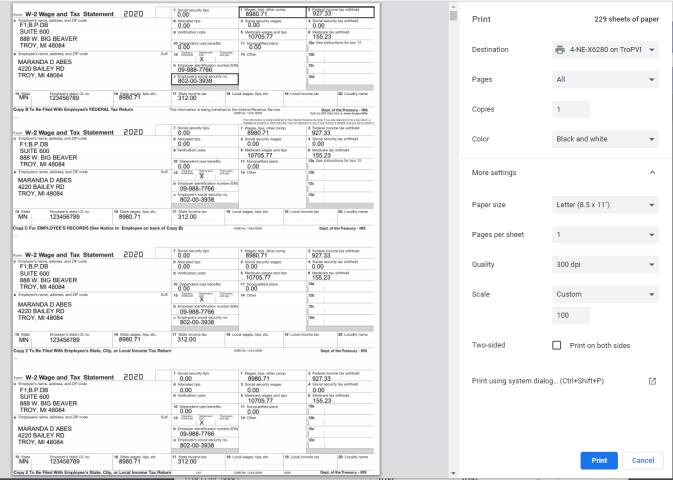
Select the appropriate print options.
Note: It is recommended that you first print one form to ensure the paper is loaded correctly in your printer before you print all forms.
Click Print.
Note: The W-2 Z-fold form must be printed on a network printer, due to additional printer setup that needs to be performed.
The Z-fold version of the W-2 form prints on legal-size paper. Printing from new world ERP uses the default paper size for the printer you select, so unless that is the default for your printer, follow the steps below to change the network printer’s default paper size to Legal.
-
Connect to the server that houses the application server or the report server (if installed) by going to Start > Run and typing mstsc /console:
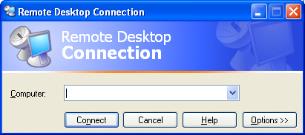
- In the Computer field, type the name of your server and click Connect.
- Log into the server using the administrator log in.
- Select Start > Devices and Printers or Start > Printers and Faxes.
- Right click the printer used to print the Z-fold W-2 forms. Remember that it should be a network printer, not a local printer.
-
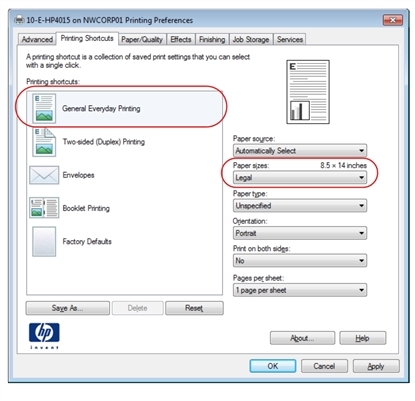
Select Printing Preferences from the menu. Set the default paper size to Legal. Below is an example for an HP PCL5 printer:
-
Click Apply to make the changes.
Note: The log-on user for the service must have rights to the printer used to print the Z-fold forms. This setup has been performed if the printer is available for selection on the myReports page.
- You may print the W-2 Z-fold forms from the Print W-2 Form page in new world ERP. Remember to select the 2020 W-2 Z-Fold or 2020 W-2 Z-Fold Blank option in the W-2 Form field. When you select the Print button at the bottom of the preview pane in myReports, the printer expects legal-size paper to be used.
- Once the forms are printed, return your network printer to its default settings.
To see help for another page in the W-2 Processing workflow, click the appropriate link provided below:


