New Server Setup Guide
This guide is meant to be an addition to the Installation Guide to account for one-time tasks that are required when installing to a new set of servers.
Note: The sections below are listed sequentially from top to bottom. Please follow them in order. At the end of each section, a link will guide you to the next section in the sequence. Some steps within a section may not apply to you.
To review hardware recommendations for this release, please navigate to https://check.tylertech.com. Use your personal email address and a password of Tyler to log in. Clicking on New World ERP will get you to the hardware recommendations.
For browser and Operating System support information on client machines or servers, please see the Technical Currency Matrix.
To determine what versions of other Tyler products this release has been certified with, please see the ERP Compatibility Matrix.
Before beginning the upgrade process, it is important to complete the following steps:
- Request a new license key from the support group.
- Create a backup of your database before installing.
Tyler Deploy requires a tentacle on each Windows Server that will accept software during the upgrade process. That would include your Application and web (eSuite) servers. If a Tyler infrastructure server is in place for software like Tyler Identity/Hub/etc., that server would also need a tentacle. The tentacles run as a Windows Service that communicates back to the deploy server via port 10943 and address tylerdeployer.tylertech.com.
To test for firewall connectivity, please navigate to this address on the server: https://tylerdeployer.tylertech.com:10943. A certificate error is fine in this case and a message like the below would indicate success:

Tyler Deploy resides on a node-based AWS site to provide better connectivity. As such, the following ports need to be open from all servers with a tentacle (typically application and eSuite servers):
IP: 18.233.92.43
3.219.50.129
DNS
https://tylerdeployer.tylerdeploy.com:443
https://tylerdeployer2.tylerdeploy.com:443
https://tylerdeployer3.tylerdeploy.com:443
https://tylerdeployer4.tylerdeploy.com:443
https://tylerdeployer.tylerdeploy.com:10943
https://tylerdeployer2.tylerdeploy.com:10944
https://tylerdeployer3.tylerdeploy.com:10945
https://tylerdeployer4.tylerdeploy.com:10946
https://tylerdeployer5.tylerdeploy.com:10947
https://tylerdeployer6.tylerdeploy.com:10948
Important: All the following items MUST be completed prior to the scheduled build date or will require rescheduling of the server build.
Servers should be ready to begin the build:
Verify that you have created the VMs (or physical servers) sufficient resources based on the recommended specifications, and referring to your existing servers as necessary
- Virtual CPU count
- RAM
- Drive space (system as well as data and/or application)
Operating System (Windows Server 2016 strongly preferred)
- Activate Windows
- Assign a static IP Address
- Update Windows with all patches
- Join all servers to your domain
Add the AD (Windows) service account to the local Administrators group for each server
Have desired SQL Server credential (sa or equivalent) information ready
SQL Server installation media available
SQL Server Management Studio is a separate download
New World ERP installation files for the version that we will be installing
Install any SSL certificates installed on all web servers (if implementing SSL only configuration *)
Have email address available for alerts
Note: SSL certificates will be required on all New World ERP web servers. It is suggested that “SSL only” configuration be implemented during the migration.
Pre-build check point (If using Tyler Services):
- Verify server requirements
- Verify availability of media
- Verify software and license.dat were downloaded
- Install Bomgar client
- High level overview/review of process with customer
- Start FileStorage/Documents copy (to new Live and Test servers)
Server Build Tasks (Applies to all scenarios):
- Install Microsoft SQL Server
- Apply service pack and cumulative updates for SQL
- Configure SQL using industry standard best practices
- Configure Database Mail
- Setup Microsoft standard maintenance plans
- Migrate copies of all New World ERP databases to new SQL servers
- Apply Server Roles and User setup as defined in Appendix A and B of this document.
- Install all New World ERP products and related 3rd party software based on the Install Guide.
- Test to make sure HTML and SSRS reports generate and convert to PDF
- Copy FileStorage\Documents to the new Production Application server
- Setup custom interfaces purchased and supported by Tyler
- Perform basic testing to make sure all report types can be produced in the system
These SQL components are needed for New World ERP and DSS:
- SQL Server Analysis Services
- SQL Server Integration Services
- SQL Server Reporting Services
- SQL Server Database Engine
- SQL Server Management Studio
When installing SQL, ensure the following:
- Keep Data and Log drives in mind. They are typically separated.
- You often want a backup partition to keep things separate.
- SQL needs to be able to run in mixed-mode authentication, i.e., SQL and Windows Authentication.
- If using the built-in SQL accounts and Group Policy (Server\ReportServer$, etc.), they will need access to Log On as a Service in GPO. Failing to do this in this type of environment makes the services unable to restart on a reboot.
- Set a SQL memory cap in SQL Server Management Studio. Cap should never be more than 80% of the RAM on a machine and usually should be around 60% as a guideline.
- Ensure you have a redundancy plan in place for your SQL backups.
- MSDTC and Windows Firewall need to be configured for Microsoft Distributed Transaction Coordinator.
In SQL Server Configuration Manager, ensure these items are configured:
- SQL Server Agent set to automatic start.
- Named Pipes needs to be enabled.
Maintenance Plans are crucial for SQL Server performance. Our Maintenance Plan Recommendations Guide may be found here.
Server 2016/2019/2022 (on the new application server)
- Run Server Manager
- Select Manage > Add Roles and Features
-
Under Server Roles, verify the Web Server (IIS) Role has the following installed:
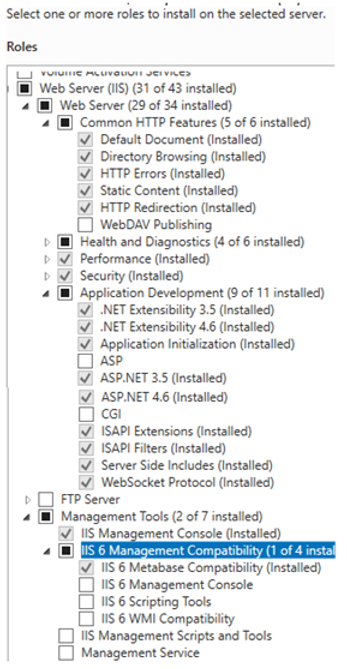
-
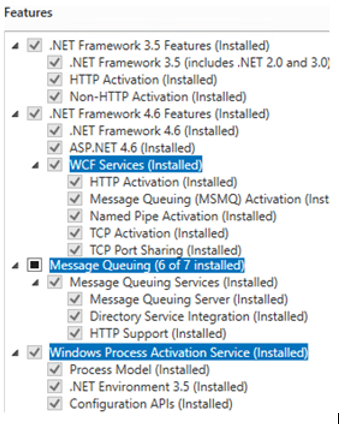
Under Features, verify the following features are installed:
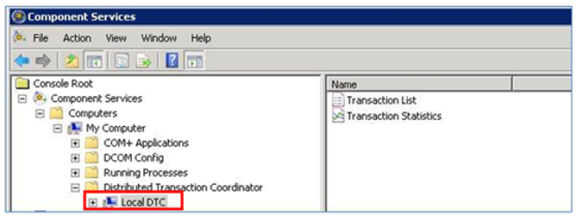
Setting up Microsoft Distributed Transaction Coordinator
To have network access enabled, Microsoft Distributed Transaction Coordinator (MS DTC) must be set up. Follow the below steps to enable network access:
- Click Start, then Run.
- Type dcomcnfg.
-
Expand the console tree to locate Local DTC (e.g. Component Services > Computers > My Computer > Distributed Transaction Coordinator > Local DTC):
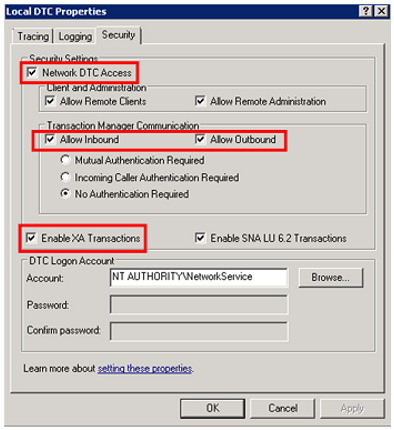
- On the Action menu, click Properties.
- Click the Security tab and verify that the following operations are enabled:
- Network DTC Access
- Allow Inbound
- Enable XA Transactions
Ensure No Authentication Required is also chosen in the radio button:
- Ensure the database server has had steps 1-5 applied as well.
Setting up Windows Firewall
- On the Application and Database Servers, browse to Control Panel > Administrative Tools > Windows Firewall with Advanced Security, or navigate through Server Manager > Tools.
- Inbound Rules: All three components beginning with “Distributed Transaction Coordinator Inbound Rules” must be enabled. Right-click on each component and select Enable Rule.
- Outbound Rules: Enable Distributed Transaction Coordinator Outbound Rule.
- Open Computer Management
- Expand the tree to: Computer Management\System Tools\Local Users and Groups\Users
- On the Action menu, click New User.
- Type the appropriate information into the dialog box.
- Clear the check box for User must change password at next logon.
- Check Password never expires.
Note: The user who will run the application service should be setup as someone other than “Administrator,” or whatever name typically is used to log into the system.
- Open Computer Management.
- Expand the tree to: Computer Management\System Tools\Local Users and Groups\Groups.
- Right-click the Administrators group and select Add to Group.
- Click Add.
- Type the name of the user you just created or a user that already existed.
- Click Check Names.
- Once valid, click OK.
- Click OK again.
- Click Start, then run.
- Type gpedit.msc.
- Press <Enter>.
-
Select Computer Configuration > Windows Settings > Security Settings > Local Policies > User Rights Assignment:
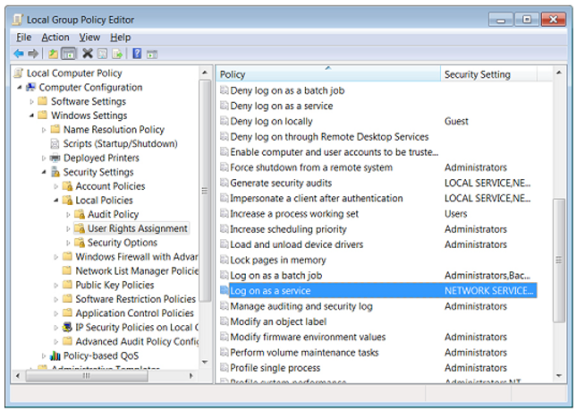
- Double-click Log on as a service policy.
- Click Add User or Group.
- Enter the account that will be running the service.
- Click OK.
Note: The user needs to log into this account at least once on the server itself.