Workforce Administration
Welcome to New World ERP Workforce Administration. This topic will guide you through the setup and processing aspects of the Employment and Payroll Data tabs housed in Workforce.
It is divided into two sections:
The System Administrator will focus on the set-up components necessary to access and create new employees within New World ERP. This will include detailed information on “master files” that must be set-up such as benefits, deductions, taxes, banks and will also include the security settings which will be utilized to enable workflow and tailor user options to your needs.
The End User will describe the steps and workflow of how to maintain and update employee records in the Personal, Employment, Jobs, and Payroll Data tabs in Workforce Administration. It will demonstrate the proper sequence of effective dating and creating employment events. Included in the section there will be a guide to the standard reports available in the software.
Pay Day Setup Frequencies
When creating employees and managing employee’s personal data, there are several set-up processes that will need to be implemented before any employees can be created.
Maintenance > Human Resources > Pay Day Setup > Frequencies
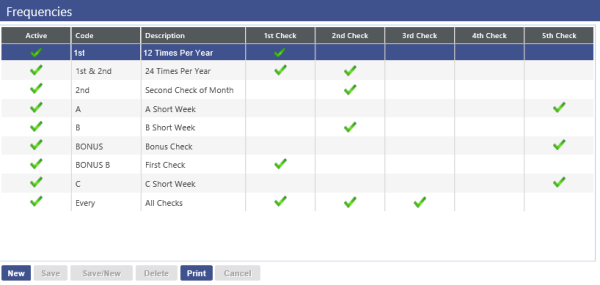
The frequency table shown above will dictate how often a deduction, benefit, or scheduled hours will occur in payroll. The frequency of these actions will be applied to each deduction, benefit and schedule set up in new world ERP.
New – This button will create a new frequency option. There will be a code designated to the new frequency, a description, and the pay period number of the month that it will be utilized.
Banks
Here is where all of the bank information is housed for new world ERP including all of the direct deposits that will be set up on the employee’s record.
Maintenance > new world ERP Suite > Banks

New – This button will allow you to add banks in new world ERP. The banks created will be a major part of the employee direct deposit setup under the payroll data tab in Workforce.
Once the level descriptions have been defined, the Transactions check box can be checked if applicable for any level of the budget. Transaction based budgeting is a more detailed, optional way to make budget entries where, instead of entering a budget amount by GL account, the budgeted amount by GL account is calculated based on any number of Transactions that are created for the line item. Each transaction consists of a Description, a Cost per Unit and the Number of Units.
If the Position Budgeting module is being utilized,check the budget levels where the amounts calculated in Position Budgeting will be swept in the Annual Budget process.
Validation Sets
new world ERP has validation sets that will need to be set up to define values for multiple fields throughout the Workforce portion of the Human Resources menu. All validation sets are numbered to help assist in the process of locating them efficiently.
Maintenance>new world ERP Suite>System>Validation Sets>Validation Set List

New – This will create a new validation set.
Delete – This will delete a selected validation set
Refresh – This will refresh any data that was manipulated
Context – Will display where the values are associated in new world ERP
Values – This will display all of the existing Values of the Validation Set
There are several validation sets that will need to be completed before employees can be created or their personal data can be managed.
The Personal Tab uses the following Validation Sets. Entries in bold are required when creating a new employee.
- Employee Name Title (367)
- Name Suffix (24)
- Employee Address Type (371)
- Gender
- Race
- Marital Status
- Military Branch (372)
- Veteran Status (373)
- Employee Education (71)
- Major (72)
- State (3)
- Email Type (387)
- Relationship (124)
- Removal Reason (134)
- Employee Phone Type (370)
- Skill - Unit of Measure (19)
- Skill – Equipment/Application (20)
- Operator License Type (41)
- Employee Inventory (70)
There are six validation sets that will be used on the Employment tab of Workforce Administration:
Validation set number 39 - Employee Status: controls the primary status of employees.
Validation set number 368 - Employee Status Event: allows an event to be tracked on the employee record to signify a change to his or her status.
Validation set number 369 - Employee Status Event Reason: allows you to attach a reason for the employee status event.
Validation set number 6 - Employment Type: labels the employee as either full time or part time, or any other variation that is created to categorize employees.
Validation Set number 7 - Employment Class: will help further define an employee’s categorization with additional information of the user’s choice.
Validation Set number 376 - EEOC Employment Type: helps to place the employee in the correct category for the Equal Employment Opportunity Commission reporting.
The Jobs Tab uses the following Validation Sets. Entries in bold are required when creating a new employee.
- Job Event (374)
- Job Event Reason (375)
- EEOC Category (9)
- EEOC Function (8)
- Benefit Exception Code (386)
- Longevity Exception Code (383)
- Pay Group (10)
Employment Status Event Maintenance
Employment Status Event Maintenance is where connections are made between the Status, Status Events and the Status Event reasons.
Maintenance>Human Resources>Event Maintenance>Employment Status Event
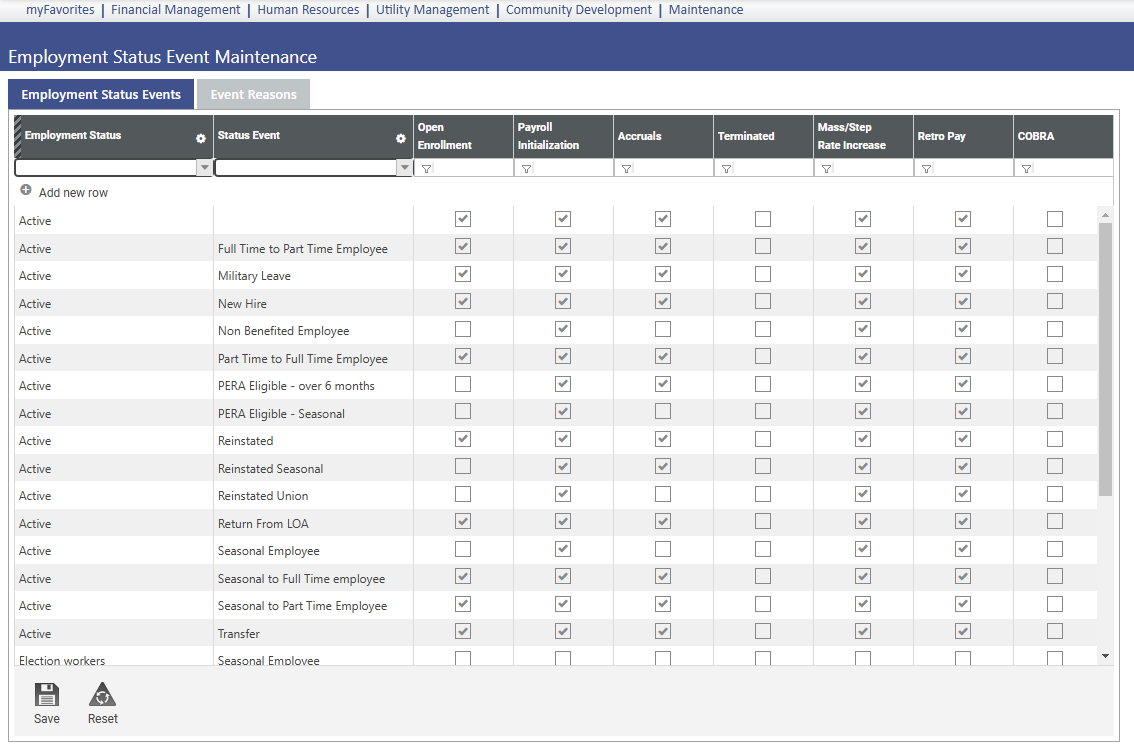
Employment Status Events – This tab contains the values of all status and status events created in the validation sets. Here, the status can be linked to a particular status event and the available options for the status to be eligible for an open enrollment process, payroll validation, leave hour accruals, mass step rate increase, retro pay, or even termination, leaving the status to be ineligible for any option.
Event Reason – The event reason tab will be used in much the same way as the Employment Status Event page. This screen will display the employment status event and the event reason that will be linked to it.
Separate Check Codes
Separate Check Codes can be used to create separate checks for different hours codes in a schedule or for separate checks in the direct deposit setup in Workforce Administration.
Maintenance>Human Resources>Pay Day Setup>Separate Check Codes
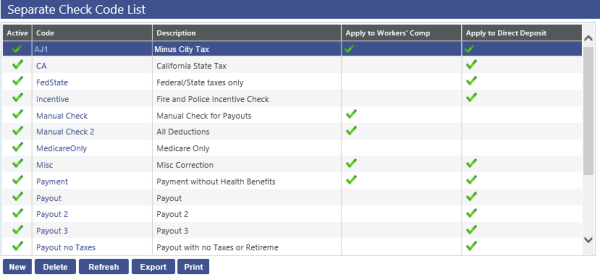
This screen will allow for the creation of separate check codes that contain different criteria for checks that will be created through the Payroll Manager.
User-Defined Fields (UDFs)
User defined fields can be used in Employment Tab of Workforce Administration to capture additional personal information or State required information for reporting purposes.
Maintenance>new world ERP Suite> Security>User-Defined Fields
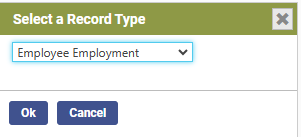
First, select the appropriate Record Type. The Record Type for Workforce Administration is Employee Employment.
The User-Defined Field (UDF) Mass Update Add-In supports SSL, HTTP and all types of UDFs. Logos.NET Server Protocol, a new field on the new world ERP UDF Mass Update Login panel, lets you select HTTP or SSL.
You may update the following types of UDFs:
- Check Box
- Date
- Monetary
- Quantity
- Text
- Validation Set
- Numeric
Creating Section Headers
The ability exists to categorize UDFs by Section Headers for organized presentation on the UDF screen. If a substantial number of UDFs are to be utilized, this can be helpful.
If UDF Section Headers are desired, they can be set-up by selecting the Section Header(s) tab.
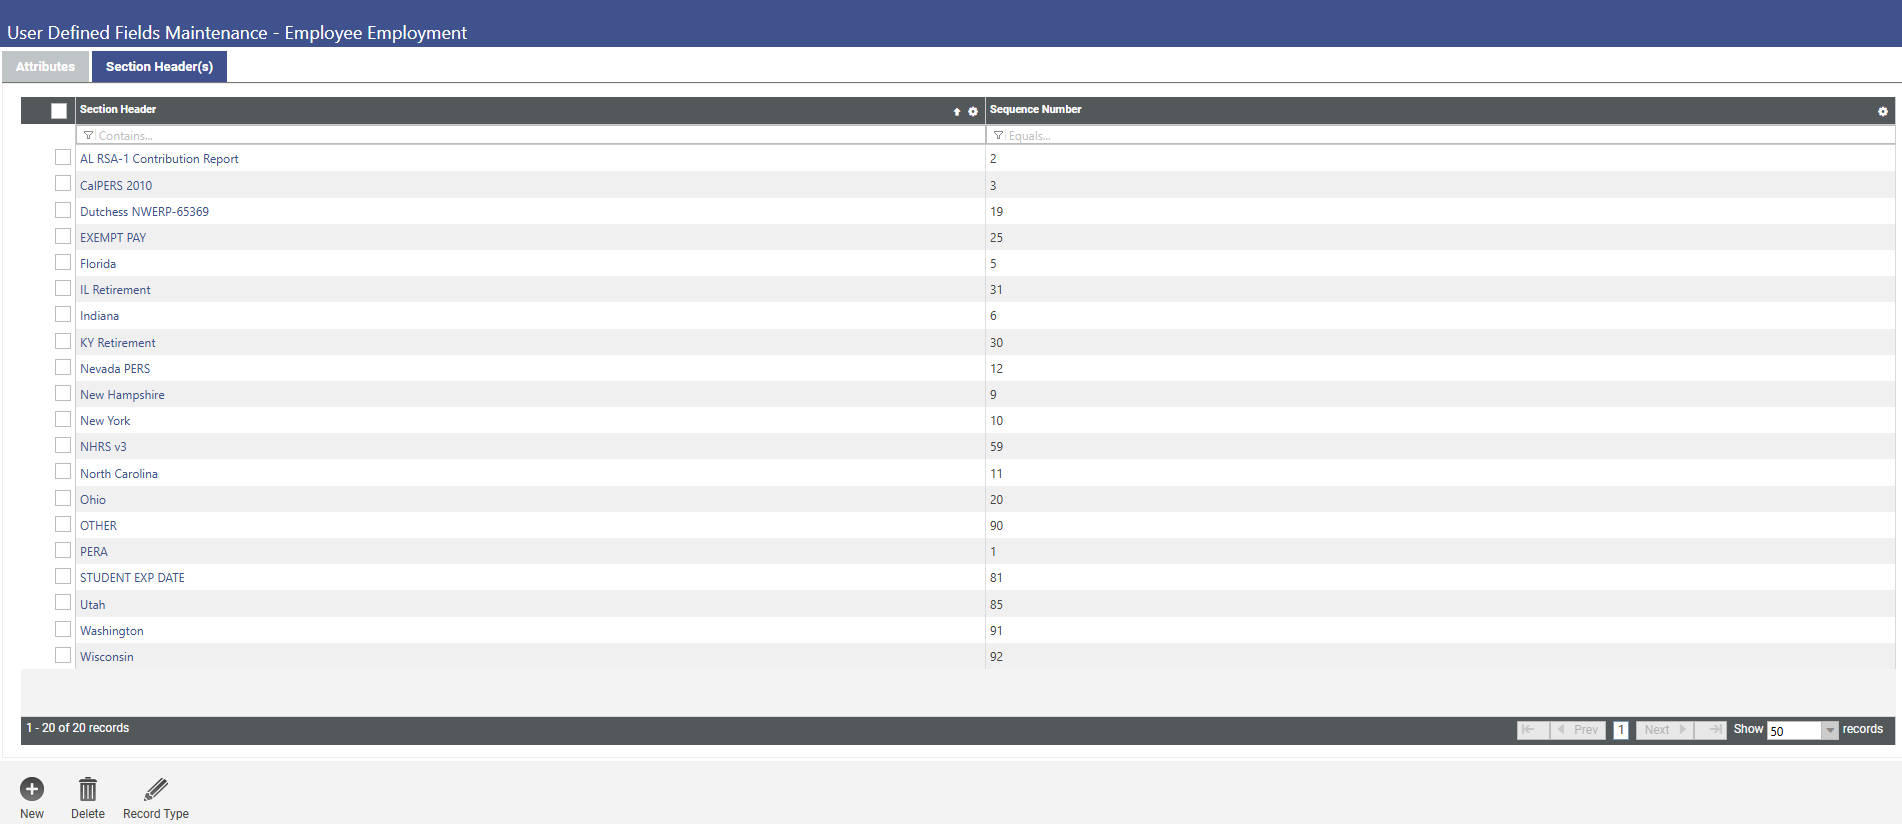
To add a Section Header, click the New button.
UDF Section Header Add window
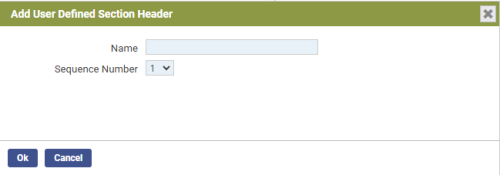
The Section Header description should contain the description of the category.
Creating User-Defined Fields
To add user defined fields, select the Attributes tab, then click the New button to add a new field.
The pop-up below will appear:
Adding a User Defined Field
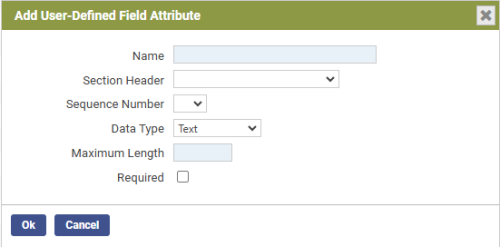
Name – This is the title of the User Defined Field.
Section Header – If appropriate, select the Section Header
Sequence Number – This will determine the order in which the field is presented within the section header.
Data Type - This is a drop-down with the following options:
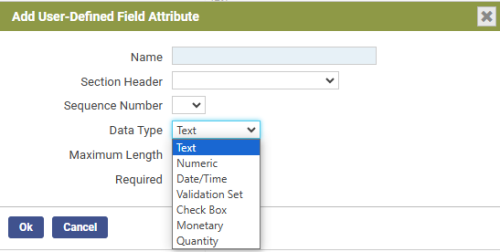
The UDF Date Type Drop-down window options are:
Text – Select this option if the desired field should be free form text. If selected, an additional field will request the maximum number of allowable characters for the field. The options for this entry are 1 to 999.
Numeric – Select this option if you wish to have a number entered in the user defined field. If selected, an additional prompt will request the minimum and maximum allowable values. These can be set to negative amounts if desired.
Date/Time – Select this option if you wish to have a Date/Time for the User Defined Field.
Validation Set – Select this option if you would like the UDF to present the user with a drop down from a validation set. If selected, an additional prompt will require specification of the validation set to use. If an additional validation set is required, go to Maintenance>new world ERP Suite>System>Validations Sets>Validation Set List and click New to create an additional validation set and its entries. A unique (unused) number will be required for any new Validation Sets created.
Check Box – Select this option if you wish the UDF to be a simple True/False utilizing a check box.
Monetary – This allows for entry of a monetary figure. If selected, the user may specify the desired number of decimal places which can be useful for per unit information.
Quantity – Select this option if you wish to record quantity information in the UDF. If selected, an additional prompt will request the number of decimal places to be recorded.
Required – The Required check box will only require that a user put an entry into that field when accessing the UDF screen in Budget Maintenance. It does not require that the user actually access the screen and it does not set a requirement in the system that the UDF is completed to advance or adopt the budget.
After creating the desired UDFs, the list of UDFs will populate the User Defined Field List screen. They can be edited or changed by clicking on the Attribute Name to re-open them.
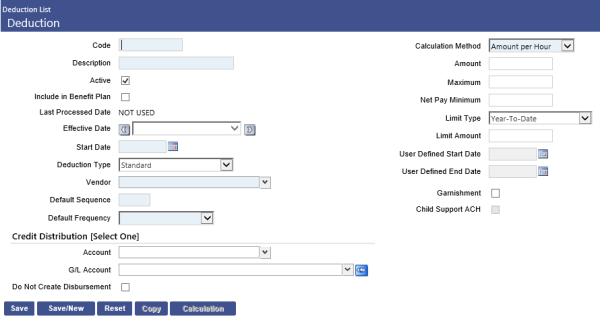
Deductions
When deductions are applied in the Payroll Data tab, the available deductions for selections will come from the list of deductions created during the setup process.
Maintenance>Human Resources>Deductions and Benefits>Deductions
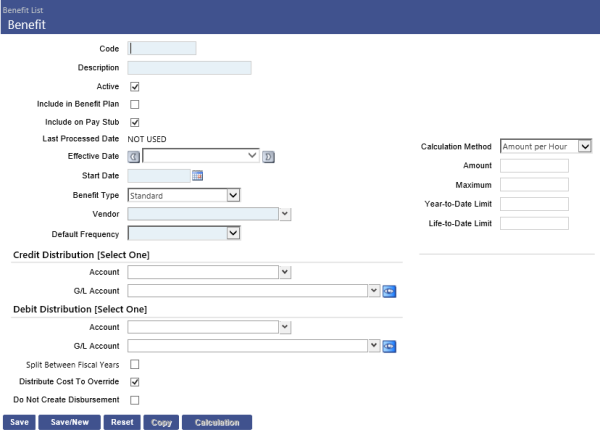
Benefits
When Benefits are applied in the Payroll Data tab, the available Benefits for selections will come from the list of created Benefits during the setup process.
Maintenance>Human Resources>Benefits and Deductions>Benefits
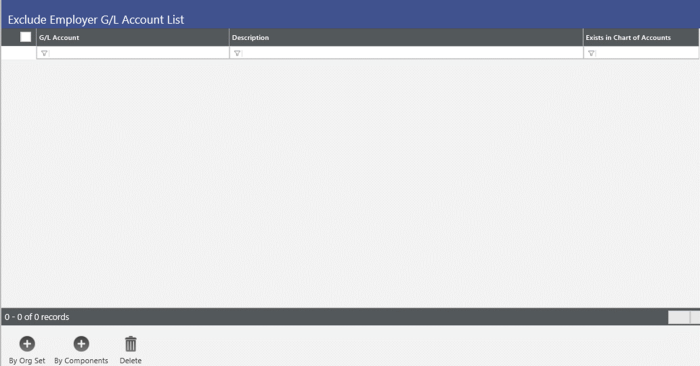
Exclude Employer Cost G/L Accounts
Exclude Employer Cost G/L Accounts lets you identify the general ledger accounts that should be excluded from benefit and employer tax allocations during payroll processing. These accounts have never been created on the G/L Account List page, or they have been created and used at one time but no longer should be.
Maintenance>Human Resources>Deductions and Benefits>Exclude Employer G/L Account List
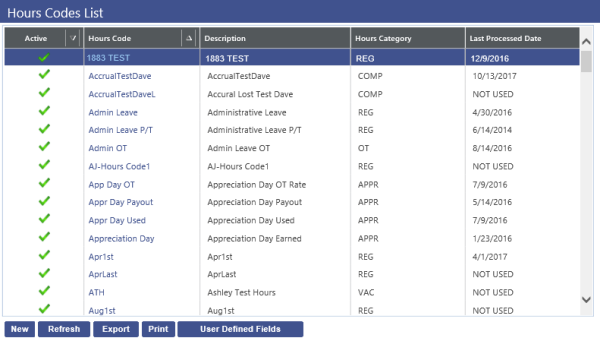
Hours Codes
Hours Codes are an essential part of the Schedule setup on the Payroll Data tab in Workforce Administration. An Hours code will need to be selected when creating a schedule of hours worked for an employee and the Hours Codes are created and housed under the Human Resources drop-down in the Maintenance menu.
Maintenance>Human Resources>Earnings Maintenance>Hours Codes
Taxes
Taxes will also need to be created to apply them to employees in the Payroll Data tab. Before taxes can be applied to an employee record, they will need to be created in new world ERP. Below is a list of taxes and the path to locate them in new world ERP.
Maintenance>Human Resources>Deductions and Benefits>Taxes

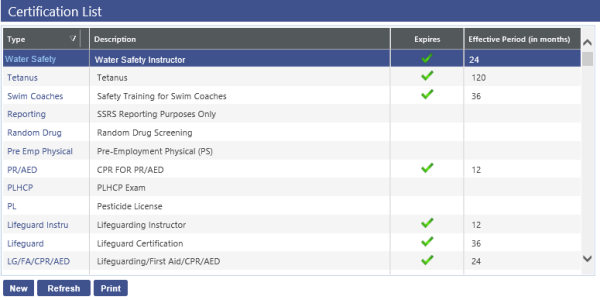
Certification
Certifications are a portion of the Payroll Data tab that will allow an employee to receive additional pay for specialized trainings or job specific training an employee has completed. This is an optional value which can also be applied without any pay increase. The Certifications will need to be built in new world ERP before they can be applied at the employee level.
Maintenance>Human Resources>Employee Attributes>Certifications
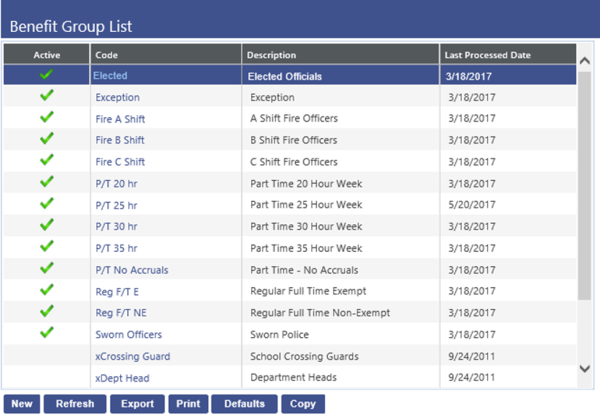
Benefit Groups
A benefit group provides a way to group employees whose benefits or other attributes are the same; for example, all employees who accrue sick and vacation time and who work the same hours per day and pay period may occupy one benefit group, while all employees whose longevity is calculated the same way may occupy another.
The payroll initialization, add employee to batch, and manual check processes return a warning if at least one tax has not been set up for an employee. If you do not want this warning to display, an Allow for No Tax Setup check box has been added to the Benefit Group page.
Maintenance>Human Resources>Employee Attributes>Benefit Groups
Benefit Plans
Benefit Plans are a way to manage benefits in a more organized method. The Benefit plan will house the deduction and benefit portion of a medical or dental plan in one central location. Benefit Plans can be applied to an employee record in the same way a standard benefit or deduction can be applied, although the build of a benefit plan is more involved. The path for Benefit plans is labeled below, although Benefit plan construction will be explained in another training document.
Maintenance>Human Resources>Benefits Administration>Benefit Plan Maintenance

Security Setup
Security for the Workforce Application of new world ERP is controlled through User Based Security and Application Permissions. Access for certain fields and menus are utilized through the use of Permissions which will control what the user is allowed to access. User Based Security will control hours codes usage for schedules.
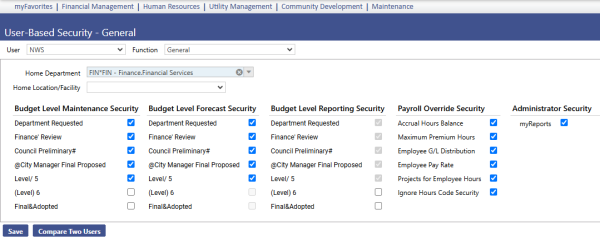
User-Based Security/General Tab
The General Tab within User Based Security is shown below:
Maintenance>new world ERP Suite>Security>User Based Security
User-Based Security/Hours Codes
The Hours Code area of User Based Security allows for filtering of the Hours Codes that a user can work with in the Payroll and Schedule setup in the Payroll Data tab.
Maintenance>new world ERP Suite>Security>User Based Security>Hours Codes

There are three available jump boxes that can be used to give users access to hours codes. All of the created hours codes will initially be in the far-left list box which means that the specified user will not have access to use or view any of them in new world ERP. If the hours codes are moved to the middle list box, labeled View, the user will be able to view the hours codes (such as in related reports), but not use or apply them in new world ERP. The list box on the right, labeled Use, will allow users to view and use all hours codes that are housed in that box.
Application Permissions
Application Permissions for Workforce Administration can typically be completed effectively with one general template. This template would include all the basic permissions to apply necessary payroll information on employees.
Change the Feature Group in the Filter panel to HR – Employee Maintenance. This will narrow down the permissions. Find the permissions in the Permissions panel that start with Workforce Administration. Marking the checkbox under the Full column will allow you to select any of the choices for the corresponding permission. To create a new employee, a minimum of the Add,Change, and Viewcheckboxes should be selected.
Permission Type – Company Applications
Feature Group – HR Employee Maintenance
|
App |
Component |
Description |
Full |
Add |
Change |
Delete |
View |
|
|
|---|---|---|---|---|---|---|---|---|---|
|
HR |
Workforce Admin-Employee. |
Provides the ability to search for employees in Workforce Administration |
X |
X |
X |
X |
X |
|
|
|
HR |
Workforce Admin Employment |
Ability to access the employment tab in Workforce |
X |
X |
X |
X |
X |
|
|
|
HR |
Workforce Admin Payroll Data – Benefit Plans |
Ability to apply Benefit Plans in the payroll data tab of Workforce |
X |
X |
X |
X |
X |
|
|
|
HR |
Workforce Admin Payroll Data – Certification |
Ability to apply Certifications in the payroll data tab of |
X |
X |
X |
X |
X |
|
|
|
HR |
Workforce Admin Payroll Data - Check Messages |
Ability to apply Check Messages in the payroll data tab of Workforce. |
X |
X |
X |
X |
X |
|
|
|
HR |
Workforce Admin Payroll Data - Deductions |
Ability to apply Deductions in the payroll data tab of Workforce. |
X |
X |
X |
X |
X |
|
|
|
HR |
Workforce Admin Payroll Data - Direct Deposit |
Ability to apply Direct Deposits in the payroll data tab of Workforce. |
X |
X |
X |
X |
X |
|
|
|
HR |
Workforce Admin Payroll Data - Schedule |
Ability to create Schedules in the payroll data tab of Workforce. |
X |
X |
X |
X |
X |
|
|
|
HR |
Workforce Admin Payroll Data - Tax |
Ability to apply Taxes in the payroll data tab of Workforce. |
X |
X |
X |
X |
X |
|
|
|
HR |
Workforce Admin Payroll Data - Benefits |
Ability to apply Benefits in the payroll data tab of Workforce. |
X |
X |
X |
X |
X |
|
|
|
Suite |
Bank Account Entry |
Ability to add or edit current bank accounts used for direct deposit. |
X |
X |
X |
X |
X |
|
|
|
HR |
Employee - Employee Name |
Ability to view or change an employee name. |
X |
|
X |
|
X |
|
|
|
HR |
Employee Entry - UDF's |
Ability to use created user defined fields in the employment tab. |
X |
|
|
|
X |
|
|
|
HR |
Employee Search |
Ability to complete an employee Search |
|
|
|
X |
X |
|
|
|
HR |
Employee Status Event Maintenance |
Ability to access the Status Event Maintenance and link status events with status reasons. |
X |
|
X |
|
X |
X |
|
Process Manager
Process Manager can be used to limit the visibility of departments and employees in Workforce Administration to certain users.
Maintenance>new world ERP Suite>Process Manager
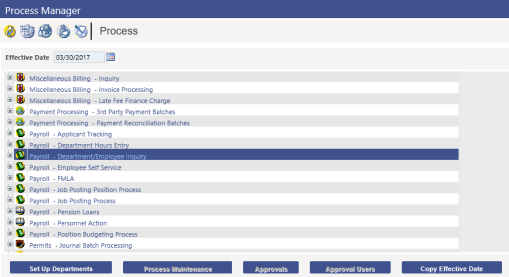
Highlight the Payroll – Department/Employee Inquiry process and click Set Up Departments. On the next screen use the list box to move departments from the Available Departments box to the Selected Departments box. Departments moved to Selected will be visible for this process. Click Save.
Breadcrumb back to the Process Manager and click the Manager icon at the top of the page. Highlight the user that you want to grant the Payroll – Department/Employee Inquiry process to and click Process Approvals.
Choose Payroll – Department/Employee Inquiry in the process drop-down menu. Move the appropriate departments over in the Selected Departments list box for the user to view in Workforce Administration.
Maintaining and applying data to the Employment and Payroll Data tabs will be managed through Workforce Administration. The Employment tab will allow the input of employee specific dates as well as User Defined fields while the Payroll Data Tab will contain all payroll information that is employee specific for deductions and benefits.
Creating an Employee
Human Resources > Workforce Administration > Create Employee
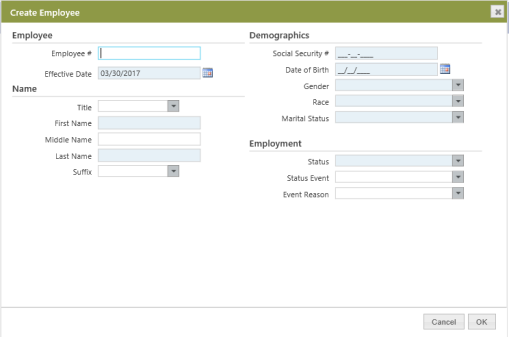
Upon choosing to create an employee, a pop-up window appears that requires certain information. Required fields are a corn silk color and optional fields are white. Click OK when complete.
Some information from this window will populate in the Personal Tab of an employee record in Workforce Administration.
Personal Tab
There are ten sections of the Personal Tab which can be accessed easily through the Quick Links section on the left side of the page. You can also use the scroll bar on the right.
Above Quick Links are Common Links which allow the attaching of documentation to an employee’s record, remote access to documentation through a web address, and an area for general comments.
The ten sections of the Personal Tab can have the following buttons in the blue bar: New, Edit, Create Event, and Delete Event.

New - use this to add new information to an unused section.
Edit - use this to edit previously entered information in the Name and Demographics sections.
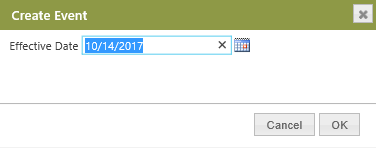
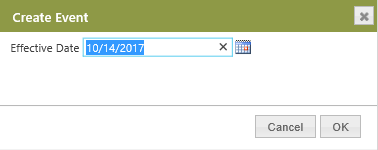
Create Event - use this to create a new point in history, or effective date, where information will change. Upon clicking this button type in a date that is after the most recent posted payroll’s pay period ending date. Then edit the information.
Delete Event - If you have created an event and changed information, you can delete the changes up until the next payroll is posted by using this button.
There are also icons that appear after adding information to most sections.
 The Edit icon allows editing of the section during setup and after Create Event has been used, but before the next payroll is posted.
 The delete icon allows for the deletion of the information during setup and after Create Event has been used, but before the next payroll is posted.
Note: To take someone out of Pending status, some sections of the Personal Tab are required when creating a new employee. Pending status means that there is not enough information to create a paycheck and W-2. The required fields of Name, Address, and Demographics need to be completed as part of the process to remove the pending status.
Name
Effective Date, First Name, and Last Name fields are required. Title and Suffix choices populate from Validation Sets. Ctrl+left click is a shortcut that will take you to the validation setup screen via a pop-up window.
The Alternate Names section allows for employees to use different names in new world ERP than what might be required on a paycheck or W-2.
Address
Effective Date, Address Type, Address, Zip, City, and State fields are required. Address Type and State choices populate from Validation Sets.
At least one address must have the Primary Address check box selected. This address will print on checks and W-2 forms.
Demographics
Effective Date, Date of Birth, Gender, Race, and Marital Status fields are required. Gender, Race, Veteran Status, Military Branch, and Marital Status choices populate from Validation Sets.
Other fields such as Light Duty, Disabled, Pension Number, and the fields under the Veteran Information and Citizenship headers are for informational purposes. Fill these in if it suits your needs.
Education
Education Type and Institution Name fields are required if choosing to complete this section. Education Type and Major choices populate from Validation Sets.
Attendance information, Employer Cost, and Employee Cost are informational fields.
Email Addresses
Email Type and Email Address fields are required if choosing to complete this section. Email Type choices populate from Validation Sets.
At least one email address must have the Primary Email Address check box selected. Select the Domain Email Address check box to have email integrate with Time and Attendance.
Contacts/Dependents
First Name and Last Name fields are required if choosing to complete this section. If you select the Dependent check box, Date of Birth is also required. Title, Relationship, Gender, and Reason Inactivated choices populate from Validation Sets.
Most information in this section is optional and for informational purposes. If you are using Benefits Administration and choose to track dependents, information about the dependent(s) will be required in this section.
Phone Numbers
Phone Type and Phone Number fields are required if choosing to complete this section. Phone Type choices populate from Validation Sets.
At least one phone number must have the Primary Phone check box selected.
Skills
Skill Type is a required field if choosing to complete this section. Skill Type choices can be set up on the Employee Attributes menu under the HR Maintenance menu. Measurement and Equipment/Application choices populate from Validation Sets.
Operator’s Licenses
License Type is a required field if choosing to complete this section. License Type and State choices populate from Validation Sets.
Inventory
Inventory Type is a required field if choosing to complete this section. Inventory Type choices populate from Validation Sets. Location choices populate from Work Sites.
Reports
Human Resources > Reports > Employee Reports
The following Employee Reports will help you survey employee information coming from the Personal Tab in Workforce Administration.
- Employee Contact Report
- Employee Emergency Contact Report
- Employee Birthday/Anniversary Report
- Employee Inventory Report
- Employee Education Report
- Employee Skills Report
- Employee SSN Verification
- EEO Reports
Employment Tab
Human Resources>Workforce Administration>Search
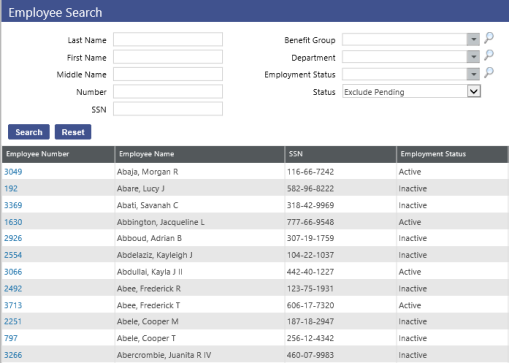
This screen will not display any employees until the search is executed. The drop-down boxes will help narrow the employee search by limiting the results by name, number, social security number, benefit groups, departments or employee status. Leaving all fields blank will return all employees. Here the search has been executed and the resulting employees are displayed. Clicking on an employee number will open the Personal tab in Workforce.
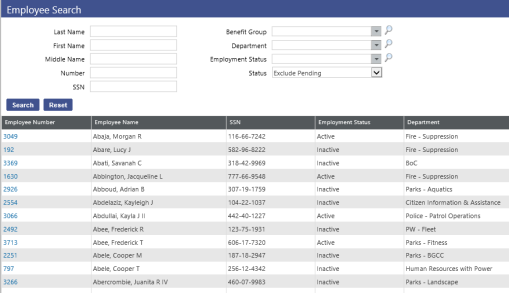
Human Resources>Workforce Administration>Search
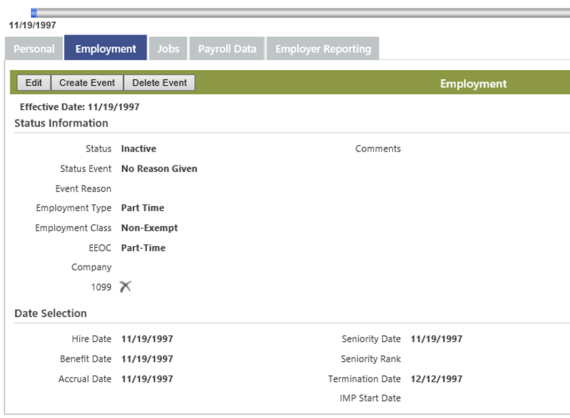
This is the result of clicking on employee number and clicking on the Employment Tab
The default page that opens will be the Personal tab. When the Employment tab is clicked, this screen will display. There are 3 buttons at the top of the screen, Edit, Create Event, and Delete Event.
Edit - By clicking the Edit button, the fields will become active and allow for changes to be made.
Create Event – Creating an event will save the current information and create a marker on the date sensitive timeline to signify the changes that will be made. By utilizing this feature, this data will be saved as its own page and will be available to be viewed by the date it was changed. The timeline will display every event that was created during the life cycle of an employee.
Delete Event – In the same manner an event is created, and event can be deleted. If an event was created in error, the Delete Event button will allow for the removal of any marker or saved data that was placed on the time line.
The fields on this screen are:
Status – This defines the relationship between the employee and payroll initialization. This status will trigger whether an employee will be pulled into a payroll batch.
Status Event – The status event can be used to categorize the employee’s status by further describing if the status is a result of being rehired, a new hire, or any other variation.
Event Reason – The Event Reason will help add additional information about why the employee has the current Status Event. An employee could have a status of Active, with a Status Event of Rehire, and a Status Reason as Seasonal Worker.
Employment Type – This field will help to label employees based on the terms of their employment.
Employment Class – Employment Class will help further describe or label the employee’s Employment Type.
EEOC – The Equal Employment Opportunity Commission will be used to label the employee’s terms of employment on the Federal EEO4 report.
Company – This field will house the federal ID number. If multiple companies are processing payroll under a single new world ERP database, then this field will help distinguish an employee’s employer on form W2.
1099 – If this box is checked, it signifies the employee is a private contractor and will need a form 1099 at the close of the calendar year.
Comments – User specific comments can be applied here.
Hire Date – The day the employee started work.
Benefit Date – This can be any date specified by the user. Usually used to mark the day the employee becomes eligible for company paid benefits.
Accrual Date – This can be any date specified by the user. Typically, it is used to mark the day the employee becomes eligible for paid time off.
Seniority Date – This can be any date specified by the user. Typically, it is used if the employee has come from another subsidiary of the company and will keep seniority as a date prior to the hire date.
Seniority Rank – This gives the user the ability to classify the employee by their Seniority Date.
Termination Date – The date an employee is effectively no longer employed.
User Defined Fields – These fields can be populated to user specifications and can be applied according to the setup from previous instruction.
Reports
Human Resources > Reports > Employee Reports
The following Employee Reports will help you survey employee information coming from the Employment Tab in Workforce Administration.
- Employee New Hire Report
- Employee Termination Report
- Employee Status Report
Jobs Tab
A “job” in Workforce Administration is a consolidated home for much of the information used to create compensation for an employee. Some of the most notable items are pay rate, grade and step, department, and General Ledger distribution. Also, you may use this page to assign an accrual plan, longevity plan, and FLSA code.
If you are using the Position Control module, a majority of the information will be filled in when you choose the position to apply to the employee.
On the far-left side of the screen, you will see Quick Links and Common Links. There is only one Quick Link on this page. If you click it, you will be taken back to the top of the Jobs tab, should you have scrolled down the page. The Common Links section allows the attaching of documentation to an employee’s record, remote access to documentation through a web address, and an area for general comments.
There are four sections of the Jobs tab: Position Detail, Position, Payroll, and G/L Distribution.
The top of the Jobs Tab has the following buttons in the blue bar: New and Create Event.
New - use this to add a new job to the page.
Create Event - use this to create a new point in history, or effective date, where information will change. Upon clicking this button, type in a date that is after the most recent posted payroll’s pay period ending date. Then edit the information on the page.
There are also several icons that appear after adding a job to the page.
The Edit icon allows for editing of the page during setup and after Create Event has been used, but before the next payroll is posted.
The Delete icon allows for deletion of the information during setup and the ability to delete after Create Event has been used, but before the next payroll is posted.
 The Checkmark icon indicates that this is the employee’s primary job. The employee can have multiple jobs but they must have one primary job designated. Multiple jobs could serve a few purposes: additional pay rates, G/L distributions, workers’ comp codes, benefit groups, or pay groups.
Note: To take someone out of Pending status, the Jobs tab is required when creating a new employee. Pending status means that there is not enough information to create a paycheck and W-2.
Also, the required fields of Name, Address, and Demographics need to be completed on the Personal Tab as part of the process to remove the pending status.
Job Detail
There are no required fields in this section. The Job Event field populates from a Validation Set and is used to denote occasions where employees takes on or changes job responsibilities. The Event Reason field populates from a Validation Set and is used to denote reasons why an employee’s job is changing.
Ctrl+left click is a shortcut that will take you to the validation setup screen via a pop-up window.
Comments is an open text field for additional comments.
Position & Payroll
The following charts describe the function and requirements of these sections.
|
Field Name |
Field Description |
|---|---|
|
Position |
Pulls from Position Control. Populates many fields on the Jobs tab. If not using Position Control, this is required. |
|
Title |
A title for the employee’s job. A required field if not using Position Control. An optional field if using Position Control. |
|
Position Entry Date |
The date that the employee took on this job’s responsibilities. |
|
Department |
Provides report sorting capabilities. This is a required field. |
|
Department Entry Date |
The date that the employee entered the department which the position reports to. |
|
Union Code |
An informational field that denotes an employee’s union affiliation. This field populates from a Validation Set. |
|
Worksite |
An informational field that denotes an employee’s physical work location (address). When completed, this field helps with sorting of Check Stubs. This field populates from a Maintenance>HR>Employee Attributes>Work Sites. |
|
Workers’ Comp Code |
This field assigns an employee’s Workers’ Compensation code that was set up at Maintenance>HR>Deductions and Benefits>Workers’ Compensation |
|
EEOC Category |
This field assigns an EEOC-related category to an employee. This field populates from a Validation Set. |
|
EEOC Function |
This field assigns an EEOC-related function to an employee. This field populates from a Validation Set. |
|
Benefit Group |
This field assigns a Benefit Group to an employee. Benefit Groups are used to group employees for reporting, benefits, and sorting purposes. |
|
Benefit Exception |
This field assigns an exception to an employee for benefits purposes, which is first set up on the Rule Set of the Benefits Administration plan. This field populates from a Validation Set. |
|
Accrual Plan |
This field assigns an Accrual Plan and its related profiles to an employee. |
|
Accrual Plan Exception |
This field assigns an exception to an employee for accrual purposes, which is first set up on the Rule Set of the Accrual Plan. This field populates from a Validation Set. |
|
Longevity Plan |
This field assigns a Longevity Plan to an employee. |
|
Longevity Exception |
This field assigns an exception to an employee for longevity purposes, which is first set up on the Longevity Plan. This field populates from a Validation Set. |
|
Plan Calculation Percent |
Used when the following are calculated: accruals, longevity and the percent of plan costs an employee will pay for benefits. |
|
Position FTE |
Required if a Position has been selected. It tells the number of employees (full-time equivalents) who may be active in this position at one time. This entry will default from Position Control. |
|
Daily Hours |
This field denotes the number of work hours assigned to this position per day. This field is required. |
|
Cycle Hours |
This field denotes the number of cycle hours assigned to this position per day. This field is required. |
|
Annual Hours |
This field denotes the number of annual hours assigned to this position per day. This field is required. |
Fields in the Payroll section of the Jobs tab
|
Field Name |
Field Description |
|---|---|
|
Pay Group |
Identifies the employee's pay group, such as weekly or bi-weekly. This is a required field and populates from a validation set. |
|
Grade |
This is the pay grade code. It is a required field. |
|
Hourly Rate |
This is the employee’s rate of pay. It is required, and is filtered by grade. |
|
Special Assignment |
This code identifies an additional amount of pay to be added to the hourly amount for an hourly grade/step employee. |
|
Project |
Hours will be charged to this project code from the Financial Management application. |
|
FLSA |
This field populates from FLSA codes that have been set up. |
|
FLSA Rate |
This is an override pay amount the employee receives for FLSA. This amount is the weighted average hourly rate of pay for FLSA hours. |
|
Holiday Time |
If selected, this determines that an employee is eligible for holiday time. |
|
Holiday Hours |
This field is an override to the number of holiday hours that are set up on the Benefit Plan. |
|
Pay Type |
This is a view-only field that reflects the grade type that an employee is assigned to (annual, hourly, or salary). |
|
Grade Minimum |
This is a view-only field that reflects the grade minimum amount. |
|
Grade Maximum |
This is a view-only field that reflects the grade maximum amount. |
G/L Distribution
Although not corn silk in color, this section is required for payroll processing. The G/L distribution will fill in from Position Control, or you can enter/override it manually. Click New or Edit. Search for the org. set created in the Financial Management application that you want to assign to this employee.
The Percent field is required. Whether there are one or many distributions, the total must equal 100%.
Click Save, then click OK to exit the G/L entry pop-up window.
Reports
Human Resources > Reports > Employee Reports
The following reports will help you survey employee information coming from the Jobs Tab in Workforce Administration.
- Employee Pay Rate Report
- Employee Job Change Report
- Employee Information Report which includes EEOC categories
Related reports on Position Control can be found here: Human Resources > Reports > Position Control
Payroll Data Tab
Human Resources>Workforce Administration>Search
This screen will not display any employees until the search is executed. The drop-down boxes will help narrow the employee search by limiting the results by name, number, social security number, benefit groups, departments or employee status. Leaving all fields blank will return all employees. Here the search has been executed and the resulting employees are displayed. Clicking on an employee number will open the Personal tab in Workforce.
Human Resources>Workforce Administration>Search
This is a result of clicking on employee number and clicking on the Payroll Data Tab
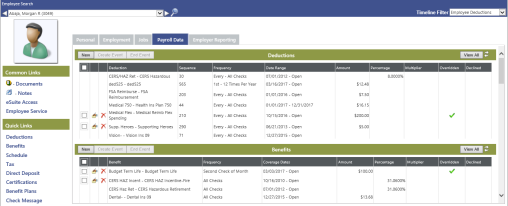
Deductions
Deductions is the first of many sub-headings under the Payroll Data Tab. This screen displays all the current and past deductions that have been applied to this employee. There are several features that can be utilized to add, modify and end a deduction. The buttons housed in the Deductions banner will be used to accomplish these functions.
A column of check boxes has been added on the far-left of the Deductions and Benefits grids to let you create end events for multiple deductions and benefits at once.
The New button will give the ability to add a new deduction to the employee, Create Event can be used to change a current deduction that has already been used in payroll, and the End Event button is used to stop or end the deduction from being taken from the employee.
New – This button will open a pop-up window allowing the creation of a new deduction.
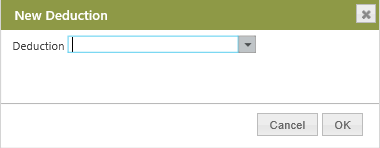
Opening the drop-down box will display the available deductions that can be applied to the employee. After selecting a deduction, click the OK button and the following screen will appear.
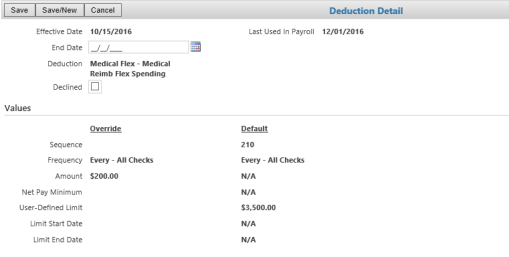
Effective Date – This is the date the deduction will begin
End Date – This is the date the deduction will end, this field does not need to be populated if this is a deduction that is ongoing.
Declined - This check box lets Michigan Office of Retirement Services (ORS) users assign employees benefits and deductions with zero contributions so the employees will be reported correctly on the Michigan ORS Report and transmittal file. The Create ORS Member Data process will include benefits and deductions that have been declined.
The Values section of this screen controls the frequency, amount, and limit of the deductions. These values can be defaulted in at the deduction level, which will display under the column labeled Default or they can be overriden at the employee level under the Override column. If the default information is correct, then no override information will be necessary.
Sequence – This value determines the order that deductions will be taken out of the employee’s check. This references all deductions and not just the deductions applied to the employee.
Frequency – The frequency controls how often the deduction will occur in payroll. Sometimes deductions will only be effective for the first pay of the month, whereas other deductions will be effective every pay period.
Amount – The amount field will control the dollar amount to be deducted from the employee. If the deduction is set up as a percentage, then this field will be labeled Percent. If the default amount is not accurate, the override field can be utilized to apply the correct amount for the employee.
Net pay Minimum – This field is most commonly used with garnishments that allow an employee to keep a fixed amount of net pay and applying the overage to the third party agency. Entering a value in this field will leave the employee with the specified net pay and the remaining pay will be deducted.
Year-to-Date Limit – This field can be useful if a deduction has a maximum amount to be deducted for the year. If an amount is populated here, it will not allow the deduction to exceed this amount for the current calendar year.
The Create Event button can be used to change an exiting deduction. To utilize this feature, highlight a current deduction by clicking on it. This will enable the Create Event and End Event button. Clicking on the Create Event button will trigger the pop-up window requesting a new effective date for the deduction. The new effective date will populate with the earliest date the deduction can be modified.
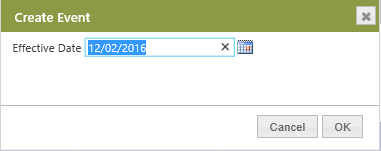
After the new effective date has been entered and reviewed for accuracy, the OK button can be clicked and the deduction detail will be displayed.
This screen can now be modified in the same way a new deduction is created.
The End Event button will be used when a deduction should no longer be active on the employee record. To utilize this feature, highlight a current deduction by clicking on it or checking the checkbox. This will enable the Create Event and End Event buttons. Clicking on the End Event button will trigger the pop-up window requesting an End Date for the deduction. The End Date will populate with the earliest end date that the deduction can be ended.
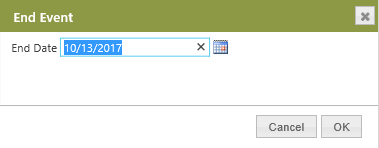
After the end date has been entered and reviewed for accuracy, the OK button can be clicked and the deduction will be removed from the employee record.
Benefits
The next sub-heading under the Payroll Data Tab is Benefits. This screen displays all the current and past benefits that have been applied to this employee. There are several features that can be utilized to add, modify and end a Benefit. The buttons housed in the Benefits banner will be used to accomplish these functions.
A column of check boxes has been added on the far-left of the Deductions and Benefits grids to let you create end events for multiple deductions and benefits at once.
The New button will give the ability to add a new benefit to the employee, Create Event can be used to change a current benefit that has already been used in payroll, and the End Event button is used to stop or end the benefit from being applied to the employee.
New – This button will open a pop-up window allowing for the creation of a new benefit.
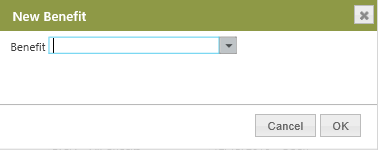
Opening the drop-down box will display the available benefits that can be applied to the employee. After selecting a deduction, click the OK button and the following screen will appear.
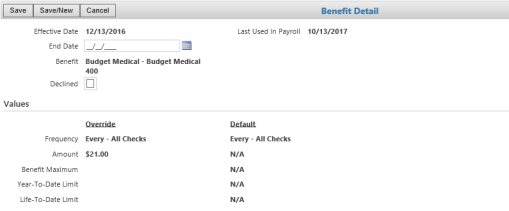
Effective Date – This is the date the benefit will begin.
End Date – This is the date the benefit will end, this field does not need to be populated if this is a benefit that is ongoing.
Declined - This check box lets Michigan Office of Retirement Services (ORS) users assign employees benefits and deductions with zero contributions so the employees will be reported correctly on the Michigan ORS Report and transmittal file. The Create ORS Member Data process will include benefits and deductions that have been declined.
The Values section of this screen controls the frequency, amount, and limit of the benefit. These values will be defaulted in at the benefit level, which will display under the column labeled Default or they can be overriden at the employee level under the Override column. If the default information is correct, then no override information will be necessary.
Frequency – The frequency controls how often the benefit will occur in payroll. Sometimes benefits will only be effective for the first pay of the month, whereas other deductions will be effective every pay period.
Percent – The percent field will control the percenage of wages to be applied for the benfit. If the benefit is set up as a flat dollar amount, then this field will be labeled Amount. If the default percent is not accurate, the override field can be utilized to apply the correct percent for the employee.
Benefit Maximum – If this benefit has a maximum amount that can be applied to an employee record per pay period, then the maximum should be populated into this field.
Year-to-Date Limit – This field can be useful if a benfeit has a maximum amount to be applied for the year. If an amount is populated here, it will not allow the benfefit to exceed this amount for the current calendar year.
Life-to-Date Limit – The life to date limit is similar to the year-to-date limit in the fact that it is set up the same way, although this will not reset at the end of a calendar year. It will contiunue until the employee has reached a lifetime maximum defined by this amount.
The Create Event Button can be used to change an exiting benefit. To utilize this feature, highlight a current benefit by clicking on it. This will enable the Create Event and End Event button. Clicking on the Create Event button will trigger the pop-up window requesting a new effective date for the benefit. The new effective date will populate with the earliest date the benefit can be modified.

After the new effective date has been entered and reviewed for accuracy, the OK button can be clicked and the benefit detail will be displayed.
This screen can now be modified in the same way a new benefit is created.
The End Event button will be used when a benefit should no longer be active on the employee record. To utilize this feature, highlight a current benefit by clicking on it or checking the checkbox. This will enable the Create Event and End Event button. Clicking on the End Event button will trigger the pop-up window requesting an End Date for the deduction. The End Date field will populate with the earliest end date that the deduction can be ended.
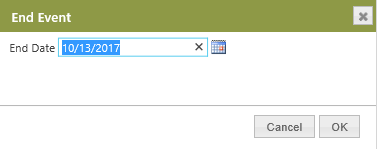
After the end date has been entered and reviewed for accuracy, the OK button can be clicked and the benefit will be removed from the employee record.
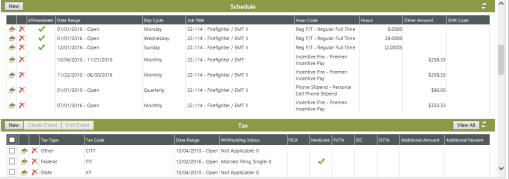
Schedule
The Schedule can be used to load specific hours codes and hours on an employee record. The schedule that is created here can be pulled into any payroll batch the employee is eligible for. This will alleviate the need to key in payroll hours every pay period where the employee works the same repeating schedule. This is not a permanent schedule of hours worked. It can be easily changed or manipulated after being loaded into the pay batch in Payroll Manager.
The New button will give the ability to add a new schedule line to the employee. When the New button is clicked, this pop-up window will display.
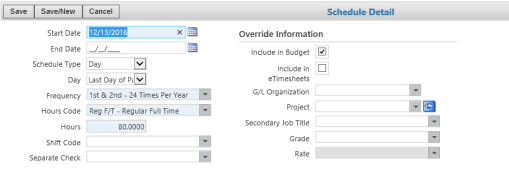
Start Date – This field will trigger the start date of the employee schedule. This can be dated to begin at a future date.
End Date – The end date should only be populated if there is a specific time period the schedule should be active.
Schedule Type – The options for schedule type are Day and Cycle. Day refers to a specific day or days during the pay period and Cycle will allow for a periodic occurrence of the schedule.
Day – This controls the day of the week in the pay period where the hours codes and hours will be applied to the employee.
Frequency – The frequency controls the number of times each month this particular schedule line will be loaded in the payroll batch.
Hours Codes – The hours code will dictate the type of pay used for the hours that will be loaded into the payroll system. It can be any hours code that has been created. If the hours code calculation is rate x hours, then a field will appear looking for hours, if the hours code is set up as a flat amount, then a new field will appear asking for a dollar amount to be loaded.
Shift Codes – Shift codes can be applied to the predetermined hours to increase pay on a regular basis.
Separate Check – If the schedule dictates the hours or pay amount be processed on a separate check, then the separate check code can be applied here and will automatically pay this amount as a separate check in the payroll process.
Override Information
The override information can be populated in the schedule creation to prevent the usage of the default GL, project, secondary job, grade, and rate that is currently set up on the employee level. These fields only need to be populated if the employee’s default information is not accurate for the specified schedule.
Note: The schedule can be manipulated or deleted at will. There is no need to create an event to change or delete. To remove a schedule, click on the red X to the left of the Date Range column, to edit a current schedule, simply click on the Editicon.
Tax
Tax is another sub-heading under the Payroll Data tab. This screen displays all the current tax information that has been applied to the employee. There are several features that can be utilized to add, modify and end a tax. The buttons housed in the tax banner will be used to accomplish these functions. In many cases, there will be a need to add more than one tax to an employee. This example will demonstrate the application of federal taxes, although state taxes and local taxes will also need to be applied in the same manner.
The New button will give the ability to add a new tax to the employee, Create Event can be used to change a current tax that has already been used in payroll, and the End Event button is used to stop or end the tax from being applied to the employee.
New – This button will open a pop-up window allowing the creation of a new tax.
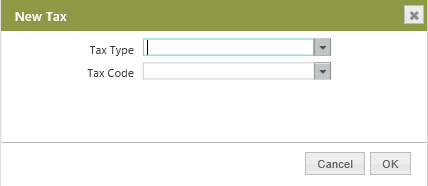
This pop-up window requires two fields, the tax type and the tax code. These tax fields will have been created during the initial payroll setup. Upon completion, clicking the OK button will display the following screen.
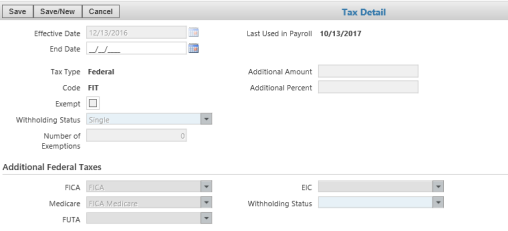
Effective Date – The date the tax will become effective on the employee.
End Date – The end date should only be populated if the tax has a specific end date, normally the taxes applied to an employee will not have an end date.
Exempt – This check box should only be selected if the employee claims exemption from the particular tax.
Withholding Status – Tax status will have been built during the construction of the tax tables and the most common tax status are single and married.
Number of Exemptions – This is a numerical value that will need to be assigned to this field which will determine the number of dependents or exemptions the employee will claim.
Additional Amount – If the employee elects to have additional flat dollar amount withheld for this tax agency, the amount can be loaded here.
Additional Percent – If the employee elects to have an additional percent of tax withheld for this agency, then the percentage should be loaded here.
Additional Federal Taxes
The additional federal taxes section houses the subsidiary taxes regulated by the federal government. Here is where the FICA, Medicare, FUTA, and EIC taxes can be applied to the employee. These fields only need to be populated if the particular tax applied to the employee.
The Create Event Button can be used to change an existing tax. To utilize this feature, highlighting a current tax by clicking on it. This will enable the Create Event and End Event button. Clicking on the Create Event button will trigger the pop-up window requesting a new effective date for the tax. The new effective date will populate with the earliest date the tax can be modified. The most common change made to an employee tax is a withholding status change, which will require the use of the Create Event button.
After the new effective date has been entered and reviewed for accuracy, the OK button can be clicked and the tax detail will be displayed.
This screen can now be modified in the same way a new tax is created. This example refers to the state tax, which resembles the federal screens in all respects with the exception that there are not any subsidary taxes mandated by the state agency that need to be selected like FICA or Medicare.
The End Event button will be used when a tax should no longer be active on the employee record. To utilize this feature, highlight a current tax by clicking on it or checking the checkbox. This will enable the Create Event and End Event button. Clicking on the End Event button will trigger the pop-up window requesting an End Date for the tax. The End Date will need to be entered and by clicking the OK button, the tax will no longer be active on the employee record.
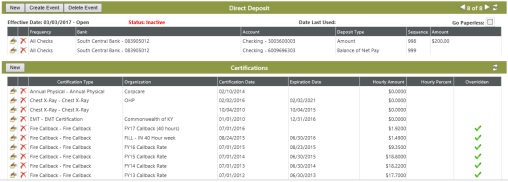
Direct Deposit
The Direct Deposit section will allow the application of a bank account or multiple bank accounts to an employee record in order to make payroll payments electroncally through an ACH process. Much like the deductions, benefits, and taxes, there are three main optoins available to manipulate the direct deposit data in the direct deposit ribbon. The options are New, Create Event and End Event.
Clicking the New button will display the following pop-up window.
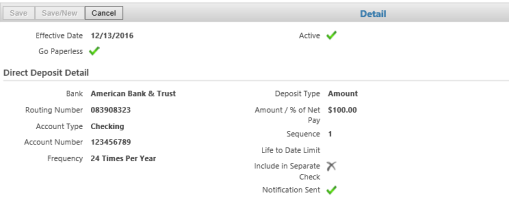
Effective Date – The date the direct deposit will become effective on the employee.
Go Paperless – If this check box is selected, it will prevent the EFT advice from printing through the payroll payment patch.
Bank – This drop box will open the available banks that have been created in new world ERP during the setup process.
Account Type – There are only two options for this field, checking and savings. A value will need to be entered to define the account being set up.
Account Number – This needs to be populated with the final desination of the ACH into the account that is being set up.
Frequency – The frequency controls how often the direct deposit will occur during the month.
Deposit Type – This drop box determines the calculation of the direct deposit. The options are Amount, where a flat amount can be sent to this particular account, Percent of net pay, where a specified percent of net pay can be allocated to this account, and Balance of Net Pay, where the entire net pay will be deposited into the account.
Sequence – The sequence will deteremine the order in which direct deposits will be removed from the net pay and deposited. When multiple accounts are set up on an employee, it is important to assign the sequence carefully. When the option for Balance of Net Pay is selected in the Deposit Type field, the sequence will automatically populate as 999. If any other deposit type is selected, a sequence will need to be populated. A sequence of 1 will siginify this particular direct deposit will be first in line to be removed from the net pay, where a sequence of 2 means it will follow the direct deposit with the sequence of 1.
Life-to-Date Limit – This field can be useful if a direct deposit has a maximum amount not to be exceeded for the duruation of its existance. If an amount is populated here, it will not allow the benfefit to exceed this amount while it is active.
Include in Separate Check – If the direct deposit dictates an amount be processed on a separate check, then the separate check code can be applied here and will automatically pay this amount as a separate direct deposit in the payroll process.
Notification Sent – If this check box is selected, a pre-note has already been sent and the direct deposit account information is accurate and active, resulting in an immediate direct deposit with the employee’s first check. If this box is cleared, then the first payroll processed with the direct deposit setup will not be sent electronically.
Create Event – This option can be used to change an exiting direct deposit. To utilize this feature, highlighting a current direct deposit by clicking on it. This will enable the Create Event and End Event button. Clicking on the Create Event button will trigger the pop-up window requesting a new effective date for the benefit. The new effective date will populate with the earliest date the benefit can be modified. From here the direct deposit can be modified in the same manner it was originally set up.
End Event – The End Event button will not be used when a direct deposit should be inactive on the employee record. To remove a direct deposit, the Create Event button must be used. Highlight the direct deposit and click the Create Event button and select the next available date for the event. Once this has been completed, the red X next to the direct deposit will be ready for use. By clicking the red X, it will remove the direct deposit and the field will be cleared of the entry and the direct deposit will no longer be active on the employee record.
Certifications
Certifications are a method to increase an employee’s pay or reward them by increasing their rate of pay for having specific qualifications that apply to their job. Certifications can also be applied for tracking purposes only where it does not increase the employee’s hourly pay. The certifications are built during the payroll setup process and will be applied here in the payroll data tab. Like many of the other items housed under the payroll data tab, certifications can be added, removed and edited on individual employees through the use of the buttons on the certification ribbon.
New – This button will allow you to add a new certification to an employee. When the new button is selected, a pop-up window will display requesting a certification type. Once the certification is selected from the drop-down menu, executing the OK button will display the certification detail screen.
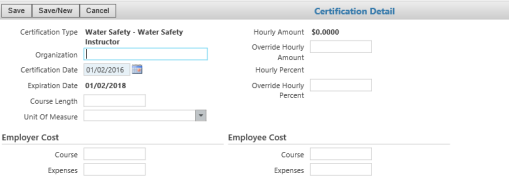
Certification Type – Select the Certification that was created during the payroll setup that will be applied to the employee.
Organization – This field will help define the group or organization that is associated with this particular certification.
Certification Date – Date the certification was acquired by the employee.
Expiration Date – If this certification expires after a specific time period, this field will need to be populated with the expiration date.
Course Length – This field can be utilized to display the length, usually measured in a unit of time, for the required course to receive the certification.
Unit of Measure – Unit of Measure is a description of time it takes to complete the course. The course length could be a value of 1, and the unit of measure would be in days or weeks.
Hourly Amount – If the certification dictates an increase in pay, the amount will be displayed here upon application to the employee.
Override Hourly Amount – If the hourly amount is not accurate, this field will allow for a different amount to be used for this particular employee.
Hourly Percent – If the certification dictates an increase in pay, the percent will be displayed here upon application to the employee.
Override Hourly Percent – If the hourly amount is not accurate, this field will allow for a different amount to be used for this particular employee.
Fields listed below Employer and Employee Costs will populate if these costs were associated during the creation of the certification, but can also be input on this screen as well.
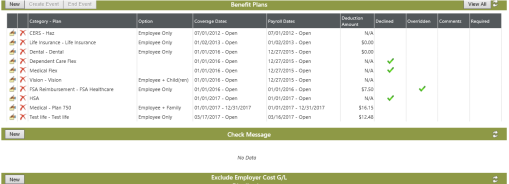
Benefit Plans
Benefit Plans is the next sub-heading under the Payroll Data Tab. This screen displays all the current and past benefits plans that have been applied to this employee. There are several features that can be utilized to add, modify and end a Benefit Plan. The buttons housed in the Benefit Plan banner will be used to accomplish these functions.
The New button will give the ability to add a new Benefit Plan to the employee, Create Event can be used to change a current Benefit Plan that has already been used in payroll, and the End Event button is used to stop or end the Benefit Plan from being applied to the employee.
New – This button will open a pop-up window allowing the creation of a new Benefit Plan.
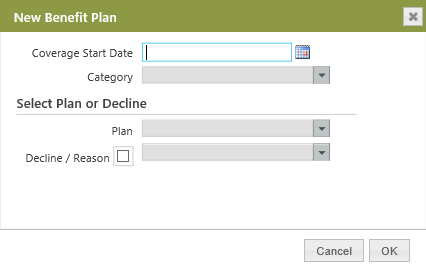
Coverage Start Date – This is the date the coverage for the actual benefit will begin.
Category – This category will define the type of benefit, weather it is a medical or dental coverage.
Plan – This will be a drop box of all the available plans under the category that was selected above.
Decline/Reason – This will be used only if it is necessary to track the plan an employee is eligible for and they have declined coverage.
Once this information is completed, clicking the OK button will result in the following screen.
Coverage Start Date – This date was selected earlier with the last screen and will default in.
Coverage End Date – This field should only be populated if the coverage will end prior to the scheduled end of the benefit plan year.
Category – The category will default in from the previous screen.
Plan – The plan will default in from the previous screen.
Option – This will be the employee’s coverage option, usually for a medical category, the options would be employee only, employee plus one, and family coverage.
Enrollment Date – This date will only be populated if this Benefit Plan was applied to the employee through an open enrollment process.
Last Used in Payroll Date – This date will be populated with the last day the Benefit Plan was used by this employee.
Payroll Start Date – This date dictates the day the Benefit will be applied to the employee’s pay check.
Payroll End Date – This field should only be populated if the Benefit Plan will end prior to the scheduled end of the benefit plan year.
Frequency – The frequency controls how often the Benefit Plan will be applied to the employee record during the month. This field cannot be changed here; it is built into the Benefit Plan
Decline Reason – The coverage for an employee can be declined here and a reason can be entered.
Comments – Any notes that are pertinent to this employee can be entered here.
Plan Cost
Rule Set – This rule set determines the eligibility of the employee based on date criteria.
Total Annual Cost – This field will display the total annual cost of the Benefit Plan.
Employee Benefit Amount – This will be the amount associated to the benefit side of the plan.
Employee Deduction Amount – This will be the amount that will be deducted from the employee paycheck.
The Dependents section here will display the dependents that have been loaded into the Personal data tab in Workforce. If the coverage option for the benefit plan contains coverage for more than the employee, then the covered dependents will need to be marked here.
Create Event – This can be used to change an exiting Benefit Plan. To utilize this feature, highlighting a current Benefit Plan by clicking on it. This will enable the Create Event and End Event buttons. Clicking on the Create Event button will trigger the pop-up window requesting a new effective date for the Benefit Plan. The new effective date will populate with the earliest date the Benefit Plan can be modified.
After the new effective date has been entered and reviewed for accuracy, the OK button can be clicked and the Benefit Plan detail will be displayed.
The resulting screen can now be modified in the same way a new Benefit Plan is applied.
End Event – This button will be used when a Benefit Plan should no longer be active on the employee record. To utilize this feature, highlight a current benefit by clicking on it. This will enable the Create Event and End Event buttons. Clicking on the End Event button will trigger the pop-up window requesting an End Date for the Benefit Plan. The End Date will populate with the earliest end date that the Benefit Plan can be ended.
Exclude Employer Cost G/L Accounts
To accommodate cases when particular expense accounts should not be used for some or all employee benefits, workers' compensation or employer taxes, an Exclude Employer Cost G/L Distribution section is in the Workforce Administration Payroll Data tab. In this section, you may select the general ledger expense accounts that are to be excluded when payroll calculations are run. To select a G/L account, click the New button, located on the far-left side of the section header. An Exclude G/L Distribution Detail section will display, containing one field, G/L Distribution. Type the name or click one of the prompts to select the full G/L account to be excluded, and click Save or Save/New, depending on whether you want to exclude more than one account. Saved selections will be added to a grid.

Check Message
Here Check Stub messages can be applied to employee paychecks.
Effective Date – The day the message will be effective added to the paycheck stub.
End Date – The date the message will no longer be active on the employee paycheck.
Check Message – This is the body of the message, type any required message.
Reports
Human Resources > Reports > Employee Reports
The following reports will help you survey employee information coming from the Payroll Data Tab in Workforce Administration.
- Employee Benefit Report
- Employee Deduction Report
- Employee Direct Deposit Report
- Employee Tax Report
- Employee Audit Report
Employer Reporting Tab
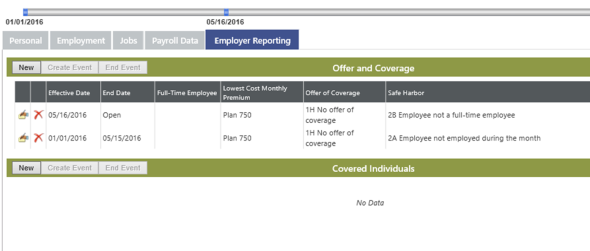
Offer and Coverage
The Offer and Coverage section on the Employer Reporting tab tracks employee information to be reported in Part II of the 1095-C form required under the Affordable Care Act (ACA).
Covered Individuals
For customers with self-insured plans who do not track covered individuals with Benefits Administration, the Covered Individuals section on the Employer Reporting tab tracks individuals to be reported in Part III of the 1095-C form required under the Affordable Care Act (ACA).
In the Covered Individuals Detail section of the Employer Reporting tab, an employee may be deselected as a covered individual.
In the Withholding Status column of the Taxes grid, an employee's number of elected exemptions appears next to each withholding status. Additional Amount and Additional Percent columns also have been added to the grid.