Journal Processing
Introduction
This document is intended to provide users with a working knowledge of processing and posting journals to the General Ledger.
In New World ERP all journals, both system created and user created, are processed through the Journals module within the Financial Management application.
The system will create journal entries that will need to be validated, approved and processed through this section. Examples of modules within the system that will create journals that require posting are:
- Revenue Collections
- Accounts Payable
- Purchasing
- Payroll
- Utility Billing
- Permits
- Licensing
The user will be able to create manual journal entries for items that are not processed through any other application within the system, as well as make adjustments, corrections, and reclassifications of previously posted entries in the system.
System Settings
Company Suite Settings
Maintenance > new world ERP Suite > System > Company Suite Settings
Journal Processing Tab
This screen allows the user to establish the system business rules for journal processing.
Post Dates – The minimum and maximum posting dates define the eligible date range for posting journals to the system. This eligible date range will also apply to other modules in the system such as Miscellaneous Billing, Utilities, and Business Licensing.
- Minimum – this is the earliest historical date that postings will be allowed. Example: If this date is set to January 1, 2012, the system will not allow any journals dated earlier than that date to be created or posted.
- Maximum Future – This is the maximum future date that the system will allow journals to be posted. Example: If this date is set to December 31, 2012, the system will not allow any journals to be created or posted after December 31, 2012.
- Post Journals Prior to Minimum – Checking this box will allow manual journals and sub-ledgers to be created and posted prior to the minimum posting date. When processing sub-ledgers the user will receive a warning message that they are executing transactions outside of the minimum posting date. The system will allow them to “Accept” the transaction and continue processing.
Processing Options
Centralized Journal Processing Department – this will be the default functional department that will be used for processing the manual journal entries. Often a functional department such as “System Journals” is established as a functional department and applied to this field. This allows a minimum number of approvals for the system generated journals.
Allow Changes to Approved Journals – The system standard is to not allow any changes to the journal entries after an approval is in place. Checking this box will allow users at higher approval levels to make changes to the journals after lower level approvals have been applied. If the box is not checked, to make a change to the journal, all approvals must be removed from all levels.
Journal Processing and Validation Sequence – This is the system rule defining the required sequence of validations and approvals. There are 3 options:
- Require Approvals for Validations – this means that no validation of the journals can take place until all approvals have been applied
- Require Validation for Approvals – this means that the journals must be validated before approvals can be applied (recommended setting).
- Require no Dependencies – this means that approvals and validations may be applied in any sequence.
Track Prior Year Activity – Selecting this check box will enable the user to identify certain transactions as prior year activity. This activates the option on multiple general ledger reports to report or exclude the prior year activity.
Default Prior Year Activity Setting – this option is only available when the above field, Track Prior Year Activity has been selected as active. This defaults the option selected from the three listed below on all of the general ledger reports that allows the Prior Year Activity Setting:
- Include – This will include the transactions labeled as prior year activity in the selected report.
- Exclude – This option will specifically exclude all of the prior year activity from the report.
- Only Include – this option will report only the prior year activity and exclude all other transactions.
Counters Tab
All journals are automatically assigned a number by the system in the following format:
YYYY-XXXXXXXX
The first four characters will represent the fiscal year of the journal. The last 8 characters will be the number. The system will begin with 00000001 as the first number unless overridden by the user. The system will automatically change the beginning four characters on the first day of the new fiscal year. It will also automatically continue with the numbers on the first day of the fiscal year. (Example: if the last journal number for the year 2012 is 2012-00000987, then the first journal number created in the year 2013 will be 2013-00000001. The user does have the ability to override this journal number and begin with a different sequence.
Security
All three elements of New World ERP security (Permissions, User-Based Security and Process Manager) apply to Journal Processing.
Permissions
The Permissions that apply to the journal processing are listed in the table below:
Journal Processing Permissions
|
App |
Component |
Description |
All |
Add |
Change |
Delete |
View/Use |
|
Checkout |
Undo |
Finalize |
Reminder |
|---|---|---|---|---|---|---|---|---|---|---|---|---|
|
FM |
Investment Distribution |
This permission is required for users that will be creating, modifying and approving the investment journal process. |
ü |
ü |
ü |
ü |
ü |
ü |
|
|
|
|
|
FM |
Investment Distribution |
This permission allows a user to post investment distribution journals. This is normally assigned to an administrator of the journals. |
ü |
|
ü |
|
|
|
|
|
|
|
|
FM |
Investment Distribution |
This permission allows a user to print the edit listings and reports related to investment distributions. All users that will be working with the investment distribution journals will require this permission. |
ü |
|
|
|
|
ü |
|
|
|
|
|
FM |
Investment Distribution |
This permission allows a user to validate the investment distribution journals. All users that will be working with the investment distribution journals will require this permission. |
ü |
|
ü |
|
|
|
|
|
|
|
|
FM |
Journal Import |
This permission allows a user to import journals from other sources. This would include other systems and Excel files. |
ü |
ü |
ü |
|
|
|
|
|
|
|
|
FM |
Journal Import Audit |
This permission allows a user to run the audit listings generated from the imports of journals. This is a required permission for any user authorized to import journals. This report provides error and warning listings for the imports. |
ü |
|
|
|
|
ü |
|
|
|
|
|
FM |
Journal Import Listing |
This permission allows the user to process reports of the journals that have been imported. |
ü |
|
|
|
|
ü |
|
|
|
|
|
FM |
Auto Create Due To/Due |
This permission allows the user to execute the due to/from transactions that are necessary to balance a journal that has transactions in multiple funds. |
ü |
ü |
|
|
|
|
|
|
|
|
|
FM |
Create Control Account |
This permission only applies when control accounts are required to be used. This will allow a user to create the journals that generate the control account entries. |
ü |
ü |
|
|
|
|
|
|
|
|
|
FM |
Create Offsetting Journal |
The system will automatically analyze due to/from accounts and create a journal entry to consolidate the balance to one account for each respective fund. This permission allows the user to create this offsetting journal entry. |
ü |
ü |
|
|
|
|
|
|
|
|
|
FM |
Create Reclassification |
Reclassification journals are used at year end to make adjustments that are required for the annual GASB/ACFR report. Only the users that work with these annual reports need permission to use these types of journals. |
ü |
ü |
|
|
ü |
|
|
|
|
|
|
FM |
Due To/Due From |
This permission allows the user to print and view the due to/from summary. This permission should be given to all users that will be processing transactions over multiple funds. |
ü |
|
|
|
|
|
ü |
|
|
|
|
FM |
G/L Transaction Search |
This permission allows the user to search journals from the GL Account Inquiry screens. This permission may be given to users that need inquiry for general ledger but have no authority to create or edit any journals. |
ü |
ü |
ü |
ü |
ü |
ü |
ü |
|
|
|
|
FM |
Journal - Summary |
This permission allows the user to view the summary of the journal entry. This is required for any user that will be working with journal entries. |
ü |
|
|
|
|
|
ü |
|
|
|
|
FM |
Journal Detail |
This permission allows the user to view the full detail of the journal entry. This is required for any user that will be creating journal entries. |
ü |
|
|
|
|
ü |
|
|
|
|
|
FM |
Journal Detail - Source |
This permission allows a user to view the source of the journal entry. |
ü |
|
|
|
ü |
|
|
|
|
|
|
FM |
Journal Edit/Post Listing |
This permission allows the user to print the edit/post listing during the journal process. Any user that will be creating journal entries should be assigned this permission. |
ü |
|
|
|
|
ü |
|
|
|
|
|
FM |
Journal Error Listing |
This permission allows the user to process and view any errors that will prevent the journal from posting. It is recommended that any user processing journal entries is also given the ability to process this report. |
ü |
|
|
|
|
ü |
|
|
|
|
|
FM |
Journal Export |
The permission allows the user to export a journal that will be needed by a third party system. |
ü |
|
ü |
|
|
|
|
|
|
|
|
FM |
Journal Export Listing |
This permission allows the user to view the export listing. |
ü |
|
ü |
|
|
|
|
|
|
|
|
FM |
Journal Fund Summary |
This permission allows the user to view the summary of debits and credits by fund to verify that the journal is in balance before posting. This is required for any user that will be processing journal entries. |
ü |
|
|
|
|
ü |
|
|
|
|
|
FM |
Journal List |
This permission allows the user to view the list of journals. It is required for any user that will be viewing or processing journal entries. |
ü |
|
|
|
|
ü |
|
|
|
|
|
FM |
Journal Process Manager |
This permission gives the user access to Process Manager for the journals. This access is required for any users that will be processing or reviewing journals entries. |
ü |
|
|
|
ü |
|
|
|
|
|
|
FM |
Journal Process Manager - Execute All Processes |
This permission allows the user to validate, print edit lists, approve and post a journal or journals in a single step. This is not recommended for the general users of the journal processing. |
ü |
|
ü |
|
|
|
|
|
|
|
|
FM |
Journal Process Manager - Post |
This permission allows the user to post the journal to the general ledger. This is the final step in journal processing. Once a journal has been posted, it is a permanent transaction in the general ledger. |
ü |
|
ü |
|
|
|
|
|
|
|
|
FM |
Journal Process Manager - Print Edit & Error Listing |
The permission allows the user to print and review the edit reports before the journal has been posted. |
ü |
|
|
|
|
ü |
|
|
|
|
|
FM |
Journal Process Manager - Validate |
This permission allows the user to validate the journal entry. This process verifies that all of the business rules defined within the system have been followed. All users that will be processing journal entries must have this permission. |
ü |
|
ü |
|
|
|
|
|
|
|
|
FM |
Journal Processing |
This is the general permission that allows the user to create new data within the journal. Any user that will adding and modifying journal transactions, must have this permission. |
ü |
ü |
ü |
ü |
ü |
ü |
|
|
|
|
|
FM |
Journal Template Detail |
This permission allows the user to enter the detail transactions within a journal entry. This is a required permission for any user that will be adding or modifying the detail line items within a journal entry. |
ü |
ü |
ü |
ü |
ü |
ü |
|
|
|
|
|
FM |
Journal Template Edit |
This permission allows the user to view an edit listing of journal templates that have been created. |
ü |
|
|
|
ü |
|
|
|
|
|
|
FM |
Journal Template Entry |
This permission allows a user to create a new template journal and to use this template in the journal process. |
ü |
ü |
ü |
ü |
ü |
ü |
|
|
|
|
|
FM |
Journal Template List |
This permission allows the user to view the list of template journals that have been created. |
ü |
|
|
|
ü |
|
|
|
|
|
|
FM |
Retrieve Journal |
This permission gives the user access to the retrieve journals in Process Manager allowing them to recover, recreate, reverse journals and use journal templates. This permission is required to allow activity related to recovery, recreation, reversal of journals and create templates. |
ü |
|
|
|
ü |
|
|
|
|
|
|
FM |
Retrieve Journal - Recover |
This permission allows the user to retrieve previously removed journals and reinstate them as a journal entry. |
ü |
ü |
|
|
|
|
|
|
|
|
|
FM |
Retrieve Journal - Recreate |
This permission allows the user to retrieve previously posted journal entries and create a duplicate of the entry. |
ü |
ü |
|
|
|
|
|
|
|
|
|
FM |
Retrieve Journal - Reverse |
This permission allows the user to retrieve previously posted journal entries and create a reversal of the entry. |
ü |
ü |
|
|
|
|
|
|
|
|
|
FM |
Retrieve Journal - Template |
This permission allows the user to retrieve template journals and create a journal entry from the template. |
ü |
ü |
|
|
|
|
|
|
|
|
|
FM |
Investment Distribution |
This permission allows users to add, change, or delete documents to be attached to investment distribution batches. |
ü |
ü |
ü |
ü |
ü |
ü |
ü |
ü |
ü |
ü |
|
FM |
Investment Distribution |
This permission allows users to add, change, or delete notes to be attached to investment distribution batches |
ü |
ü |
ü |
ü |
ü |
ü |
ü |
|
|
|
|
FM |
G/L Documents |
This permission will allow the user to work with documents attached to the GL Accounts. |
ü |
ü |
ü |
ü |
ü |
ü |
ü |
ü |
ü |
ü |
|
FM |
Journal Documents |
This permission allows users to add, change, or delete documents to be attached to journal entries. |
ü |
ü |
ü |
ü |
ü |
ü |
ü |
ü |
ü |
ü |
|
FM |
Journal Notes |
This permission allows users to add, change, or delete notes to be attached to journal entries. |
ü |
ü |
ü |
ü |
ü |
ü |
ü |
|
|
|
The above table lists all of the permissions related to the processing of journal entries. The descriptions provide explanations of the permissions and information regarding the applicability to users.
User-Based Security
Maintenance > new world ERP Suite > Security > User-Based Security
All of the User-Based Security related to journal processing will be found by selecting the Sub-Ledgers function.
General Ledger Sub Ledger in User Based Security
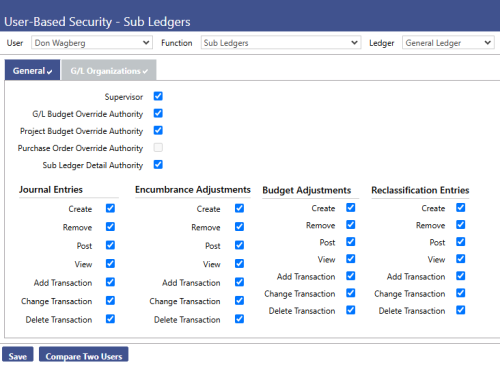
This page is the format used on all Sub Legers in the system. The top left section of the screen is related to processing options within the sub-ledger. The lower half of the screen indicates the users authorities for the journal entries created by this sub-ledger.
Upper Half of the General Ledger Sub Ledger Screen
Supervisor – Checking this box allows the user to view all journals created by all users on the Journal List in the Journal Process Manager. Any user who reviews or approves other user’s journals must have this authority. Therefore, the box must be selected. When the box is not selected, the user only sees journals they have created.
GL Budget Override Authority – Selecting this box allows this user to override over-budget warnings generated during the journal process. This permission should be limited to those users that are authorized to permit over budget situations.
Project Budget Override Authority - Selecting this box allows this user to override the over budget warning for projects. This permission should be limited to those users that are authorized to allow over budget situations for projects.
Purchase Order Override Authority – This is inactive for the general journals.
Sub-ledger Detail Authority – When this box is checked the user will be able to view the detail of journals when executing inquiries and reports in the system. If this box is not selected, the user will not be able to drill down to the detail transactions and other support of the general journal entries when executing inquiries and reports.
Lower Half of the Sub Ledger Screen
The lower half of the General Tab for all sub-ledgers contains the same list of permissions. Each Sub-Ledger has only specific permissions that are active. The checkboxes will be unavailable on the inactive permissions.
The four different journal types are displayed in columns from left to right as follows:
- Journal Entries – these are the general journals that are used by the system sub-ledgers and the user to create journal entries.
- Encumbrance Adjustments – this type of journal will affect only the encumbrances within the system
- Budget Adjustments – This type of journal affects only the budgets within the system. It is used to create any changes to the budget during the year after the initial budget has been adopted.
- Reclassification Entries – This type of entry is used for governmental reporting only. These types of journals are used for the year-end adjustments required to produce the annual ACFR/GASB reports. These entries are not included in the soft close process and do not automatically post to fund equity balances. This type of journal is only active in the General Ledger sub-ledger.
Within each Journal Type there are permissions for the detail transactions available within each Journal Type:
Create – This permission allows the user to create a new journal entry of the respective type. This permission is only active on the General Ledger Sub-Ledger, The Bank Reconciliation Sub-Ledger, and Project Accounting Sub-Ledger.
Remove – This permission allows a user to remove a journal entry. The system does not allow a journal to be deleted. Journals may only be removed from processing. This process then allows the user to retrieve any journal that was removed in error.
Post - This permission allows the user to post the respective journal type. Users may be given permission to post journals from specific sub-ledgers but not all sub-ledgers. If a user has no Post authorities, they will not see the post workflow icon in the Journals Process Manager. This permission should only be given to users who have the final authority to post items to the general ledger.
View – This permission allows a user to view the respective journal type on the Journal List in the Journals Process Manager. The user must have this permission to be able to create and modify any journal entries.
Add Transaction – This permission will allow the user to add individual transactions to a journal entry of the respective type selected. To create journal entries the user must have this permission.
Change Transaction – This permission will allow the user to modify an existing detail transaction from within a journal entry. A user must have this permission to modify a detail transaction line in any journal entry of the respective type.
Delete Transaction – This permission will allow the user to delete a detail transaction from within a journal entry.
Process Manager
There is one process in the Process Manager that controls the approval levels required before posting a journal entry: General Ledger Journal Processing. The functional departments that will be set up for the approvals of journals must be established under this heading.
Journal Processing
Accessing the Journals
Navigate to Financial Management > Journals > Journals to access the journal process management screen.
The following workflow icons will be displayed at the top of the processing screen, depending on the processes authorized for the user:
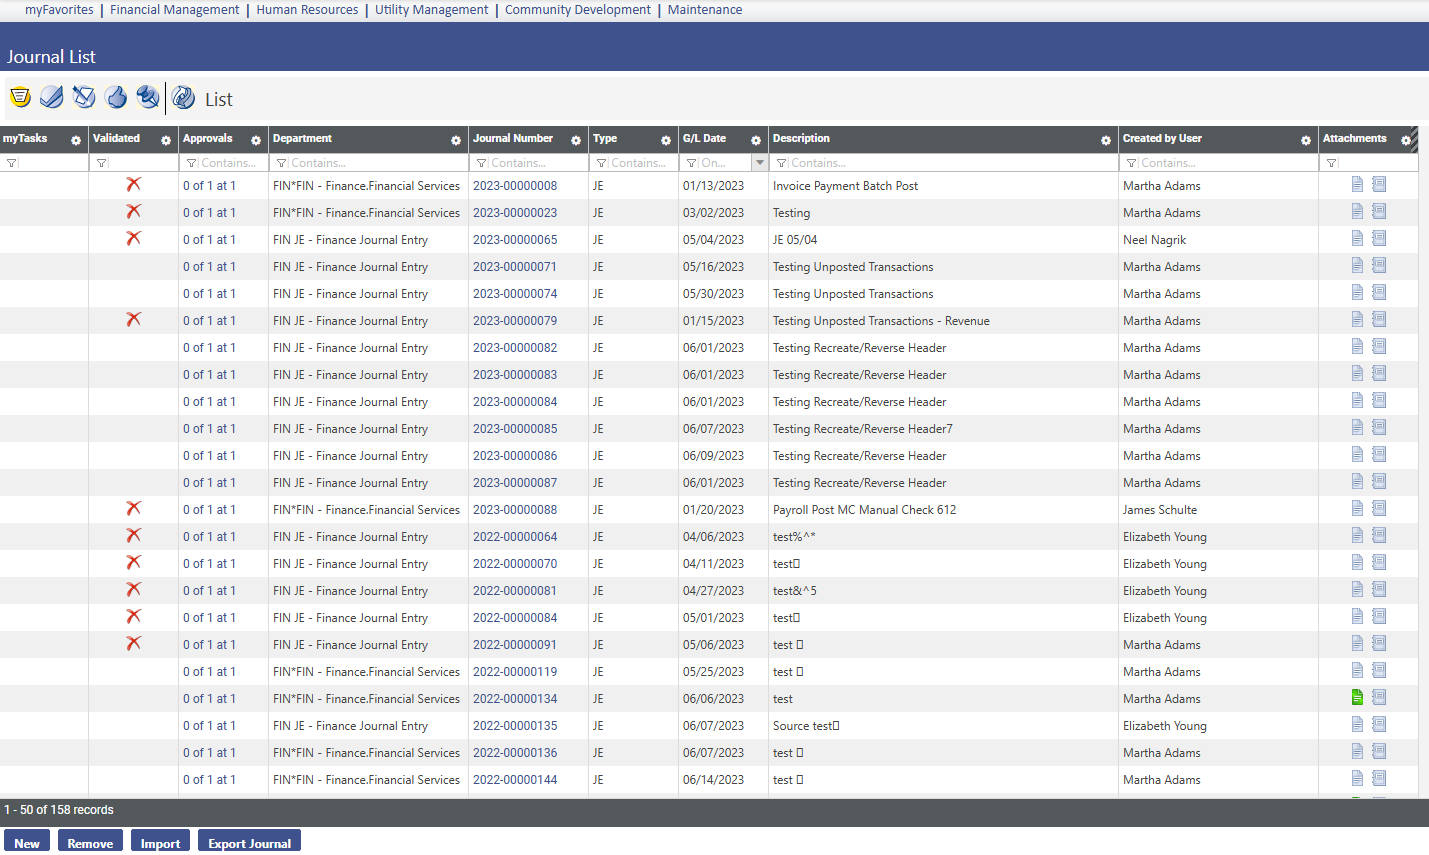
 Journal List – clicking on this icon opens the Journal List. This is a list of all journals currently in process. Once a journal entry has been posted, it will no longer appear on this processing screen. Form this screen the user can determine the status of all journals based upon the information presented in the various columns:
My Tasks – if a green checkmark appears in this column, the journal has been sent to this user for approval. The green check mark will be removed when the user has completed their approval of the journal.
Validated – This column indicates whether the journal has been validated in the system. There are three possible views in this column:
- Blank – when the column is blank, no validation of the journal has been attempted.
- Green Check Mark – when a green check mark appears, the journal has passed the validation test and has met the business rules defined for the journal so that approvals and posting may take place.
- Red X – When there is a red X in the column, the journal has failed the validation test. The rules that were violated must be fixed and the journal re-validated.
A journal may not be eligible for approvals or postings until the journal has passed the validation and a green check mark appears in this column.
Approvals – This column indicates the status of the approvals for the journal. When the journal is fully approved and eligible for posting, the word “Approved” will appear in this column. Before it is approved there will be a series of three numbers that appear in this column indicating the approval status: 0 of 2 at 1. The first number indicates the number of approvals that have been applied at the indicated approval level. The middle number in the sequence indicates the total number of approvals required at the indicated approval level. The third number in the sequence indicates the existing approval level. The number of approvals required at each level and the number of approval levels are all defined within the Process Manager. The eligible users for each of these levels are also defined in the Process Manager.
Example: 1 of 2 at 3.
This indicates that 1 person (first number) has approved this journal at level 3 (last number). 2 approvals (second number) are required. When the final approval is applied at a specific level, the system will then change the approval status indicator to the next level or to “Approved” status if the indicated level is the final level of approval for the journal.
Department – This indicates the functional department that has been assigned to this journal. The number of levels of approval, the number of approvals at each level and the eligible users for approvals are defined by this functional department. These assignments and values are defined in the Process Manager.
Journal Number – This indicates the journal number that has been assigned to this entry. This will be the reference assigned to this journal in the system and will be used for all reports and inquiries in reference to this journal. This number is automatically assigned by the system. The beginning counter numbers for the journals are defined by the user in Maintenance > new world ERP Suite > System > Company Suite Settings > Counters tab.
Type – There are 4 types of journals in the system:
- JE – Journal Entry - Journals posting standard transactions to the general ledger. The majority of journals in the system are this type.
- BA – Budget Adjustments – these journals affect only the budget balances in the system. These are used to modify the original adopted budget during the year. The user may define whether the increases and decreases must balance for budget adjustments in Maintenance > Financial Management > Company FM Settings > Budget Validation tab.
- EA – Encumbrance Adjustments – These entries affect only encumbrances in the system. The debits and credits for these entries are not required to balance. The majority of the EA entries are created by the system through Procurement, Accounts Payable and the soft close process. Manual creation of EA adjustment should not be required if processing of the purchase orders have been executed properly through the system. Consult with a New World representative if a manual EA is going to be made to review all of the implications of the entry and the requirements for the entry.
- RJE – Reclassification Journal – This type of journal is used in the preparation of the annual Governmental Reporting statements ONLY! Their use should be limited to those users that will be working with and preparing the ACFR/GASB statements at year end.
GL Date – This is the default general ledger posting date defined by the user that created the journal. It is the date that the journal will be posted to the general ledger. Total debits and credits must balance by date or the journal will not validate and will not post.
Description – When the journal was created, the user typed a brief description of the journal. This description is limited to 64 characters. The system creates pre-defined descriptions for the journals generated by the system from the other modules within the system.
Created by User – this column indicates the name of the user that created the journal. For entries that are created through the system modules, the user name will be the user that executed the post process in that specific module.
Journal Processing Buttons
New – Click this tab to create a new journal.
Remove – Journals cannot be deleted from the system. This tab will allow the user to remove the journal from the active list. The journal will be able to be “Recovered” if necessary.
Import – Journals may be imported from Excel spreadsheets and from other third party sources. Clicking this tab will allow the user to begin the import process.
Export Journal – Journals may be exported to other systems. Clicking this tab will allow the user to begin the process of exporting the journal.
Options – There are multiple options available:
- Export – Allows export of the data in the grid to excel.
- Columns – Allows the user to determine the columns that are displayed on the screen.
- Layouts – Allows the user to Save and Load the screen layouts.
- Settings – This tab allows the user to modify the data specifications for the columns on the screen.
- Reset – This tab will allow the user to return the screen to the prior settings.
Processing the Journals
To post the journals to the General ledger the user must process them based upon the business rules defined in the system.
Creating a Manual Journal
To create a new journal, click the New button at the bottom of the journal processing screen. The following journal header screen will be displayed:

The above is the header screen that is displayed when the user selects the “New” tab at the bottom of the screen to create a new journal entry.
Note: Only the far left workflow icon will be active until this header screen has been completed and saved.
The following are the descriptions and purposes of the fields on the screen:
Department – this is the functional department assigned in the Process Manager for this user. If the user has more than one functional department, the system will default to the user’s functional department as defined on the User Based Security - General Tab for this specific user. The user will see all functional departments authorized to them through the Process Manager – General Journal Entries when they use the drop down arrow to view all available functional departments. This is a required field.
Journal Type – the user must select the journal type. The four different journal types available were described earlier (Journal Entry, Budget Adjustment, Encumbrance Adjustment and Reclassification Journal). This is a required field.
Fiscal Year – The fiscal year will determine the journal number that is assigned to the journal. The numbers are defined and tracked under the Company Suite Settings on the Counters tab.
Reference – This field obtains its values from the Validation Set #356 – Journal Reference. This field is not required for all journals entries. It is highly recommended that the field be used on all manually created journal entries. It provides consistent and reliable search criteria for all of the manual journals.
GL Date – This is the date the journal will be posted to the general ledger. The system will default the current date into this field. This is a required field.
Source – Source had been pre-defined for all journals created by the system. For manual journal entries, this is an optional field. It is suggested that the user develop a system for assigning source codes to the manually created entries to provide consistency.
Description – The description is a 64 character alphanumeric field that allows the user to enter a brief description of the journal. This description will appear in reports and inquiry screens that present the journal transactions.
Retain Entries – Select this box to retain the same date and description on all lines of the journal entries. This can help save entry key strokes during the entry process of the journal details.
Save – this button is used to save the journal header. Place the cursor on the button and select it by using the left mouse. The system will then display the detail journal transactions entry screen and will activate the remaining work flow icons at the top of the processing screen.
Reset – Select this button to restore the screen to its condition after the last save. If the screen has not been saved, clicking this icon will clear all entries.
After you click Save, the following screen displays:
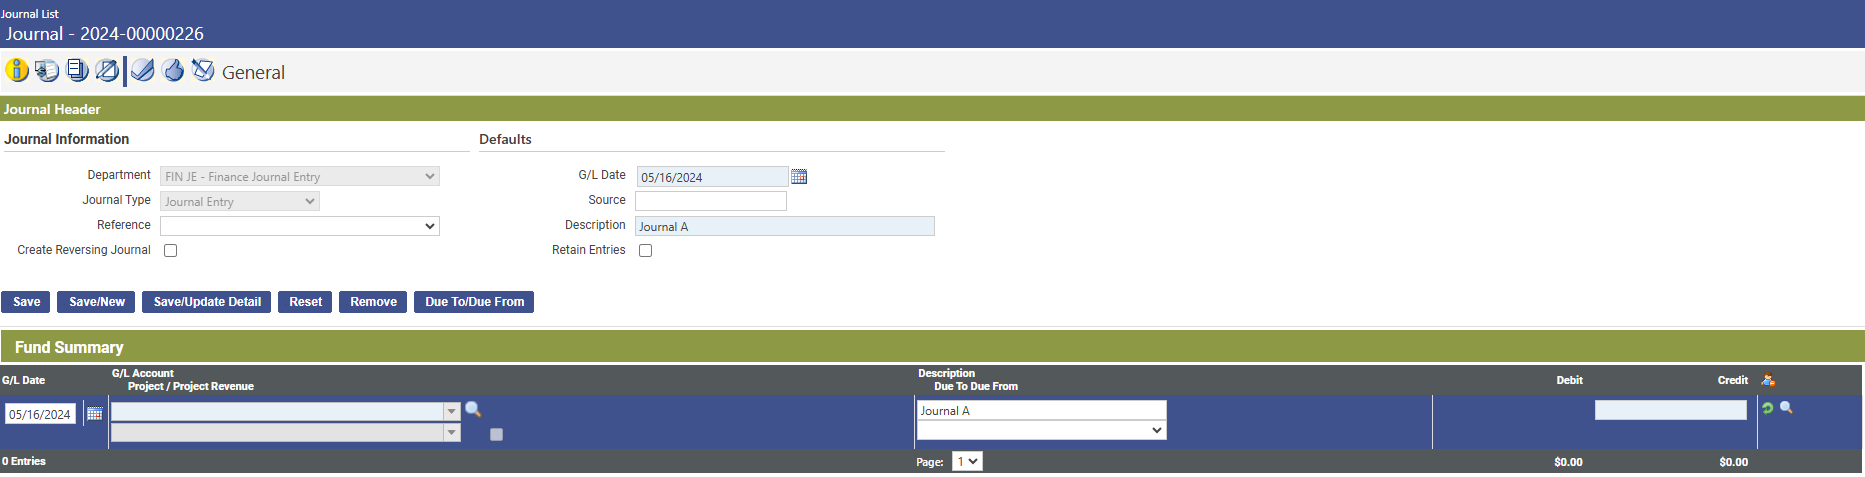
G/L Date - This field is required. It contains the default general ledger date of the journal from the header.
G/L Account - This field is required. It contains the general ledger account to which the journal entry will be updated. The entry must be a valid general ledger account number to which the user has sub ledger authority. The account must pass budget validation.
Project - This field contains the project code associated with the G/L transaction entry. This is not a required field, and can only be used if the general ledger account number selected has been set up to allow project usage.
Transaction Description - This field contains the textual description of the journal detail. It may contain up to 64 characters. This is automatically populated from the header information.
Amount - This field is required. It contains the dollar amount of the transaction. Debits are recognized by positive values, and Credits are recognized by negative values.
Project Revenue - Visible once a project is selected, this field signifies whether project revenue will be tracked for the journal detail. The check box becomes available if the project selected is setup to track revenues. Revenues within projects can only be tracked at the lowest level of the project. The user must select this box if the transaction should update revenue reported for the project.
Due To/Due From - This field contains the fund providing or receiving the financial resources as an inter-fund loan and the appropriate asset or liability account to use if a Due To or Due From account is specified in the transaction G/L Account field. It is disabled if the Journal Type is Reclassification Journal.
Journal Detail Command Buttons
Save - This button inserts/updates the row in the table, and returns the cursor focus to the G/L Date field. The Budget Validation page displays once the save is complete and the transaction exceeds the G/L Account budget amount.
Save/New - This button inserts/updates the row into the table. The G/L Date and Transaction Description fields are populated with the defaults defined in the table. It places the cursor focus on the G/L Date field. The Budget Validation page displays once the save is complete and the transaction exceeds the G/L Account budget amount. The Project Budget Validation page is displayed once the save is complete and the transaction exceeds the project budget amount.
Save/Update Detail – When this page is opened in edit mode, this button saves and gives the option to update the entry. Once selected, a confirmation screen will display asking for verification to update the journal. Once OK is clicked, editing the entry will be allowed.
Reset - If the page was opened in add mode, this button clears all entry fields and returns them to their default state. If the page was opened in edit mode, it returns the data in the fields to the data that was last saved.
Remove - If the user is authorized, the system will prompt to confirm removal. If OK is clicked, it deletes row from the table, closes page, and returns to the journal list page.
Due To/Due From – Once a cross fund entry has been created with valid general ledger account numbers, then this button may be used. Once clicked, the automatic due to/due from creation page will engage. This page requires information regarding the offsetting fund, the account the funds are due to, and the account the funds are due from. All of these are required fields. Once this information is entered, the system will automatically create due to and due from entries for the funds involved.
Workflow Buttons
 General – This button represents the main entry screen in journal processing. This is where a manual journal entry is created.
 Summary – This button represents the summary page. This page will show a summarized view of all of the debit and credit entries summarized with a total for the entire entry.
 Documents – This button allows documentation to be attached to a journal entry.
 Remote Documents – This button allows for URL locations to be attached to specific journals.
 Notes – This button allows you to attach a note to this specific journal entry. Users also have the option to send the notes to specific users so that they are viewable only to specific users.
Retrieve Journals
Navigate to Financial Management > Journals > Retrieve Journals. Once on this screen, a drop-down field contains four different options of journals to retrieve: recover, recreate, reverse and template journals.
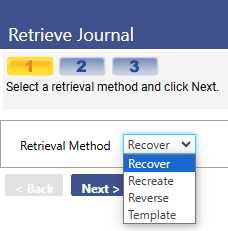
Recover Journals
The first option is to recover a journal. Select the Recover option and click Next at the bottom of the page. The following screen will be displayed:
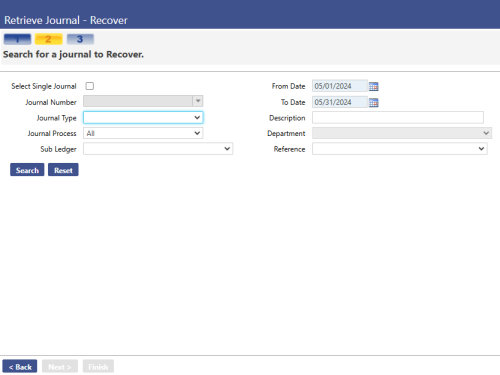
Select Single Journal – This checkbox allows the user to search for a specific journal number if the box is selected. When selected, the journal number field becomes required.
Journal Number – This is an optional field that can be used to find the specific journal to be recovered.
- Journal Type - The four different journal types that are displayed in the drop down are as follows:
- Journal Entries – These are the general journals that are used by the system sub-ledgers and the user to create journal entries.
- Encumbrance Adjustments – This type of journal will affect only the encumbrances within the system.
- Budget Adjustments – This type of journal affects only the budgets within the system. It is used to create any changes to the budget during the year after the initial budget has been adopted.
- Reclassification Entries – This type of entry is used for governmental reporting only. These types of journals are used for the year-end adjustments required to produce the annual ACFR/GASB reports. These entries are not included in the soft close process and do not automatically post to fund equity balances. This type of journal is only active in the General Ledger sub-ledger.
Sub Ledger - This field displays the sub ledger that is the source of the journal detail.
From Date – This field is required when the select single journal check box is left open. This allows the user to search for a journal based on a date range.
To Date – This field is required when the select single journal check box is left open. This allows the user to search for a journal based on a date range.
Description - This field allows the user to search for a specific journal based on the description that was entered for it.
Department - This displays the department responsible or the source of the journal.
Reference – This is a validation set, and allows the user to search for specific journals based on the reference code it was assigned.
Once the appropriate search criteria has been entered, click the Search button, select the journal to recover and click Next. This will display a page giving details about the specific entry. Confirm the entry by selecting Finish.
Recreate/Reverse Journals
The next options in the drop down are the options to recreate/reverse journals. Once the recreate/reverse option has been selected, click Next.
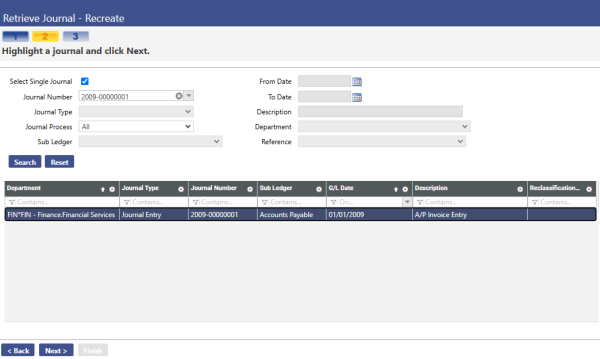
Select Single Journal – This checkbox allows the user to search for a specific journal number if the box is selected. When selected, the journal number field becomes required.
Journal Number – This is an optional field that is used for search criteria to find the specific journal to be recreated/reversed.
Journal Type - The four different journal types that are displayed in the drop down are as follows:
- Journal Entries – These are the general journals that are used by the system sub-ledgers and the user to create journal entries.
- Encumbrance Adjustments – This type of journal will affect only the encumbrances within the system.
- Budget Adjustments – This type of journal affects only the budgets within the system. It is used to create any changes to the budget during the year after the initial budget has been adopted.
- Reclassification Entries – This type of entry is used for governmental reporting only. These types of journals are used for the year-end adjustments required to produce the annual ACFR/GASB reports. These entries are not included in the soft close process and do not automatically post to fund equity balances. This type of journal is only active in the General Ledger sub-ledger.
Sub Ledger - This field displays the sub ledger that is the source of the journal detail.
From Date – This field is required when the select single journal check box is left open. This allows the user to search for a journal based on a date range.
To Date – This field is required when the select single journal check box is left open. This allows the user to search for a journal based on a date range.
Description - This field allows the user to search for a specific journal based on the description that was entered for it.
Department - This displays the department responsible or the source of the journal.
Reference – This is a validation set, and allows the user to search for specific journals based on the reference code it was assigned.
Once the journal that the user wishes to recreate/reverse is highlighted, click Next.
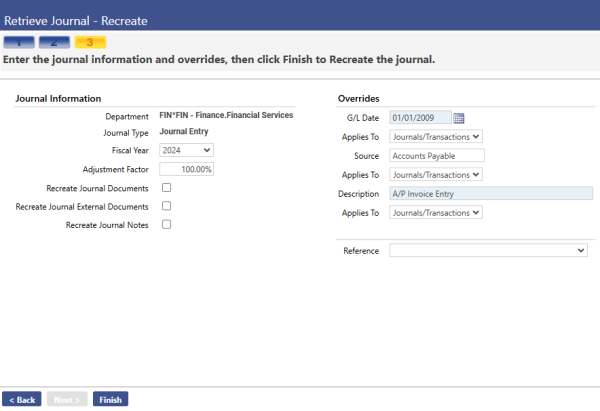
Department – This field will automatically be populated based on the department of the journal entry that was selected on the previous screen.
Journal Type – This field will automatically be populated with the journal type that was selected on the previous screen.
Fiscal Year – This field will recreate/reverse the selected journal entry for the specific fiscal year selected.
Adjustment Factor – This field will multiply the amounts entered in the debit and credit tabs by the amount listed in the adjustment factor. For example, if the journal being recreated/reversed needs to reflect a 5% increase, the adjustment factor will be 105%. To leave the amounts the same set the percentage to 100% (This is the default).
Recreate Journal Documents – If selected, this check box will recreate the journal documents that were attached to the original entry, and attach them to the recreated journal entry.
Recreate Journal External Documents – This check box will recreate the journal external documents that were attached to the original entry, and attach them to the recreated journal entry.
Recreate Journal Notes – This check box will recreate the journal notes that were attached to the original entry, and attach them to the recreated/reversed journal entry.
G/L Date – This field is required. It applies to when the recreated/reversed entry should be posted on the general ledger.
Applies To – This field explains what the G/L date override should apply to. There are 3 options:
- Journals – This will change the G/L date of the journal header, but will not change the date that the transactions actually hit the general ledger.
- Transactions – This will not change the G/L date of the journal header, but will change the date of the actual transactions, and when they post to the general ledger.
- Journals/Transactions – This will change the G/L date for both the journal header and the transactions within the journal.
Source – This field is used to describe where the entry is coming from. This is an optional field and can be set to anything that the user feels is relevant.
Applies To – This field explains what the source override should apply to. There are 3 options:
- Journals – This will change the source of the journal header, but will not change the source of the transactions.
- Transactions – This will not change the source of the journal header, but will change the source of the actual transactions.
- Journals/Transactions – This will change the source for both the journal header and the transactions within the journal.
Description – This field is the description that will apply to the journal entry.
Applies To – This field explains what the description override should apply to. There are three options:
- Journals – This will change the description of the journal header, but will not change the source of the transactions.
- Transactions – This will not change the description of the journal header, but will change the description of the actual transactions.
- Journals/Transactions – This will change the description for both the journal header and the transactions within the journal.
Reference – This field is a validation set. The validation set can be edited within the current screen by holding down the Ctrl key on the keyboard and left clicking on the mouse. This allows the user to add new references or edit existing references.
Once all of the information has been entered for the journal to be recreated, select the finish button at the bottom of the page.
Template Journals
The next option in the drop down is the option to access template journals. Once the template option has been selected, click Next.

This screen is used to search for a template that has already been created in the system. All of these fields are optional and are only used to help narrow the search down to find the specific template the user is looking for.
Journal Type - The four different journal types that are displayed in the drop down are as follows:
- Journal Entries – These are the general journals that are used by the system sub-ledgers and the user to create journal entries.
- Encumbrance Adjustments – This type of journal will affect only the encumbrances within the system.
- Budget Adjustments – This type of journal affects only the budgets within the system. It is used to create any changes to the budget during the year after the initial budget has been adopted.
- Reclassification Entries – This type of entry is user for governmental reporting only. These types of journals are used for the year-end adjustments required to produce the annual ACFR/GASB reports. These entries are not included in the soft close process and do not automatically post to fund equity balances. This type of journal is only active in the General Ledger sub-ledger.
Description – If the description of the template is known, this field can be used to search.
Department – If the department of the template is known, this field can be used to search.
Reference - This field is a validation set. The validation set can be edited within the current screen by holding down the Ctrl key on the keyboard and left clicking on the mouse. This allows the user to add new references or edit existing references. If a certain reference is known, this field can be used to search for a specific template.
Once the search criterion has been entered, click Search. Highlight the template that is desired and click the Next button.
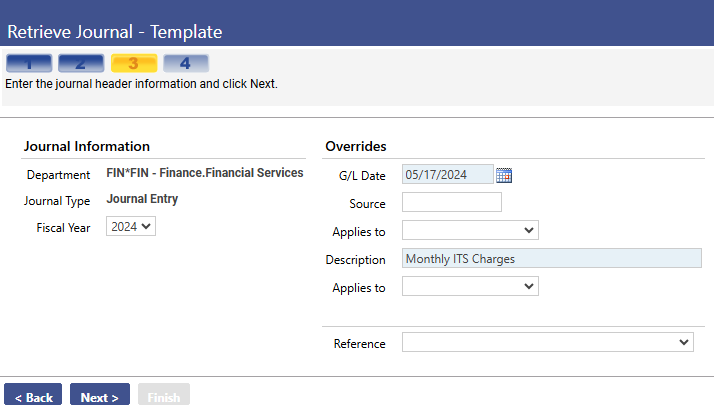
Fiscal Year – Select the year that the template journal will apply to from the drop-down.
G/L Date – This field is required. It applies to when the template entry should be posted on the general ledger.
Source – This field is used to describe where the entry is coming from. This is an optional field and can be set to anything that the user feels is relevant.
Applies To – This field explains what the source override should apply to. There are 3 options:
- Journals – This will change the source of the journal header, but will not change the source of the transactions.
- Transactions – This will not change the source of the journal header, but will change the source of the actual transactions.
- Journals/Transactions – This will change the source for both the journal header and the transactions within the journal.
Description – This field is the description that will apply to the journal entry.
Applies To – This field explains what the description override should apply to. There are 3 options:
- Journals – This will change the description of the journal header, but will not change the source of the transactions.
- Transactions – This will not change the description of the journal header, but will change the description of the actual transactions.
- Journals/Transactions – This will change the description for both the journal header and the transactions within the journal.
Reference - This field is a validation set. The validation set can be edited within the current screen by holding down the Ctrl key on the keyboard and left clicking on the mouse. This allows the user to add new references or edit existing references. If a certain reference is known, this can be used to search for a specific template.
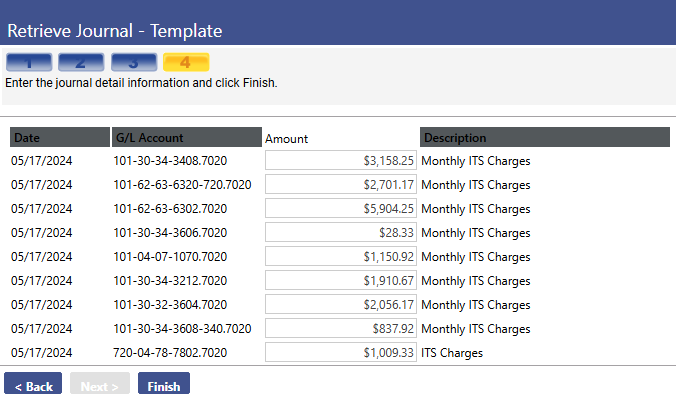
Once the template has been selected, click Next and the template journal detail page will display. Enter the amounts for each of the accounts specified in the template.
Offsetting Journals
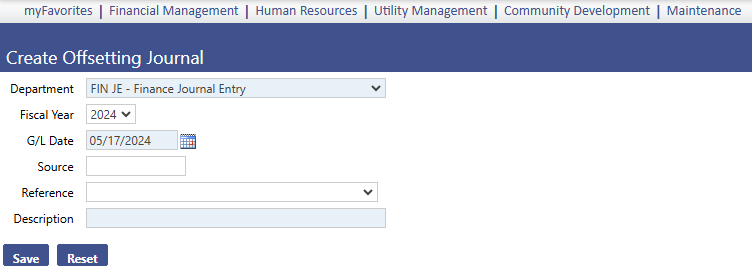
Department – this is the functional department assigned in Process Manager for this user. If the user has more than one functional department, the system will default to the user’s functional department as defined on the User Based Security - General Tab for this specific user. The user will see all functional departments authorized to them through Process Manager.
Fiscal Year – The fiscal year will determine the journal number that is assigned to the journal.
G/L Date – This field is required. It applies to when the template entry should be posted on the general ledger.
Source – This field is used to describe where the entry is coming from. This is an optional field and can be set to anything that the user feels is relevant.
Reference - This field is a validation set. The validation set can be edited within the current screen by holding down the Ctrl key on the keyboard and left clicking on the mouse. This allows the user to add new references or edit existing references.
Description – This field is the description that will apply to the journal entry. This is a required field.
Once the information has been entered, click Save and a prompt will be issued stating that the journal has been created.
Note – Offsetting entries are only used if due to/due from accounts are accumulating transactions throughout the month without hitting a cash account. The offsetting entry will then take the transactions accumulated throughout the month and offset them to the cash account.
Reclassification Journals
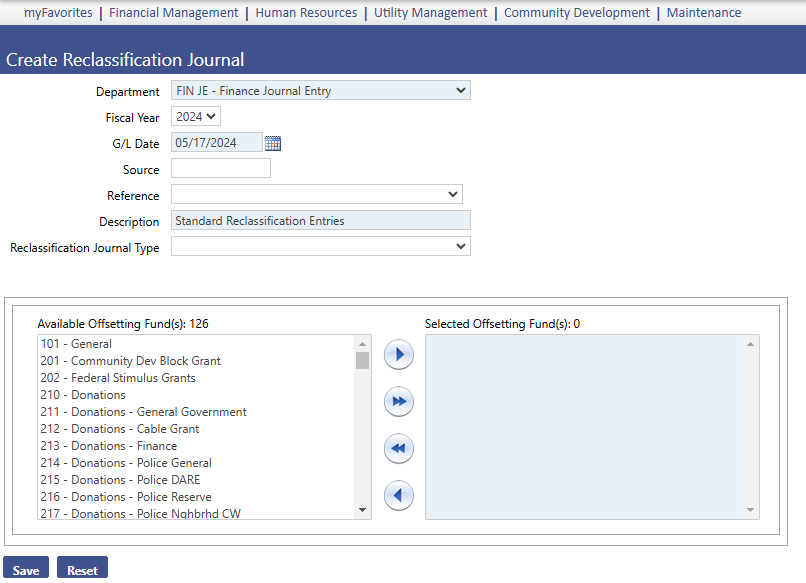
Department – This is the functional department assigned in the Process Manager for this user. If the user has more than one functional department, the system will default to the user’s functional department as defined on the User Based Security - General Tab for this specific user. The user will see all functional departments authorized to them through Process Manager.
Fiscal Year – The fiscal year will determine the journal number that is assigned to the journal.
G/L Date – This field is required. It applies to when the template entry should be posted on the general ledger.
Source – This field is used to describe where the entry is coming from. This is an optional field and can be set to anything that the user feels is relevant.
Reference - This field is a validation set. The validation set can be edited within the current screen by holding down the Ctrl key on the keyboard and left clicking on the mouse. This allows the user to add new references or edit existing references.
Description – This field is the description that will apply to the journal entry. This is a required field.
Reclassification Journal Type – This field is a validation set. The validation set can be edited within the current screen by holding down the Ctrl key on the keyboard and left clicking on the mouse. This allows the user to add new reclassification types if the type desired is not defined.
Offsetting Funds – This table lists all available funds on the left, and all selected funds on the right hand side. Select which funds should have reclassification entries created for them. In order to select funds, either double click on the fund on the left side of the table, or use the arrows in the center of the table.
Note: Reclassification entries are only used for governmental reporting purposes. Specific General Ledger Expense/Revenue Accounts may be in the wrong classification for GASB reporting purposes. The system allows only one classification for the base account. The account may have a different classification depending on the organization set assigned. This reclassification would allow the user to automatically move the balances in this account to a different account that is coded with the proper GASB classifications at year end.
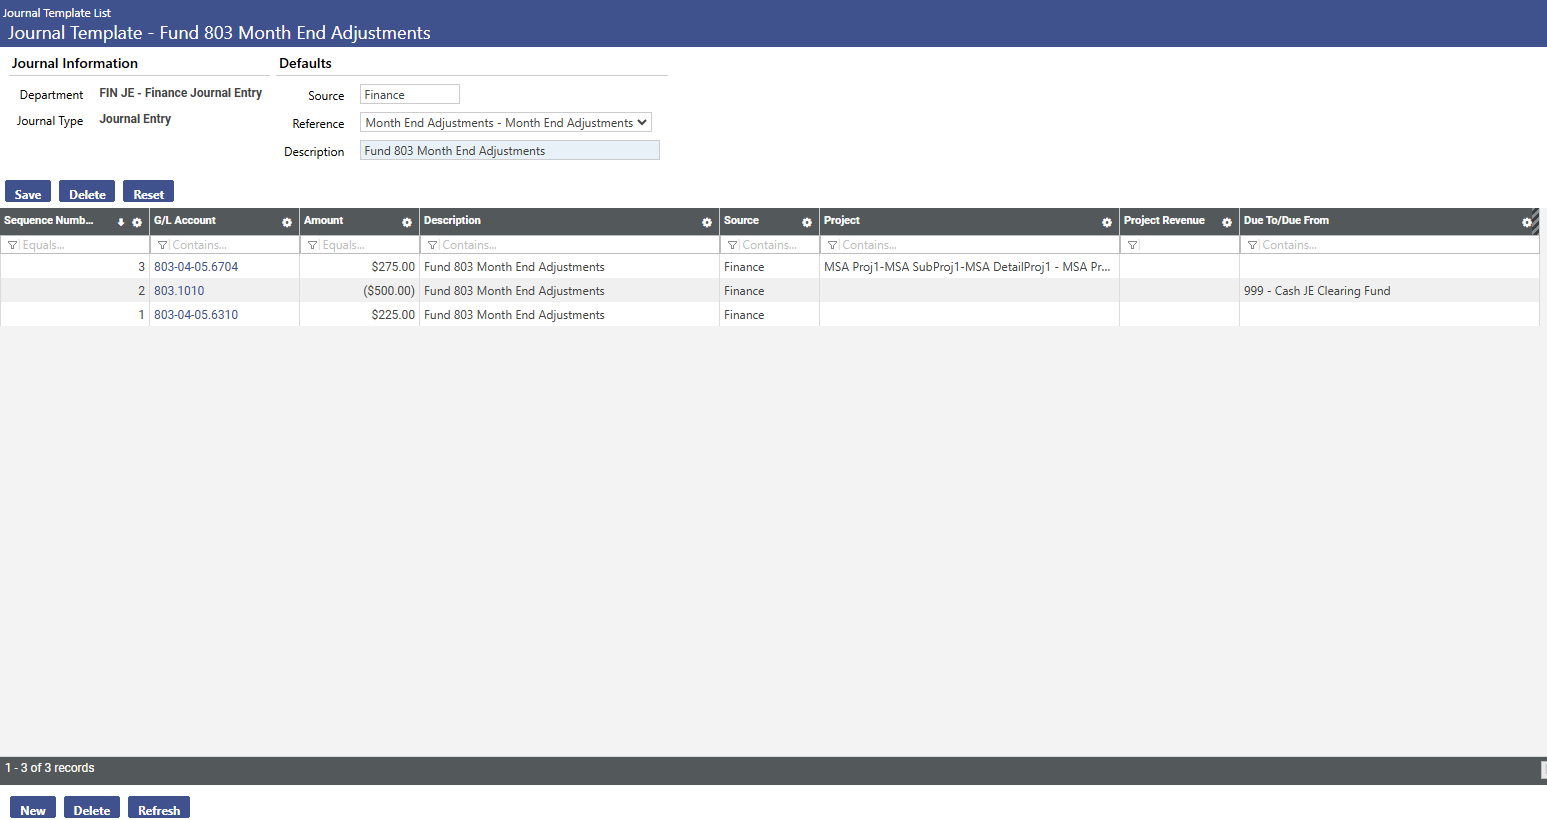
Creating Template Journals
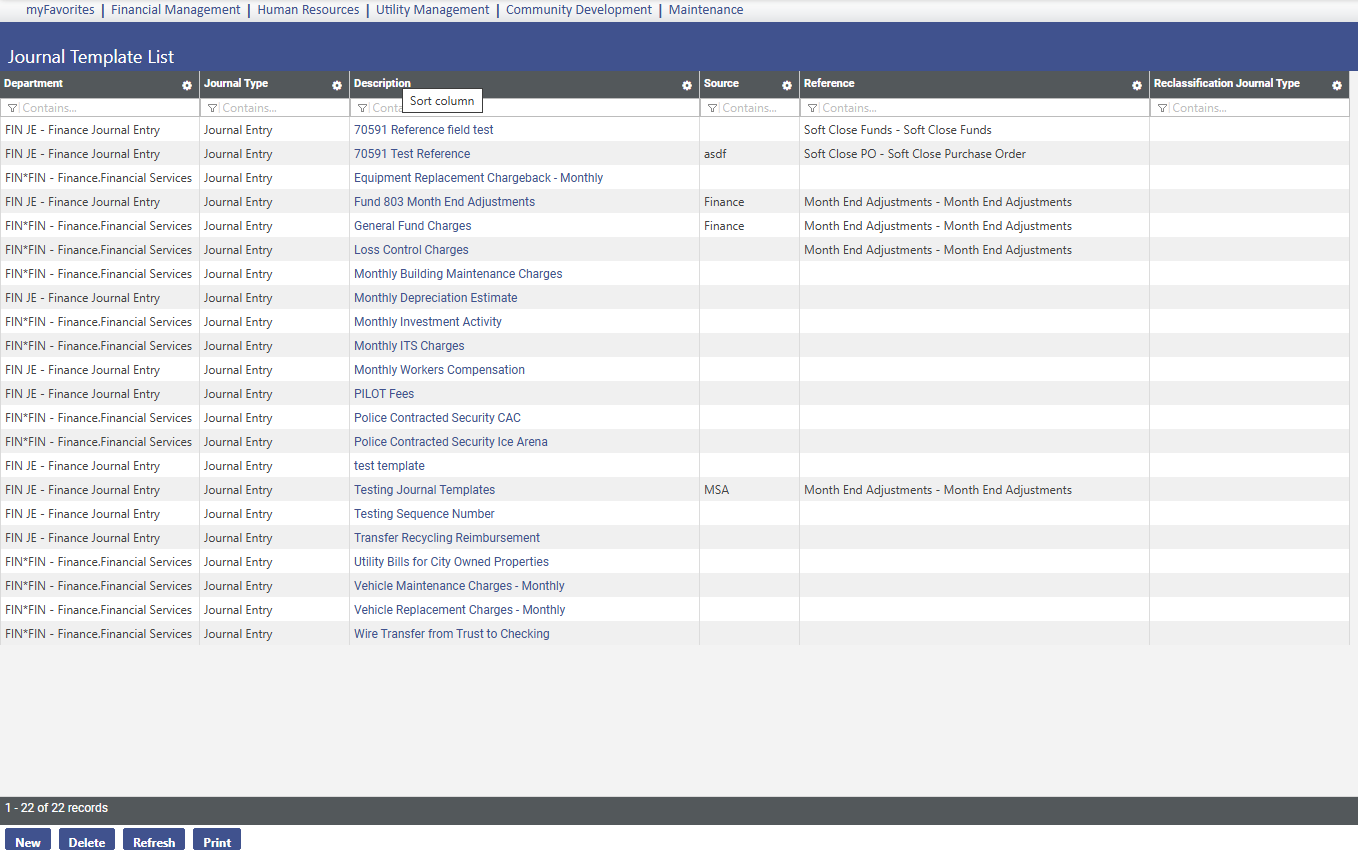
The first page accessed within template journals is the journal template list page. Templates that have already been created will show in the list area.
New – Click this button to create a new template journal.
Delete – Click this button to delete an existing template.
Refresh – Click this button to reload the page and the data on it.
Export – Journals may be exported to other systems. Clicking this button will allow the user to begin the process of exporting the template journal.
Print – Clicking this button will print all of the template journals.
Once New has been clicked at the bottom of the page, the following page will be displayed.
Department – This is the functional department assigned in the Process Manager for this user. If the user has more than one functional department, the system will default to the user’s functional department as defined on the User Based Security - General Tab for this specific user. The user will see all functional departments authorized to them through Process Manager.
Journal Type – The user must select the journal type. The 4 different journal types available were described earlier (Journal Entry, Budget Adjustment, Encumbrance Adjustment and Reclassification Journal). This is a required field.
Source – This field is used to describe where the entry is coming from. This is an optional field and can be set to anything that the user feels is relevant.
Reference - This field is a validation set. The validation set can be edited within the current screen by holding down the Ctrl key on the keyboard and left clicking on the mouse. This allows the user to add new references or edit existing references.
Description – This field is the description that will apply to the journal entry. This is a required field.
Once Save has been clicked, the page will reload with the bottom of the page available to start adding G/L accounts and sequences for the journal entry template. To begin entering new sequences, click New.
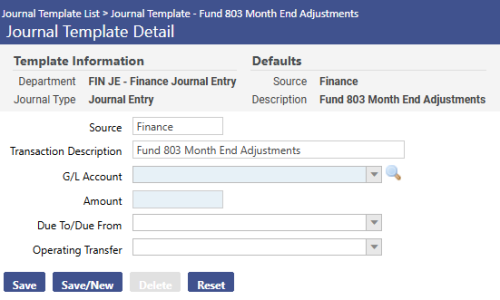
Source – This field is used to describe where the entry is coming from. This is an optional field and can be set to anything that the user feels is relevant.
Transaction Description – This field is optional. It will serve as the description for this specific line in the entry.
G/L Account - This field is required. It contains the general ledger account to which the transaction should reflect. The entry must be a valid general ledger account number to which the user has sub ledger authority. The account must pass budget validation.
Amount – This field is required. This is where the dollar amount for the line item should be entered. Debits will always be positive and credits will always be negative.
Due To/Due From – This is an optional field. If there is a due to/due from account that should be reflected in this transaction, this is where the specific due to/due from account should be selected.
Operating Transfer – This is an optional field. If there is an operating transfer being reflected in the transaction, select the account from the drop down list.
Completing this page will create one line item for each entry. If multiple entries need to be created, select the Save/New feature and the line item will be saved and a new blank screen will be listed allowing for another line item to be created. If there are no more entries to be entered, select the Save feature. Once the entry has been saved, breadcrumb back to the Journal Template List screen to view the completed template. Now the template is able to be used in the Template Journal screen.
Export Journal Transactions
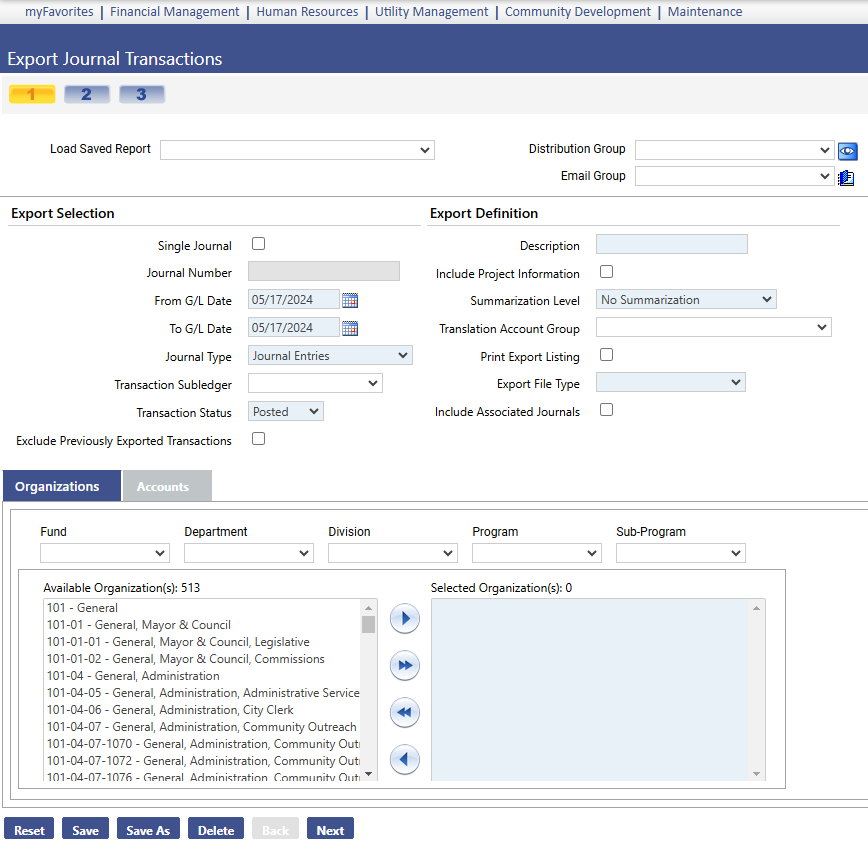
Load Saved Report – This field is where a user would load a saved report for use. Once selection criteria have been entered for journal entries, the system allows a user to save the search criteria for future use. This is a very helpful tool if the same entries are being exported frequently.
Distribution Group – This field allows the user to select specific users within New World ERP to send this report/export to. Once a distribution group has been created, it will be available under the drop-down.
- To create a new distribution group, click the
 icon next to the distribution group field. Once selected, a page will open allowing different users to be selected to create the distribution group. Once completed click Save.
Email Group – This field allows the user to email the report/export to different external users outside of New World. Once an email group has been created, it will be available under the drop-down.
- To create a new email group, click the
 icon next to the email group field. Once selected, a page will open allowing the user to enter email addresses to send the information to. Once completed click Save.
Select Single Journal – This checkbox allows the user to search for a specific journal number if the box is selected. When selected, the journal number field becomes required.
Journal Number – This is an optional field that is used for search criteria to find the specific journal to be exported.
From Date – This field is required when the select single journal check box is left open. This allows the user to search for a journal based on a date range.
To Date – This field is required when the Select Single Journal check box is cleared. This allows the user to search for a journal based on a date range.
Journal Type - The four different journal types that are displayed in the drop-down are as follows:
- Journal Entries – These are the general journals that are used by the system sub-ledgers and the user to create journal entries.
- Encumbrance Adjustments – This type of journal will affect only the encumbrances within the system.
- Budget Adjustments – This type of journal affects only the budgets within the system. It is used to create any changes to the budget during the year after the initial budget has been adopted.
- Reclassification Entries – This type of entry is used for governmental reporting only. These types of journals are used for the year-end adjustments required to produce the annual ACFR/GASB reports. These entries are not included in the soft close process and do not automatically post to fund equity balances. This type of journal is only active in the General Ledger sub-ledger.
Transaction Sub-Ledger - This field displays the sub ledger that is the source of the journal detail.
Journal Status – This control will show only the journals that the user specifies. The options are posted, unposted, and all.
- Posted – This will only show transactions that have been posted to the general ledger.
- Unposted – This will only show transactions that have not yet been posted to the general ledger.
- All – This will show all transactions whether they have been posted to the general ledger, or not.
Exclude Previously Exported Transactions – This check box allows the search to not include transactions that have been previously exported.
Description - This is a 64 character alphanumeric field that allows the user to enter a brief description of the journal export.
Include Project Information – This check box should be selected if the user wishes to display project information in the export. If not, it should be left unchecked.
Summarization Level – This field will summarize the information being exported as either not summarized, summarize one transaction per G/L date, or summarize one transaction per export.
- No Summarization – This option will provide no summarization at any level within the export.
- One Transaction per G/L Date – This option will provide a summarization the information in the export by G/L date.
- One Transaction per Export – This option would summarize by providing one total per export for each G/L account.
Translation Account Group – This field will list all of the options that are available to export the file to. This is a validation set and allows the user to change or add a translation account group if the correct option is not listed. To add or edit, hold down the Ctrl key and left click. This will launch the validation set window and allow for additions or modifications.
Print Export Listing – This check box controls whether the export listing will be printed or not.
Export File Type – This field needs to be set up by following the path: Maintenance > new world ERP Suite > System > Import/Export > Export. Once export types have been set up in the system, they will be available for selection here.
Include Associated Journals – This check box will include associated journals in the export. If associated journals should not be included, leave the box unchecked.
The bottom portion of the page allows specific components to be selected based on the fund, department, project, location, function, sub function, and account. Selections of these are required.
Once this page has been completed and all of the required fields have been filled, select Next.
The next page that loads is the summarization page. This page lists a summarization of the data that will be exported, showing the fund summary and the transaction details. Once this has been reviewed, click Next.
The last page that displays is a final summary and review of the information to be exported. Once this has been reviewed, click Finish. Once finish is clicked an export file is created and sent to myReports.
Investment Distribution
This option allows users to calculate investment distribution earnings and create journals based on those calculations. However, in order to properly work investment distributions, there is some setup that needs to be done.
The first step is to set up the Investment Distribution Journal Groups. In order to set this, follow Maintenance > new world ERP Suite > System > Validation Sets > Validation Set list.
The next step is to assign G/L accounts to the investment distribution groups. To select accounts and assign them to an investment distribution journal group navigate to the G/L account list. Maintenance > new world ERP Suite > Chart of Accounts > G/L Accounts > List. Use the search criteria to find the accounts that need to be added to a group then click on the account number to work with an account. Once in the account there will be a drop down titled Investment Distribution Journal Group. This is where the user will select the appropriate group from the values created in the investment distribution group validation set. Once the appropriate group is selected click the Save button.
With the Investment Distribution Journal Group selected, saving the G/L Account enables the G/L Distribution tab, where you will set up the accounts that will participate in the investment distribution process.
Once the setup has been completed, navigate to Financial Management > Journals > Investment Distribution.
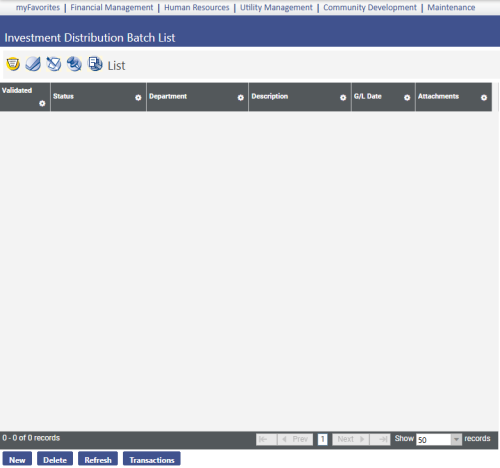
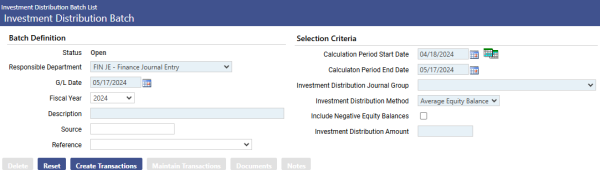
Click the New button at the bottom of the Investment Distribution Batch List page to create a new Investment Distribution Batch.
Responsible Department - This displays the department responsible for the investment distribution.
G/L Date - This field is required. This is the date that the investment distribution batch should post to the general ledger.
Fiscal Year – The fiscal year will determine the journal number that is assigned to the journal. The numbers are defined and tracked under the Company Suite Settings on the Counters tab.
Description – The description is a 64 character alphanumeric field that allows the user to enter a brief description of the investment distribution
Source – Source had been pre-defined for all journals created by the system. For manual journal entries and investment distributions, this is an optional field. It is suggested that the user develop a system for assigning source codes to the manually created entries to provide consistency.
Reference - This is a validation set, and allows the user to search for specific journals based on the reference code it was assigned.
Calculation Period Start Date – This is the date that will be used as the start date for the investment distribution calculation.
Calculation Period End Date - This is the date that will be used as the end date for the investment distribution calculation.
Investment Distribution Journal Group – This is the validation set that was configured at the beginning of the investment distribution set up. All of the available investment distributions that have been created will be selectable in the drop-down.
Investment Distribution Method – There are four available selections:
- Ending Equity Balance – This method uses the balance of the G/L accounts selected on the Calculation Period End Date to determine the prorated amount of the investment distribution that is allocated to each account.
- Average Equity Balance - This method will add the balance as of the Calculation Period Start Date to the balance as of the Calculation Period End Date, divide the amount in half and use the average of the starting and ending balances to calculate the prorated amount.
- Dollar Day Average - Based on the balance in each account and what it represents in terms of the overall available cash for each day in the date range selected, the Dollar Day Average method will allocate the interest per day. This method is the most complex and precise method of all listed.
- Custom - In situations where one of the previous three methods do not meet the user’s needs, there is an option to select a Custom Investment Distribution Method.
Include Negative Equity Balances - If the user wants negative equity balances to be included in the distribution calculation, select the Include Negative Equity Balances box. Accounts with negative balances will be charged negative interest. If left unchecked any negative number will be treated as zero, and nothing will be distributed to the account.
Investment Distribution Amount – This field is the dollar amount of the investments. This number represents the net amount of the investment distribution that is to be allocated.
After making completing the selections on the Investment Distribution Batch page, click Create Transactions. On a prorated basis, the Investment Distribution Amount will be allocated to all of the accounts associated with the Investment Distribution Journal Group that was selected.
Next, to process the allocations that have just been created, breadcrumb back to the Investment Distribution Batch List to process and post the batch.
Note: Once the transactions have been created, the Documents and Notes buttons will become available on the Invoice Distribution Batch page. These buttons allow for scanned documents and notes to be attached to the batch. An example of a document may be a bank statement showing interest earned. Attached documents and notes will be carried forward through the posting of the batch and the creation of the journal.