Miscellaneous Billing
Introduction
Welcome to the New World ERP Miscellaneous Billing Processing guide. This manual will guide you through both the setup and processing aspects of Miscellaneous Billing Processing.
The guide is divided into two sections.
The System Administration Guide will focus on the set-up components necessary to utilize Miscellaneous Billing Processing within New World ERP. This will include detailed information on “master files” that must be set-up such as Invoice Types and Customer and will also include the security settings which will be utilized to enable workflow and tailor user options to your needs.
The End User Processing Guide will describe the steps, workflow and options available in Miscellaneous Billing Processing to the end-user. It will guide you through the process from entering Customers, through to Invoice Entry and Invoice adjustments. Included in the section will be a guide to the standard reports available in the software.
This document is available in Microsoft Word format to allow for customization to your agencies particular needs and procedures.
System Administrator Guide
Company FM Settings
The Company FM Settings area contains universal settings that control system behavior within the Miscellaneous Billing Module.
Miscellaneous Billing Tab
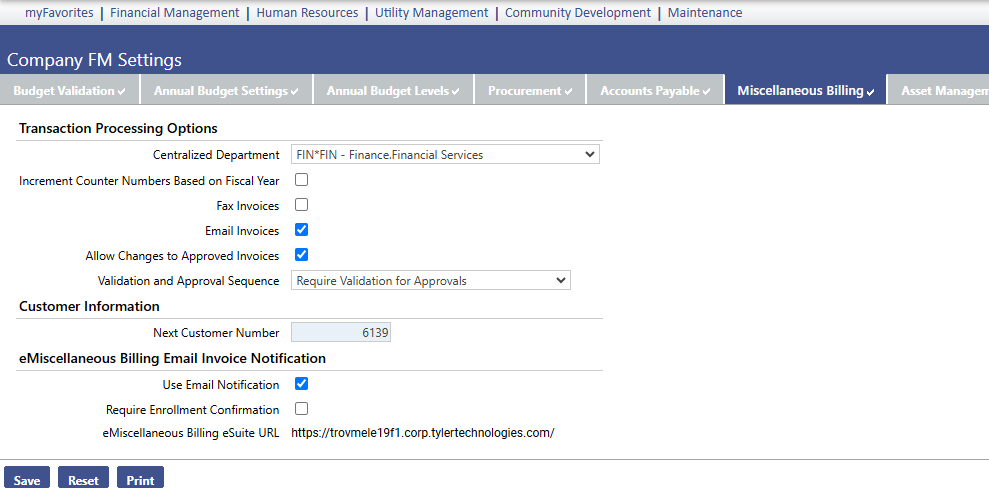
Maintenance > Financial Management > Company FM Settings > Miscellaneous Billing tab
Fields:
Centralized Department – This is an optional field. If a value is chosen from the drop-down, it will be the default department that is filled in when any transaction is started within Miscellaneous Billing granted the user has access to the selected department. In addition, the department entered in this field will be the Functional Department that is used when a system generated journal entry is created from any Miscellaneous Billing transaction.
Increment Counter Numbers Based on Fiscal Year – If selected, this check box will automatically increment system assigned Invoice Numbers based on the fiscal year specified in New World ERP. E.g., 2012-0000001
Fax Invoices – If selected, this check box will allow for the option to produce an Invoice via fax.
Email Invoices – If selected, this check box will allow for the option to produce an invoice via email.
Allow Changes to Approved Invoice – If selected, this check box will allow users to make changes or modifications to an Invoice if one or more approvals have been placed on the Invoice Batch. If the check box is cleared, no user will be able to make modifications to an Invoice that resides within an Invoice Batch with at least one approval on it.
Validation and Approval Sequence – This drop-down decides the order in which a user must proceed through the work flow buttons as transactions are entered in the Miscellaneous Billing module.
Next Customer Number – The number entered in this field will determine the next number assigned to a Customer created for Miscellaneous Billing.
Customer Types
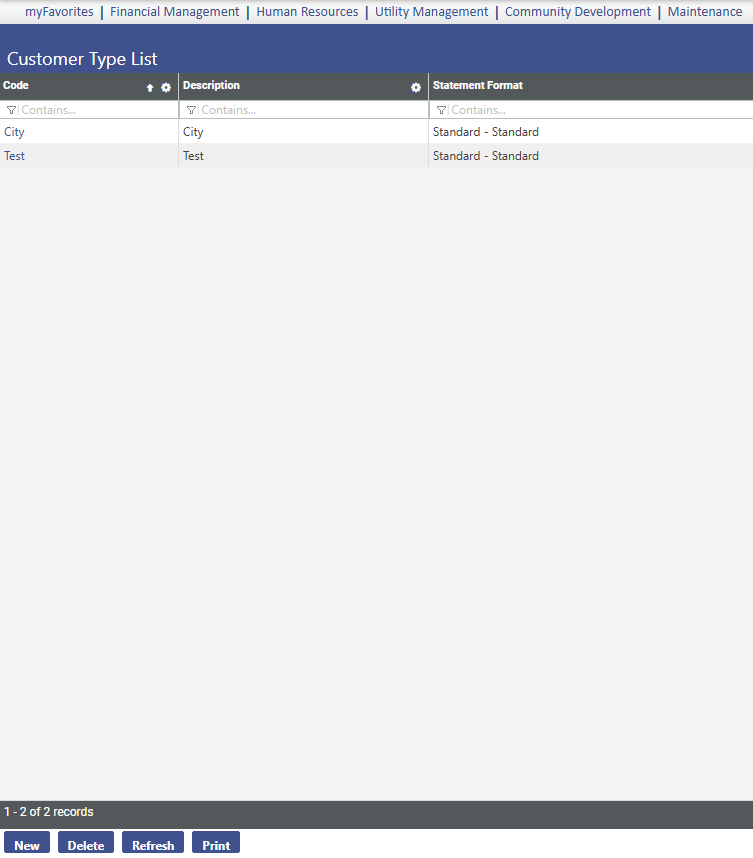
Maintenance > Financial Management > Miscellaneous Billing > Customer Types
Customer Types are a required item to set up in order to use the Miscellaneous Billing module. Customer Types have numerous functions that assist users in many ways. First and foremost, this required setup item acts as a grouping category for Customers in New World ERP. To gather Invoice Billing information based on Customer Types, there are reports and inquiries in New World that can be generated by this Customer Type. This is designed to give users a high level view of which types of customer are being billed the most and which types of customers have the most outstanding invoices.
Fields:
Code – Enter a code descriptive of the particular Customer Type being entered. This is typically a shortened description of the Customer Type being entered; however, this will need to be easily identifiable to users in New World.
Description – Enter a full description of the Customer Type being entered. This field will allow up to 32 characters.
Statement Format – Choose a format used when Customer Statements are generated for Customers associated to the Customer Type being entered. A standard format is already pre-defined in New World, however, if a custom format is needed please discuss this option with an Application Specialist.
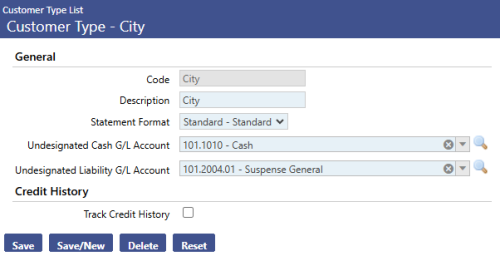
Undesignated Cash G/L Account – A G/L Cash account is required to be entered in this field. This field is used for any pre-payments or over payments that have been received by a Customer in Revenue Collections. If one of these scenarios occurs when the Revenue Collection Batch is posted, the amount taken in by the Receipt will hit the Cash Account specified in this field as opposed to the Cash account. This is set up on the Payment Code used on the Cash Receipt.
Undesignated Liability G/L Account – A G/L Liability Account is required to be entered in this field. This field is used for any pre-payments or over payments that have been received by a Customer in Revenue Collections. If one of these scenarios occurs when the Revenue Collection Batch is posted, the amount taken in by the Receipt will hit the Liability Account specified in this field as opposed to the Revenue Account entered during the setup of the Payment Code used on the Cash Receipt.
Track Credit History – If this check box is selected, New World will track the history of delinquent customers. Delinquent customers accumulate more points.
Period (months) – Setting a period in months allows New World to determine the length of time credit points can be tracked on a customer. This field can range from 1 – 9,999 months.
Maximum Points – The number entered in this field will define the ceiling of points a customer can gain. It is set up within this Customer Type. Once a customer reaches the points entered into this field, alerts can then be sent to users within New World.
Invoice Types
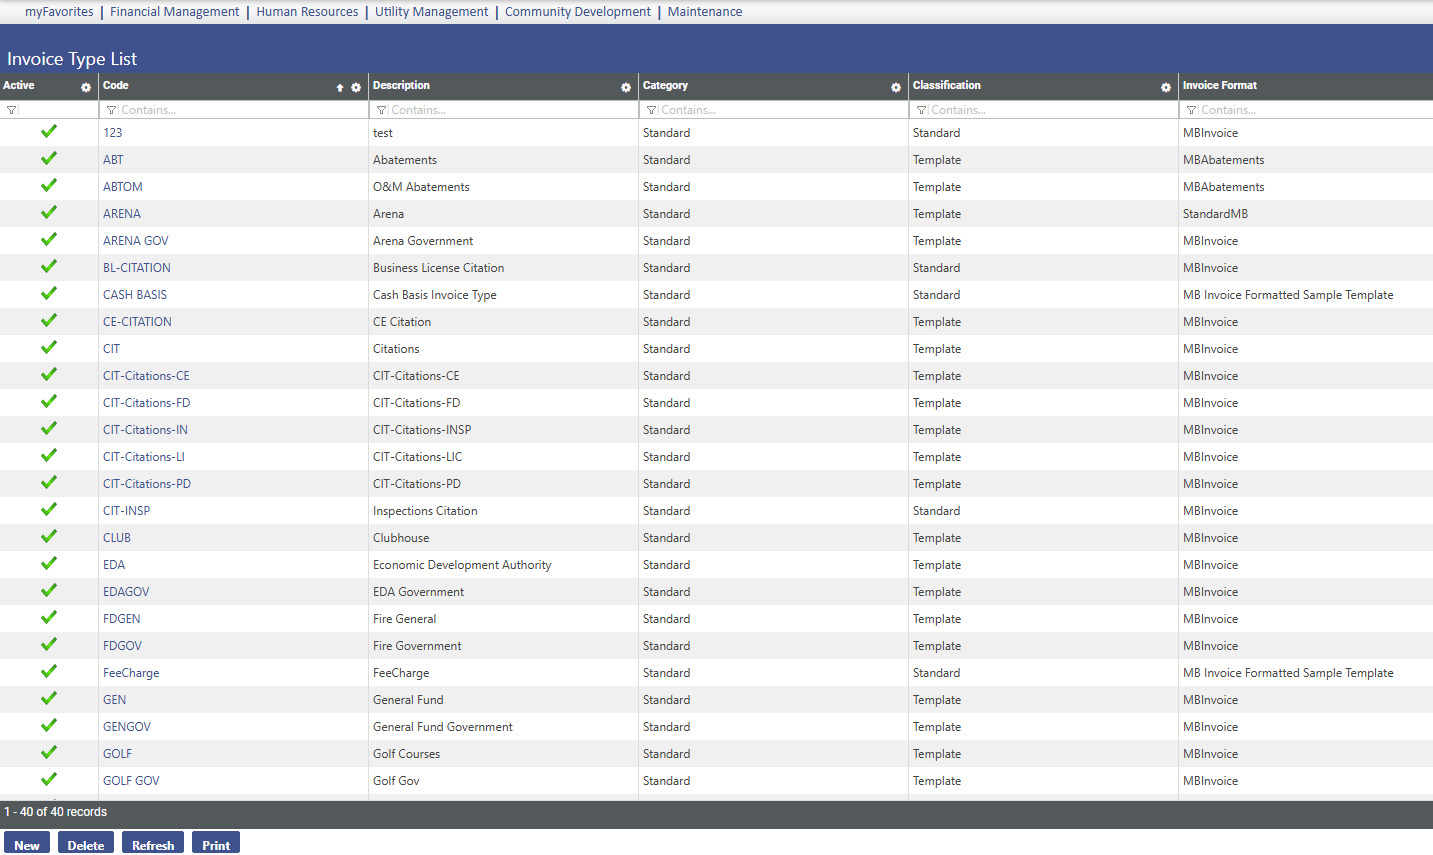
Maintenance > Financial Management > Miscellaneous Billing > Invoice Types
The Invoice Type List page allows authorized users to view a list of all existing invoice types. On this page a user can also add new invoice types and edit or delete existing types. Invoice Types are used for categorizing invoice formats, late notices, billing codes, and general ledger distributions. The software allows the system administrator to define the different types of invoices generated by your municipality and all the types of activities billed on the different invoice types.
The default sort order is by Code (in alphabetical order). Clicking a hyperlink in the Code column opens the Invoice Type page where invoice type information can be entered.
To add a new invoice type click New. To open and edit an existing invoice type, click the Code hyperlink.
To delete an invoice type from the list, select it in the list and click Delete. The Delete button is hidden or disabled if the user does not have the appropriate security permissions. If authorized, when Delete is clicked the user is prompted to confirm the deletion.
To print a list of all standard or template invoice types, click Print. When the Invoice Type Listing pop-up window appears select the criteria to be displayed on the report. Click OK to submit the Invoice Type Listing to myReports. The Print button is hidden if the user does not have the appropriate security permissions.
Invoice Type Page
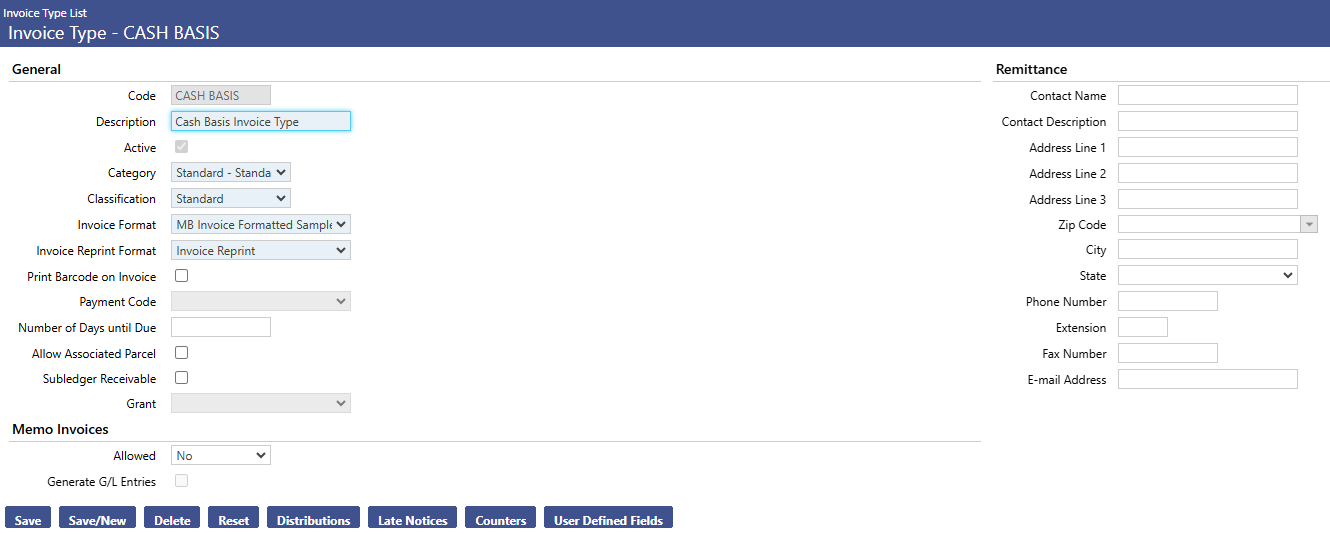
The Invoice Type page allows authorized users to enter and maintain the invoice types used by your municipality that are sent to customers. It may be accessed for a given record by clicking on the Code column hyperlink. Invoice Types are used for categorizing invoice formats, late notices, billing codes, and general ledger distributions. The software allows the system administrator to define the different types of invoices that are generated by your municipality and all the different types of activities that are billed on the different invoice types.
Fields:
Code – Type the code to identify the invoice type. It must be a unique code between 1 and 16 characters.
Description – Type the description of the invoice type. It must be between 1 and 32 characters.
Active – Select this check box to enable Invoice Type when users are entering invoices.
Category – Select the category belonging to this invoice type. The category is defined in Validation Set 68. Press the CTRL key and click the field to open the Validation Set Values List dialog box where you can add or edit a validation set. Category is a way to group similar invoice types together for reporting and inquiry purposes. Examples are: licenses, office rental, and retiree insurance. Another example of category would be the use of departments: Fire, Water, Electric, etc.
Classification – Select the classification of invoice belonging to this invoice type (e.g., Standard or Template).
- Standard – Used for invoices that can be billed anytime and do not have a recurring bill pattern; these invoices are reactive and are sent out as needed. For example, consider ambulance fees since they could be billed anytime.
- Template – Used for invoices that have a recurring bill pattern; these invoices are proactive and are sent out on a regular schedule. For example, boat slips, hangars, or parking space rentals would be billed each month so the invoice type could be setup as a template.
Invoice Format – Select the format used for this invoice type. This list is populated with data from the mail merge document created using the mail merge. This defines what the invoice will look like when printed.
You must design the MB invoice document that will be sent out to the customers. It’s a mail merge document so you can customize the MB invoice to meet your specifications. This is the document that the system prints out which can be mailed to the MB customers.
Invoice Reprint Format – Select the default format used when users want to reprint an invoice for this invoice type, for example a second notice. This list is also populated with data from the mail merge document that was created using the mail merge. This defines what the invoice will look like when reprinted.
Print Barcode – Select the Print Barcode on Invoice check box if the barcode should be printed on the invoice. When selected, this enables the Payment Code field. Enabling this feature is a time-saving benefit to your organization, allowing users to bypass manually entering the invoice number during the payment collection process.
Payment Code – Select the payment code to associate with the invoice type. It is enabled if the Print Barcode on Invoice check box is selected. (Payment Codes are defined in Maintenance > new world ERP Suite > Revenue Collection > Payment Codes with Miscellaneous Billing as the A/R Sub Ledger.)
Number of Days Until Due – Type the number of days before the invoice type is due. The acceptable range is 1 through 32,767. The system calculates the default due date based on this number when creating the invoice.
Allow Associated Parcel – If your organization wants to be able to associate parcels to this invoice type, select the Allow Associated Parcel check box. This will cause the Jurisdiction and Parcel ID fields to display on all invoices of this type where the user has user-based security permissions for Parcel Jurisdiction and Miscellaneous Billing Invoice Type.
Grant – Select the grant associated with the invoice type. This ties the invoice to a grant to be used for reimbursements. Selecting a value displays and enables the Grant Program/Grantee field on the Billing Code page. (This Grant field only appears if the Miscellaneous Billing check box is selected on the Grants tab in Company FM Settings.)
Click Save to save this invoice type or Save/New to create another invoice type.
Memo Invoices – Invoice types may be set up as memo invoices that do or do not generate general ledger transactions when posted. Memo invoices let you generate internal billing invoices to other departments within your municipality.
A memo invoice that does generate general ledger transactions may be set up for one department that bills another for services rendered. This type of invoice creates debits and credits, charging an expense account in one department and recognizing revenue in another department.
A memo invoice that does NOT generate general ledger transactions may be set up for a department that pays a monthly bill for an entire organization, and then sends an invoice to each department within the organization, showing the amount that was withdrawn from the department’s expense account for its portion of the bill. This type of invoice improves the method of auditing the expenses that each department incurs.
- Allowed – If this setting is set to Yes then this Invoice Type will support memo billing.
Generate G/L Entries – If this check box is selected, New World will generate General Ledger entries when an Invoice is processed for memo billing using this Invoice Type. G/L Entries will be specified on the Distributions page.
Remittance – The information entered here will be used by default on invoices and delinquent notices that use this invoice type when printed. This information is not required, but can be mapped to your mail merge document. If this remittance information is left blank, by default the system uses the address information entered on the Company tab in Company Suite settings.
Contact Name - Type the name of the contact.
Contact Description - Type the textual description of the contact. For example: Director or Manager.
Address Line 1 - Type the first line of the address at which the contact is located.
Address Line 2 - Type the second line of the address at which the contact is located. This is optional.
Address Line 3 - Type the first line of the address at which the contact is located. This is optional.
Zip Code - Select or type the zip code where the contact is located.
City - Displays the city in which the contact is located. This box is automatically populated when a value is selected in the Zip Code box. It can be edited if needed.
State – Displays the state in which the contact is located. This box is automatically populated with the correct state when a value is selected in the Zip Code box. It can be edited if needed.
Phone Number - Type a telephone number at which the contact can be reached.
Extension – Type the phone extension number at which the contact can be reached, if necessary.
Fax Number - Type the fax number at which the contact can be reached.
E-mail Address - Type an email address for the contact.
Invoice Type Distributions

Maintenance > Financial Management > Miscellaneous Billing > Invoice Types
Invoice Type Distributions allows authorized users to maintain default general ledger, payment processing options, and billing codes information for the invoice types.
When you save a new record, the Invoice Type Distributions page opens. Otherwise, click Distributions to define the debit and credit distributions for this invoice type on the Invoice Type Distributions page.
Fields:
Effective Dates – Select the effective date range for the invoice type distributions information. On the left and right sides of the drop-down list are arrows. Clicking the left arrow moves the display to the previous effective date range in the list (i.e., earlier in time from the currently selected date range). Clicking the right arrow moves the display to the next effective date range in the list (i.e., later in time from the currently selected date range).
Start Date – Select the effective start date for the invoice type distributions information. The date selected must be greater than the previous record’s start date. The effective Start Date must be unique for each instance of the invoice type. The time periods during which an invoice type is effective must be unique for that type.
Billing Account Method – Select the revenue recognition method to use for the invoice type (i.e., Cash or Accrual). The default is Accrual. If Cash is selected there are no receivable accounts and the entry is recognized as revenue.
Revenue G/L Account – Select the default revenue account to be used when this invoice gets processed. Clicking the Search icon  next to this field opens a pop-up which enables you to search for the G/L account you want to display.
Bad Debt Expense Account – If Accrual is selected as a Billing Account Method, select a Bad Debt Expense G/L Account, which is the default bad debt expense account to be used when writing off uncollectible accounts associated with the invoice type. If entered, the Bad Debt Expense G/L Account must share the same Fund (Organization 1) as the Revenue G/L Account selected. Clicking the Search icon next to this field opens a pop-up which enables you to search for the G/L account you want to display.
Override Cash Account – Select the cash account to use for invoice type revenue collections. This overrides the fund's default cash incoming account setup. Use this if you want the cash coming in to go to a specific cash account other than the fund's default offsetting account.
Override Receivable Account – If Accrual is selected as a Billing Account Method, select an Override Receivable Account, which is the receivable account to use for invoice type revenue collections. It overrides the fund's default A/R account setup. Use this if you want the receivable to hit a specific receivable account other than the Fund's default A/R account.
Doubtful Receivable Account – If Accrual is selected as a Billing Account Method, select a Doubtful Receivable Account, which is the receivable account to use when the receivable is reclassified to doubtful. If the attribute is not defined, invoices of this type cannot be selected in Bad Debt Processing for reclassification. It overrides the Fund's default A/R account setup. Use this if you have a specific account used to track doubtful A/R.
Memo Billing Expense Account – If the Invoice Type is set up to only support memo invoices, the Memo Billing Expense Account field appears. Use Memo Billing Expense Account to select the departmental account that will be expensed for the selected invoice type. When a memo invoice is created for this invoice type, the system matches the departmental organization set defined for the customer with this expense account to create the general ledger account that will be charged the expense.
Default Project – To allocate revenues to projects, in Default Project select the project to which Miscellaneous Billing revenue will be allocated. Clicking the Search icon () next to this field opens a pop-up which enables you to search for the project you want to display.
Allow Partial Payments – Select this box if allowing partial payments of an Invoice is desired.
In Partial Payment Method, select the method in which partial payments are allocated (i.e., Sequential or Prorated). The default is Prorated. Even if partial payments cannot be collected, the application of undesignated balances (overpayments) to an invoice during billing is always allowed and the amount applied may be less than what is being billed.
- Prorated – Distributes payment proportionately based on percentages of billing codes.
- Sequential – Distributes payment based on the order of the sequence numbers assigned to the invoice, late fee, and finance charge.
Invoice Payment Sequence Number – Select the payment sequence to use when a partial payment is received. The number must be unique. It is visible and enabled only if the Allow Partial Payments check box is selected. The available options are 1, 2, or 3. The default selection is 1.
Late Fee Payment Sequence Number – Select the payment sequence to use when a partial payment is received. It must be unique. It is visible and enabled only if the Allow Partial Payments check box is selected. The available options are 1, 2, or 3. The default selection is 2.
Finance Charge Sequence Number – Select the payment sequence to use when a partial payment is received. It must be unique. It is visible and enabled only if the Allow Partial Payments check box is selected. The available options are 1, 2, or 3. The default selection is 3.
Reclassification Credit Points – Type the number of credit points assigned when invoices of this type are reclassified from Accounts Receivable to Doubtful Receivables. The acceptable range is 1 through 999.
Assignment Credit Points – Type the number of credit points assigned when invoices of this type are assigned to a collection agency. The acceptable range is 1 through 999.
Write Off Credit Points – Type the number of credit points assigned when invoices of this type are written off to bad debt, collection agency, or property taxes. The acceptable range is 1 through 999.
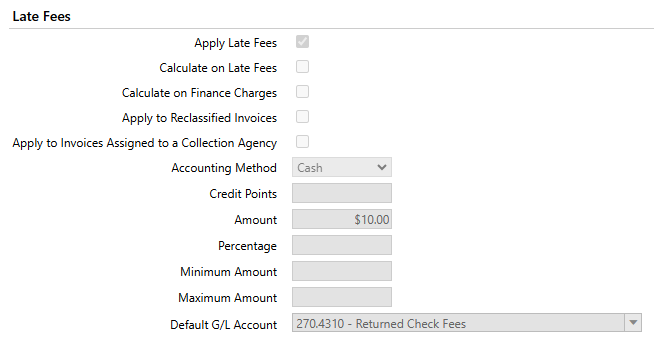
The Late Fees section groups the default late fee information for the invoice type. Users can assign the accounting method to use, dollar amount or percent within parameters, and a default GL account. The fields in this section are only visible when the Apply Late Fees check box is selected.
Apply Late Fee – Check box if late fees will be charged for the invoice type. If selected, it also enables the Apply Late Fee field on the Billing Code page.
Calculate on Late Fees – Check box if late fees will be calculated on top of existing late fees for the invoice.
Calculate on Finance Charges – Check box if late fees will be calculated on top of existing finance charges for the invoice.
Apply to Reclassified Invoices – Check box if late fees should be applied to invoices reclassified as Doubtful Receivables.
Apply to Invoices Assigned to Collection Agency – Check box if late fees should be applied to invoices that have been assigned to a collection agency. It can only be changed if an effective dated record has not been used.
Accounting Method – Enabled if Accrual is selected in the Billing Account Method field. Select the revenue recognition method to use for the invoice type late fees (i.e., Cash or Accrual).
Credit Points – Type the number of credit points assigned to each instance of applying late fees to an invoice.
Amount – Type the flat fee amount to be billed as late fees. The acceptable range is 0.01 through 9,999,999.99. Percentage or Amount is allowed, but not both.
Percentage – Type the percentage amount to be used to calculate late fees. The acceptable range is 0.0001 through 100.0000. Percentage or Amount is allowed, but not both.
Minimum Amount – Type the minimum dollar amount of late fees to be billed when calculating late fees based on a percentage. It is enabled if a value is entered in the Percentage field. It is disabled if a value is entered in the Amount field. The acceptable range is 0.01 through 9,999,999.99.
Maximum Amount – Type the maximum dollar amount of late fees that can be billed when calculating late fees based on a percentage. It is enabled when a value is entered in the Percentage field. It is disabled if a value is entered in the Amount field. The acceptable range is 0.01 through 9,999,999.99. The Maximum Amount field must be greater than or equal to the Minimum Amount field.
Default G/L Account – Select the default G/L account to use for recording the late fee revenue. It must be in the same Fund as the Bad Debt G/L Expense Account selected. Clicking the Search () icon next to this field opens a pop-up which enables you to search for the record you want to display.
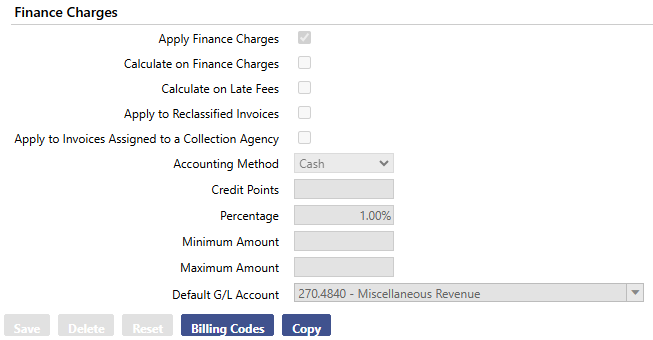
The Finance Charges section groups the default Finance Charge information for the Invoice Type. Users can assign the accounting method to use, percentage within parameters, and a default GL account. The fields in this section are visible when the Apply Finance Charges check box is selected.
Apply Finance Charge – check box if finance charges will be charged for the Invoice Type. If selected, it enables the Apply Finance Charge field on the Billing Code page.
Calculate on Finance Charge – check box if finance charges will be calculated on top of existing finance charges for the invoice.
Calculate on Late Fees – check box if finance charges will be calculated on top of existing late fees for the invoice.
Apply to Reclassified Invoices – check box if finance charges should be applied to invoices reclassified as Doubtful Receivables. It can only be changed if an effective dated record has not been used.
Apply to Invoices Assigned to a Collection Agency – check box if finance charges should be applied to invoices that have been assigned to a collection agency. It can only be changed if an effective dated record has not been used.
Accounting Method – Select the revenue recognition method to use for the Invoice Type Finance Charges (i.e., Cash or Accrual). It is disabled if Cash is selected in the Billing Account Method field. It is enabled if Accrual is selected in the Billing Account Method field.
Credit Points – Type the number of credit points assigned for each instance of applying finance charges to an invoice. The acceptable range is 1 through 999.
Percentage – Type the percentage amount to be used to calculate finance charges. The acceptable range is 0.0001 through 100.0000.
Minimum Amount – Type the minimum dollar amount of finance charges to be billed when calculating finance charges based on a percentage. It is enabled if a value is entered in the Percentage field. The acceptable range is 0.01 through 9,999,999.99.
Maximum Amount – Type the maximum dollar amount of finance charges that can be billed when calculating finance charges based on a percentage. It is enabled if a value is entered in the Percentage field. The acceptable range is 0.01 through 9,999,999.99.
Default G/L Account – Select the default G/L account to use for recording finance charges revenue. The account must be in the same Fund as the Bad Debt G/L Expense Account selected. Clicking the Search icon next to this field opens a pop-up which enables you to search for the record you want to display.
Copy Invoice Type Distributions
Use this feature to make changes to invoice types that have been previously used. While on the Invoice Type Distributions page, you can copy the default general ledger information for the invoice type to create a new one with a new effective date.
- Click Copy, which copies the values from the currently effective record into the fields using the New Effective Date specified. This button is hidden if you do not have Add permission rights to the Miscellaneous Billing – Invoice Types security component.
- In New Effective Date, select or enter the new date for the new invoice type distribution.
- Click OK.
- Update the fields on the Invoice Type Distribution page as needed and save the new record.
Billing Code List
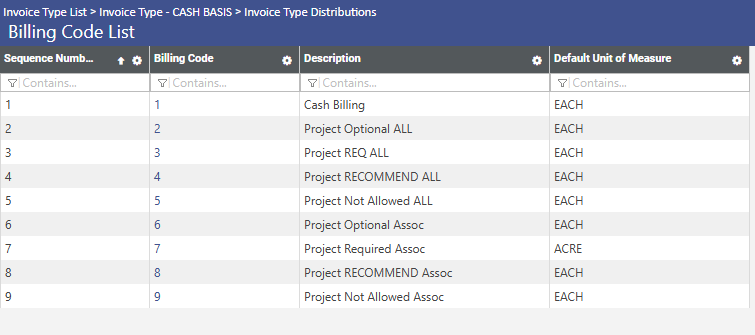
The Billing Code page allows authorized users to enter and maintain billing code detail for billing codes associated with invoice types. Billing codes appear on the Miscellaneous Billing invoice that your organization sends to the customer. You can create as many billing codes as needed for each invoice type. When you create the actual MB invoice, you can pick from all the billing codes available for the particular invoice type. It’s important to create simple and logical codes and descriptions for the billing codes.
The Billing Code List page may be accessed by clicking on the Distributions button on the Invoice Type Code page.
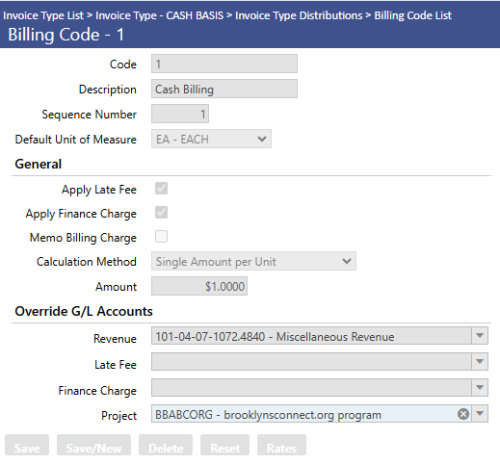
Fields:
Code – Type a unique billing code identifier. The maximum character length is 16; the minimum is 1. There are no character restrictions.
Description – Type a description of the billing code. The maximum character length is 64; the minimum is 1. There are no character restrictions.
Sequence Number – Type a unique sequence number to use for displaying the billing code on the billing pages, printed invoice, and payment sequence if a partial payment is made. This may be a numerical value from 1-999.
Default Unit of Measure – Select the unit of measure to use with the associated billing for calculating billing code amounts. The category is defined in Validation Set 30. Press CTRL and click the field to open the Validation Set Values List dialog box where validation sets may be added or edited.
Apply Late Fee – Select the check box if the billing code can charge late fees. It is enabled if the Apply Late Fees check box is selected on the Invoice Type Distributions page.
Apply Finance Charge – Select the check box if the billing code can charge finance charges. It is enabled if the Apply Finance Charges check box is selected on the Invoice Type Distributions page.
Memo Billing Charge – If Memo Invoices is specified on the Invoice Type page, the Memo Billing Charge check box is enabled. If the invoice type will be used for memo billing, select this check box.
Calculation Method – Select the method used to calculate the charge amount of the billing code. The default is Single Amount per Unit. If the method selected is Step Rate-method, the Rates button is enabled when the page is saved.
The Available Options Are:
- Single Amount per Unit – quantity x amount per unit
- Single Flat Fee – regardless of the quantity, flat amount is charged
- Step Rate – Single Rate for Quantity – (full quantity x step rate for the quantity) + step rate flat amount
- Step Rate – Step Rate for Quantity – (full quantity – previous step maximum amount) x step rate for the quantity) + step rate flat amount
Amount – If the Calculation Method selected is either Single Flat Fee or Single Amount Per Unit, enter a value in Amount for the default single amount or the single amount per unit.
Override G/L Accounts – In this section, users can override the default Revenue G/L Account defined on the Invoice Type Distribution page so that each billing code created is unique. If nothing is selected here, the system will use the default Revenue G/L Account assigned on the Invoice Type Distributions page.
Revenue – Select the billing code revenue G/L account. Clicking the Search icon next to this field opens a pop-up which enables users to search for the records they want to be displayed.
Bad Debt Expense – Select the billing code bad debt expense G/L account. It is enabled only if the Billing Account Method defined for the Invoice Type Distribution is Accrual. Clicking the Search icon next to this field opens a pop-up which enables users to search for the record they want to be displayed.
Late Fee – Select the billing code bad debt expense G/L account. It is enabled only if the Billing Account Method defined for the Invoice Type Distribution is Accrual. Clicking the Search icon next to this field opens a pop-up which enables users to search for the records they want to be displayed.
Finance Charge – Select the billing code finance charge G/L account. It is enabled if the Apply Finance Charge check box is selected on the Invoice Type Distribution page and on the Billing Code page. Clicking the Search icon next to this field opens a pop-up which enables users to search for the records they want to be displayed.
Memo Billing Expense Account – Select an expense account that will override the expense account that was placed on the Invoice Type Distributions Page.
Invoice Type Late Notices
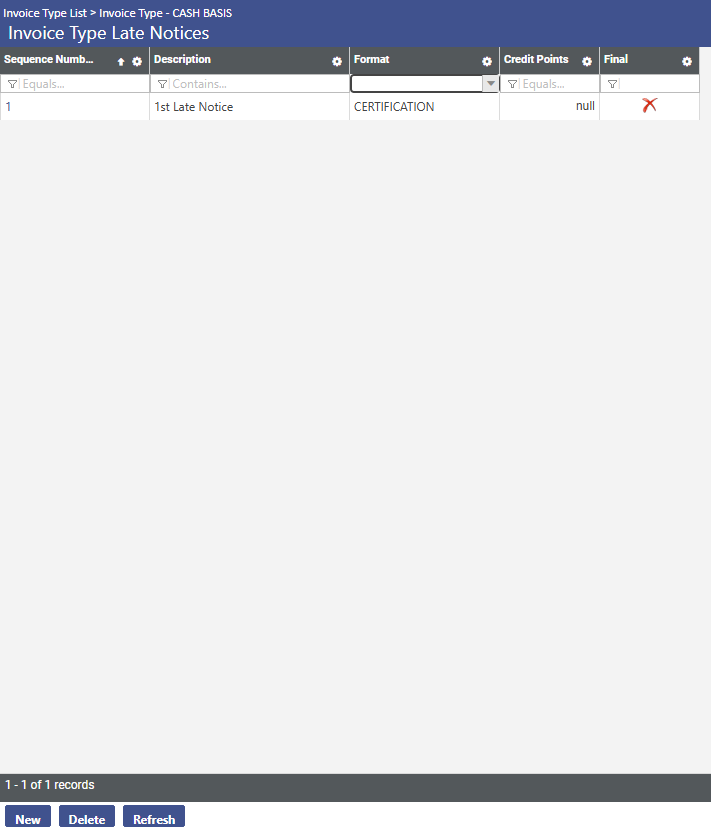
The Invoice Type Late Notices page allows authorized users to enter and maintain late notices (reminders) associated with the invoice type. It is displayed by clicking the Late Notices button on the Invoice Type page. The format for late notices and credit points are defined here on the Invoice Type Late Notices page.
The default sort order is by Sequence Number (in ascending order). Clicking a hyperlink in the Sequence Number column in the list opens the Invoice Type Late Notice pop-up page, where you can edit the late notice information.
Fields:
Sequence Number – Order in which Late notices will appear.
Description – Type the textual description of the late notice. The maximum character length is 32; the minimum is 1.
Format – Select the format assigned to the late notice. This pulls from the mail merge template that was created for the miscellaneous billing delinquent notice form letter. This defines what the invoice will look like when printed.
You must design the MB invoice document that will be sent out to the customers. It’s a mail merge document so you can customize the MB invoice to meet your specifications. This is the document that the system prints out which can be mailed to the MB customers.
Credit Points – Type the number of credit points assigned every time a late notice is generated for the customer, if applicable. The acceptable range is 1 through 999.
Final – Check box if this sequence number is the final notice. Only one late notice can be defined as the final notice.
Generate Final Only Once – Check box is enabled if the Final check box is selected. Select the Generate Final Only Once check box if the final notice should be re-generated multiple times as late notices are run.
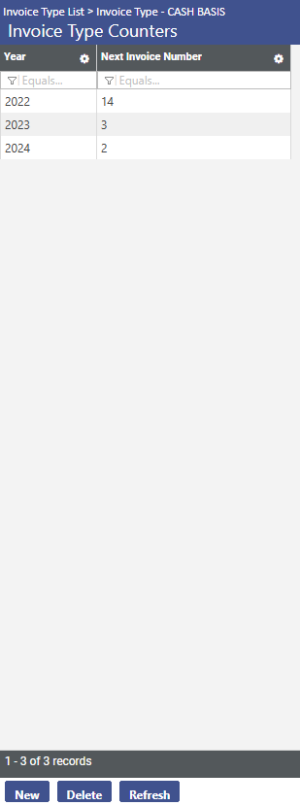
The Invoice Type Counters page allows authorized users to view and define the next available invoice number by invoice type. The system automatically assigns invoice numbers by year.
Year – Type the year of the invoice type counter for the next invoice number. The combination of the Invoice Type and Year fields should be unique. The year must be greater than or equal to 2000.
Next Invoice Number – Type the next number to be assigned to an invoice for the invoice type. The current counter number cannot exist in any of the miscellaneous billing transaction tables for the Invoice Type. The number automatically increments based upon the usage in the current year. The acceptable range is 1 through 999,999,999.
Adjustment Types
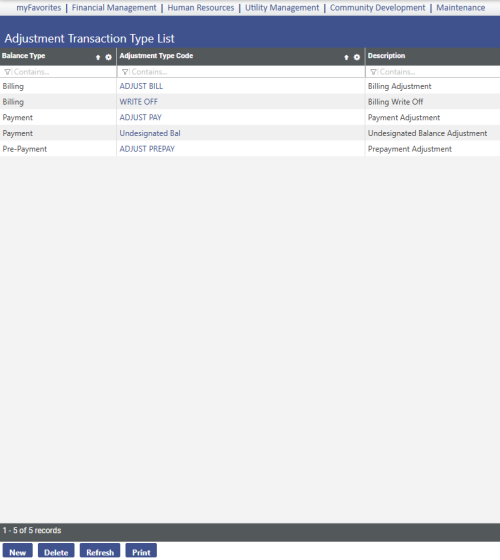
Maintenance > Financial Management > Miscellaneous Billing > Adjustment Types
The Adjustment Transaction Type List page allows authorized users to view a list of all existing adjustment transactions types, add new adjustment transaction types, or edit or delete existing types. Adjustment Transaction Types provides the ability to define and categorize corrections to payment and billing adjustments.
The default sort order is by Adjustment Type Code (in alphabetical order), followed by Balance Type (in alphabetical order). Clicking a hyperlink in the Adjustment Type Code column in the list opens the Adjustment Transaction Type page where you can edit the adjustment transaction type information.
To add a new adjustment transaction type click New. To edit an existing adjustment type, click the Adjustment Type Code hyperlink to open the existing record.
Adjustment Transaction Type
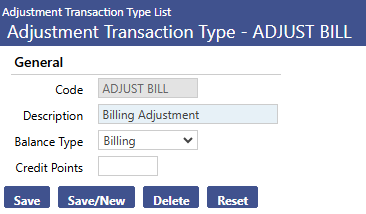
Fields:
Code – Type a code that identifies the adjustment transaction type. The code must be unique. The maximum character length is 16; the minimum is 1.
Description – Type a textual description of the adjustment transaction type. The maximum character length is 32; the minimum is 1.
Balance Type – Select the classification of the adjustment transaction type (e.g., Billing, Payment, or Prepayment). The default is Billing. It cannot be changed if any adjustment history (Edit or Posted) exists for the code.
- Billing – Adjustment affects the MB billing amount.
- Payment – Adjustment affects the payment amount for the customer.
- Pre-Payment – Adjustment used when an overpayment/prepayment has occurred.
Credit Points – Type the credit points resulting from the adjustment transaction type. The acceptable range is 1 through 999. Assign credit points for each adjustment that will tie to the customer’s total credit points. For example, you can assign points for NSF checks, which generates an adjustment for your organization.
Standard Messages
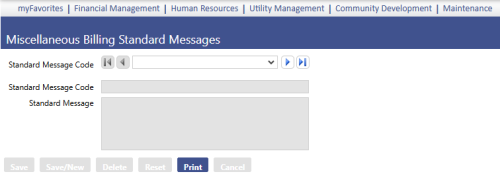
Maintenance > Financial Management > Miscellaneous Billing > Standard Messages
The Standard Messages page allows authorized users to enter and maintain standard messages that can be placed on miscellaneous billing invoices, requisition forms, purchase order forms, payments, permits and permit application checklists. These codes allow you to load standard messages which you can later customize onto the form instead of typing them in each time they are needed.
Fields:
Standard Message Code – Type in a code to identify a message when creating an Invoice.
Standard Message – Type in a standard message that a user can choose when entering an Invoice.
Security Setup
Permissions
Permission Type – Company Applications
Feature Group – Miscellaneous Billing
|
App |
Component |
Description |
All |
Add |
Change |
Delete |
View/Use |
|
|---|---|---|---|---|---|---|---|---|
|
FM |
Miscellaneous Billing – Adjustment Process Manager - Approve |
Enables the Approve icon to appear on the Adjustment page |
ü |
|
ü |
|
|
|
|
FM |
Miscellaneous Billing – Adjustment Process Manager – Edit Listing |
Enables the Edit Listing icon to appear on the Adjustment page |
ü |
|
|
|
|
ü |
|
FM |
Miscellaneous Billing – Adjustment Process Manager –Error Listing |
Enables the Error Listing icon to appear on the Adjustment page |
ü |
|
|
|
|
ü |
|
FM |
Miscellaneous Billing – Adjustment Process Manager –Post |
Enables the Post icon to appear on the Adjustment page |
ü |
|
ü |
|
|
ü |
|
FM |
Miscellaneous Billing – Adjustment Process Manager – Print Edit & Error Listing |
Enables the Edit & Error listing icon to appear on the Adjustment page |
ü |
|
|
|
|
ü |
|
FM |
Miscellaneous Billing – Adjustment Process Manager – Validate |
Enables the Validate icon to appear on the Adjustment page |
ü |
|
ü |
|
|
ü |
|
FM |
Miscellaneous Billing – Adjustment Processing |
Ability to get to the Adjustment Processing List |
ü |
ü |
ü |
ü |
ü |
ü |
|
FM |
Miscellaneous Billing – Adjustment Transaction Type |
Allows users to be able to add and maintain the list of Adjustment Types |
ü |
ü |
ü |
ü |
ü |
ü |
|
Suite |
Import Miscellaneous Billing Invoices – Invoice Audit Listing |
Allows users to print an Audit Listing from any Invoices that have been imported into New World ERP |
ü |
|
|
|
|
ü |
|
Suite |
Import Miscellaneous Billing Invoices –Invoice Edit Listing |
Allows users to print an Edit Listing from any Invoices that have been imported into New World ERP |
ü |
|
|
|
|
ü |
|
Suite |
Import Miscellaneous Billing Invoices – New Customer Listing |
Allows users to print an New Customer Listing from any Invoices that have been imported into New World ERP |
ü |
|
|
|
|
ü |
|
Suite |
MB Delinquent Notices Form Letter |
Allows users to be able to print Second and Final Notices to myReports |
ü |
|
|
|
|
ü |
|
Suite |
MB Invoice Form Letter |
Enables the Print Invoices icon to appear on the Invoice Batch List page |
ü |
|
|
|
|
ü |
|
Suite |
Miscellaneous Billing – Analysis By Invoice Type |
Inquiry users can perform to analyze Invoices by Invoice Type |
ü |
|
|
|
ü |
|
|
Suite |
Miscellaneous Billing – Bad Debt Batch Processing |
Enables users to utilize Bad Debt Batch Processing |
ü |
ü |
ü |
ü |
ü |
ü |
|
Suite |
Miscellaneous Billing – Bad Debt Process Manager |
Enables users to get to the Bad Debt Batch List |
ü |
|
|
|
ü |
|
|
Suite |
Miscellaneous Billing – Bad Debt Process Manager – Post |
Enables the Post icon to appear on the Bad Debt Batch List page |
ü |
|
ü |
|
|
|
|
Suite |
Miscellaneous Billing – Bad Debt Process Manager – Print Edit & Error Listing |
Enables the Print Edit & Error icon to appear on the Bad Debt Batch List page |
ü |
|
|
|
|
ü |
|
Suite |
Miscellaneous Billing – Bad Debt Process Manager – Validate |
Enables the Validate icon to appear on the Bad Debt Batch List page |
ü |
|
ü |
|
|
|
|
Suite |
Miscellaneous Billing – Billing Customer |
Allows users to create/maintain new Miscellaneous Billing Customers |
ü |
ü |
ü |
ü |
ü |
|
|
Suite |
Miscellaneous Billing – Billing Customer Contact |
Allows users to enter/maintain new contact information for Miscellaneous Billing customers |
ü |
ü |
ü |
ü |
ü |
|
|
Suite |
Miscellaneous Billing – Customer Inquiry |
Allows users to inquire on Miscellaneous Billing Customer Invoices |
ü |
ü |
ü |
ü |
ü |
ü |
|
Suite |
Miscellaneous Billing –Customer Transaction Report |
Allows users to generate a report showing all Customer Transactions |
ü |
|
|
|
|
ü |
|
Suite |
Miscellaneous Billing – Customer Type |
Gives users the menu option to be able to create/maintain Customer Types |
ü |
ü |
ü |
ü |
ü |
ü |
|
Suite |
Miscellaneous Billing – Delinquent Notice – Error Listing |
Enables the Error Listing icon to appear on the Delinquent Notice Page |
ü |
|
ü |
|
|
|
|
Suite |
Miscellaneous Billing – Delinquent Notice – G/L Distribution Summary |
Enables the G/L Distribution Summary Listing Report icon to appear on the Delinquent Notice Page |
ü |
|
ü |
|
|
|
|
Suite |
Miscellaneous Billing – Delinquent Notice –Post |
Enables the Post icon to appear on the Delinquent Notice Page |
ü |
|
ü |
|
|
|
|
Suite |
Miscellaneous Billing – Delinquent Notice – Print Edit & Error Listing |
Enables the Edit & Error Listing Report icon to appear on the Delinquent Notice Page |
ü |
|
ü |
|
|
|
|
Suite |
Miscellaneous Billing – Delinquent Notice – Validate |
Enables Validate icon to appear on the Delinquent Notice Page |
ü |
|
ü |
|
|
|
|
Suite |
Miscellaneous Billing – Delinquent Charges |
Allows users to perform delinquent charges against Miscellaneous Billing Customers |
ü |
ü |
ü |
ü |
ü |
ü |
|
Suite |
Miscellaneous Billing – Invoice |
Allows users to create/maintain Miscellaneous Billing Invoices |
ü |
ü |
ü |
ü |
ü |
|
|
Suite |
Miscellaneous Billing – Invoice Aging Report |
Allows users to be able to generate a Miscellaneous Billing Aging Report |
ü |
|
|
|
|
ü |
|
Suite |
Miscellaneous Billing – Invoice Batch Process Manager – Post |
Enables Post icon to appear on the Invoice Batch List Page |
ü |
|
ü |
|
|
|
|
Suite |
Miscellaneous Billing – Invoice Batch Process Manager – Print Edit & Error Listing |
Enables Print Edit & Error Listing icon to appear on the Invoice Batch List Page |
ü |
|
|
|
|
ü |
|
Suite |
Miscellaneous Billing – Invoice Batch Process Manager – Print Batch G/L Distribution Summary |
Enables the Print G/L Distribution Summary Report icon to appear on the Invoice Batch List Page |
ü |
|
|
|
|
ü |
|
Suite |
Miscellaneous Billing – Invoice Batch Process Manager – Print Edit & Error Listing |
Enables the Print Edit & Error Listing Report icon to appear on the Invoice Batch List Page |
ü |
|
|
|
|
ü |
|
Suite |
Miscellaneous Billing – Invoice Batch Process Manager – Print Edit & Post Listing |
Enables the Print Edit & Post Listing Report icon to appear on the Invoice Batch List Page |
ü |
|
|
|
|
ü |
|
Suite |
Miscellaneous Billing – Invoice Inquiry |
Allows users to be able to inquire on Miscellaneous Billing Invoices |
ü |
|
ü |
|
|
|
|
Suite |
Miscellaneous Billing – Invoice Type |
Allows users to be able to enter/maintain Miscellaneous Billing Invoice Types |
ü |
ü |
ü |
ü |
ü |
ü |
|
Suite |
Miscellaneous Billing – Print Customer Statements |
Allows users to be able to have access to the Print Customer Statements menu option |
ü |
|
|
|
|
ü |
|
Suite |
Miscellaneous Billing – Print Delinquent Invoice Notices |
Allows users to be able to have access to the Print Delinquent Notices menu option |
ü |
|
|
|
|
ü |
|
Suite |
Miscellaneous Billing – Recurring Invoice |
Allows users to be able to use Recurring Invoices when entering Invoices into a Miscellaneous Billing Invoice Batch |
ü |
ü |
ü |
ü |
ü |
|
|
Suite |
Miscellaneous Billing – Undesignated Funds |
Allows users to be able to apply undesignated funds to future Invoices being entered into a Batch |
ü |
ü |
ü |
ü |
ü |
|
|
Suite |
Miscellaneous Billing Standard Messages |
Allows users to gain access to the Standard Messages menu option |
ü |
ü |
ü |
ü |
ü |
ü |
|
Suite |
Print Miscellaneous Billing Check |
Allows users to be able to print a Refund Check to MB Customers that have made a pre/over payment |
ü |
|
|
|
|
ü |
Permission Type – Company Documents and Notes
Feature Group – Miscellaneous Billing
|
App |
Component |
Description |
All |
Add |
Change |
Delete |
View/Use |
|
|---|---|---|---|---|---|---|---|---|
|
Suite |
MB Customer Notes |
Enables the Approve icon to appear on the Adjustment page |
ü |
ü |
ü |
ü |
ü |
ü |
|
Suite |
MB Invoice Notes |
Enables the Edit Listing icon to appear on the Adjustment page |
ü |
ü |
ü |
ü |
ü |
ü |
|
Suite |
Miscellaneous Billing – Billing Customer Documents |
Enables the Error Listing icon to appear on the Adjustment page |
ü |
ü |
ü |
ü |
ü |
ü |
|
Suite |
Miscellaneous Billing – Invoice Documents |
Enables the Post icon to appear on the Adjustment page |
ü |
ü |
ü |
ü |
ü |
ü |
Permission Type – Company Documents and Notes
Feature Group – Miscellaneous Billing Reports
|
App |
Component |
Description |
All |
Add |
Change |
Delete |
View/Use |
|
|---|---|---|---|---|---|---|---|---|
|
Suite |
MB Customer Balance Report |
Allows users to print a Customer Balance Report |
ü |
|
|
|
|
ü |
|
Suite |
Miscellaneous Billing - Bad Debt Batch Edit/Post Listing |
Allows users to print an Edit and Post Listing Report |
ü |
|
|
|
|
ü |
|
Suite |
Miscellaneous Billing - Bad Debt Batch Error Listing |
Allows users to print a Bad Debt Batch Error Report |
ü |
|
|
|
|
ü |
|
Suite |
Miscellaneous Billing – Bad Debt Batch G/L Distribution Summary |
Allows users to print a Bad Debt Batch G/L Distribution Summary Report |
ü |
|
|
|
|
ü |
|
Suite |
Miscellaneous Billing – Customer Report |
Allows users to print a Customer Report |
ü |
|
|
|
|
ü |
|
Suite |
Miscellaneous Billing –Customer Transaction Report |
Allows users to print a Customer Transaction Report |
ü |
|
|
|
|
ü |
|
Suite |
Miscellaneous Billing – G/L Distribution Report |
Allows users to print a G/L Distribution Report |
ü |
|
|
|
|
ü |
|
Suite |
Miscellaneous Billing – Invoice Report |
Allows users to print an Invoice Report |
ü |
|
|
|
|
ü |
|
Suite |
Miscellaneous Billing – Open Invoice Report |
Allows users to print an Open Invoice Report |
ü |
|
|
|
|
ü |
|
Suite |
Miscellaneous Billing – Payment Edit Report |
Allows users to print a Payment Edit Report |
ü |
|
|
|
|
ü |
|
Suite |
Miscellaneous Billing – Revenue Summary Report |
Allows users to print a Revenue Summary Report |
ü |
|
|
|
|
ü |
|
Suite |
Miscellaneous Billing – Waived Delinquent Charges Report |
Allows users to print a Waived Delinquent Charges Report |
ü |
|
|
|
|
ü |
User Based Security
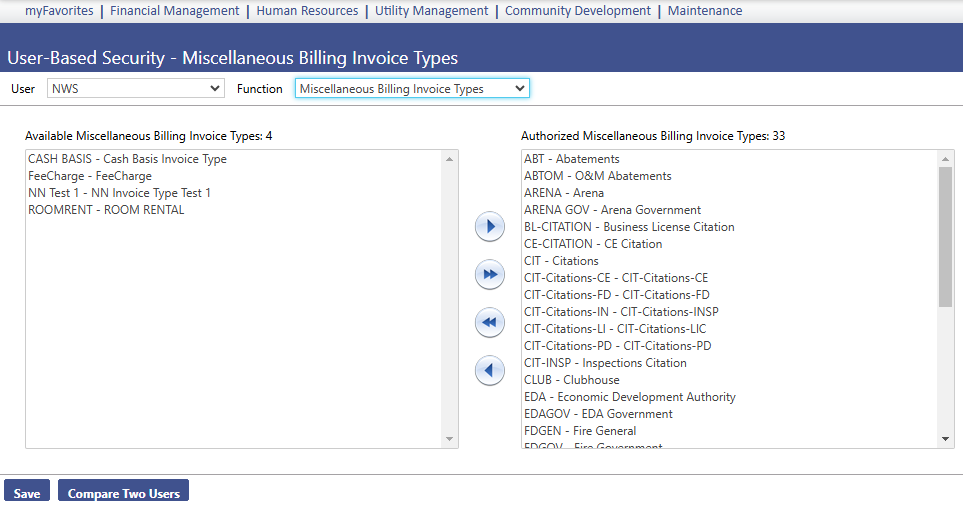
Maintenance>new world ERP Suite>Security>User Based Security
Add the applicable Miscellaneous Billing Invoices Types to each user.
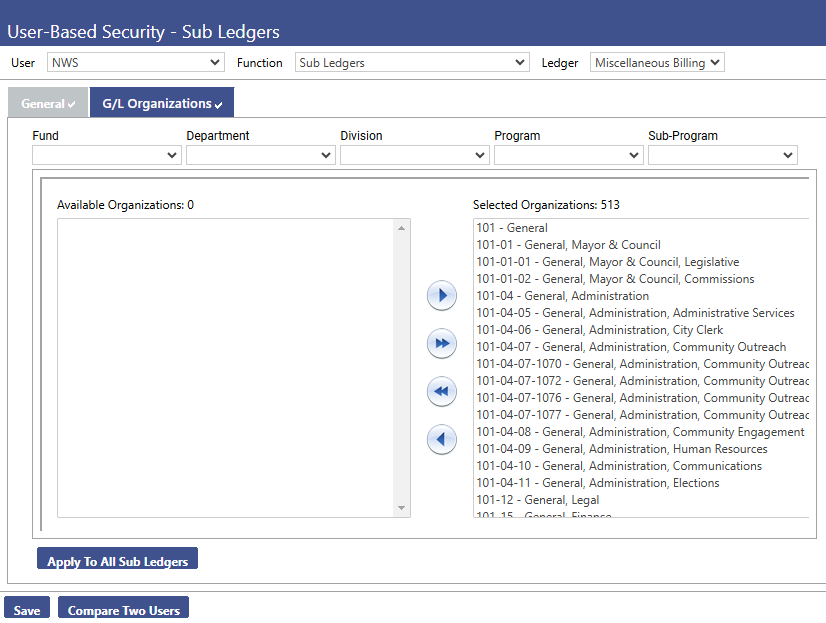
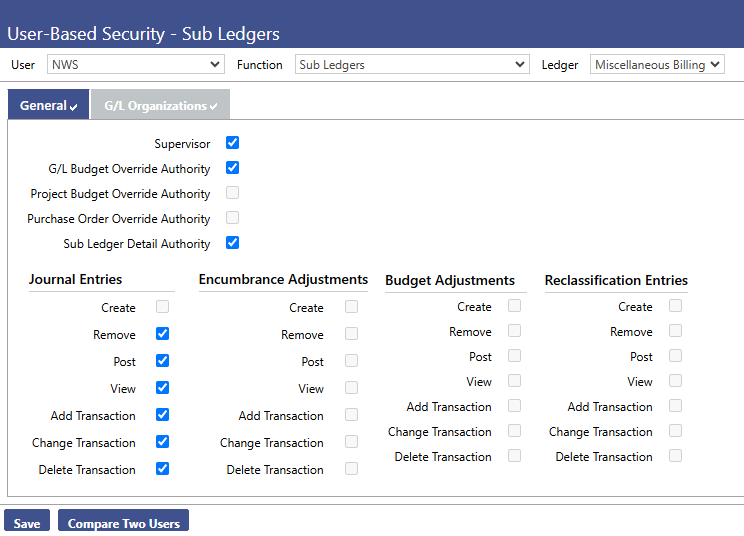
User Based Security/Sub Ledger
The Sub Ledger area of User Based Security allows for filtering of the General Ledger Organization Sets that a user can work with in the Miscellaneous Billing Module. This can be utilized to provide administrators access to all organization sets while limiting departmental users to their own areas.
Fields:
Supervisor – Check this box if a user needs to be able to see other users’ Invoice Batches other than just their own.
G/L Budget Override - Check this box is a user needs authority to override the budget on the G/L Account that is being used in a Miscellaneous Billing Transaction.
Sub Ledger Detail Authority – Check this box if a user needs to view detail transactions from Miscellaneous Billing in General Ledger Inquiries.
Journal Entries – Check these boxes if a user needs to view/post system generated Journal Entries that are automated from entering in any Miscellaneous Billing Transaction.
Process Manager
There are six different processes within process manager that control the approval processes within Miscellaneous Billing.
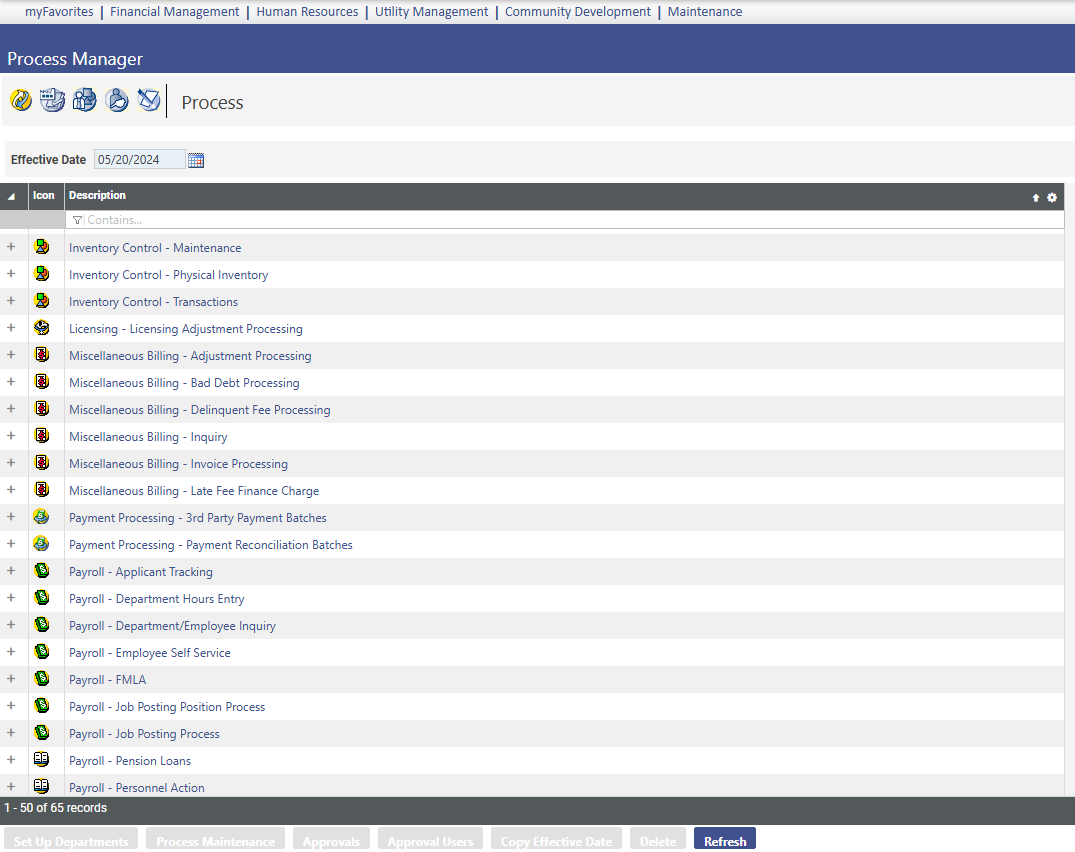
Maintenance > new world ERP Suite > Process Manager
Miscellaneous Billing – Adjustment Processing: Allows users to create adjustments to Miscellaneous Billing Invoices that have previously been entered into New World.
Miscellaneous Billing – Bad Debt Processing: Allows users to flow through the Bad Debt Process for reclassifying Invoices.
Miscellaneous Billing –Delinquent Fee Processing: Allows users to create second and final late notices to MB Customers.
Miscellaneous Billing –Inquiry: Allows users to run reports and inquiries on any transactions that were entered through Miscellaneous Billing for the users’ respective department.
Miscellaneous Billing –Invoice Processing: Allows users to create/maintain Miscellaneous Billing Invoices for their respective department.
Miscellaneous Billing –Late Fee Finance Charge: Allows users to assign late fees and finance charges to MB Customers.
Validation Sets
|
Validation Set Number |
Validation Set Description |
Where Used |
Purpose |
Examples |
||
|---|---|---|---|---|---|---|
|
68 |
Invoice Type Category |
|
Assigns Invoice Types to a common group |
|
||
|
293 |
MB Customer Category |
MB Customers |
Assigns MB Customers to a common group |
|
||
Miscellaneous Billing Processing
Creating Customers
The Miscellaneous Billing module is used for charging customers for services provided by your organization or municipality. Users of the system maintain a customer database. Each person, business or other entity that is invoiced has a unique customer profile.
Miscellaneous Billing Customer List
The Miscellaneous Billing Customer List page allows authorized users to view a list of all existing billing customers, add new customers, or edit or delete existing customers.
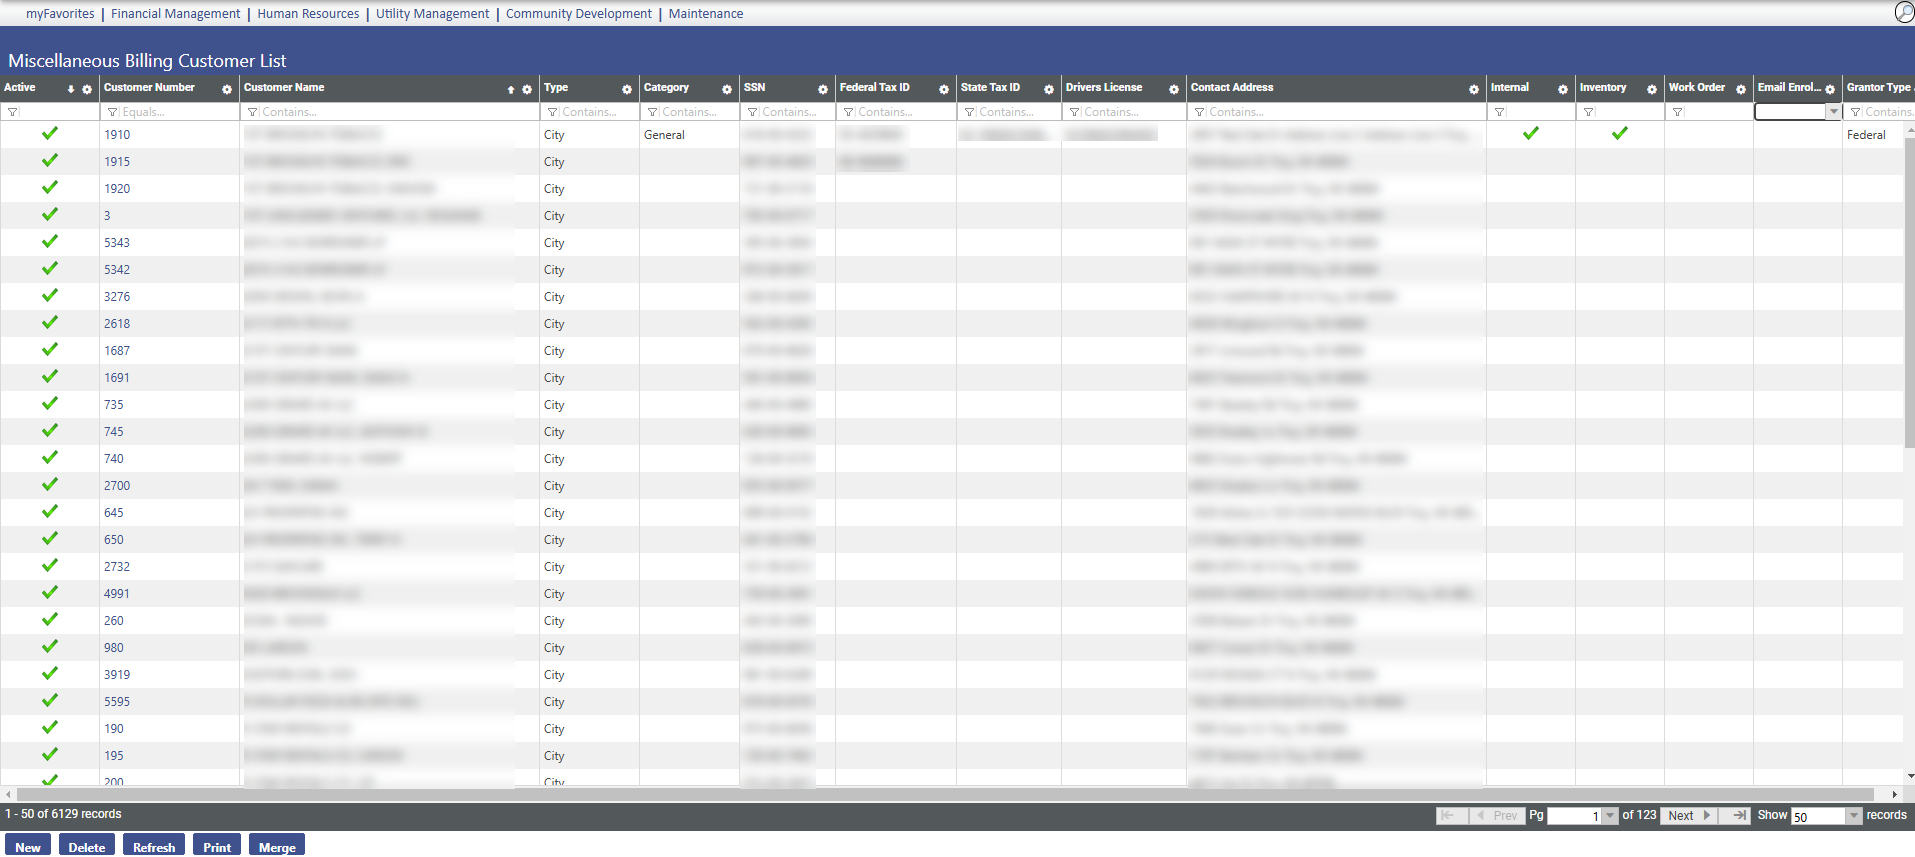
Financial Management > Miscellaneous Billing > Customers
On the Miscellaneous Billing Customer List page, users must search for customers before new customers can be added. To search for all customers in the system, leave the fields blank and click Search. To narrow your search and limit the results, select or enter partial or full values in any or all of the search fields as needed before you click Search.
Click New or the Customer Number hyperlink in the list to open an existing Customer record.
In Attribute, select the information to view for the selected customer. The default value is Identification. The available options are: Identification, Contacts, Recurring Invoices, User-Defined Fields, Documents, and Remote Documents. The value selected determines the information displayed on the page. Expand a link below for more information on an attribute.
Miscellaneous Billing Customer

The Identification screen of the Miscellaneous Billing Customer page allows authorized users to enter or update general personal information about customers such as their mailing addresses and tax information. This is shown as the default page.
Fields:
Active – Select the Active check box if the status of the customer is active. The default is selected. In EDIT mode, it cannot be cleared if invoices exist with a process status of Edit or Open or customer has a current undesignated balance.
Last Name / Business – Type the last name of the customer or business name. The maximum character length is 50; the minimum is 1.
First Name – Type the first name of the customer. The maximum character length is 20.
Middle Name – Type the middle name of the customer. The maximum character length is 20.
Suffix – Select the suffix applied to the name of the customer, if applicable.
Primary Address – Type the primary mailing address of the billing customer. The first line of the address is required. The second and third address lines are optional. The maximum character length is 40; the minimum is 1 (per line).
Zip Code – Select the zip code in which the customer is located. Based on the zip code selected, the City and State boxes are automatically populated.
City – Select the zip code in which the customer is located. Based on the zip code selected, the City and State boxes are automatically populated.
State – Select the state in which the customer exists. If you entered the Zip code first, the state is automatically populated for you.
Federal Tax ID - Type the customer’s federal tax identification number. The maximum numeric length is 9 (excludes delimiters).
State Tax ID - Type the customer’s state tax identification number. The maximum numeric length is 15 (excludes delimiters).
Social Security Number - Type the customer’s social security number. The maximum numeric length is 9 (excludes delimiters).
Driver's License Number -Type the customer’s driver’s license number in this field. The maximum character length is 20; there are no character restrictions. The number must be unique.
Phone Number - Enter the customer’s telephone number. The maximum length is 10 numeric characters.
Type – Enter the customer type assigned to the customer.
Category - Select the category to which this customer belongs. The category is defined in Validation Set 293. Press CTRL and click the field to open the Validation Set Values List dialog box where you can add or edit a validation set. Category is a way to group customer types together for reporting and inquiry purposes; examples are: Business and Individual.
Internal Customer – Select the check box if the customer is internal to your organization or municipality. When selected, the Internal Customer Department field is displayed. In the drop-down list, select the internal customer’s department. Memo invoices may be issued only to internal customers that have valid departments defined.
Inventory Customer – Select the check box if inventory will be issued to the customer. When selected, the Bill Inventory field is enabled.
Bill Inventory - Select one of the following three methods for billing:
- Inventory – Bill the customer directly for inventory from the Inventory Control module. When inventory is issued, debit the department’s expense account and credit an inventory account, creating no other accounting entries or invoices.
- Memo Bill – When inventory is issued to a customer, bill the customer with a memo invoice through the Miscellaneous Billing module.
- Standard Bill – When inventory is issued to a customer, bill the customer with a standard invoice through the Miscellaneous Billing module. This method applies automatically to all external customers.
Work Order Customer Category - Select the customer category to be assigned to the customer if billed for work orders. When selected, the Bill Work Orders field is enabled. In the drop down list, select one of the following two methods for billing:
- Standard Bill – This method creates a "regular" invoice and receivable the customer has to pay.
- Memo Bill – This method creates an internal (within the city/county) invoice the customer does not “write a check” to pay. A Memo Bill usually hits the general ledger account directly instead of creating a receivable that requires payment.
Exempt from Late Fees – Select the check box if the customer is exempt from late fee charges.
Exempt from Finance Charges - Select the check box if the customer is exempt from finance charges.
Grantor Type – This field is visible and enabled only if the system license key for Grant Accounting is selected. In the drop-down list, select the type of grantor that applies to the customer. It allows ability to setup MB customers to reimburse for grant tracking.
After updating or entering the required information, click Save to retain the settings or Save/New to create another Identification record.
Contacts Screen
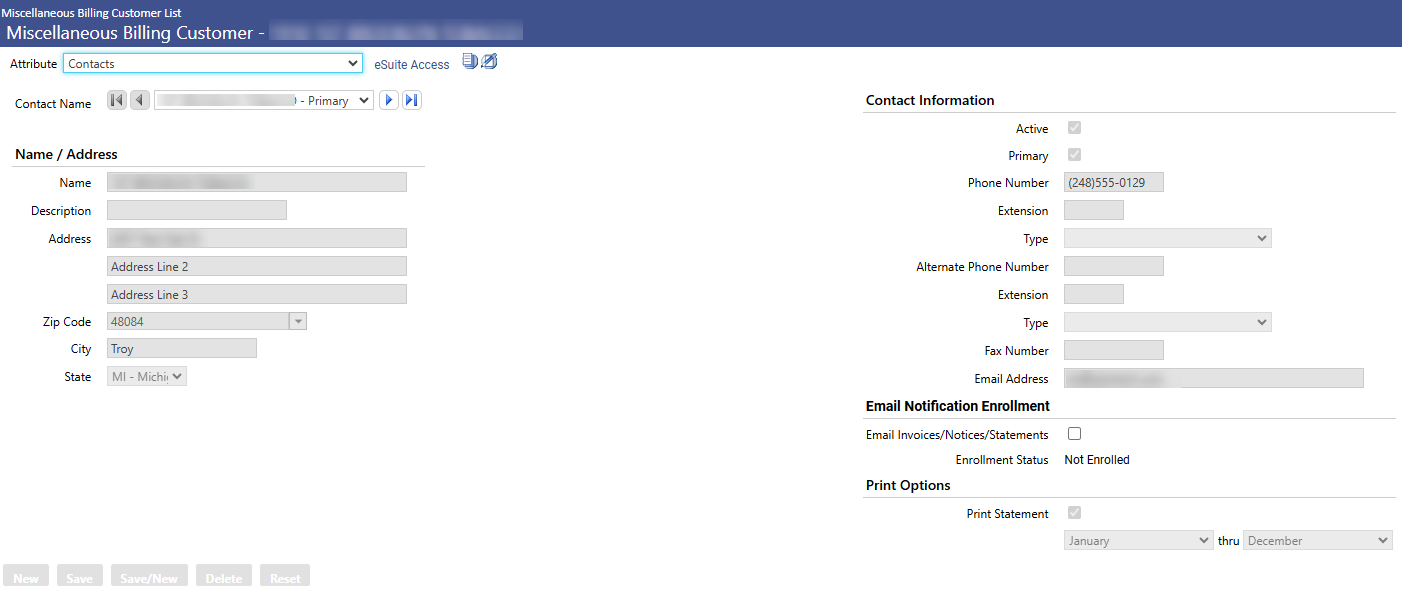
The Contacts screen of the Miscellaneous Billing Customer page allows authorized users to enter or update customer contact information. Each MB customer can have multiple contact addresses. The defaults from the Identification screen default in as the primary contact.
To view this page select Contacts from the Attribute drop-down at the top of the page.
Contact Name - Select a customer contact or click New at the bottom of the page. The drop-down list contains all contacts defined for the selected customer. The default is the selected contact name or primary contact. On the left of the field is a Move Previous  symbol; click the symbol to move the display to the previous customer contact record in the list. On the right of the field is a Move Next
  symbol; click the symbol to move the display to the next customer contact record in the list. Click the Move First
  symbol to display the first customer contact listed. Click the Move Last
  symbol to display the last customer contact listed.
Name - Type the full name of the contact. The maximum character length is 64; the minimum is 1. There are no character restrictions. The default entry is the customer name on the Identification screen.
Description - Type the textual description of the contact if needed.
Address - Type the address at which the contact is located. The first line of the address is required if a city or state are entered. The second and third address lines are optional. The default entry is the address on the Identification screen.
Zip Code - Select the zip code in which the customer is located. Based on the zip code selected, the City and State boxes are automatically populated.
City - Type the city in which the customer exists. If you entered the Zip code first, the city is automatically populated for you.
State - Select the state in which the customer exists. If you entered the Zip code first, the state is automatically populated for you.
Bank Draft – Select the check box if the contact has provided bank draft information.
Routing Number - Type the contact’s bank account routing number. It is enabled and required if the Bank Draft check box is selected. The valid values are 0 through 999999999.
Account Number - Type the contact’s bank account number. It is enabled and required if the Bank Draft check box is selected. The maximum character length is 16; the minimum is 1.
Account Type - Select the type of bank account. It is enabled and required if the Bank Draft check box is selected. The available options are <blank>, Checking, and Savings.
Notice Sent – Select the check box if notification has been sent from the bank to verify that the account is valid. It is enabled if the Bank Draft check box is selected.
Active – The check box is selected if the contact is active.
Primary – The check box is selected if the contact is the primary contact on the account. There can only be one primary contact for the customer. If a primary contact already exists and a new primary contact is entered, the existing primary contact is no longer the primary contact.
Phone Number - Type the contact’s telephone number. The maximum length is 10 numeric characters. This field accepts numeric entry only; no dashes. The default entry is the phone number on the Identification screen.
Extension - Type the contact’s telephone extension number, if needed.
Type - Select the type of the above-referenced Phone Number. These values are defined in Validation Set 17. Press CTRL and click the field to open the Validation Set Values List dialog box where you can add or edit a validation set.
Alternate Phone Number - Type the contact’s alternative telephone extension number. The maximum length is 10 numeric characters. This field accepts numeric entry only; no dashes.
Extension - Type the contact’s telephone extension number, if needed.
Type - Select the type of the above-referenced Alternate Phone Number.
Fax Invoices/Notices/Statements – Select the check box if communication with the contact will be done via fax. If selected, the Fax Number field is required.
Fax Number - Type the contact’s fax number. The maximum numeric length is 10. This field accepts numeric entry only. This is required if the Fax Invoices/Notices/Statements check box is selected.
Email Invoices/Notices/Statements – Select the check box if communication with the contact will be done via email. If selected, then the Email Address field is required.
Email Address - Type the contact’s email address. The maximum character length is 128; the minimum is 1. This field is required if the Email Invoices/Notices/Statements check box is selected.
After updating or entering the required information, click Save to retain the settings or Save/New to create another Contacts record.
Recurring Invoices
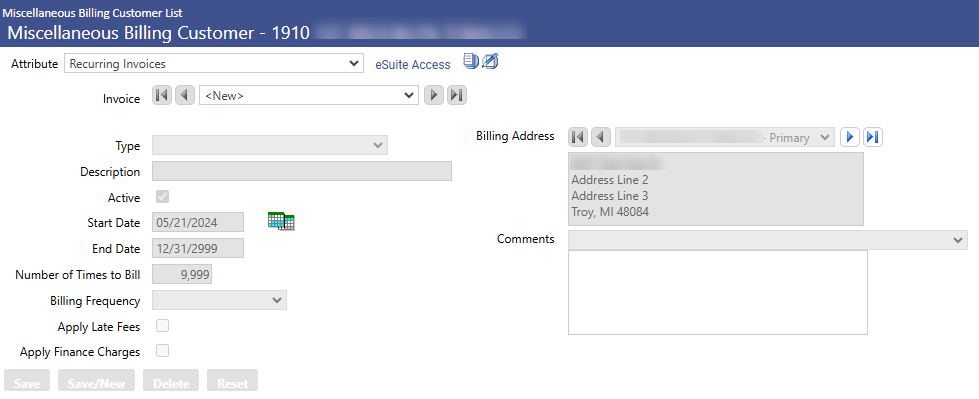
The Recurring Invoices screen allows authorized users to enter or edit recurring invoice information such as number of times to bill, apply late fees and/or finance charges, and billing address. MB Invoice types that were setup as Template are assigned to the customer for recurring billings. Each customer can have multiple recurring invoices assigned to them.
To view this page select Recurring Invoices from the Attribute drop-down at the top of the page.
Invoice - Select a different invoice type. The default is the first recurring invoice type. If there are no recurring invoices specified for the customer, the default is <blank>. The drop-down list contains all invoice types for the selected customer to which the user has invoice type security. On the left of the field is a Move Previous symbol; click the symbol to move the display to the previous invoice type record in the list. On the right of the field is a Move Next symbol; click the symbol to move the display to the next invoice type record in the list. Click the Move First symbol to display the first invoice type listed. Click the Move Last symbol to display the last invoice type listed.
Type - Select the invoice type for the customer recurring invoice.
Description - Type the textual description of the recurring invoice. The maximum character length is 64; the minimum is 1.
Active - The check box signifies whether the recurring invoice is active and still being sent to the customer. In ADD mode, the default is selected and disabled.
Start Date - Select the start date for the recurring invoice. The default is the current system date. The date must be a valid date.
End Date - Select the end date of the recurring invoice. The default is 12/31/2999. The date must be greater than or equal to the Start Date and must be a valid date.
Number of Times to Bill - Type the total number of times the recurring invoice will be billed in between the Start and End Dates specified. The default is 9999. The acceptable range is 1 through 9999.
Billing Frequency - Select the recurring interval of time that customers are billed. If several customers are billed annually but in different months, this field helps to eliminate errors during invoice entry.
Invoice Type – If the invoice type selected is a memo invoice, the Memo Invoice check box displays. Select the check box if this recurring invoice will support memo invoices. If cleared, any billing code that has not been flagged as a memo billing charge will be disabled.
Apply Late Fees – Select the check box if late fees should be applied to the recurring invoice. It is disabled if either the invoice type does not allow late fees or the customer is not billed late fees. The default is selected if Late Fees are applied for the invoice type.
Apply Finance Charges – Select the check box if finance charges should be applied to the recurring invoice. It is disabled if either the invoice type does not allow finance fees or the customer is not billed finance fees. The default is selected if Finance Charges are applied for the invoice type.
Billing Address - Select the default billing address to use for the invoice. The default is the billing address associated with the selected MB customer. The drop-down list contains all billing addresses for the selected customer. On the left of the field is a Move Previous symbol; click the symbol to move the display to the previous billing address record in the list. On the right of the field is a Move Next symbol; click the symbol to move the display to the next billing address record in the list. Click the Move First symbol to display the first billing address listed. Click the Move Last symbol to display the last billing address listed.
Comments – In the drop-down list, users can optionally select a standard message to appear on the MB invoice or type a message in the text box below the drop-down list. If users select a previously created standard message, the text of that message can be edited. When the text of a previously created message is edited, the system makes a copy and it does not affect the original message template.
After updating or entering the required information, click Save to retain the settings or Save/New to create another Recurring Invoices record.
Entering Invoices
Financial Management > Miscellaneous Billing > Billing Invoice Batches
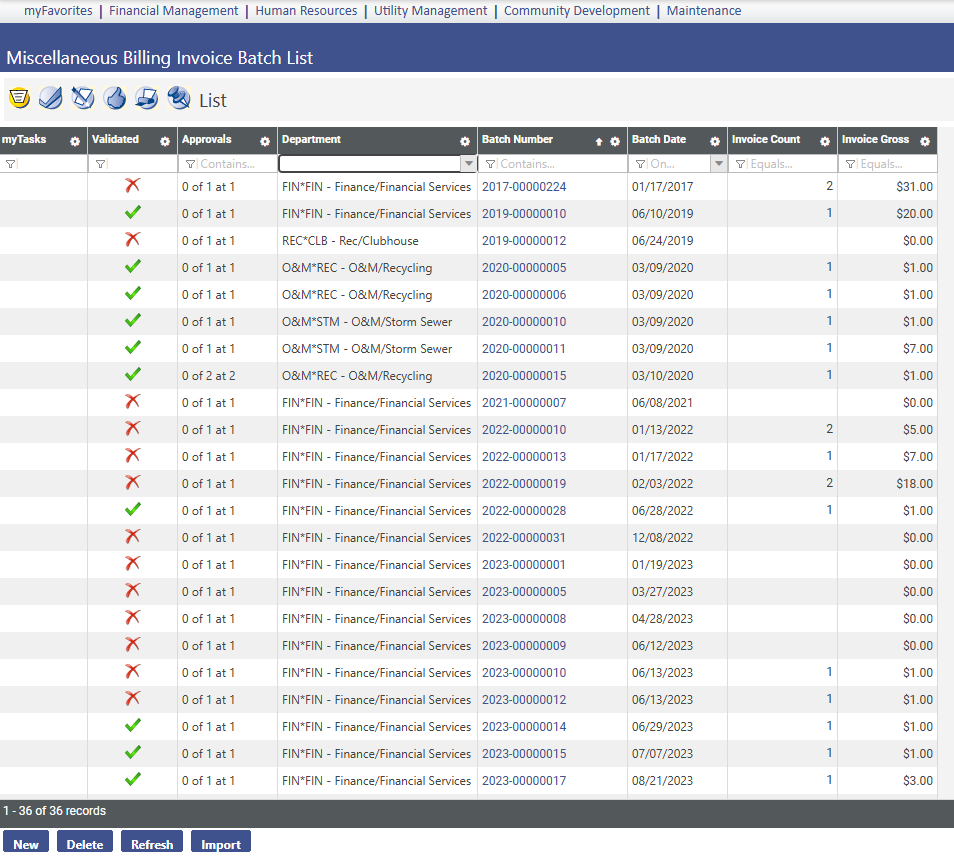
The Miscellaneous Billing module is used to charge customers for goods and services provided by your municipality. It is designed for use by a number of departments and can generate one-time (Standard) or repeat/recurring (Template) bills. Miscellaneous Billing Invoice Batches uses the standard workflow process that allows authorized users in your organization to generate the edit and error listing, validate, approve, print, and post invoice batches.
The Miscellaneous Billing Invoice Batch List page allows authorized users to view a list of all existing invoice batches, add new invoice batches, or edit or delete existing batches.
To add a new invoice batch click New. To edit an existing invoice batch, click the Batch Number hyperlink to open the existing record.
General Tab
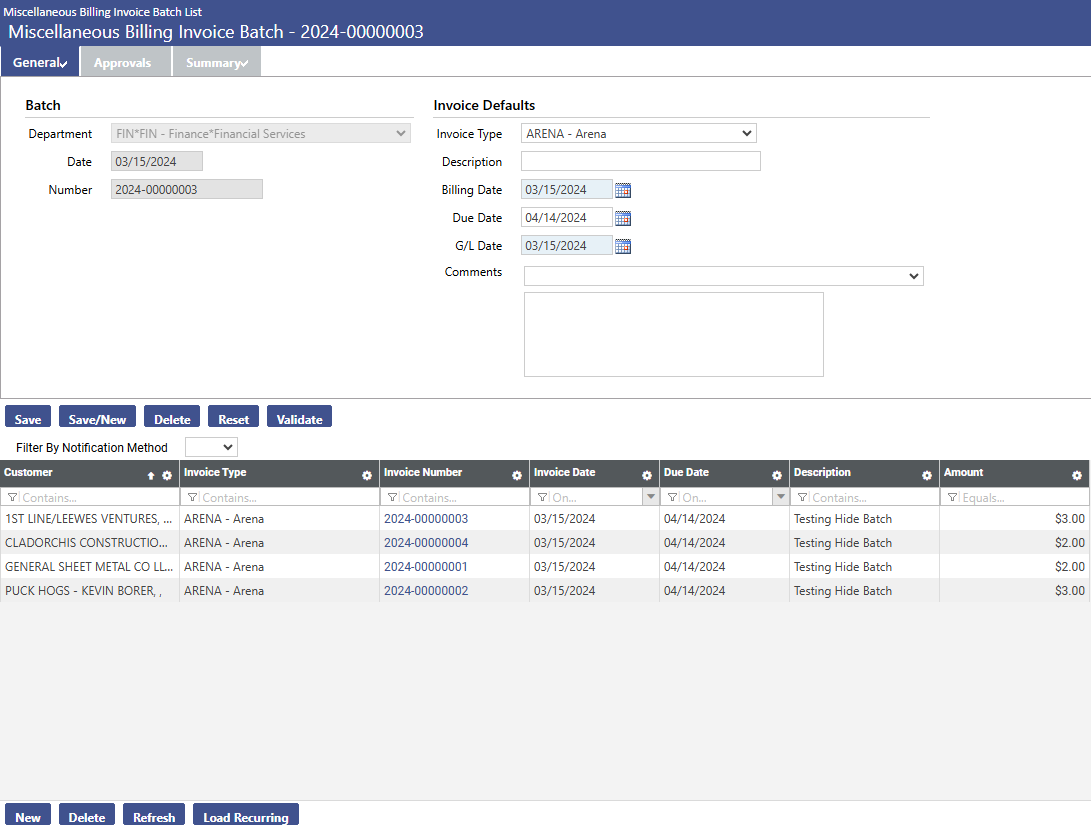
The General tab allows authorized users to enter basic invoice batch header information.
Fields:
Department - Select the department to assign to the invoice. The user must have authorization to the department for Miscellaneous Billing processing. See Process Manager in Miscellaneous Billing Setup for more information.
Date – Select or enter the date on which the batch of invoices is being processed.
Number - Enter the number assigned to the batch for identification purposes during processing. The valid values are 1 through 9,999,999,999 and dashes are allowed. The number must be unique regardless of any other value (e.g., OrgStructure or BatchDate). In ADD mode, the batch number is automatically assigned based on the number entered on the Counters tab on the Company FM Settings page. If no data was entered on the Counters tab on the Company FM Settings page, you must manually enter a batch number. This field is disabled in EDIT mode.
Invoice Type - Select the type of invoice being processed. It only displays the invoice types to which you have been given authority by your system administrator. This field can be modified in EDIT mode.
Description – Enter a description of the invoice batch.
Billing Date - Select or enter the Billing Date on which the invoices were issued. The default is the current system date.
Due Date - Select or enter the date on which the total amount of the invoice is due from the customer. It can be modified in EDIT mode. If the invoice type is changed, the Due Date automatically updates.
G/L Date - Select or enter the date on which the invoices posted to the general ledger are recorded. The default is the current system date. It can be modified in EDIT mode. The date must be a valid date, but less than the date entered in the Maximum Future post-date field on the Journal Processing tab on the Company Suite Settings page.
Comments – Users can optionally enter any additional text in the box regarding the invoice batch or selected a previously saved comment from the drop-down list. The field may contain 256 characters.
Click Save to save the invoice batch information or Save/New to save the batch and create another one.
Click New to create a new invoice. To edit an existing invoice, click the Invoice Number hyperlink in the invoice list
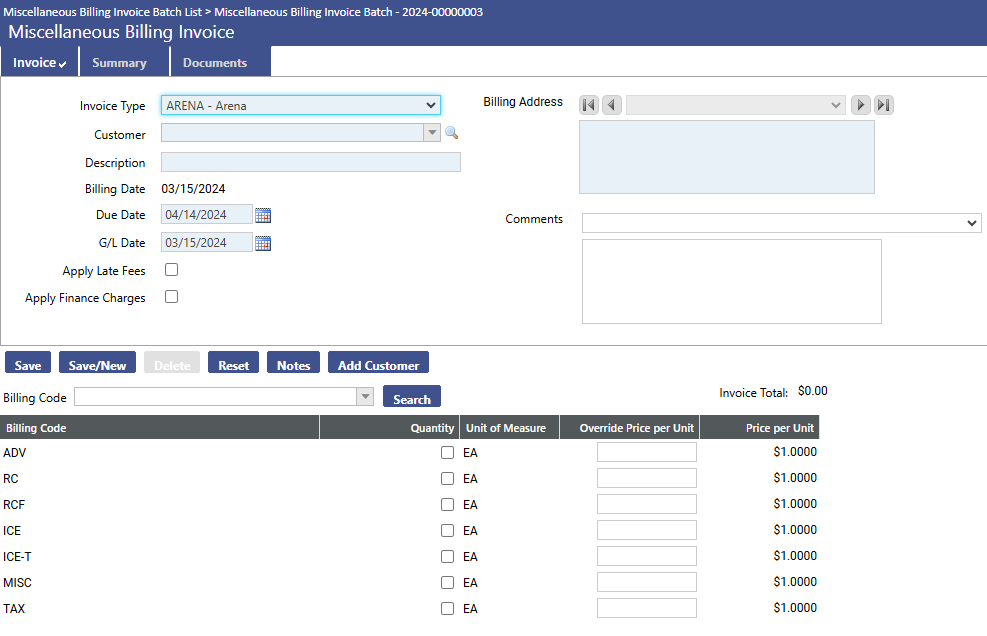
Invoice Type – Select the invoice type associated with the invoice. It is disabled in EDIT mode. Only invoice types to which you have authority are displayed.
Customer – Select the customer associated with the invoice being created. The customer must have an active status to be selected. This field is disabled in EDIT mode. Clicking the Search  icon opens a pop-up which enables you to search for the customer record you want to display.
Description - Enter a textual description for the invoice. The maximum character length is 64; the minimum is 1. There are no character restrictions.
Billing Date - Displays the date the invoice was generated; it is view-only. The default is the invoice batch header billing date.
Due Date - Select or enter the date the invoice is due. The default is the invoice batch header due date.
G/L Date - Select or enter the date on which the invoice is to be recorded in the general ledger. The default is the invoice batch header G/L date. The date must be less than the date entered in the Maximum Future post-date field on the Journal Processing tab on the Company Suite Settings page.
Apply Late Fees – Select this check box if late fees are to be applied to the invoice.
Apply Finance Charges – Select this check box if finance charges are to be applied to the invoice.
Billing Address – Select the billing address to use for the invoice. The default is the primary address from the customer contact. The drop-down portion of the Billing Address field lists all addresses defined for the customer chosen. On the left of the field is a Move Previous symbol; click the symbol to move the display to the previous billing address record in the list. On the right of the field is a Move Next symbol; click the symbol to move the display to the next billing address record in the list. Click the Move First symbol to display the first billing address listed. Click the Move Last symbol to display the last billing address listed.
Comments - Select or enter any comments associated with the invoice. It may contain up to 256 characters.
Click Save or Save/New to save and create a new invoice.

The Recurring Invoice List page allows authorized users to view a list of recurring invoices by invoice type for the selected invoice batch. Follow the steps below to select the search criteria to produce the list of recurring invoices you want to find.
On the Miscellaneous Billing Invoice Batch List page, click New or the Batch Number hyperlink in the list to open an existing invoice batch.
On the Miscellaneous Billing Invoice Batch page, click Load Recurring to open the he Recurring Invoice List page.
In Invoice Type, select the invoice type that displays on the Invoice Batch Header.
Billing Frequency - Select the recurring interval of time that customers are billed.
Billing Date - Select the date the invoice was generated. The default is the Invoice Batch Header billing date.
Due Date - Select the date the invoice is due.
G/L Date - Select the date on which the invoice is to be recorded in the general ledger. The default is Invoice Batch Header G/L date.
Override Description – An optional description may be entered in this field that will override the default description entered for the invoice type.
Click Search to populate the list with recurring invoices that meet the search criteria you entered.
Select the check box next to the recurring invoice(s) you want to add to the current invoice batch and click Save. The system uses the Amount, Undesignated Amount, and Amount to Apply values to update the invoice batch summary. Any specified undesignated amounts will be applied to the invoices that are created.
Adjustments

Financial Management > Miscellaneous Billing > Adjustments
The Miscellaneous Billing Adjustment List page allows authorized users to view a list of all pending Miscellaneous Billing adjustments, add new adjustments, or delete existing adjustments.
Adjustments uses the standard workflow process that allows authorized users in your organization to generate the edit and error listing, validate, approve, and post groups of adjustments to which the user is authorized and that meet a series of pre-defined criteria. The Validation and Approvals icons may switch locations in the workflow list depending on the option selected in the Validation and Approval Sequence field on the Miscellaneous Billing tab on the Company FM Settings page.
Click New and the Add Adjustments page opens.
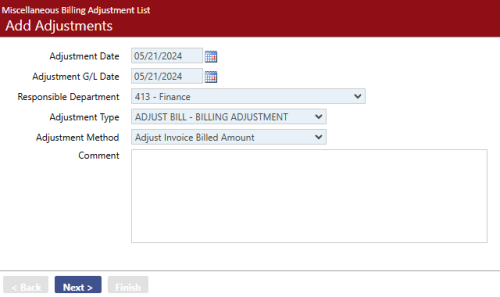
Fields:
Adjustment Date - Enter or select the date assigned to the adjustment transaction. The default is the current system date.
Adjustment G/L Date - Enter or select the date when the adjustment is to be recorded in the general ledger. The default is the current system date. The date must be a valid date that is greater than or equal to the Adjustment Date.
Responsible Department - Select the department responsible for the adjustment transaction.
Adjustment Type - Select the type of the adjustment as defined within the application by your organization.
Adjustment Method - Select the adjustment method required to create the adjustment. This value determines the action that takes place in the system to process the adjustment. The available options are: Reverse a Transaction, Adjust Invoice Billed Amount, Adjust Invoice Paid Amount, Adjust Customer Undesignated Balance, and Refund Customer Undesignated Balance.
Comment - Type a description, notes, etc., for the adjustment transaction. The default is <blank>. The maximum character length is 256; there are no character restrictions.
Search Type - Select the transaction process/batch type to search for the transactions to be reversed. It is visible if Reverse a Transaction is selected in the Adjustment Method field. The default is <blank>. The available options are: Customer, Invoice Batch, Delinquent Batch, Bad Debt Batch, and Receipt Number.
Click Next to move to the second step of the wizard process. It opens the second page of Add Adjustment. The Adjustment Method and Search Type (if entered and applicable) determine the initial fields and title that display on this second page. Below is a description of the possible fields that may display.
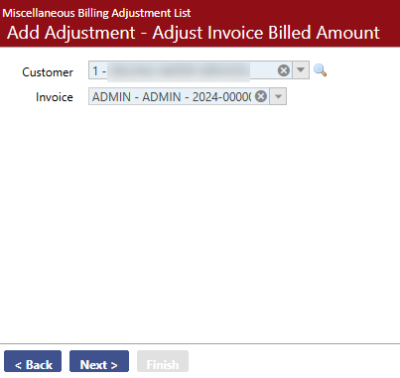
Fields:
Customer – Enter customer that an adjustment is being made for.
Invoice – Once the customer is selected, choose the invoice that needs to be adjusted.
The Adjust Invoice Billing Detail pop-up page, accessed by clicking the Detail icon in the Detail column on the Adjust Invoice Billed Amount page, allows users to edit the invoice item quantity and/or override rate per unit.

Fields:
Revised Quantity - If needed, enter the revised invoice billing code quantity. The default is the amount of the invoice billing detail's revised quantity as displayed on the Adjust Invoice Billed Amount page. The acceptable range is -9,999,999.9999 through 9,999,999.9999 (including 0.0000).
Revised Override Rate/Unit - If needed, enter the revised invoice billing code override rate per unit. The default is the amount of the invoice billing detail’s revised override rate per unit as displayed on the Adjust Invoice Billed Amount page. The acceptable range is -9,999,999.9999 through 9,999,999.9999 (including 0.0000).
Click OK to save any changes and close the window.
Once all of the adjustments are completed, click Finish and send the adjustment(s) through the work-flow buttons.
Delinquent Charges
The Delinquent Charges List page allows authorized users to view a list of all existing delinquent charges, add new delinquent charges, or edit or delete existing delinquent charges. Delinquent Charges uses the standard workflow process that allows authorized users in your organization to generate the edit and error listing, validate, approve, and post delinquent charge batches. The Validation and Approvals icons may switch locations in the workflow list depending on the option selected in the Validation and Approval Sequence field on the Miscellaneous Billing tab on the Company FM Settings page.
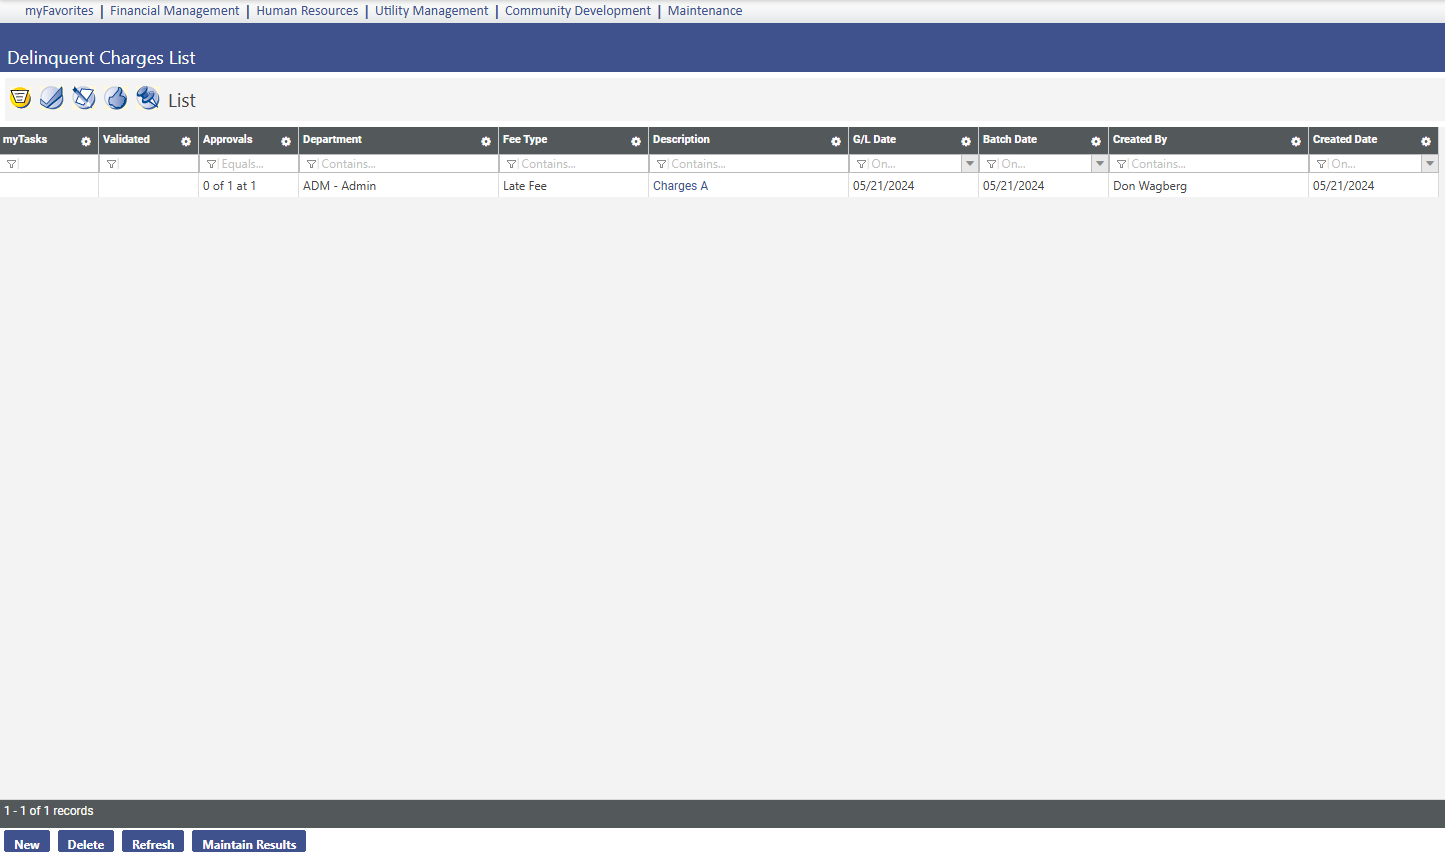
Financial Management > Miscellaneous Billing > Period End Processing > Delinquent Charges
To add a new delinquent charge batch click New. To edit an existing delinquent charge batch, click the Description hyperlink to open the existing record.
To delete a delinquent charge batch, select the item in the list to highlight it and click Delete. The Delete button is hidden or disabled if you do not have the appropriate security permissions. If you are authorized, when you click Delete you are prompted to confirm the deletion.
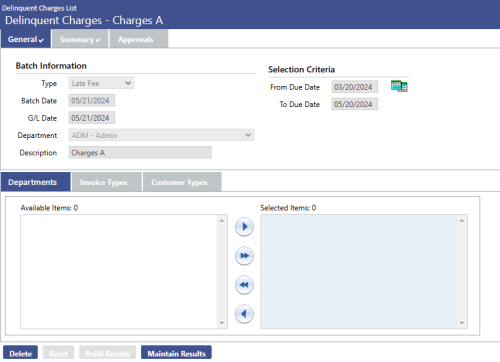
The General tab allows authorized users to view general information about the batch.
- In Type, select the type of charge (late fee or finance charge) to associate with the batch. The default is Late Fee. The available options are Late Fee and Finance Charge.
- In Batch Date, type or select the processing date assigned to the batch. The default is the current system date.
- In G/L Date, type or select the date on which the late fees/finance charges that are posted to the general ledger are recorded. The default is the current system date. The date must be a valid date, but less than the date entered in the Maximum Future post date field on the Journal Processing tab on the Company Suite Settings page.
- In Department, select the department responsible for the batch. The default is <blank>. This field displays only those departments to which the user has authority.
- In Description, type a description of the charge, for example: July Late Fees. The maximum character length is 64; the minimum is 1.
- Use From Due Date to select all qualifying invoices with a due date greater than or equal to the From Due Date that will be assigned late charges or finance fees.
- Use To Due Date to select all qualifying invoices with a due date less than or equal to the To Due Date that will be assigned late charges or finance fees.
- On the Departments tab, select the departments to which the charge will be associated. In the Available Departments box select and move the appropriate department(s) to the Selected Departments box. This list displays all departments to which you have miscellaneous billing process authority. Ctrl+Click can be used to select or deselect multiple departments or Shift+Click to select a range of departments.
-
On the Invoice Type tab, select the invoice types to which the charge or fee will be associated. In the Available Invoice Type (s) box select and move the appropriate invoice type(s) to the Selected Invoice Type(s) box. This list displays all invoice types to which you have authority. Ctrl+Click can be used to select or deselect multiple invoice types or Shift+Click to select a range of invoice types.
-
Click Build Results, which calculates and selects invoices based on the selection criteria you entered. This button is hidden if you do not have Add rights to the Miscellaneous Billing - Delinquent Charges security component. It is disabled if you do not have Change rights to the Miscellaneous Billing - Delinquent Charges security component.
-
Click Maintain Results to return the results of the invoice search (Build Results) and open the Delinquent Charge Items page where you can accept or waive the late fee or finance charge.
The Summary tab allows authorized users to view summary information about the batch.
|
Field |
Description |
|---|---|
|
Number of Invoices |
Total number of invoices included in the delinquent charges batch. |
|
Billing Amount |
Total dollar amount billed of all invoices in the delinquent charges batch. |
|
Late Fees |
Total amount of late fees charged to the invoices from prior delinquent charges batch. |
|
Finance Charges |
Total amount of finance charges charged to the invoices from prior delinquent charges batch. |
|
Additional Late Fees/Finance Charges |
Additional late fee and finance charges charged to the invoices in the delinquent charges batch. |
|
Total Amount |
Billed amount plus any late fees or finance charges added to the invoices in the delinquent charges batch. |
The Approvals tab allows authorized users to view the approvals needed and completed for the selected delinquent charges batch.
To delete a delinquent charge batch click Delete. The Delete button is hidden or disabled if you do not have the appropriate security permissions. If you are authorized, when you click Delete you are prompted to confirm the deletion.
Print Delinquent Notices
The Print Delinquent Invoice Notices page allows authorized users to print a listing and/or predefined late notices for overdue customer invoices.
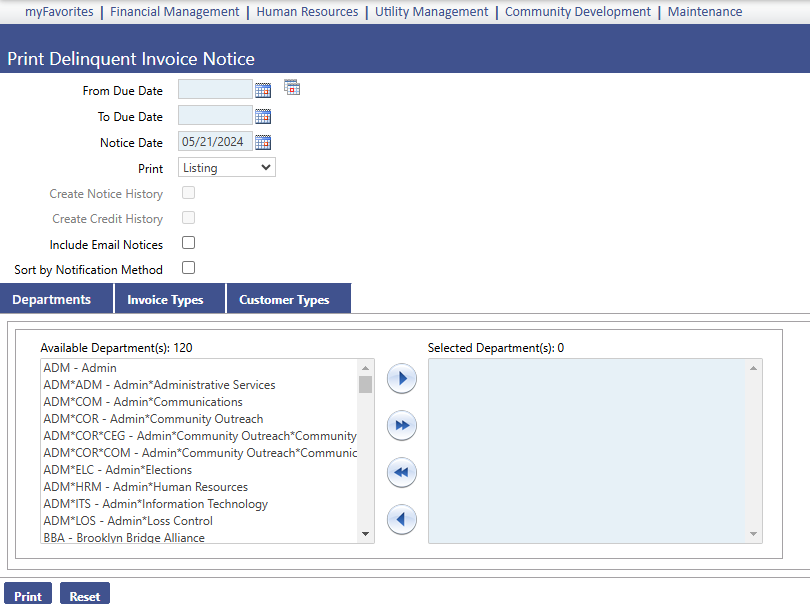
Financial Management > Miscellaneous Billing > Period End Processing > Print Delinquent Notices
Follow the steps below to print delinquent invoice notices and/or a listing of overdue customer invoices:
- Go to Financial Management > Miscellaneous Billing > Period End Processing > Print Delinquent Notices.
- Use From Due Date to select all qualifying invoices with a due date greater than or equal to the To Due Date that will be assigned late charges or finance fees. It must be less than or equal to the To Due Date. The default is the current system date.
- Use To Due Date to select all qualifying invoices with a due date less than or equal to the From Due Date that will be assigned late charges or finance fees. The default is the current system date. The date must be greater than or equal to the From Due Date field.
- In Notice Date, select the date on which the notice is to be printed. The default is the current system date.
- In Print, select what will be printed (e.g., Listing, Notice, or Both). The default is Listing. If you select Notice or Both, the Create Notice/Credit History check boxes are enabled.
- Select the Create Notice History check box to add the delinquent notice statement to the customer’s history file. This check box is enabled and selected if the value selected in Print is Notices or Both.
- Select the Create Credit History check box to create a delinquent notice credit history calculation and entry to be retained in the customer’s history file. The default is deselected. It is disabled if the Print control is Listing. This check box is enabled and selected if the value selected in Print is Notices or Both.
- On the Departments tab, select the departments to which delinquent invoice notices will be printed. In the Available Departments box select and move the appropriate department(s) to the Selected Departments box. This list displays all departments to which you have authority. Ctrl+Click can be used to select or deselect multiple departments or Shift+Click to select a range of departments.
- On the Invoice Types tab, select the invoice types to which the charge or fee will be printed. In the Available Invoice box select and move the appropriate invoice type(s) to the Selected Invoice Types box. This list displays all invoice types to which you have authority. You can use Ctrl+Click to select or deselect multiple invoice types or Shift+Click to select a range of invoice types.
- To select multiple items randomly throughout the list, hold down CTRL while clicking each item.
- To select multiple consecutive items, hold down SHIFT, and click the first item then the last item.
- Click Print to print Delinquent Invoice Notice, the Delinquent Notice Invoice Listing, or both. It prints based on the value selected within the Print drop-down list. It also sends the Invoice Late Notice Listing to myReports.
Sample Delinquent Notice:
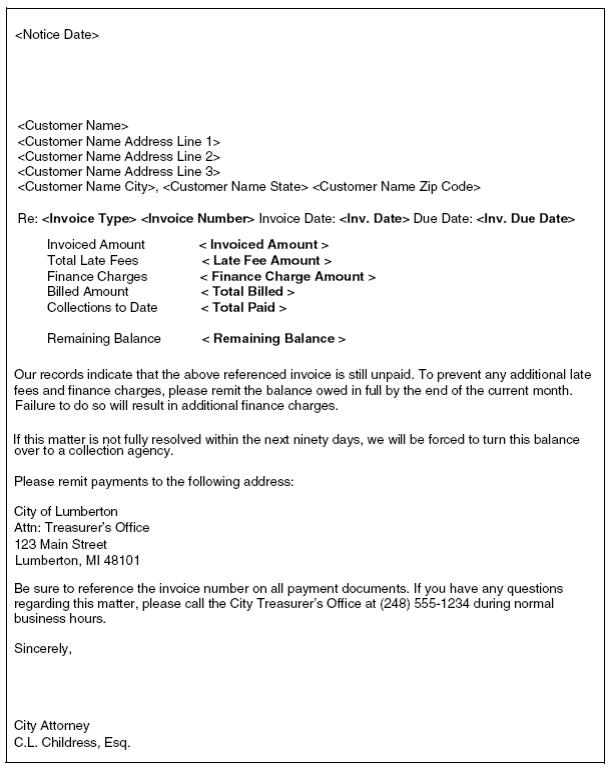
Print Customer Statements
The Print Customer Statements page allows authorized users to print a statement and/or listing for a selected customer or all customers. The customer statement provides a summary of customer invoice activity.
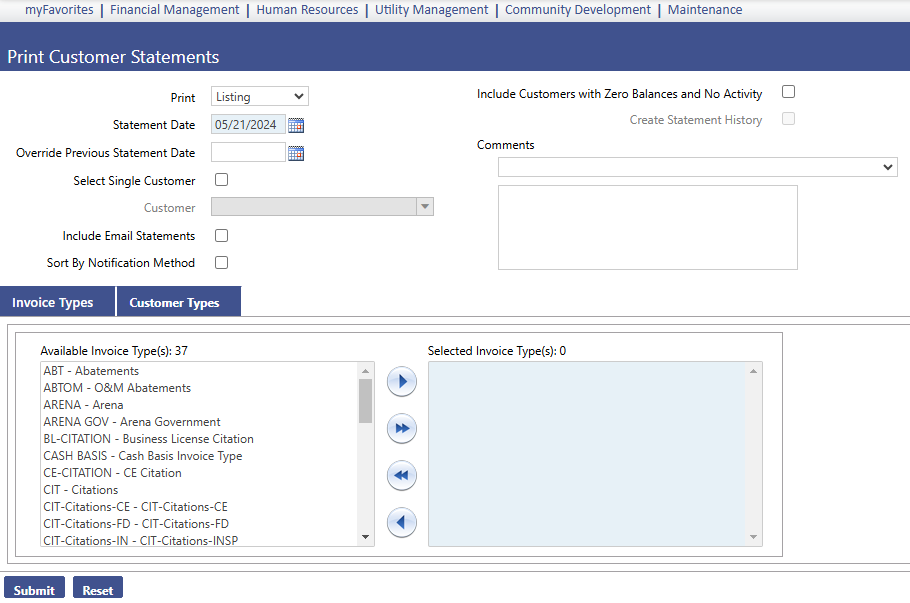
Financial Management > Miscellaneous Billing > Period End Processing > Print Customer Statements
- In Print, select what will be printed (e.g., Listing, Statement, or Both). The default is Listing. If you select Statement or Both, the Create Statement History check box is enabled.
- In Statement Date, enter or select the date on which the statement is created. The default is the current system date.
- Use the Override Previous Statement Date in place of the previous statement date to determine the beginning balance and the transactions that were entered between the Override Date and the current Statement Date. This Override Previous Statement Date is typically used to recreate a new statement. The default is <blank>.
- Select the Select Single Customer if you are going to select a single customer. If selected, it displays and enables the Customer field.
If not selected, the Available/Selected Customer Type(s) list displays every customer type since the last statement date or override previous statement date.
- In Customer select the customer for which to print a statement, if the Select Single Customer check box is selected. It is disabled if the Select Single Customer check box is not selected. Click the Search icon next to this field to search for the record you want to display.
- Select the Include Customers with Zero Balances and No Activity check box to include customers whose balance is zero and have no activity between statement dates. A customer statement will be printed for all active customers belonging to the customer type(s) selected regardless of the account balance and activity. This check box is disabled if the Select Single Customer control is selected.
- Select the Create Statement History check box to add the statement to the customer’s history file. It is disabled if the Print value selected is Listing. It is enabled if the Print option selected is Statement or Both.
- In Comments, either select a previously created standard message or type a message of your own in the text box. You can also edit the text of the standard message you select that populates the text box.
- If the Select Single Customer check box is not selected, you must select at least one customer type in the Available Customer Type(s) list that should print. In the Available list, select and move the appropriate customer type(s) to the Selected Customer Types box. Ctrl+Click can be used to select or deselect multiple customer types or Shift+Click to select a range of customer types.
- Click Submit to print the customer listing and/or statement and send it to myReports.
Bad Debt
The Bad Debt Batch List page allows authorized users to view a list of all existing bad debt batches, add new bad debt batches, or edit or delete existing batches.
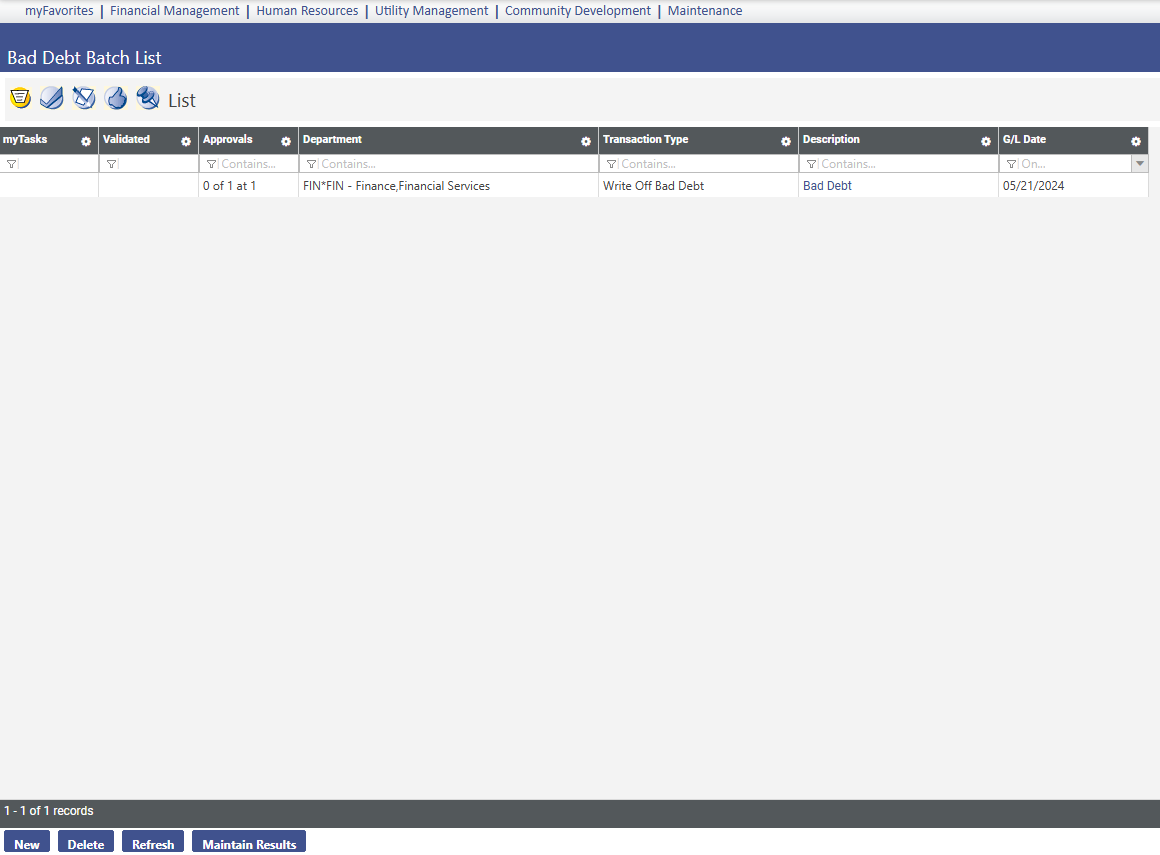
Financial Management > Miscellaneous Billing > Bad Debt
To add a new bad debt batch click New. To edit an existing bad debt batch, click the Description hyperlink to open the existing record.
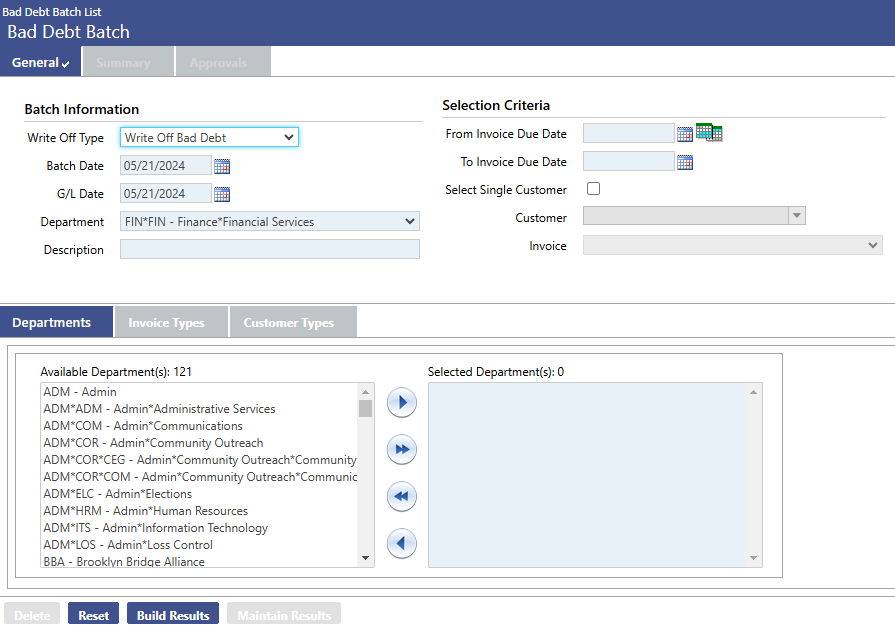
The General tab allows authorized users to view general information about the batch.
- In Write Off Type, select the type of bad debt transaction to associate with the batch. The default value is Write Off Bad Debt. The available options are: Write Off Bad Debt, Transfer to Collection Agency, Transfer to Taxes, Assign to Collection Agency, and Reclassification.
- The Collection Agency drop-down list appears when the Write Off Type selected is Transfer to Collection Agency or Assign to Collection Agency. Select the collection agency to which the invoices will be transferred or assigned.
- In Batch Date, select or enter the processing date assigned to the batch. The default is the current system date.
- In G/L Date, select or enter the date on which the bad debt transactions that are posted to the general ledger are recorded. The default is the current system date. The date must be a valid date, but less than the date entered in the Maximum Future post-date entered on the Journal Processing tab on the Company Suite Settings page.
- In Department, select the department responsible for the batch. The list is populated with all departments to which you are authorized. If there is a Centralized Miscellaneous Billing Department on the Miscellaneous Billing tab on the Company FM Settings page, and you have process authority within this department, the list defaults with this department value.
- In Description, type a description of the charge. The maximum character length is 64; the minimum is 1.
- Use the From Invoice Due Date to select all qualifying invoices with a due date greater than or equal to the To Due Date that will be assigned to the bad debt batch. The date must be less than or equal to the To Invoice Due Date.
- Use the In To Invoice Due Date to select all qualifying invoices with a due date less than or equal to the From Due Date that will be assigned to the bad debt batch. The date must be greater than or equal to the From Invoice Due Date.
- Select the Select Single Customer check box if a single customer will be selected. If selected, the customer must have at least one open invoice having due dates in the range selected in the From Invoice Due Date and To Invoice Due Date fields; also, the Organization, Invoice Types, and Customer Types tabs are disabled.
- In Customer, select the customer for which to select an invoice for bad debt processing. It is disabled if the Select Single Customer check box is not selected. Click the Search icon next to this field to search for the record you want to display.
- In Invoice, select the customer invoice for bad debt processing. It is enabled if the Select Single Customer check box is selected and a valid customer has been loaded in the Customer field. It is disabled if the Select Single Customer check box is not selected. It is populated with the open invoices belonging to the customer selected.
- On the Departments tab, select the departments to which the bad debt will be associated. In the Available Departments box select and move the appropriate department(s) to the Selected Departments box. This list displays all departments to which you have authority. Ctrl+Click can be used to select or deselect multiple departments or Shift+Click to select a range of departments.
- On the Invoice Types tab, select the invoice types to which the bad debt will be associated. In the Available Invoice Type(s) box select and move the appropriate invoice type(s) to the Selected Invoice Type(s) box. This list displays all invoice types to which you have authority. Ctrl+Click can be used to select or deselect multiple invoice types or Shift+Click to select a range of invoice types.
- On the Customer Types tab, select the invoice types to which the bad debt will be associated. In the Available Customer Type(s) box select and move the appropriate customer type(s) to the Selected Customer Type(s) box. This list displays all customer types to which you have authority. Ctrl+Click can be used to select or deselect multiple customer types or Shift+Click to select a range of customer types.
- Click Build Results, which selects the invoices for bad debt processing and creates the corresponding transactions. This button is hidden if you do not have Add rights to the Miscellaneous Billing - Bad Debt Batch Processing security component.
- Click Maintain Results to return the results of the invoice search (Build Results) and open the Bad Debt Invoice List page where you can select the bad debt invoices to apply to the batch.
The Summary tab allows authorized users to view summary information about the batch.
|
Field |
Description |
|---|---|
|
Number of Invoices |
Total number of invoices included in the bad debt batch. |
|
Billing Amount |
Total dollar amount billed of all invoices in the bad debt batch. |
|
Late Fees |
Total amount of late fees charged to the invoices in the bad debt batch. |
|
Finance Charges |
Total amount of finance charges charged to the invoices in the bad debt batch. |
|
Total Amount |
Billed amount plus any late fees or finance charges added to the invoices in the bad debt batch. |
The Approvals tab allows authorized users to view the approvals needed and completed for the selected bad debt batch.
To delete a bad debt batch click Delete. The Delete button is hidden or disabled if the user does not have the appropriate security permissions. If authorized, when the user clicks Delete they are prompted to confirm the deletion.
Miscellaneous Billing inquiries
Miscellaneous Billing Inquiries can be found by navigating to Financial Management > Inquiries > Miscellaneous Billing.
Customer Inquiry – This page will allow users to inquire on the customers that they have access depending on how Process Manager was setup.
Customers
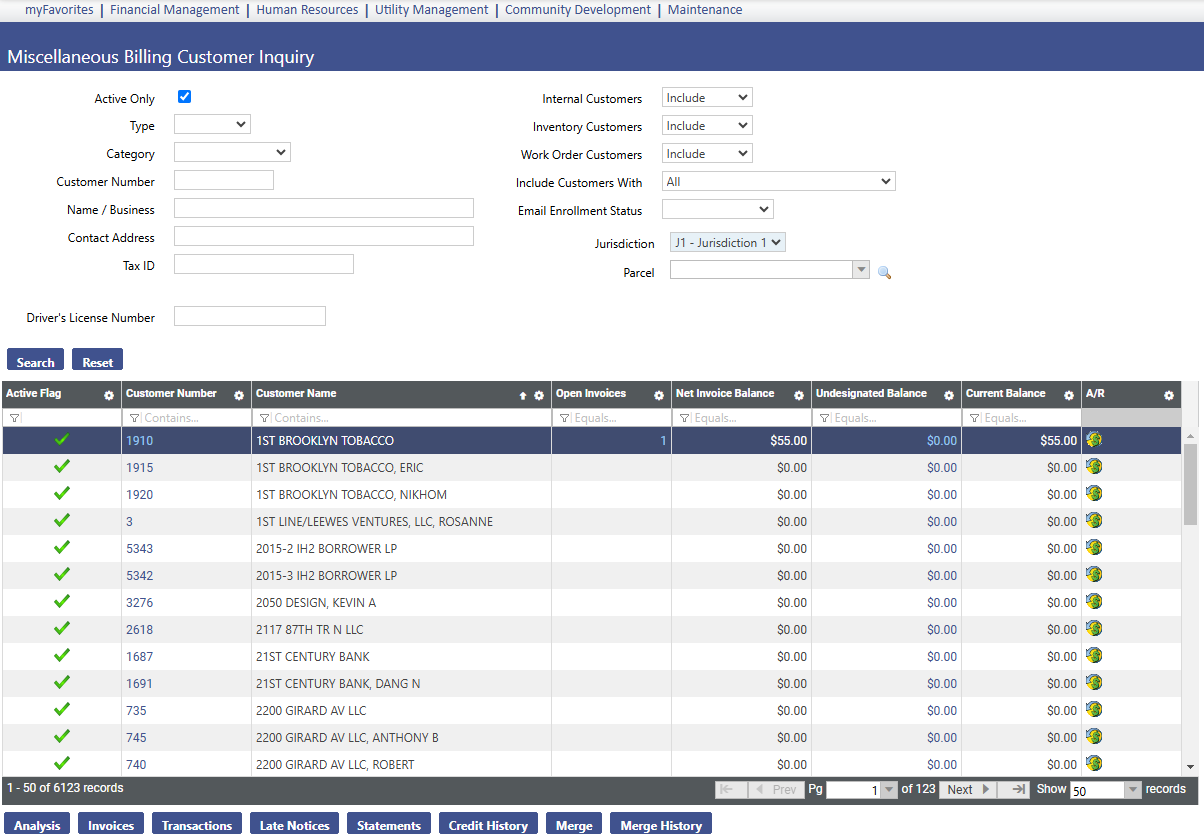
Financial Management > Inquiries > Miscellaneous Billing > Customers
The Miscellaneous Billing Customer Inquiry will help provide summary and detail information on transactions entered for Miscellaneous Billing Customers. Users will be able to identify the number of Open Invoices per customer. In order to view the Open Invoices for a particular Customer, underneath the Open Invoices Column, click on the number of Invoices that are open and New World will then navigate to a Miscellaneous Billing Invoice Inquiry in order to view the details that make up the open invoices. In addition, the Customer Inquiry screen will display the Customer Net Invoice Balance, Undesignated Balance and Current Balance.
Invoice Inquiry
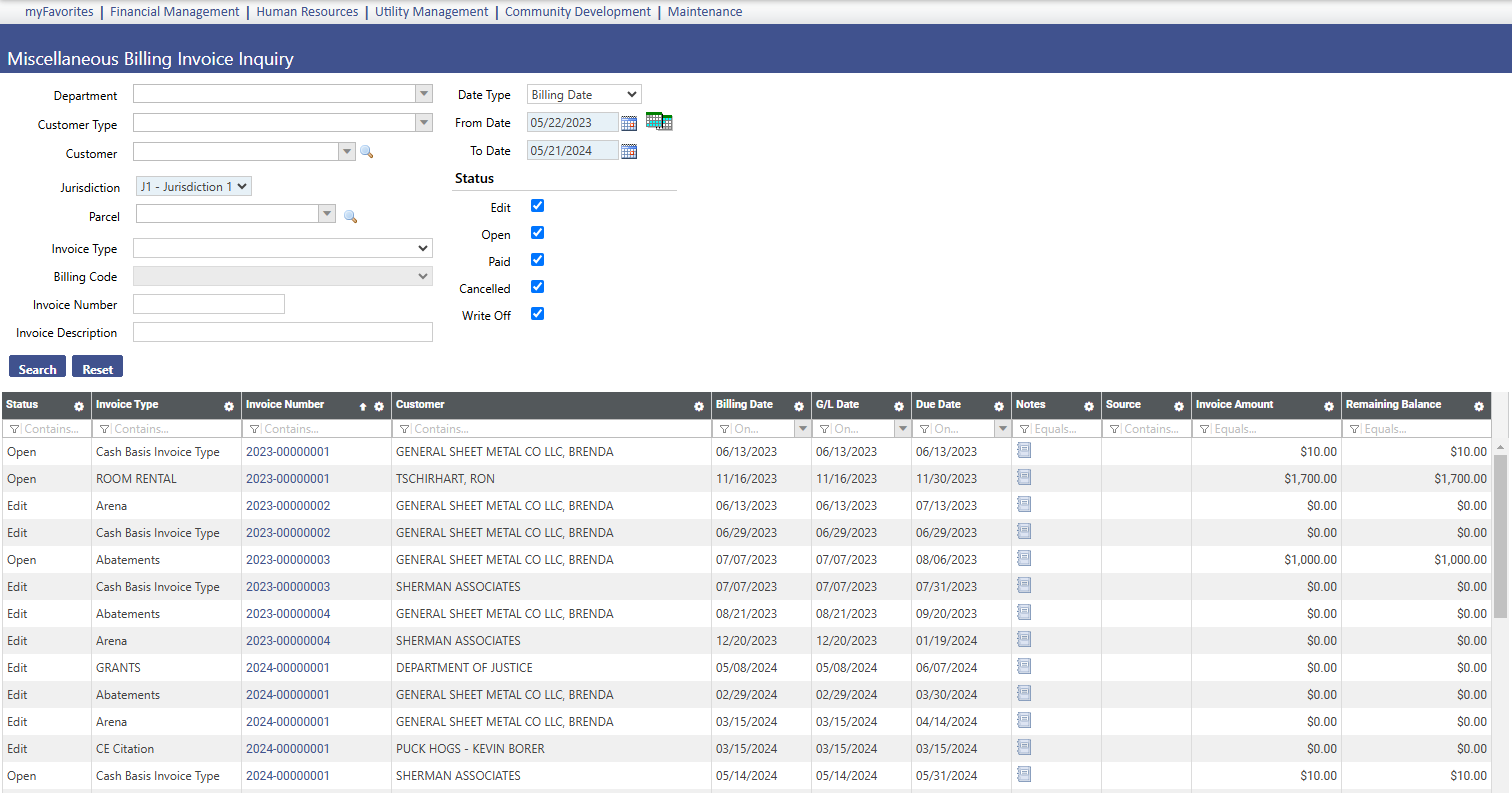
Financial Management > Inquiries > Miscellaneous Billing >Invoice Inquiry
The Miscellaneous Billing Invoice Inquiry Screen will allow users to search for any Invoice Transaction that has been entered into New World. Every field is optional to fill out on this screen which allows for broad or specific Invoice Searches. Once the appropriate fields have been filled out, click Search to view the results.
Once the results have been populated depending on the search fields that have been filled out, numerous pieces of information will display as seen above.
Fields:
Status – This displays whether an Invoice is in an Edit, Open or Paid status.
Invoice Type – This will display the Invoice Type used during the Invoice Entry process.
Customer – This will display the Customer that was used upon the entry of the Invoice.
Billing Date – Date entered when the Invoice was entered. This date is simply informational.
G/L Date – General Ledger Date that was entered on the Invoice. This date depicts when the Journal Entry will hit the General Ledger. The date keyed in on the Invoice will never change unless a user were to manually edit the system generate Journal Entry created from posting a Miscellaneous Billing Invoice Batch.
Due Date – Date that the Invoice is due to be paid. This date controls any late fees that need to be distributed to a Customer for any late payments made.
Billings by Invoice Type
Financial Management > Inquiries > Miscellaneous Billing >Billings by Invoice Type
The Miscellaneous Billing Analysis by Invoice Type Inquiry will allow users to view performance information based Billing Codes within an Invoice Type.
Fields:
Date Type – Choose between Billing Date, G/L Date, Due Date or Resolution Date. Information will be generated based on the Date Type chosen on this field.
From/To Date- Enter a from and to date from which information needs to be displayed. Information will populate based on the Date’s and Date Type entered.
Chart By – Choose from Amount or Transaction. Amount will display the dollar amounts that have been entered for each Billing Code within an Invoice Type and Transaction will show the number of transactions entered for Billing Codes within an Invoice Type.
Invoice Type – Choose an Invoice Type to view information on. Users will only be able to choose from Invoice Types that have been granted to them via User Based Security.
Miscellaneous Billing Reports
Miscellaneous Billing Customer Transaction Report
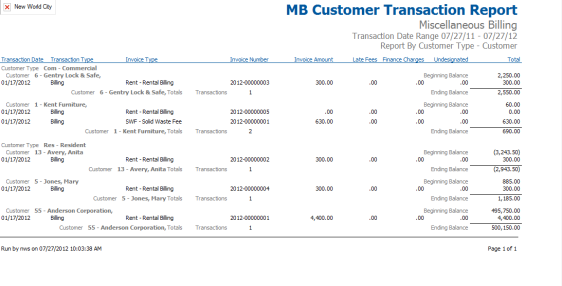
The Miscellaneous Billing Transaction Report displays all types of transactions that have been entered for Miscellaneous Billing Customers. Users can only run this report on Invoice Types that they have access to in User Based Security.
Miscellaneous Billing Customer Balance Report
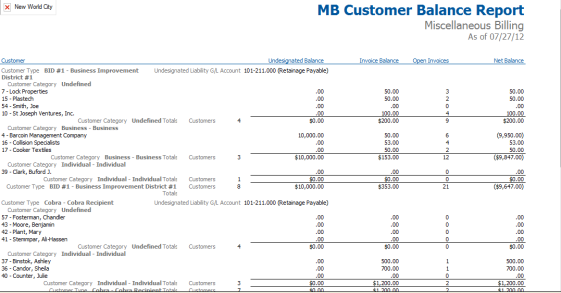
The Miscellaneous Billing Customer Balance Report displays all customer balance information. The report will show an undesignated balance if the customer were to have a pre-payment or over payment, as well as the number of Open Invoices with the Invoice Balance.
Miscellaneous Billing Invoice Report
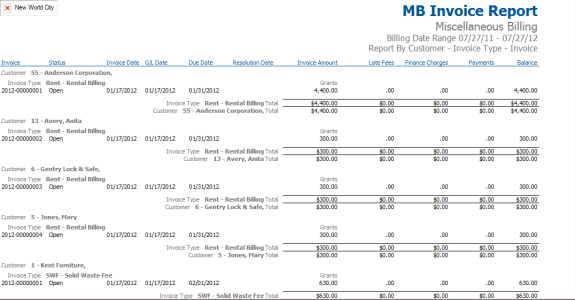
The Miscellaneous Billing Invoice Report will show users a list of Open, Paid, Write Off or Cancelled Invoices. Users can only run this report based on the Invoice Types that have been granted in User Based Security.
Miscellaneous Billing Open Invoice Report
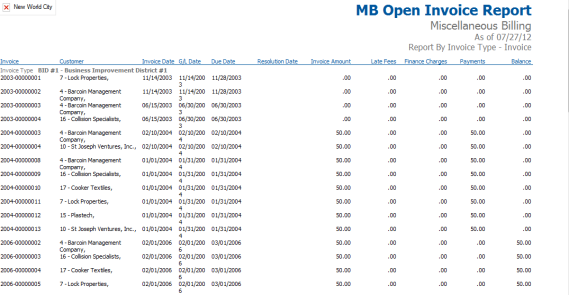
The Miscellaneous Billing Open Invoice Report will display all of the Open Invoice per customer. This is one of the most commonly used reports for Miscellaneous Billing.
Miscellaneous Billing Invoice Aging Report
The Miscellaneous Billing Invoice Aging Report displays the amount of Open Invoices per Customer and how far past due they are. This report is also a very commonly run report for Miscellaneous Billing.
Miscellaneous Billing Revenue Summary Report
Miscellaneous Billing Revenue Summary Report shows users all of the revenue that has come in against the Miscellaneous Billing Invoices that have been created in New World and distributed to Customers.
Miscellaneous Billing G/L Distribution Report
The Miscellaneous Billing G/L Distribution Report shows how many transactions and the dollar amounts for those transactions have been established for particular General Ledger Accounts to report on.