Utility Billing
Introduction
The utility management billing module is used for all aspects of regular cycle billing. Each billing cycle will run through the cycle billing process individually.
System Administrator Guide
UM Settings
Maintenance > Utility Management > UM Settings
General Tab
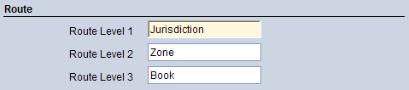
The Routes section contains the controls that allow the organization to name the tiers for utility routes. The values defined here determine how many tiers the routes set up in the system may have (e.g., if only Route Levels 1 and 2 are provided here, the routes will be set up using only a two-tiered structure). The values also serve as a prefix for the numbers assigned to route tiers (e.g., Jurisdiction 100) and are the control labels for route tiers throughout the application.
- Enter in the Route Level 1 control the name used to identify the top tier of routes (e.g., jurisdiction). This field is required.
- Enter in the Route Level 2 field the name used to identify the top tier of routes (e.g., zone).
- Enter in the Route Level 3 field the name used to identify the top tier of routes (e.g., book).
Initial Setup - This section contains the Enforce Maintenance Rules control. This check box is designed to help preserve data integrity in the system (e.g., maintaining the integrity of history data by not allowing master files such as rates to be changed if they are already in use in a billing cycle). If this flag is selected, certain areas of maintenance (e.g., rates) cannot be changed. An administrator who needs to change a setting can clear this check box, save the System Settings, make the necessary change(s), and then re-select the check box.
General Tab - Form Types
The Forms section allows the organization to define the default form types that should be used for the transactions listed below. The form types in the fields are defined in Maintenance > new world ERP Suite > System > Form Layout. All of the fields in this section are required except for the aggregate bill.
- Select the Bill form to be used as the default form for bills. Value is populated in validation set 142 – Utility Bill Type.
- Select the Work Order form to be used as the default form for work orders. Value is populated in validation set 178 – Utility Work Order Type.
- Select the Exception Bill form to be used as the default form for exception bills. Value is populated in validation set 142 – Utility Bill Type.
- Select the Aggregate Bill form to be used as the default form for aggregate bills. Value is populated in validation set 142 – Utility Bill Type.
- Select the Transaction Statement form to be used as the default form for transaction statements. Value is populated in validation set 203 – Transaction Statement Form Type.
- Select the Consumption Statement form to be used as the default form for consumption statements. Value is populated in validation set 299 – Consumption Statement Form Type.
The Remittance address section provides the details for the Remit To address that can appear on custom utility bills.
Workflow Tab
Select or clear the billing options. This will determine which workflow processes appear in Utility Management > Billing
- Use Non-Metered Entry
- Use Non-Metered Audit
- Use Meter Audit
- Use Billing Audit
- Use Billing Register
- Use Bill Export
Consumption Tab
The Read Types section on the Consumption tab allows the organization to define the titles of regular and user-defined reads. The type of read and whether it should include an audit can also be defined for user-defined reads.
- Enter the Initialize code to assign to reads that will record the initial settings on a meter. This value is required; it may contain up to 16 characters.
- Enter the Failure code to assign to rejected reads. These are reads that were entered but discarded and not used for billing. This value is required.
- Enter the Estimate code to assign to system-estimated reads. This value is required.
- The User Defined 1-6 fields allow up to six types of user-defined fields to be defined. The first field is required. Each value may contain up to 16 characters. Any user-defined read that is not marked as an actual read (see below) is considered an estimate.
- The Default for the Manual Entry section contains a check box for each user-defined read type. The check box should be selected for the user-defined type whose manual read should be treated as the read type defaulted for manual (non-AMR) reads. If a new default is selected, the check box that indicated the previous default will be cleared.
- The Default for the AMR Created section contains a check box for each user-defined read type. The check box should be selected for the user-defined type whose AMR read should be treated as the read type defaulted on reads imported from the AMR. If a new default is selected, the check box that indicated the previous default will be cleared.
- The Considered Actual Reads by Audit section contains a check box for each user-defined read type used in the actual read audit. Those considered actual reads are selected; otherwise, they are cleared. For example, Manual Estimate, Customer Reported, AMR, Manual, and Final are all considered "real" reads and would most likely be selected. At least one Considered Actual Read check box must be selected.
Bills Tab
The Accounts to Bill section on the Bills Tab contains fields that determine which accounts get a bill. By default, all active accounts with at least one active service will receive a bill.
- The Bill Print Options field defaults to Print All Bills. When this is selected, bills will be generated for all accounts in the billing cycle regardless of the bill amount.
- The other option in the Bill Print Options field, Suppress Small Bills, allows the municipality to exclude bills from being generated for accounts whose bill falls within a specific dollar range that brackets zero. When this option is selected, two more fields display to allow this range to be defined.
- The Suppress Bills From field is required if it displays. Enter the lowest dollar amount for which bills should not be generated. This number can be negative. It must be smaller than the Suppress Bills To value. The dollar sign will display when the changes are saved.
- The Suppress Bills To field is required if it displays. Enter the highest dollar amount for which bills should not be generated. This number must be larger than the Suppress Bills From value. The dollar sign will display when the changes are saved.
- If the Bill Inactive Accounts check box is selected, both active and inactive accounts with charges will receive a bill. If the check box is cleared, only active accounts will receive a bill. The check box is cleared by default.
The Bill Print section on the Bills tab organizes the fields that determine the settings for printing bills.
- If the Pre-Calculated Penalty check box is selected, the projected penalty will be included on the bill. The check box is cleared by default.
- The Show Detailed Charge Categories check box indicates whether charge category child levels will be listed on the bill with the parent levels. If there are too many to fit the bill form, the summary version (just the parent charge categories) will automatically be used.
- The Show Parent Charge Categories check box, if selected, indicates that the parent charge categories will display on the bill.
- If deduction meters are used, selecting the Show Credit Effects of Deduction Meters check box will display information about this meter on the bill. Effects of deduction meters will appear as a derived charge category.
- The Deduction Credit Title field is required if the Show Credit Effects of Deduction Meters check box is selected. Enter the title for the deduction meter.
- If the Post Net check box is selected, the post net barcode will print on the bill. The barcode contains the city, state, and Zip code.
The next three check boxes allow control of the relationship and details of consumption and charge category dollars. Only one of these three check boxes should be selected; having more will impede performance, and the system will only use one of the settings regardless of how many are selected.
- Select the Transaction with Consumption Information check box to print transaction and consumption information on the bill. If this check box is selected, the rate that the consumption was run through will appear next to the consumption. This format requires a custom change to the standard bill.
- Select the Include Consumption By Charge Category check box to present consumption organized by charge category on the bill. If this check box is selected, the bill is divided by services, and all charge categories for that service are grouped with the service. Meters (or non-metered units) that belong to that service will also be grouped together. This format requires a custom change to the standard bill.
- Select the Include Consumption by Service Type check box to present consumption organized by service type on the bill. This is the presentation used in our standard bill.
If the Show Budget Bill Details check box is selected, accounts that use budget billing will have budget billing information printed on their bill.
- A payment code must be selected if using a barcode on the utility bill form.
- A user can select to include up to five user defined fields on the utility bill.
- A user can select to display the current cost adjustment for electric billing.
- The eBill options should be set if your municipality is using the eBill functionality.
Maintenance > Utility Management > Billing Calendar > Frequencies
To add a billing frequency, select the New button on the Billing Frequency List page.
- Enter a Description of the frequency. This field is required. This value will uniquely identify the frequency in the system.
- Select the Billing Frequency that will be used. The options are Monthly, Quarterly, and Bi-Monthly.
- The New Accounts field is required. The value entered here tells the system how long a new account using this billing frequency should be active before receiving a bill. For example, if the value in this field is 5, and the next cycle bill is processed 3 days after the account is activated, the account will not receive a bill until the next cycle bill is created.
- The Inactive Accounts field is required. If inactive accounts should receive a bill, this value tells the system the minimum number of days an account should be inactive (between the final bill and the next cycle bill) before it is included in a billing cycle as an inactive account.
- The Base Days value is required. This is the number of days that the cycle is typically based on (e.g., usually, Monthly is 30, Bi-Monthly is 60, and Quarterly is 90).
- The Prorate Over and Prorate Under fields allow the user to define if/when proration starts for flat rates, based on the number of days in the billing cycle or consumption date range defined on prorated rates. For instance, if the Base Days are 30, and Prorate Over value is 35, and Prorate Under values is 25, anything between 25 and 35 days will be billed the flat rate. Anything 24 days or less, or 36 days or more will have proration taken into account.
In the cycle wizard, a “From” date is entered by the user. The “From” date identifies the beginning of a billing cycle and the implied “To” date is the day before the “From” date of the next billing cycle. For instance, if the “From” date for the current billing cycle is 10/10 and the “From” date for the next billing cycle is 11/12, the current cycle’s “From – To” dates are 10/10 – 11/11. The following fields reference the events to take place for services between 10/10 and 11/11.
The values in the Cycle Defaults section tell the billing cycle wizard how to calculate when certain cycle events should occur. Within the billing process, these dates can be changed for a specific cycle by clicking on the edit pencil icon for that cycle.
- The Days Until Print field is required. The value here will be the default number of days after the From date that the bills should be printed. In the billing process, when bills have not yet been printed, the date that is calculated from this value will display in a status message on the page.
- The Days Until Post field is required. The value here will be the default number of days after the From date that the bills should be posted. In the billing process, when bills have not yet been posted, the date that is calculated from this value will display in a status message on the page.
- The Days Until Billing Date is the number of days from the billing cycle’s From Date bills should be created.
- The Days Until Statement Due is the number of days from the cycle’s From Date until the bills for the cycle are due.
- The Days Until Bank Draft is the number of days from the cycle’s From Date until bank drafts should be run for the accounts that use bank drafting.
- The Days Until Penalty is the number of days from the cycle’s From Date until penalties should be run for the accounts that are delinquent.
- Select the Skip Holidays/Weekends check box to move to the next business day if a billing action falls on a weekend. The check box is selected by default.
- Click Save to save the billing frequency.
Maintenance > Utility Management > Billing Calendar > Routes
Utility Routes are the segments of the billing area that will have their meters read in sequence. Route assignment can also be related to what group an account is billed in. Thus a route can be an indicator of both geography and bill timing. When a utility account is created, it is assigned to a route and given a read sequence within the route so that is it logically placed to indicate read order in the route.
The levels within a route are determined by the values in the Route section on the General tab of UM Settings. The values here determine what the route levels are called on the Route Detail and Billing Profile screens. It is not necessary to have all three levels.
The route in this example will have three levels, the Jurisdiction, the Zone, and the Book. The New button will be enabled for all but the lowest level (that is, any level that has a level defined beneath it).
The lowest level of a route is a hyperlink. Clicking it launches the Route Detail page in Edit mode to allow edits to the route, if necessary.
Maintenance > Utility Management > Billing Calendar > Routes > New button
The Route Detail page allows users to define a route level. The number of levels shown and their values are determined by the Route Levels defined in UM Settings; up to three can be specified.
- The Active check box is selected by default, indicating that the route can be applied to meters/accounts. If a route becomes obsolete clear this check box to inactivate and hide the route. This will ensure that users cannot assign active meters or accounts to the route.
Note: If a route is inactivated, it is still available for any report and inquiry that users them either directly or indirectly. An example of indirect use is reporting profiles. When the inactive route is part of a reporting profile, the route will be included, thus ensuring that complete reports are generated.
- The <Route Level 1> (e.g., Jurisdiction) field displays the series that was highlighted when the New button was clicked. This value is required. The field contains all billing profiles defined in the system. In Edit mode, this field is displayed only if there is no other level defined beneath it. If there are other levels defined, this value is displayed as a label.
- The <Route Level 2> (e.g., Zone) field is required if displayed. In Edit mode, this field is displayed only if there is no other level defined beneath it. If there is a third level defined, this value is displayed as a label.
- The <Route Level 3> (e.g., Book) field is required if displayed. In Edit mode, this field is displayed if it is defined in UM Settings.
- The Billing Profile is required. Select the appropriate billing profile for this route.
- Note: Billing Profiles must be defined before a route can be added.
- Enter the AMR Route Identifier, if used. This value provides route information to the AMR device.
- The Standard Route Read Time field allows the user to identify the time at which this route is usually read. The use of HH:MM:SS format allows a precise time to be specified.
- Enter an AMR Route Message, if desired. This text can provide a message about this route to the person using the AMR device to collect reads.
- Click Save to retain the route.
Maintenance > Utility Management > Billing Calendar > Billing Profiles
A billing profile is a group of accounts that are billed together. Billing profiles allow the utility to divide their accounts into logical sections, often based on geography and the route. Billing profiles are assigned on the account level and are used to select the accounts that will be included in billing-related activities.
Reporting profiles allow the utility to divide their accounts into logical sections, often based on geography and the route, for reporting purposes. Many Utility Management reports contain a Reporting Profile field, which displays the options defined here and allows the user to select a specific group of accounts for which to run a report.
The Profile Type field displays the list below based on the type selected. The options are Billing and Reporting. Billing is the default value. If Reporting is selected as the Profile Type, the list of Reporting Profiles will display.
The Billing Profile List page displays the billing profiles defined in the system. The Code is a hyperlink that opens the record in edit mode.
The Reporting Profile page displays when the Profile Type field is set to Reporting Profile on the Billing Profile List page and the New button or the Code hyperlink are selected.
Note: When a billing profile is created, an identical reporting profile is also created. Reporting profiles need to be intentionally created only if the organization wants to group accounts differently for reporting purposes.
- The Reporting Profile is required. Enter a value that will make it easy to recognize the reporting profile; this value, together with the Description, will identify the reporting profile in the Utility Management application.
- The Description is required. Enter text that will further identify the reporting profile.
- The routes that will be included in this reporting profile need to be selected. The available routes can be filtered by Series and Book, which are the components of the route that the utility uses to identify it. Select values for these fields, if desired; a Book value can be selected only if a Series has been selected.
- Select the route(s) to be included in the reporting profile. At least one route must be selected.
- Click Save to save the reporting profile.
Maintenance > Utility Management > Billing Calendar > Billing Calendar
The Billing Calendar List View page is displayed by default when the Billing Calendar menu option is selected. This page displays a list of the billing profiles defined in the system. This view is helpful when the user wants to see general information about a billing profile or its cycles; it is also a quick way to change a date on a billing cycle if one is not currently in the billing process.
The billing profiles can be expanded to display a list of the billing cycles defined in the system. The Billing Date value is also a hyperlink; clicking it launches the Edit Billing Cycle page.
Clicking the Print button launches the Billing Cycle List - Print page. It allows printing of the billing cycle event date information for one or all cycles, for a set date range or all dates, and for open cycles or all cycles.
Maintenance > Utility Management > Billing Calendar > Billing Calendar > New Cycle Wizard button
The cycle wizard allows the utility organization to define multiple billing cycles for a billing profile. If the organization defines cycles for an entire year; the wizard makes this an efficient process.
Step 1 – Select Billing Profile and Duration
- The Billing Profile is required. Select the billing profile to create new billing cycles.
- The Start Date is required. Enter the date on which the next new billing cycle should start. In most cases, this is the Billing Date from the previous cycle. The Start Date becomes the From Date for the cycle (or the next business day, if the system is configured to ignore weekends and holidays).
- Select the End After ... Cycles field to define a set number of cycles without considering the final date. Enter 12 to create a year full of monthly cycles.
- Select the End Date field if to define cycles that end by a specific date.
- The fields in the Repeat Cycles section provide a means to help keep the timing of monthly billing cycles consistent. Select the On the ... of every month option to specify the same day of each month (e.g., the first Monday). The next billing cycle will start on that day each month.
- Select the On the ... day of every month to specify the same date each month (e.g., the 15th). The next billing cycle will start on that date each month.
- Create Completed Cycles is displayed if Enforce Maintenance Rules is cleared on the UM Settings > General tab. Selecting it indicates that the cycle being created is a historical billing cycle that should be marked as completed.
- Click Next to go on to the next step of the wizard.
Step 2 – Select Number of Days Until Billing Events
The number of days until each event in the billing cycle—Print, Post, Billing Date, Due Date, and Bank Draft—are defaulted from the frequency record (Maintenance > Utility Management > Billing Calendar > Frequencies). Each field is required. Define new values if necessary.
Step 3 – Preview the New Billing Cycle
This step allows the user to view the events that will be created based on the settings specified. It shows the events on the actual calendar.
Step 4 – Automate Billing Events
This step allows the user to set up a primary user to notify when a billing event is due to occur. This functions like a calendar reminder.
Note: Note: These fields are for future use. Defining values in them will have no effect at the present time.
- The User to Notify is the user who should receive the notification that a billing event needs to be performed.
- The Days Before Event value indicates how many days in advance the user should be notified that the event is coming due.
- Selecting the Automate Processing check box will automatically send the selected user a notification on the number of days before the event.
- Click Save to finalize the billing cycle and add it to the calendar.
Billing Calendar: Calendar View
Maintenance > Utility Management > Billing Calendar > Billing Calendar > Calendar View button
The Billing Calendar page is displayed when the Calendar View button is clicked on the Billing Calendar List View page. It provides an event-based view of the billing profiles and cycles defined in the software. This view is helpful when an employee needs to see what billing tasks need to run on a particular day.
For open billing events, the entry on the calendar displays in blue and is a hyperlink. Clicking the link navigates the user to the appropriate bill processing or delinquent processing page.
For closed events, clicking the link for the following dates—From, Calculate, Print, Post, Billing, and Due Date—will take the user to the Post page for that billing cycle. From here, the post reports can be reprinted. Clicking the link for the Bank Draft date will take you to the Bank Draft Post page for that billing cycle. The post reports for bank drafting can be re-run from this page.
The right side of the page displays two calendar months. It defaults to the current month and the following month; the current day is highlighted. Use the arrows at the top of the section to navigate to different months; click on a day in the month if you want to change the main calendar month to a new month.
Clicking the Print Calendar button will print the calendar information in calendar format. It is sent to myReports
Maintenance > new world ERP Suite > System> Validation Sets > Validation Set Lists
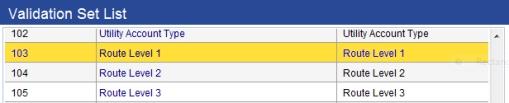
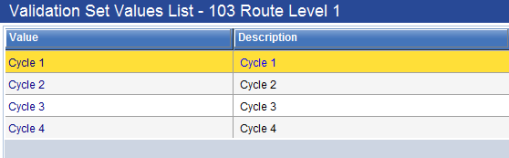
Values are required for the Route Level 1, Route Level 2, and Route Level 3 validation sets dependent on which levels were established in UM Settings.
Permission Type – Non-Company Applications
Feature Group – UM Billing Bills
|
App |
Component |
Description |
All |
Add |
Change |
Delete |
View/Use |
|
|
|---|---|---|---|---|---|---|---|---|---|
|
|
|
|
|
|
|
|
|
|
|
|
UM |
Billing Profile |
|
|
|
|
|
|
|
|
|
UM |
UM Billing - Register by Account Type |
|
|
|
|
|
|
|
|
|
UM |
UM Billing - Register by Payment Assistance |
|
|
|
|
|
|
|
|
|
UM |
UM Billing - Register by Rate Code |
|
|
|
|
|
|
|
|
|
UM |
UM Billing Estimate Unread meters |
|
|
|
|
|
|
|
|
|
UM |
UM Billing Process - Balances |
|
|
|
|
|
|
|
|
|
UM |
UM Billing Process - Bill Audit |
|
|
|
|
|
|
|
|
|
UM |
UM Billing Process - Bill Export |
|
|
|
|
|
|
|
|
|
UM |
UM Billing Process - Bill Post |
|
|
|
|
|
|
|
|
|
UM |
UM Billing Process - Bill Print |
|
|
|
|
|
|
|
|
|
UM |
UM Billing Process - Billing Register |
|
|
|
|
|
|
|
|
|
UM |
UM Billing Process - Billing Register Summary |
|
|
|
|
|
|
|
|
|
UM |
UM Billing Process - Calculate Bill |
|
|
|
|
|
|
|
|
|
UM |
UM Billing Process - Route List |
|
|
|
|
|
|
|
|
|
UM |
UM Export Bill |
|
|
|
|
|
|
|
|
|
UM |
UM Unbilled Account Report |
|
|
|
|
|
|
|
|
|
UM |
UM Unprinted Account Report |
|
|
|
|
|
|
|
|

Permission Type – Non-Company Applications
Feature Group – UM Billing Consumption
|
App |
Component |
Description |
All |
Add |
Change |
Delete |
View/Use |
|
|
|---|---|---|---|---|---|---|---|---|---|
|
UM |
Meter Read Device Import Error Report |
|
|
|
|
|
|
|
|
|
UM |
Meter Read Device Import Report |
|
|
|
|
|
|
|
|
|
UM |
UM Billing Cycle List Print |
|
|
|
|
|
|
|
|
|
UM |
Meter Read Device Import/Export |
|
|
|
|
|
|
|
|
|
UM |
Non-Metered Consumption Report |
|
|
|
|
|
|
|
|
|
UM |
Routes |
|
|
|
|
|
|
|
|
|
UM |
UM AMR Meters Not Uploaded |
|
|
|
|
|
|
|
|
|
UM |
UM Billing Estimate Unread meters |
|
|
|
|
|
|
|
|
|
UM |
UM Billing Load Non-Metered Consumptions |
|
|
|
|
|
|
|
|
|
UM |
UM Billing Process – Analysis |
|
|
|
|
|
|
|
|
|
UM |
UM Billing Process - Balances |
|
|
|
|
|
|
|
|
|
UM |
UM Billing Process - Calculate Bill |
|
|
|
|
|
|
|
|
|
UM |
UM Billing Process - Consumption Entry |
|
|
|
|
|
|
|
|
|
UM |
UM Billing Process - Meter Read Audit |
|
|
|
|
|
|
|
|
|
UM |
UM Billing Process - Meter Read Entry |
|
|
|
|
|
|
|
|
|
UM |
UM Billing Process - Meter Read Sheet |
|
|
|
|
|
|
|
|
|
UM |
UM Billing Process - Non-Metered Consumption Audit |
|
|
|
|
|
|
|
|
|
UM |
UM Billing Process - Non-Metered Consumption Entry |
|
|
|
|
|
|
|
|
|
UM |
UM Billing Process - Route List |
|
|
|
|
|
|
|
|
Permission Type – Non-Company Applications
Feature Group – UM Billing Calendar
|
App |
Component |
Description |
All |
Add |
Change |
Delete |
View/Use |
|
|
|---|---|---|---|---|---|---|---|---|---|
|
|
|
|
|
|
|
|
|
|
|
|
UM |
Billing Calendar |
Provides the ability to view or edit billing profiles. |
|
|
|
|
|
|
|
|
UM |
Billing Frequency |
|
|
|
|
|
|
|
|
|
UM |
UM Billing Cycle List Print |
|
|
|
|
|
|
|
|
The Non-Billable Account Report will display a listing of utility accounts that require additional setup to bill properly.
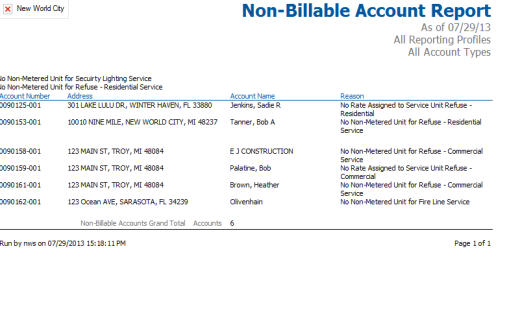
Utility Management > Reports > Management > Non-Billable Account Report
Utility Management > Billing
The Route Listing page functions as the command center for reads. It is the first workflow step in the billing process, launching users into the tasks involved in collecting the information to be used for billing. It is also a page that users will return to throughout the billing process to check the progress of gathering reads for the routes.
The route listing grid provides a status of meter and non-metered readings for the current billing cycle or route that is selected. The goal is to have 100 percent of units read.
The Status column shows the status of the selected route. The options are as follows:
- Unprocessed - No units have been read for this route.
- In Process - Either all the units have not yet been read, or some of the reads have triggered an audit.
- Exported - The route has been sent to a read device.
- Imported - The reads for the route have been received from the read device.
- Complete - All of the units have been read, and no audits exist.
Users may select the Refresh button for an up-to-date status.
Edit Pencil
The edit pencil icon in the Status bar allows for editing of the billing cycle dates. The billing dates, due dates, bank drafting dates, and delinquency event dates should be verified and edited if necessary prior to billing.
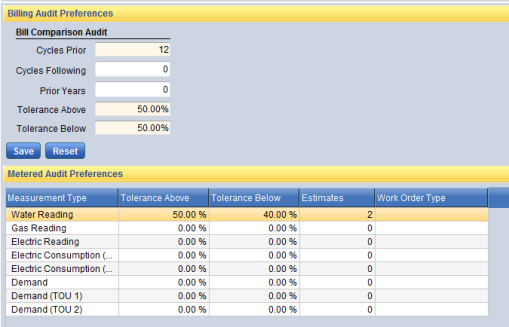
Show Preferences
The Show Preferences button in the caption bar allows for editing of bill and meter read audit preferences. Users can also select the option to create a work order when a meter read is rejected.

Command Buttons
- AMR Export allows user to export meter information to a file in order to obtain readings for the cycle.
- AMR Import allows user to import the readings that were obtained through the AMR device into the billing cycle.
- Estimate Unread Meters allows the system to determine an estimated read for any meters that do not have a read.
- Load Non-Metered Consumption will bring in the default usage for Non-metered Units.
- Meter Read Sheet is used to print a listing of meters to be read or reviewed. This list can be used as a worksheet by a meter reader to record the readings they take. It can then be given to a billing clerk so that the recorded consumption can be entered manually.
- Meter Read Report provides users with a listing of all meters that have been read in a specific billing cycle. If reads were imported from an AMR device, this report will show which meters did not return a reading. The report provides a hard copy list to review; the list serves to identify the unread meters from which to collect and/or review reads.
- Non-Metered Consumption Report provides a report showing the consumption that will bill for the consumption based non-metered units.
- Meter Read Audit Report provides a hard copy list of all the meter readings that triggered an audit. This information is then reviewed and used to take action: either verify that the read is accurate and accept it, or reject the read and create a work order for a new read to be collected (if the meter audit preferences are configured to do so).
- Non-Metered Consumption Audit Report provides a report showing the non-metered units that may have an issue based on the preferences set above.
The Meter Read Entry workflow process allows manual entry of reads for meters that did not import through the AMR Import process. User may also modify an imported read. Users must work through the meter reads for each route within the billing cycle separately.
The default display for meter read entry will display all meters within the selected route. The Show Search button in the caption bar allows for account number, meter number, and other advanced search options.
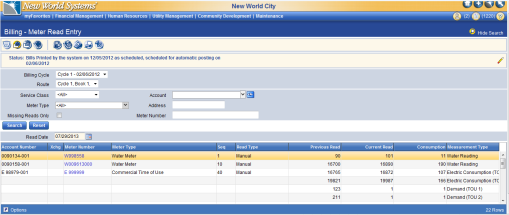
Select the Missing Reads Only option to limit the grid display to only the meters that are missing reads.
Command Buttons
- Reject – allows user to reject a read value that should not be used for billing purposes. If a read has been rejected the meter will appear as having a missing meter read and will appear in the meter read report as a missing read. The meter or account will not bill unless a new read is entered.
- Refresh – used to refresh the data display in the grid to reflect any recent modifications to reading values.
- Reset Meter – The reset meter command button is used to modify the previous read for a meter.
- Report – will regenerate the meter read report.
- Meter Read Sheets – will regenerate the meter read sheet report
By clicking on the meter number in the grid a user will be allowed to enter or modify the current read for billing. The previous read information will display along with an area to enter the current read for billing. Select a read type, a read date, and enter the current read value. Once the current read has been entered the resulting billed consumption will display.
Billing – Non-Metered Consumption Entry
The Non-Metered Consumption Entry workflow process allows manual entry of consumption values for non-metered units that did not load properly in the Load Non-Metered Unit process. Users may also modify a non-metered consumption value for billing if necessary.
By clicking on the account number in the grid a user will be allowed to enter or modify the current consumption for billing.
The Meter Read Audit workflow process allows users to review meter reads that did not pass the criteria set in the Show Preferences of the Route Listing workflow.
Users may review audits by individual route or change the Route criteria to <List All>. Users may also review audits by each audit type or leave the Audit Type criteria empty to review all audits at once.
Selecting the Account No value will navigate user to the customer service screen for the selected utility account.
Selecting the Meter No value will allow user to modify the current read value for the selected meter.
Available checks are listed below. Some of the audit types may have been deselected in the Utility Management>UM Settings > Consumption Tab
- Consumption Too Large
- Consumption Too Small
- Too Many Estimated Reads
- Zero Consumption
- Rollover/Negative Read
- Consumption on an Inactive Meter
- Meter Exchange
- Multiplier Modified
- First Read on New Account
- Insufficient History
- Exception Bill Conflict
Command Buttons
Refresh – refreshes the grid to reflect most recent modifications.
Accept – user may choose to accept a read to use for billing.
Reject – If any reads are rejected, the read is thrown out, and a new read is needed. If the Create Work Order on Rejection check box is selected, the system will create a work order for any account with a rejected read.
Audit Report – regenerates the Audit Report.
Work Order – creates a work order for the meter that is highlighted.
Audit Analysis – provides a view of the utility account information along with the meter consumption history.
The calculate workflow allows users to submit calculations for the selected billing cycle. Individual routes may be selected for calculation or all routes can be calculated at once.
The status column will inform users if the route was previously calculated. The status will also advise users if readings were modified which requires a recalculation of the route.
Any route can be calculated as many times as necessary.
Selected routes can be submitted for calculation or recalculation by clicking the Calculate command button.
Users should navigate to myReports to ensure that the Calculate Bills report completes prior to progressing to other tasks.
The bill audit workflow allows users to review any bills that may be too high or too low that did not pass the criteria set in the Show Preferences of the Route Listing workflow.
Users can review the Audit Analysis by highlighting an individual row and selecting the Audit Analysis or by clicking the audit icon for the desired row. The audit analysis will display the current billing information along with the last bill and the comparison amount. The comparison amount is the calculated average used for comparison based on the preferences set for bill audits.
A report of all bill audits is available by clicking the Print Audits command button.
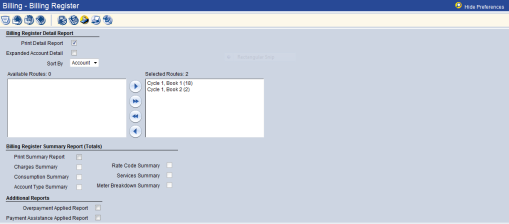
The billing register workflow allows users to review a preliminary billing register prior to printing and/or posting of the cycle bills. The post process will produce a final copy of the billing register.
To print the billing register select the billing cycle and click the Submit command button. The resulting billing register report can be found in myReports.
Additional report options are available by clicking Show Preferences in the status bar.
An Unbilled Account Report is also produced to inform users if any accounts were unable to bill. Users should review the report and correct accounts as necessary.
Users may select the Show Details option to display a breakdown of the cycle billing by charge categories.
User may select the Show Bills option to display bill amounts for each utility account within the cycle. The show bills grid will display the account number, service address, bill amount, and whether the amount is designated for bank drafting. Clicking the account number field in the grid will navigate users to the customer service transaction screen. Users can review exact bill calculations to determine accuracy.
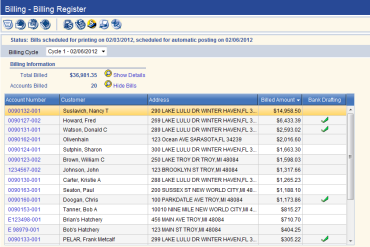
The show bills grid allows for various sort options by selecting the column headings. It is recommended to sort by bill amount. This allows a quick view of the highest bill within the cycle and the lowest bills within the cycle.
The print bills workflow allows users to print and/or export the cycle bills.
Command Buttons
Export – allows user to export billing file to a third party vendor. To create the export file click the Export command button. Prompt will ask user to add a bill message and/or stub message if desired. User can select or clear the Pulled Bills option. Pulled bills will include bills that are marked to not print. These are often bills that are normally not mailed for other city departments.
Print – allows users to print cycle bills in house. Once the Print button is clicked, the bills will be sent to myReports.
Printed reports:
- Utility Bill Form is a pdf copy of the actual bill forms ready for printing.
- Carrier Route Report – produces a report with counts by mail carrier route.
- eBill verification report – will report success or failure of eBill emails.
- Utility Unprinted Account report – will display any bills that were unable to print or were suppressed based on UM Settings.
The post bills process finalizes the bills, creates the G/L hits, and updates the balances on the accounts. The post function is not available until the bill print/export process has completed.
Please note that once bills are posted they cannot be recalculated. Adjustments will be necessary to correct any incorrect bill amounts. Bills should be reviewed for accuracy prior to posting.
Click the Post command button.
The following reports are generated during the posting process:
- Post Bills – provides status of posting process
- Billing Register – final copy of billing register for billing cycle
- Overpayments Applied Report – provides ledger account information for any bills with amounts applied to overpayment categories
- Billing Distribution Report – provides distribution by accounts
- Payment Assistance Report – reports billing information for utility accounts that are receiving payment assistance.