Inventory Request Workflow
The remaining steps of the workflow process—Validate, Print Edit and Error Listing, Approve, Post, and the Execute All option—are processed on the same page.
 Validate
Validating the entry will check several requirements for a valid request. The validation
can be done by selecting the  icon from the entry page or from a workflow
page. From the entry page, the validation launches as a pop-up, which displays the
results of the validation.
icon from the entry page or from a workflow
page. From the entry page, the validation launches as a pop-up, which displays the
results of the validation.
For each request that needs to be validated, click the checkbox at the far left side of the row to select that row. To select all requests, click the checkbox in the column header.
Click Submit to execute the validation. The validation will confirm that the following are true:
- The order contains at least one active inventory item.
- The Quantity is greater than one.
- The Issue Date is valid, today’s date or greater.
- The Need By Date is valid, today’s date or greater.
- The Requestor is an active user.
- The Department is valid and is authorized for Purchasing - Request Inventory. If the Issue Inventory to MB Customers system setting is selected, the department tied to the Miscellaneous Billing customer must also have inventory authorization.
- The G/L Account must be valid, and the use must have sub-ledger authorization to this account for Purchasing.
- The amount is checked against the budget amount. The system issues a warning if there are any issues with the G/L account or the item order total.
The page will display a message about the success of the validation once it is complete.
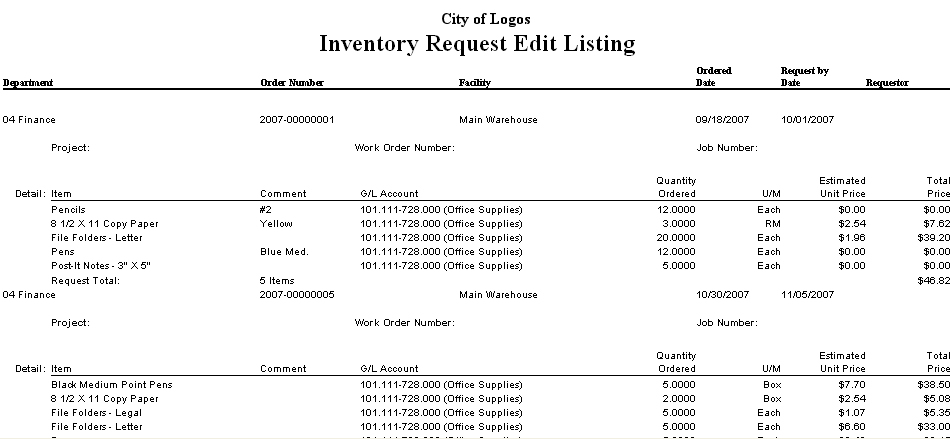
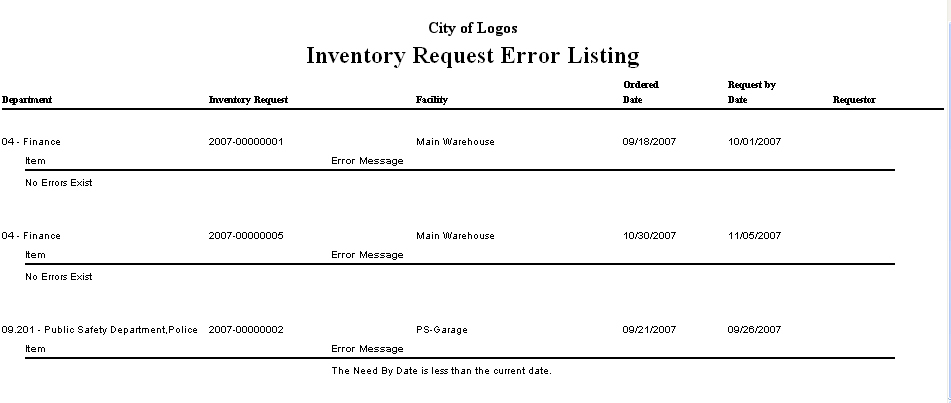
 Print Edit and Error Listing
The edit listing allows the user to see the request output and review it prior to posting it. Any changes needed can then be made before the request is posted. When you select the workflow icon, you will see the following screen:
Clicking the Show Output Preferences hyperlink will display additional options to specify for the report. For each request that needs to have the edit listing printed, click the checkbox at the far left side of the row to select that row. An error listing will be printed for each selected request if the Print Error Listing preference is selected. To select all requests, click the checkbox in the column header. Click Submit. The edit listing (and the error listing, if selected) will be sent to myReports.
 Approve
The validation can be done by selecting the  icon from the entry page or from a
workflow page.
icon from the entry page or from a
workflow page.
For each request that needs to be approved, click the checkbox at the far left side of the row to select that row. To select all requests, click the checkbox in the column header. Click Submit to execute the approvals. The page will display the results of the approvals below the buttons once the process is complete.
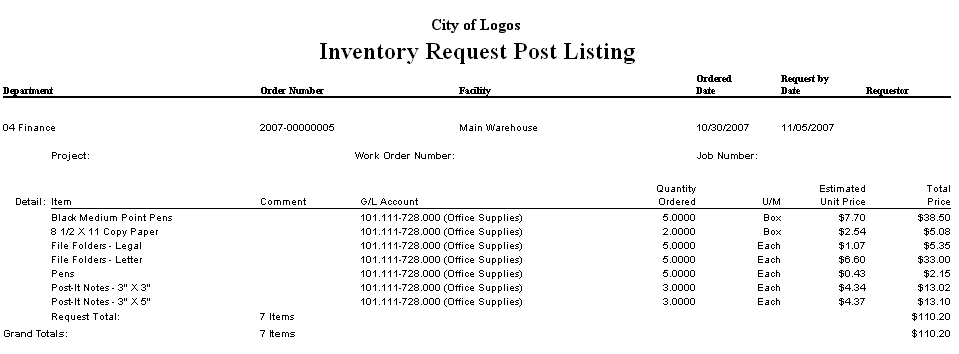
 Post
Post
Posting the request will activate it in the system. The post process checks to make sure that the order is both validated and fully approved.
To make additional selections about the format of and the items included in the post listing, select the Show Output Preferences hyperlink at the top right corner of the page. Select the checkbox for any of the output features that you want to include. For each request that needs to be posted, click the checkbox at the far left side of the row to select that row. To select all requests, click the checkbox in the column header. Click Submit. The post listing will be sent to myReports.
 Execute All
The Execute All Processes page allows the user to complete all steps of the workflow process for selected requests.
Select the checkbox at the left of each row for all rows that you want to process, or click the checkbox in the column header to process all rows. Click Submit to execute the all processes for the selected requests. All of the reports generated by the processes will be sent to myReports.