Set Up Account Classification - Revenues
To set up account classification (revenues) for G/L account summary codes, follow the steps below.
- Go to Maintenance > new world ERP Suite > Chart of Accounts > G/L Account Summary Codes.
- On the G/L Account Summary Codes page, drill down to the G/L Account Summary Codes > Base Financial > Revenues > Classification – Revenues folder.
- Click the Classification – Revenues folder to open it. If no items or sub-folders exist, the "No results" message appears beneath the folder.
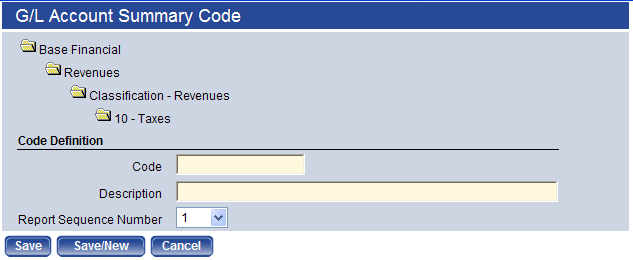
- While the Classification – Revenues folder is highlighted, click New to create a new code. The G/L Account Summary Code dialog box appears where you can enter the necessary information for each Revenue Classification. To edit an existing code, click the code description hyperlink to open the G/L Account Summary Code dialog box.
- In Code, type an alphanumeric name for the code type, for example: 10. The maximum character length is 16; the minimum is 1. There are no character restrictions. The code must be unique by category and type.
- In Description, type a textual description for the code, for example: Taxes. The maximum character length is 64; the minimum is 1. There are no character restrictions. This is the description that displays on all pages and reports.
- Select a Report Sequence Number, which is the order in which the code displays in the
list for reporting purposes, for example: 5. The available options are 1 through 255. The default is 1. The
number must be unique by level.
It is recommended that you space out the sequence numbers between codes to allow for future insertions. Most users find that starting at 5 and incrementing by 5 accomplishes this.
- Click Save/New after you type an entry and want to add another code definition. Click Save after you type the last entry.
- Click Cancel to close the dialog box. The new code appears as an item under the Classification – Revenues folder; when you add a revenue type to it, the item becomes a Classification – Revenues sub-folder.
- Repeat the above steps 4-9 until all account classification (revenues) are entered.
Sub Classification
Note: Note: You cannot create a sub classification code if the classification code it corresponds to is in use.
To enter sub-classification – revenue codes, follow the steps below.
- Select a Classification – Revenues item or folder (i.e., Taxes) to highlight it and click New. The G/L Account Summary Code dialog box appears and displays the folder hierarchy in the top of the dialog box.
- Enter the Code, Description, and Report Sequence Number for each Sub-Classification – Revenue. Example: Code = 010, Description = General Property Taxes, Report Sequence Number = 5.
- Click Save/New after you type an entry and want to add another code definition. Click Save after you type the last entry.
- Click Cancel to close the dialog box. The new code appears as an item under the selected Sub-Classification – Revenue folder.
- Repeat the above steps 1-4 until all Sub-Classification – Revenues are entered under the specific Classification –-Revenue folder.
See Also
Account Classification – Expenses
Account Classification – Fund Equities