Human Resources > State Requirements > ICMA Report
Created from selected retirement and pension benefits and deductions, the ICMA Report and transmittal file includes retirement loan data.
The following setup is required:
- The Employment tab of Workforce Administration needs to include a user-defined field (UDF) for the loan number.
- The Deduction and Benefit pages in Maintenance need a UDF to identify the type of retirement loan.
- The Deduction page needs to include a user-defined check box to identify deductions as ICMA loans.
Employment Tab: ICMA Loan Number
- Navigate to Maintenance > new world ERP Suite > Security > User-Defined Fields.
- In the Record Type field, select Employee Employment.
- In the Maintenance Type field, select Attributes.
- Click the New button. The User-Defined Field dialog opens.
- In the Name field, type ICMA Loan Number.
- Select Text as the Data Type.
- In the Maximum Length field, type 3.
-
Click OK.
Deduction and Benefit Pages: ICMA
- Navigate to Maintenance > new world ERP Suite > Security > User-Defined Fields.
- In the Record Type field, select Deduction.
- In the Maintenance Type field, select Attributes.
- Click the New button. The User-Defined Field dialog opens.
- In the Name field, type ICMA.
- Select Text as the Data Type.
- In the Maximum Length field, type 4.
-
Click OK.
To set up the Benefit UDF, repeat steps 1-8, substituting Benefit for Deduction in step 2.
- Navigate to Maintenance > new world ERP Suite > Security > User-Defined Fields.
- In the Record Type field, select Deduction.
- In the Maintenance Type field, select Attributes.
- Click the New button. The User-Defined Field dialog opens.
- In the Name field, type ICMA Loan.
- Select Check Box as the Data Type.
-
Click OK.
- Navigate to Maintenance > Human Resources > Deductions and Benefits > Benefits.
- Select a ICMA benefit.
- Click the User-Defined Field button.
-
Referring to the table below, type the appropriate code in the ICMA field:
Code Description ER Employer EE Mandatory Pre-Tax EE Voluntary Pre-Tax EV Mandatory After-Tax RT Roth -
Click Save.
To set up the deduction, repeat steps 1-5, navigating to Deductions in step 1 and selecting a deduction in step 2.
- Select an ICMA deduction.
- Click the User-Defined Field button.
- Select the ICMA Loan check box. Do not fill in the ICMA UDF.
-
Important: For ICMA Loan deductions, fill in a Life-to-Date Limit.
To set up an employee to have these benefits and deductions, follow these steps:
- Navigate to Human Resources > Workforce Administration > Search > Employee > Payroll Data.
- Click the Deductions link. The page scrolls to the Deductions section.
- Click New.
- Select the appropriate ICMA deduction.
- Click OK.
- Fill out the rest of the deduction data.
-
Click Save.
When you run the ICMA Report, make sure to select the benefits and deductions you set up with the ICMA user-defined fields, including the ICMA loan deductions.
After the report has generated, a message displays at the bottom of the page, giving you the option to open the transmittal file or save it. The report is sent as a PDF to myReports.
The report output contains two new columns: Loan Number and Loan Payoff (Yes or No).
The ICMA Report and transmittal file support the reporting of multiple loans per employee.
To set up multiple loan reporting, add as many user-defined ICMA Loan check boxes as you need to the Deduction page in Maintenance and corresponding ICMA Loan Number fields to the Employment tab in Workforce Administration; for example, if you add a deduction check box named ICMA Loan 1, also add a corresponding employment field named ICMA Loan Number 1. A deduction check box named ICMA Loan 2 requires a corresponding employment field named ICMA Loan Number 2 and so on.
Note: To show on the transmittal file, each ICMA loan deduction must have a life-to-date limit set on it.
- Navigate to Maintenance > new world ERP Suite > Security > User-Defined Fields.
- In the Record Type field, select Deduction.
- In the Maintenance Type field, select Attributes.
- Click the New button. The User-Defined Field dialog opens.
- Type the Name--for example, ICMA Loan 1.
- Select Check Box as the Data Type.
-
Click OK.
To set up more ICMA loan check boxes, repeat steps 4-7, changing the Name of each check box accordingly.
- Navigate to Maintenance > new world ERP Suite > Security > User-Defined Fields.
- In the Record Type field, select Employee Employment.
- In the Maintenance Type field, select Attributes.
- Click the New button. The User-Defined Field dialog opens.
- Type the Name--for example, ICMA Loan Number 1.
- Select Text as the Data Type.
- In the Maximum Length field, type 3.
-
Click OK.
To set up more ICMA Loan Number fields, repeat steps 4-7, changing the Name of each field accordingly.
- Navigate to Maintenance > Human Resources > Deductions and Benefits > Deductions.
- Select an ICMA deduction.
- Click the User-Defined Field button.
- Select the appropriate ICMA Loan check box. Do not fill in the user-defined ICMA field.
-
Important: For ICMA loan deductions, fill in a Life-to-Date Limit.
- Navigate to Human Resources > Workforce Administration > Search > Employee > Payroll Data.
- Click the Deductions link. The page scrolls to the Deductions section.
- Click New.
- Select the appropriate ICMA deduction.
- Click OK.
- Fill out the rest of the deduction data.
- Click Save.
- Click the Employment tab.
- Scroll to the user-defined ICMA loan number field that corresponds with the ICMA loan on the deduction.
- Fill in the loan number.
-
Click Save.
When you run the ICMA Report, make sure to select the deductions that have the user-defined ICMA check boxes selected.
After the report has generated, a message displays at the bottom of the page, giving you the option to open the transmittal file or save it. The report is sent as a PDF to myReports.
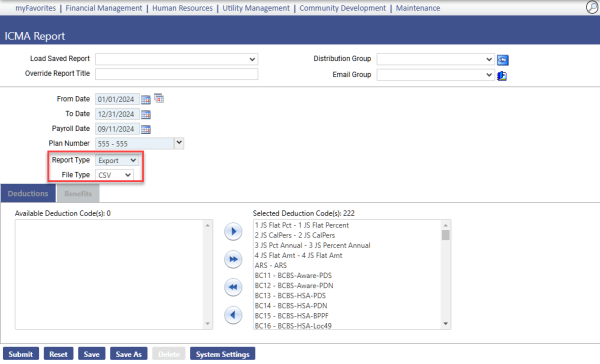
The ICMA CSV layout (File Type = CSV) requires the setup of deductions and benefits in ICMA System Settings Maintenance.
With this layout, you do not need to select deductions and benefits on this page when you run the report, since they already have been set up on the ICMA System Settings Maintenance page. Selecting a File Type of CSV disables the Deductions and Benefits tabs.
To export the ICMA Report as a .CSV file, follow these steps:
-
Run the report with a Report Type of Export and a File Type of CSV:
-
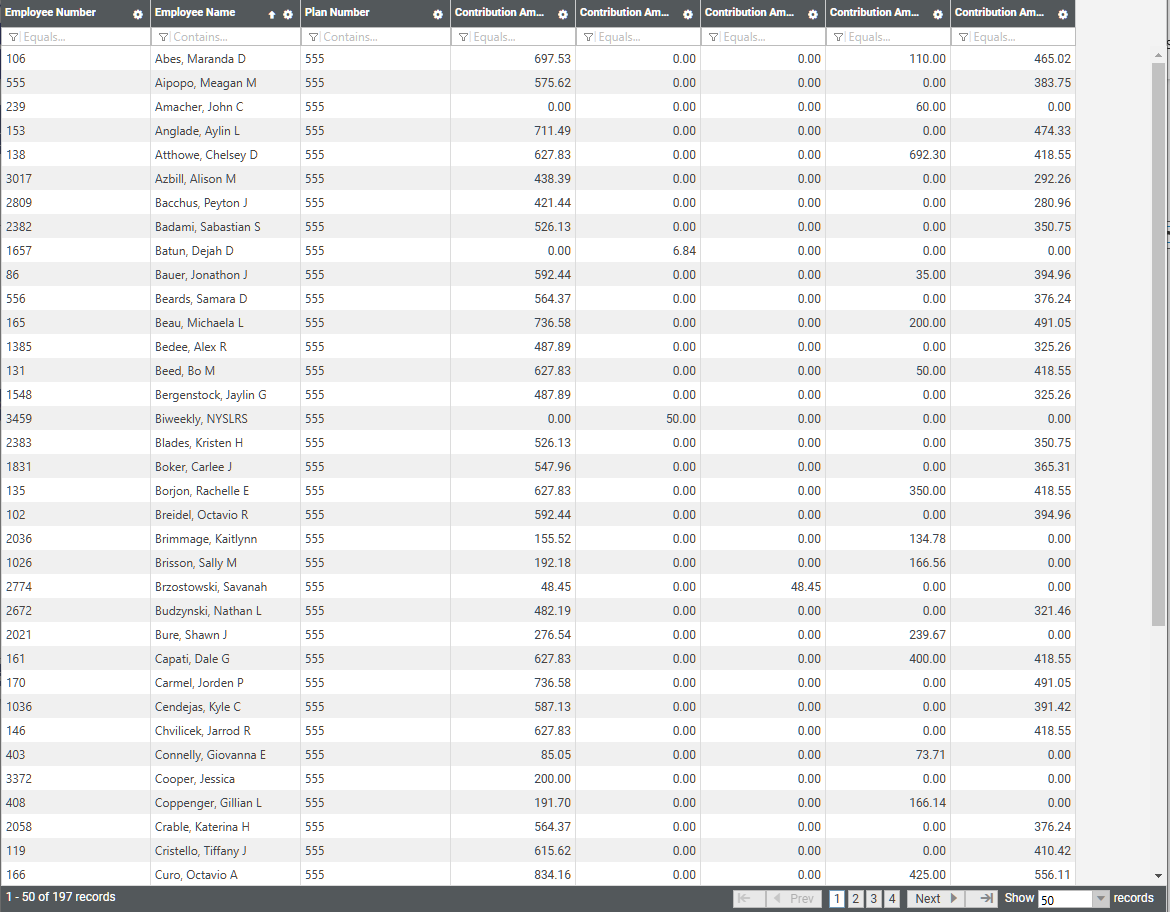
When the appropriate data has been entered, click Submit to generate and display the report:
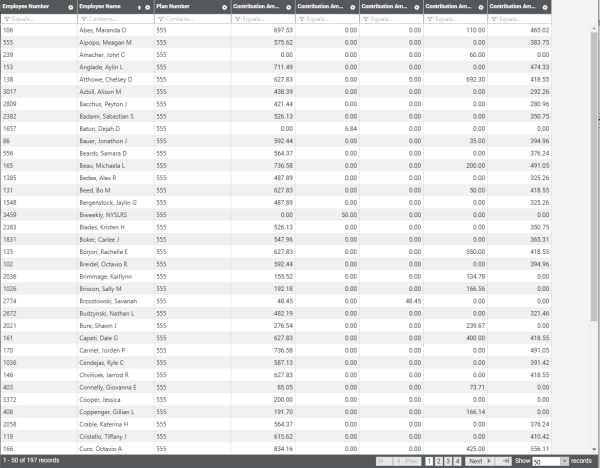
-
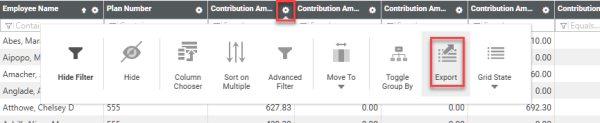
To export the report to Excel, click the Feature chooser icon in any column header, then Export:
-
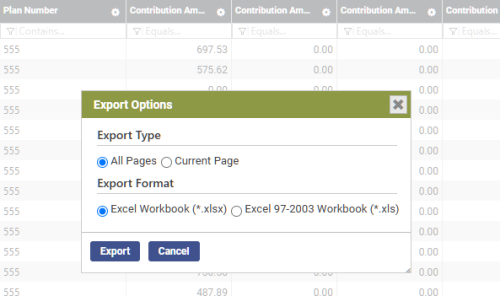
Select from the export options, and click Export:
-
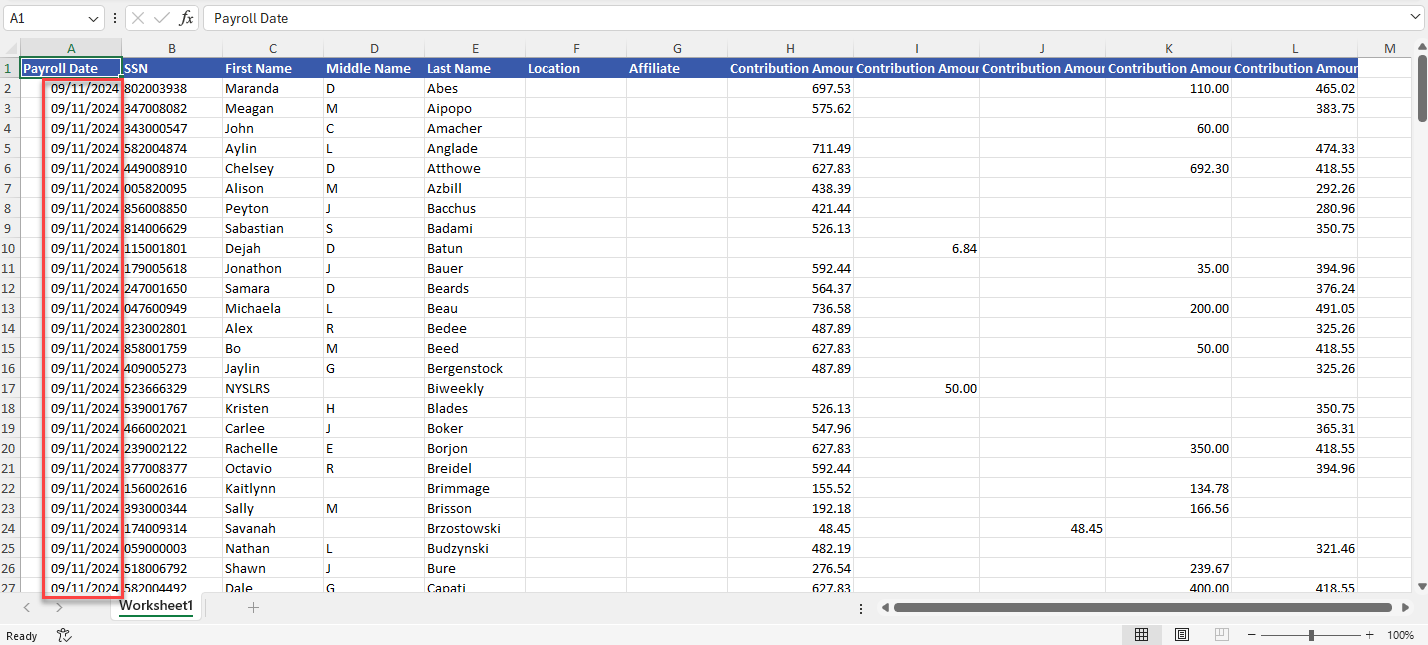
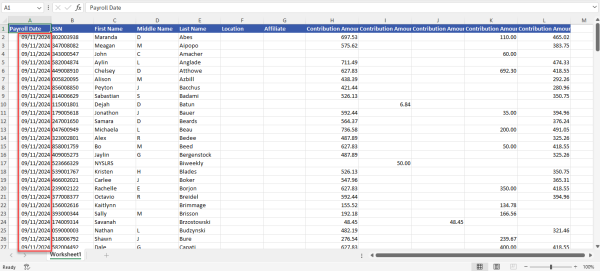
The resulting Excel file has the formatting specifications; however, you will need to remove the forward slashes from the Payroll Date column:
-
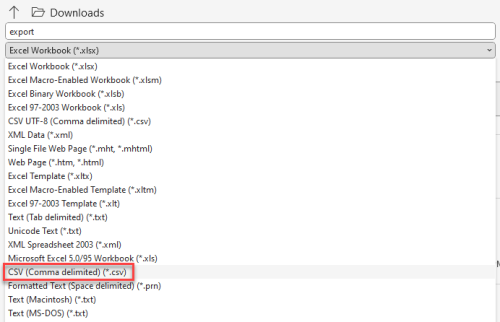
Save the file as a CSV:
- Submit the file to ICMA.