HR User Acceptance Testing (UAT) Plan
The purpose of this topic is to outline the process and protocol for a critical stage of your Tyler implementation project. User Acceptance Testing (UAT) provides the opportunity to review setup and processes to ensure that the software functions at an acceptable level prior to Production Cutover. Tyler considers the UAT process essential to a successful project.
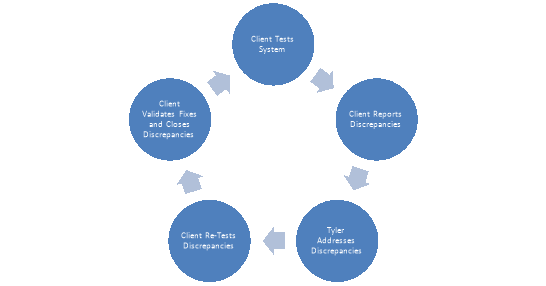
User Acceptance Testing is an iterative process, where chosen power users perform end-to-end system testing and report discrepancies in expected system functionality. Tyler will address reported discrepancies. This includes, but is not limited to, fixing the discrepancy, postponing as a post-Production Cutover improvement, determining the discrepancy is not in scope, or closing the discrepancy because it deviates from the agreed upon requirements defined during the Assess and Define stage. Once discrepancies are addressed, power users will re-test to validate the fix and close the discrepancy.
All discrepancies must be entered in advance of the close of the UAT stage to allow sufficient time for Tyler to address noted discrepancies and testers to re-test, validate, and close discrepancies. Your Tyler project manager will work with you to determine the appropriate cut off for initial testing efforts.
Acceptability is defined as the software’s ability to perform day-to-day operations without complete hindrance of one’s job responsibilities. Acceptance testers must be able to distinguish between a legitimate need for configuration or functionality change and changes that are subject to one’s own interpretation and/or subjective opinion (i.e. a feature enhancement).
Common Misconceptions
- The system will be 100% perfect prior to UAT
- Finding configuration discrepancies is a normal part of the process and should be expected, as it helps ensure the product is ready for production and in line with project definitions.
- The system will be 100% perfect after UAT
- Tyler utilizes a continuous improvement approach, which focuses on maximizing your performance over time. UAT during implementation is a validation of the system’s acceptability based on decisions made during Assess & Define. Throughout the life of your relationship with Tyler, you and your team will have the opportunity to continue improving efficiency and productivity through our everGuide approach.
User Acceptance Testing is designed for your Power Users and project decision makers. It is not designed for all end-users to participate. It is recommended that you have at least 2 users from each functional area involved in testing.
Additionally, some qualities to look for when identifying testing resource(s) are as follows:
- Knowledgeable about a specific function of your business unit (reporting, legacy system, business process, etc.)
- Proficient with everyday technology
- Represents a business unit or department using the application being tested
- Has adequate time to test. A user who is unable to properly dedicate the time and attention to testing due to other responsibilities may not be an appropriate candidate for this group.
The following outlines specific responsibilities of the client project team:
- Identify functional leads and power users to perform scenario processing.
- Identify and communicate to select functional leads and power users the assigned testing scenarios to be executed with assistance from Tyler implementation staff.
- With assistance from Tyler implementation staff, review and prioritize discrepancies that result from completed testing scenarios.
- Submit all items first to the client project manager. The project managerwill then ensure the reported item is valid prior to submitting to Tyler. This may require input from a functional lead or power user.
- Document any issues or discrepancies found related to the product area tested. Tyler recommends limiting the number of resources posting items to the issues list to minimize duplication of issues and prevent changes being requested which are not consistent with agreed upon definitions. Ensure all reports of issues are submitted in a complete and timely manner.
- Ensure testing data and testing database maintain their integrity during the testing phase by limiting access and coordinating load and refresh processes.
- Monitor the quality and timeliness of the overall testing effort.
- Facilitate testing completion by maintaining momentum during process. Check that tests are completed in the order necessary to thoroughly sign-off on process.
- Review scenario processes and modify as necessary to align with any changes to policies and procedures.
- Work with Tyler project team to oversee all functions of the testing process.
The following outlines specific responsibilities of the Tyler Team:
- Provide baseline testing steps
- Work with yourproject team to determine which processes, interfaces, and modifications need to be tested.
- Collaborate with your project team to develop a baseline scenario that details the procedures for testing data integrity across application processes.
- Assist your team in addressing reported issues/concerns.
- Provide training to your staff on tracking issues as required by Tyler.
- Support the testing plan developed for your site.
This User Acceptance Test Sample is intended to assist with development of your User Acceptance test. Customers may be using the software in a way that necessitates additional test entries or modification of the sample test criteria. If an activity is not applicable the row should be deleted or marked with “NA”.
Test Number: The identification number for a test (Test numbers are for identification only and are not sequential.)
Pass: The function operates
Fail: The function fails to operate or produces an incorrect result
Notes: If a test is marked as “Fail” the “Notes” field should describe the failed result of the test
NA: The function is not used or applicable to the Customer’s environment
Test results should be documented in the “Pass”, “Fail” and “Notes” field for each test performed.
|
Testing Information |
|
|---|---|
|
Start Test Date: |
Finish Test Date: |
|
Select Date From Calendar |
Select Date From Calendar |
|
Logos Version Tested: |
|
|
Enter Software Version Being Tested |
|
|
Tested By: |
|
|
Enter Tester’s Name(s) |
|
|
Server Tested: |
|
|
Enter Name of Logos Server Being Tested |
|
|
Base Module:HR Workforce Administration |
|||||
|---|---|---|---|---|---|
|
Test Number |
Activity |
Pass |
Fail |
NA |
Notes |
|
1 |
Create Employee - Initial Screen - Create an Employee |
☐ |
☐ |
☐ |
Click here to enter text. |
|
2 |
Create Employee - Employee Search - Verify the Employee Number was system generated or reflects what was manually entered |
☐ |
☐ |
☐ |
Click here to enter text. |
|
3 |
Create Employee - Personal Tab - Create a Primary address for the Employee |
☐ |
☐ |
☐ |
Click here to enter text. |
|
4 |
Create Employee - Employment Tab - Verify the Employment status as Active |
☐ |
☐ |
☐ |
Click here to enter text. |
|
5 |
Create Employee - Employment Tab - Fill in the Status Information section |
☐ |
☐ |
☐ |
Click here to enter text. |
|
6 |
Create Employee - Jobs Tab - Assign a Job/Position to the Employee |
☐ |
☐ |
☐ |
Click here to enter text. |
|
7 |
Create Employee - Jobs Tab - Verify the G/L Distribution for the Employee |
☐ |
☐ |
☐ |
Click here to enter text. |
|
8 |
Create Employee - Jobs Tab - Verify Jobs Tab fields are populated properly |
☐ |
☐ |
☐ |
Click here to enter text. |
|
9 |
Create Employee - Jobs Tab - Verify the Employee's Pending status has changed |
☐ |
☐ |
☐ |
Click here to enter text. |
|
10 |
Create Employee - Payroll Data Tab - Add Deductions, Benefits, Schedule, Taxes, Direct Deposits, Certifications, Benefit Plans and any Check Message to the Employee as necessary |
☐ |
☐ |
☐ |
Click here to enter text. |
|
11 |
Personal Tab - Attach an external document to the Employee record |
☐ |
☐ |
☐ |
Click here to enter text. |
|
12 |
Personal Tab - Replace the Employee Avatar with a picture |
☐ |
☐ |
☐ |
Click here to enter text. |
|
13 |
Personal Tab - Change an Employee's address with Create Event |
☐ |
☐ |
☐ |
Click here to enter text. |
|
14 |
Personal Tab - Add a non-primary Mailing address to the Employee |
☐ |
☐ |
☐ |
Click here to enter text. |
|
15 |
Personal Tab - Add an Email address on the Employee |
☐ |
☐ |
☐ |
Click here to enter text. |
|
16 |
Personal Tab - Add Contacts or Dependents on the Employee |
☐ |
☐ |
☐ |
Click here to enter text. |
|
17 |
Personal Tab - Add a Phone Number on the Employee |
☐ |
☐ |
☐ |
Click here to enter text. |
|
18 |
Employment Tab - Change the Status of an Employee with Create Event |
☐ |
☐ |
☐ |
Click here to enter text. |
|
19 |
Employment - Change Employment Type to part-time with Create Event |
☐ |
☐ |
☐ |
Click here to enter text. |
|
20 |
Employment - Add Comments to the Status Information section |
☐ |
☐ |
☐ |
Click here to enter text. |
|
21 |
Jobs Tab - Use the History view |
☐ |
☐ |
☐ |
Click here to enter text. |
|
22 |
Jobs Tab - Use the View All view |
☐ |
☐ |
☐ |
Click here to enter text. |
|
23 |
Jobs Tab - Use the View Open view |
☐ |
☐ |
☐ |
Click here to enter text. |
|
24 |
Jobs Tab - Refresh the Jobs Tab |
☐ |
☐ |
☐ |
Click here to enter text. |
|
25 |
Jobs Tab - Give the Employee a new Position with Create Event |
☐ |
☐ |
☐ |
Click here to enter text. |
|
26 |
Jobs Tab - Give a new Hourly Rate within the same Grade |
☐ |
☐ |
☐ |
Click here to enter text. |
|
27 |
Jobs Tab - Split the G/L Distribution percentage by adding another G/L Distribution |
☐ |
☐ |
☐ |
Click here to enter text. |
|
28 |
Jobs Tab - Add a Job Event/Reason to an Employee's job |
☐ |
☐ |
☐ |
Click here to enter text. |
|
29 |
Payroll DataTab - Use End Event on a Deduction |
☐ |
☐ |
☐ |
Click here to enter text. |
|
30 |
Payroll DataTab - Override the Frequency on a Benefit |
☐ |
☐ |
☐ |
Click here to enter text. |
|
31 |
Payroll DataTab - Change the Day Cycle on a Scheduled item |
☐ |
☐ |
☐ |
Click here to enter text. |
|
32 |
Payroll DataTab - Change the Hours Code on a Scheduled item |
☐ |
☐ |
☐ |
Click here to enter text. |
|
33 |
Payroll DataTab - Change the Withholding Status of Federal taxes |
☐ |
☐ |
☐ |
Click here to enter text. |
|
34 |
Payroll DataTab - Add FICA to the Federal Tax |
☐ |
☐ |
☐ |
Click here to enter text. |
|
35 |
Payroll DataTab - Add an Additional Amount to the State tax |
☐ |
☐ |
☐ |
Click here to enter text. |
|
36 |
Payroll DataTab - Create a Direct Deposit for the Balance of Net Pay |
☐ |
☐ |
☐ |
Click here to enter text. |
|
37 |
Payroll DataTab - Add a Direct Deposit for specific Amount with 998 sequence |
☐ |
☐ |
☐ |
Click here to enter text. |
|
38 |
Payroll DataTab - Override the Hourly Amount of a Certification |
☐ |
☐ |
☐ |
Click here to enter text. |
|
39 |
Payroll DataTab - Verify adding a Benefit Plan adds deductions/benefits |
☐ |
☐ |
☐ |
Click here to enter text. |
|
40 |
Payroll DataTab - Add a Coverage End Date to a Benefit Plan that is Open |
☐ |
☐ |
☐ |
Click here to enter text. |
|
41 |
Search - Search for All Employees |
☐ |
☐ |
☐ |
Click here to enter text. |
|
42 |
Search - Search for Active Employees only |
☐ |
☐ |
☐ |
Click here to enter text. |
|
43 |
Search - Search by one Benefit Group |
☐ |
☐ |
☐ |
Click here to enter text. |
|
44 |
Search - Search by Employee First Name |
☐ |
☐ |
☐ |
Click here to enter text. |
|
45 |
Search - Order the Employee list by Department |
☐ |
☐ |
☐ |
Click here to enter text. |
|
46 |
Search - Remove the SS# column from the Employee List |
☐ |
☐ |
☐ |
Click here to enter text. |
|
47 |
Search - Modify the Rows Per Page displayed by any search |
☐ |
☐ |
☐ |
Click here to enter text. |
|
48 |
Search - Export the search listing to Excel |
☐ |
☐ |
☐ |
Click here to enter text. |
|
49 |
Search - Search for Inactive or Terminated Employees only |
☐ |
☐ |
☐ |
Click here to enter text. |
|
50 |
Search - Search by multiple Depts. and multiple Benefit Groups |
☐ |
☐ |
☐ |
Click here to enter text. |
|
Base Module: Payroll |
|||||
|---|---|---|---|---|---|
|
Test Number |
Activity |
Pass |
Fail |
NA |
Notes |
|
1 |
Initialize Payroll - Verify all Active Employees have jobs, G/L Accounts, Positions, and Departments |
☐ |
☐ |
☐ |
Click here to enter text. |
|
2 |
Import 3rd Party Hours - Enter 3rd Party Hours |
☐ |
☐ |
☐ |
Click here to enter text. |
|
3 |
Import 3rd Party Hours - Approve 3rd Party Hours |
☐ |
☐ |
☐ |
Click here to enter text. |
|
4 |
Import 3rd Party Hours - View Import History |
☐ |
☐ |
☐ |
Click here to enter text. |
|
5 |
Departmental Hour List - View Employee Hours |
☐ |
☐ |
☐ |
Click here to enter text. |
|
6 |
Departmental Hour List - Approve Departmental Hours Entry |
☐ |
☐ |
☐ |
Click here to enter text. |
|
7 |
Import Departmental Hours - Approve Departmental Hours Entry |
☐ |
☐ |
☐ |
Click here to enter text. |
|
8 |
Import Departmental Hours - Import Departmental Hours entry |
☐ |
☐ |
☐ |
Click here to enter text. |
|
9 |
Centralized Hours Entry - Search non-validated Employees |
☐ |
☐ |
☐ |
Click here to enter text. |
|
10 |
Centralized Hours Entry - Validate an Employee |
☐ |
☐ |
☐ |
Click here to enter text. |
|
11 |
Centralized Hours Entry - Remove Employee from Payroll |
☐ |
☐ |
☐ |
Click here to enter text. |
|
12 |
Centralized Hours Entry - Re-Add deleted Employee |
☐ |
☐ |
☐ |
Click here to enter text. |
|
13 |
Centralized Hours Entry - Customize Hours Entry to view pay rate |
☐ |
☐ |
☐ |
Click here to enter text. |
|
14 |
Centralized Hours Entry - Override G/L in detailed view |
☐ |
☐ |
☐ |
Click here to enter text. |
|
15 |
Centralized Hours Entry - View Quick Entry and Hours Code Entry Screens |
☐ |
☐ |
☐ |
Click here to enter text. |
|
16 |
Centralized Hours Entry - Test dropdowns for Search Criteria: Primary, Employee, Benefit Group, Position |
☐ |
☐ |
☐ |
Click here to enter text. |
|
17 |
Calculate Accruals - Calculate Vacation Accruals |
☐ |
☐ |
☐ |
Click here to enter text. |
|
18 |
Calculate Accruals - Print Accrual Report |
☐ |
☐ |
☐ |
Click here to enter text. |
|
19 |
Calculate Accruals - Delete Accrual Calculation |
☐ |
☐ |
☐ |
Click here to enter text. |
|
20 |
Calculate Longevity - Calculate Longevity for all Groups |
☐ |
☐ |
☐ |
Click here to enter text. |
|
21 |
Calculate Longevity - Print Longevity Calculation |
☐ |
☐ |
☐ |
Click here to enter text. |
|
22 |
Calculate Longevity - Delete Longevity Calculation |
☐ |
☐ |
☐ |
Click here to enter text. |
|
23 |
Calculate Sick Incentive - Calculate Sick Incentive |
☐ |
☐ |
☐ |
Click here to enter text. |
|
24 |
Calculate Sick Incentive - Print Sick Incentive Calculation |
☐ |
☐ |
☐ |
Click here to enter text. |
|
25 |
Calculate Sick Incentive - Delete Sick Incentive Calculation |
☐ |
☐ |
☐ |
Click here to enter text. |
|
26 |
Calculate FLSA - Calculate FLSA Code |
☐ |
☐ |
☐ |
Click here to enter text. |
|
27 |
Calculate FLSA - Print FLSA Calculation |
☐ |
☐ |
☐ |
Click here to enter text. |
|
28 |
Calculate FLSA - Delete FLSA Calculation |
☐ |
☐ |
☐ |
Click here to enter text. |
|
29 |
Calculate Accrual Payoff - Calculate Accrual Payoff for One Employee |
☐ |
☐ |
☐ |
Click here to enter text. |
|
30 |
Calculate Accrual Payoff - Print Accrual Payoff |
☐ |
☐ |
☐ |
Click here to enter text. |
|
31 |
Calculate Accrual Payoff - Delete Accrual Calculation |
☐ |
☐ |
☐ |
Click here to enter text. |
|
32 |
Calculate Roll Accrual Hours - Roll Vacation Accrual hours |
☐ |
☐ |
☐ |
Click here to enter text. |
|
33 |
Validate - Validate Payroll |
☐ |
☐ |
☐ |
Click here to enter text. |
|
34 |
Payment Processing - Generate Payment Batch |
☐ |
☐ |
☐ |
Click here to enter text. |
|
35 |
Payment Processing - Register Payments |
☐ |
☐ |
☐ |
Click here to enter text. |
|
36 |
Payment Processing - Generate Positive Pay File |
☐ |
☐ |
☐ |
Click here to enter text. |
|
37 |
Payment Processing - Generate ACH Transmittal File |
☐ |
☐ |
☐ |
Click here to enter text. |
|
38 |
Payment Processing - Renumber a range of checks |
☐ |
☐ |
☐ |
Click here to enter text. |
|
39 |
Payment Processing - Print Checks and EFT Stubs |
☐ |
☐ |
☐ |
Click here to enter text. |
|
40 |
Post Payroll - Post Payroll |
☐ |
☐ |
☐ |
Click here to enter text. |
|
41 |
myReports - Verify Printing of Paystubs, ACH transmittal Files |
☐ |
☐ |
☐ |
Click here to enter text. |
|
42 |
myReports - Send a Payroll Report to myReports |
☐ |
☐ |
☐ |
Click here to enter text. |
|
43 |
Post Payroll Processing/Disbursement - View the current Disbursement List |
☐ |
☐ |
☐ |
Click here to enter text. |
|
44 |
Post Payroll Processing/Disbursement - Delete a Disbursement |
☐ |
☐ |
☐ |
Click here to enter text. |
|
45 |
Post Payroll Processing/Disbursement - Print the Disbursement Listing |
☐ |
☐ |
☐ |
Click here to enter text. |
|
46 |
Post Payroll Processing/Disbursement - View the Deductions Not Taken List |
☐ |
☐ |
☐ |
Click here to enter text. |
|
47 |
Post Payroll Processing/Disbursement - Delete a Deduction Not Taken |
☐ |
☐ |
☐ |
Click here to enter text. |
|
48 |
Post Payroll Processing/Disbursement - Print the Deductions Not Taken List |
☐ |
☐ |
☐ |
Click here to enter text. |
|
49 |
Post Payroll Processing/Disbursement - View the Direct Deposits Not Taken List |
☐ |
☐ |
☐ |
Click here to enter text. |
|
50 |
Post Payroll Processing/Disbursement - Search for a Deposit Not Taken |
☐ |
☐ |
☐ |
Click here to enter text. |
|
51 |
Payroll Administrator Tasks/Adjustment Processing - Search for Posted Adjustments processed during this month |
☐ |
☐ |
☐ |
Click here to enter text. |
|
52 |
Payroll Administrator Tasks/Adjustment Processing - Create a new Adjustment to an Employee's Taxes |
☐ |
☐ |
☐ |
Click here to enter text. |
|
53 |
Payroll Administrator Tasks/Adjustment Processing - Post the Adjustment |
☐ |
☐ |
☐ |
Click here to enter text. |
|
54 |
Payroll Administrator Tasks/Adjustment Processing - Reverse the Adjustment |
☐ |
☐ |
☐ |
Click here to enter text. |
|
55 |
Calculate Accrual Adjustments - Adjust Employees Vacation Accrual by adding 2 hours |
☐ |
☐ |
☐ |
Click here to enter text. |
|
56 |
Calculate Mass Rate Increase - Calculate a Mass Rate increase by raising a Grade by 1.5% |
☐ |
☐ |
☐ |
Click here to enter text. |
|
57 |
Calculate Mass Rate Increase - Review the Mass Rate Report |
☐ |
☐ |
☐ |
Click here to enter text. |
|
58 |
Calculate Mass Rate Increase - Complete Mass Rate Increase |
☐ |
☐ |
☐ |
Click here to enter text. |
|
59 |
Calculate Step Rate Increase - Calculate a Step Rate Increase for one Benefit Group |
☐ |
☐ |
☐ |
Click here to enter text. |
|
60 |
Calculate Step Rate Increase - Review the Step Rate Increase Report |
☐ |
☐ |
☐ |
Click here to enter text. |
|
61 |
Calculate Step Rate Increase - Complete Step Rate Increase |
☐ |
☐ |
☐ |
Click here to enter text. |
|
62 |
Manual Check Processing - Create a Manual Check for an employee |
☐ |
☐ |
☐ |
Click here to enter text. |
|
63 |
Manual Check Processing - Print the Manual Check |
☐ |
☐ |
☐ |
Click here to enter text. |
|
64 |
Manual Check Processing - Post the Manual Check |
☐ |
☐ |
☐ |
Click here to enter text. |
|
65 |
Process Retro Pay - Create a Retro Pay Batch |
☐ |
☐ |
☐ |
Click here to enter text. |
|
66 |
Process Retro Pay - Delete an Employee from the Retro Pay List |
☐ |
☐ |
☐ |
Click here to enter text. |
|
67 |
Process Retro Pay - Upload the Retro Pay batch and amounts |
☐ |
☐ |
☐ |
Click here to enter text. |
|
68 |
Process Retro Pay - Print the Retro Pay Listing |
☐ |
☐ |
☐ |
Click here to enter text. |
|
69 |
State Requirements - Verify State Requirements reports |
☐ |
☐ |
☐ |
Click here to enter text. |
|
70 |
Reports - Print a report |
☐ |
☐ |
☐ |
Click here to enter text. |
|
71 |
Reports - Export a report to Excel |
☐ |
☐ |
☐ |
Click here to enter text. |
|
72 |
Reports - Rename a report |
☐ |
☐ |
☐ |
Click here to enter text. |
|
73 |
Reports - Delete a report |
☐ |
☐ |
☐ |
Click here to enter text. |
|
74 |
Reports - Email a report |
☐ |
☐ |
☐ |
Click here to enter text. |
|
75 |
Inquiries - View an employee's Vacation Accrual balance |
☐ |
☐ |
☐ |
Click here to enter text. |
|
76 |
Inquiries - View a Department's current Active employees |
☐ |
☐ |
☐ |
Click here to enter text. |
|
Base Module: Employee Event Tracking |
|||||
|---|---|---|---|---|---|
|
Test Number |
Activity |
Pass |
Fail |
NA |
Notes |
|
1 |
Training- Create an Instructor |
☐ |
☐ |
☐ |
Click here to enter text. |
|
2 |
Training- Create a Training Location |
☐ |
☐ |
☐ |
Click here to enter text. |
|
3 |
Training- Create a Course |
☐ |
☐ |
☐ |
Click here to enter text. |
|
4 |
Training- Create a Training Profile |
☐ |
☐ |
☐ |
Click here to enter text. |
|
5 |
Training- Schedule a Course |
☐ |
☐ |
☐ |
Click here to enter text. |
|
6 |
Training- Enroll an Employee into a Training Profile |
☐ |
☐ |
☐ |
Click here to enter text. |
|
7 |
Training- Enroll an Employee into a Training Course |
☐ |
☐ |
☐ |
Click here to enter text. |
|
8 |
Performance Evaluation- Create an Evaluation Type |
☐ |
☐ |
☐ |
Click here to enter text. |
|
9 |
Performance Evaluation- Create an Evaluation Rating |
☐ |
☐ |
☐ |
Click here to enter text. |
|
10 |
Performance Evaluation- Create an Evaluation Profile |
☐ |
☐ |
☐ |
Click here to enter text. |
|
11 |
Performance Evaluation- Enter an Employee into an Evaluation Profile |
☐ |
☐ |
☐ |
Click here to enter text. |
|
12 |
Performance Evaluation- Schedule an Evaluation on an Employee |
☐ |
☐ |
☐ |
Click here to enter text. |
|
13 |
Performance Evaluation- Complete a Review on an Employee w/ a pay increase |
☐ |
☐ |
☐ |
Click here to enter text. |
|
14 |
Grievances- Create a Grievance Issue |
☐ |
☐ |
☐ |
Click here to enter text. |
|
15 |
Grievances- Create a Grievance Category |
☐ |
☐ |
☐ |
Click here to enter text. |
|
16 |
Grievances- Enter a Grievance on an Employee with the Employee as the Grievant |
☐ |
☐ |
☐ |
Click here to enter text. |
|
17 |
Grievances- End a Grievance with a Resolution |
☐ |
☐ |
☐ |
Click here to enter text. |
|
Base Module: Benefits Administration |
|||||
|---|---|---|---|---|---|
|
Test Number |
Activity |
Pass |
Fail |
NA |
Notes |
|
1 |
Create a Rule Set |
☐ |
☐ |
☐ |
Click here to enter text. |
|
2 |
Create a Coverage Option |
☐ |
☐ |
☐ |
Click here to enter text. |
|
3 |
Create a Life Insurance Benefit Plan using an Age Graded table |
☐ |
☐ |
☐ |
Click here to enter text. |
|
4 |
Create an Event on a Benefit Plan and update the costs. |
☐ |
☐ |
☐ |
Click here to enter text. |
|
5 |
Create a Retirement Benefit Plan that is based on percentage |
☐ |
☐ |
☐ |
Click here to enter text. |
|
6 |
Enter an Employee into a Benefit Plan |
☐ |
☐ |
☐ |
Click here to enter text. |
|
7 |
Track Dependents on a Benefit Plan and enter an Employee with their Dependents into that Plan |
☐ |
☐ |
☐ |
Click here to enter text. |
|
8 |
Create a Benefit Plan using more than one Rule Set |
☐ |
☐ |
☐ |
Click here to enter text. |
|
9 |
Generate a Benefit Plan Report |
☐ |
☐ |
☐ |
Click here to enter text. |
|
10 |
Create a Benefit Plan using more than one Coverage Option |
☐ |
☐ |
☐ |
Click here to enter text. |
|
Base Module: Position Budgeting |
|||||
|---|---|---|---|---|---|
|
Test Number |
Activity |
Pass |
Fail |
NA |
Notes |
|
1 |
Add a Budget Year |
☐ |
☐ |
☐ |
Click here to enter text. |
|
2 |
Calculate a Department |
☐ |
☐ |
☐ |
Click here to enter text. |
|
3 |
Perform a Mass Rate increase |
☐ |
☐ |
☐ |
Click here to enter text. |
|
4 |
Add a Position to an already calculated department |
☐ |
☐ |
☐ |
Click here to enter text. |
|
5 |
Budget for a flat dollar amount of Overtime in a department |
☐ |
☐ |
☐ |
Click here to enter text. |
|
6 |
Use an Adjustment Factor |
☐ |
☐ |
☐ |
Click here to enter text. |
|
7 |
Generate a List of Open Positions |
☐ |
☐ |
☐ |
Click here to enter text. |
|
8 |
Create a Position Class |
☐ |
☐ |
☐ |
Click here to enter text. |
|
9 |
Promote the Position Budget |
☐ |
☐ |
☐ |
Click here to enter text. |
|
10 |
Generate a Position Audit Report |
☐ |
☐ |
☐ |
Click here to enter text. |
|
11 |
Create an Adjustment Factor |
☐ |
☐ |
☐ |
Click here to enter text. |
|
Base Module: Positions |
|||||
|---|---|---|---|---|---|
|
Test Number |
Activity |
Pass |
Fail |
NA |
Notes |
|
1 |
Create a Position |
☐ |
☐ |
☐ |
Click here to enter text. |
|
2 |
Create the Position Mask |
☐ |
☐ |
☐ |
Click here to enter text. |
|
3 |
Create an Event on a Position |
☐ |
☐ |
☐ |
Click here to enter text. |
|
4 |
Change a Grade on a Position currently in use |
☐ |
☐ |
☐ |
Click here to enter text. |
|
5 |
Attach a Position to an Employee |
☐ |
☐ |
☐ |
Click here to enter text. |
|
6 |
Create an Employee Position Report |
☐ |
☐ |
☐ |
Click here to enter text. |